이전 포스팅 에서 gRPC와 proto buf에 대해서 이론적으로 살펴봤다.
이제는 실제로 코드를 작성하면서 통신을 해보려고 한다.
사용할 기술은 다음과 같다.
- Armeria/Kotlin
- SpringBoot/Java
- gRPC, protobuf
듣기만 해도 무시무시하다. 하나의 기술에만 집중해서 포스팅해도 너무 방대한 양이다.
그리고 필자는 각 기술들의 전문가가 아니다. 그래서 집중해서 전달하고자 하는 내용을 미리 밝히고자 한다.
참고로 설명하고자 하는 내용들은 인턴십을 하면서 가장 헷갈렸던 부분들이다.
- gRPC와 protobuf간의 역할을 명확히 구분한다.
- gRPC를 사용하면 왜 API의 명세가 되며 Body가 될까?
- 서로 다른 언어, 서로 다른 프로젝트의 메서드를 어떻게 호출할까?
그 외 HTTP/2.0, REST와의 성능 비교 등은 이미 많은 벤치마크 자료가 있다.
또, 나는 성능이 아쉬울 정도의 규모를 가진 프로젝트를 참여한 적이 없다.
그래서 내가 인턴을 하면서 경험한 것들을 집중적으로 전달하고자 한다.
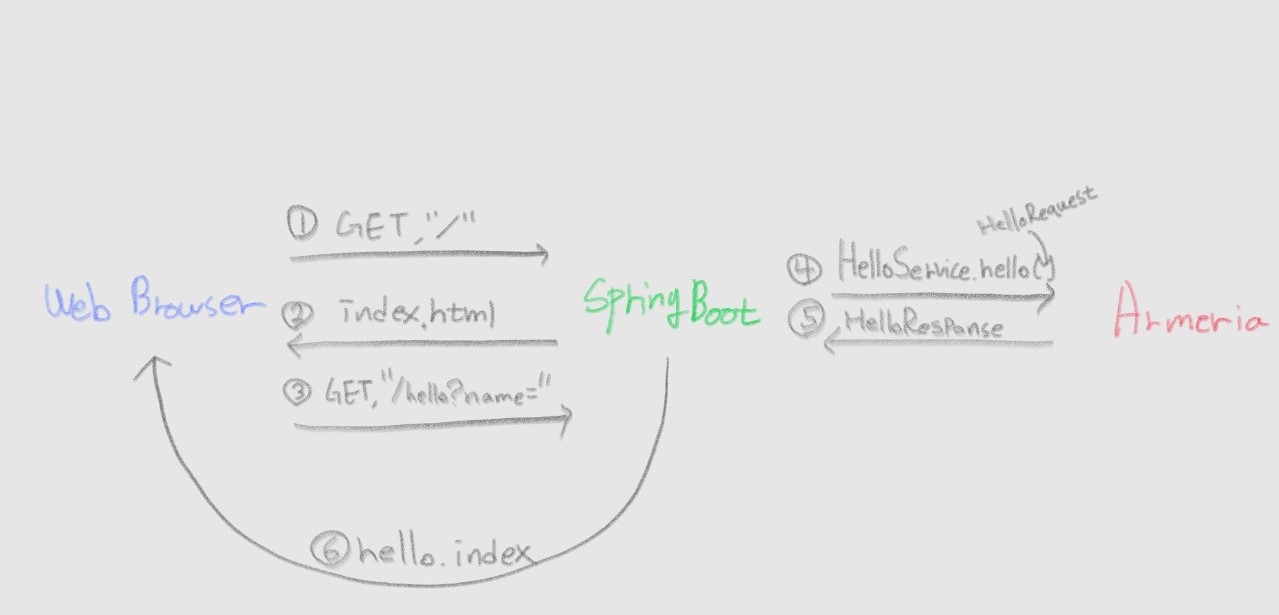
Server, Client 통신 흐름
우리가 작성할 통신의 흐름이다.
가장 먼저, 모든 서버와 클라이언트에서 공통적으로 사용할 proto message를 정의하자
proto message 정의하기
간단한 proto message와 grpc service를 정의하자
먼저 proto message를 정의 하기 위해서 적당한 위치에 proto/helloHelloService.proto를 생성하자
syntax = "proto3";

package proto.hello;

option java_package = "proto.hello";
option java_multiple_files = true;

service HelloService {
  rpc Hello (HelloRequest) returns (HelloResponse) {}
}

message HelloRequest {
  string name = 1;
}

message HelloResponse {
  string response = 1;
}HelloRequest을 요청으로 받고 HelloResponse를 응답하는 API를 정의한 것이다.
API를 HelloService에 요청과 응답을 정의 했으며 마치 함수를 정의한 것 같이 생겼다.
여기서 주목해야 할 것은 message 들은 proto buf에 해당하는 부분이다.
그리고 service에 해당하는 부분은 gRPC에 해당하는 부분이다.
최종적으로 proto/hello/HelloService.proto의 구조를 가진다.
이 녀석을 이제 git submodule로 구성하여 서버와 클라이언트에서 사용할 것이다.
그래서 git remote 저장소에 업로드 하자.
필자의 경우에는 git remote의 저장소 이름을 grpc-tutorial-common-entity로 지정했다.
Armeria gRPC 서버 구축하기
이제 요청을 받을 서버를 구성할 차례이다.
IntelliJ에서 New Project로 gradle 프로젝트를 생성하자.
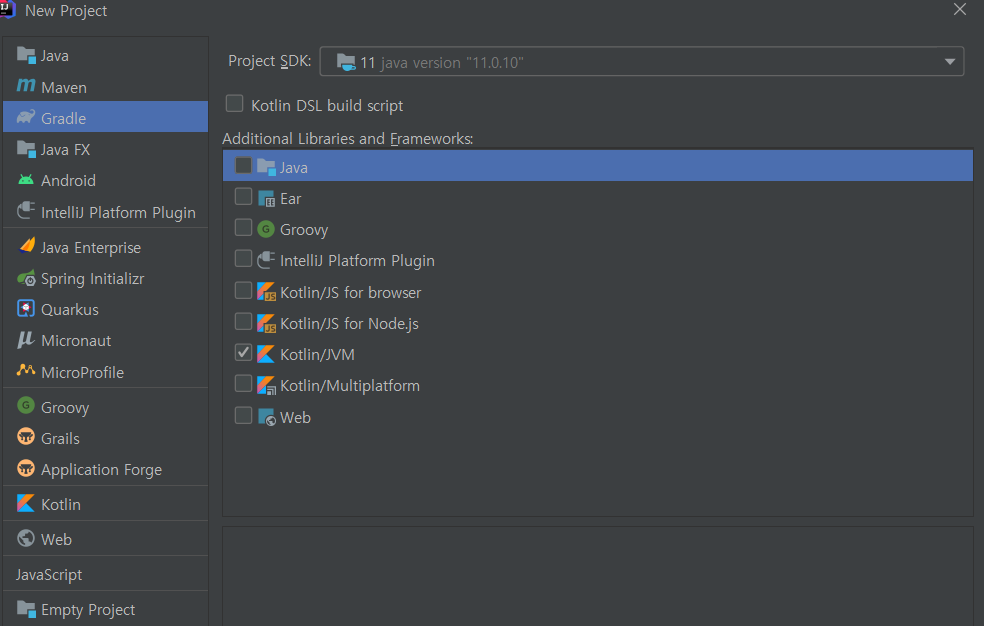
Kotlin을 사용하기 위해서 Kotlin을 체크 했다.
gradle 설정
공식 문서를 참고해서 dependency를 선언하자.
dependencies {
    // armeria
    ['armeria',
     'armeria-grpc'].each {
        implementation "com.linecorp.armeria:${it}:1.7.2"
    }

    // logging
    runtimeOnly 'ch.qos.logback:logback-classic:1.2.3'
    runtimeOnly 'org.slf4j:log4j-over-slf4j:1.7.30'
}
이제 armeria가 REST 서버, Grpc 서버를 실행시킬 준비가 되었다.
이번엔 gRPC와 proto buf을 위한 dependency와 plugin을 추가하자
마찬가지로 공식 github를 참고하자
plugins {
    ...
    id 'com.google.protobuf' version '0.8.15'
}

compileKotlin { // armeria를 사용하기 위해서 jvmTarget을 1.8 이상으로 지정
    kotlinOptions.jvmTarget = 1.8
}

sourceSets {
    main {
        proto { // protoc가 컴파일할 proto message들의 위치
                // default는 "src/main/proto" 이다.
            srcDirs '{git remote 저장소 이름}/'
        }
        java { // protoc에 의해 생성될 코드들의 위치
            srcDirs 'build/generated/source/proto/main/grpc'
            srcDirs 'build/generated/source/proto/main/java'
        }
    }
}

protobuf {
    protoc {
        artifact = "com.google.protobuf:protoc:3.12.0"
    }
    plugins {
        grpc { // 자바 뿐만 아니라 여러가지 언어로 가능하다.
            artifact = 'io.grpc:protoc-gen-grpc-java:1.37.0'
        }
    }
    generateProtoTasks {
        all()*.plugins {
            grpc {}
        }
    }
}

dependencies {
    ...
    ...

    // gRPC
    implementation 'io.grpc:grpc-netty-shaded:1.37.0'
    implementation 'io.grpc:grpc-protobuf:1.37.0'
    implementation 'io.grpc:grpc-stub:1.37.0'
    compileOnly 'org.apache.tomcat:annotations-api:6.0.53'
}
위와 같은 내용을 추가해야 한다. 추가한 후의 gradle은 아래와 같다.
plugins {
    id 'org.jetbrains.kotlin.jvm' version '1.4.32'
    id 'com.google.protobuf' version '0.8.15'
}

group 'org.example'
version '1.0-SNAPSHOT'

repositories {
    mavenCentral()
}

compileKotlin {
    kotlinOptions.jvmTarget = 1.8
}

sourceSets {
    main {
        proto {
            srcDirs '{git remote 저장소 이름}/'
        }
        java {
            srcDirs 'build/generated/source/proto/main/grpc'
            srcDirs 'build/generated/source/proto/main/java'
        }
    }
}

protobuf {
    protoc {
        artifact = "com.google.protobuf:protoc:3.12.0"
    }
    plugins {
        grpc {
            artifact = 'io.grpc:protoc-gen-grpc-java:1.37.0'
        }
    }
    generateProtoTasks {
        all()*.plugins {
            grpc {}
        }
    }
}

dependencies {
    implementation "org.jetbrains.kotlin:kotlin-stdlib"

    // armeria
    ['armeria',
     'armeria-grpc'].each {
        implementation "com.linecorp.armeria:${it}:1.7.2"
    }

    // logging
    runtimeOnly 'ch.qos.logback:logback-classic:1.2.3'
    runtimeOnly 'org.slf4j:log4j-over-slf4j:1.7.30'

    // gRPC
    implementation 'io.grpc:grpc-netty-shaded:1.37.0'
    implementation 'io.grpc:grpc-protobuf:1.37.0'
    implementation 'io.grpc:grpc-stub:1.37.0'
    compileOnly 'org.apache.tomcat:annotations-api:6.0.53'
}
proto message 컴파일하기
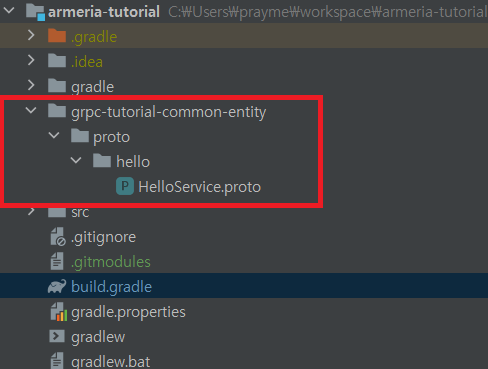
이제 준비가 되었다. 일단 proto message를 submodule로 등록하자.
Armeria 프로젝트의 루트 경로에서 다음 명령어를 입력하자
git submodule add https://github.com/google/{git remote 저장소 이름}.git
그러면 다음과 같이 디렉토리안에 처음에 작성한 proto message들을 볼 수 있다.
이제 진짜 준비가 되었다. 프로젝트를 빌드해보자.
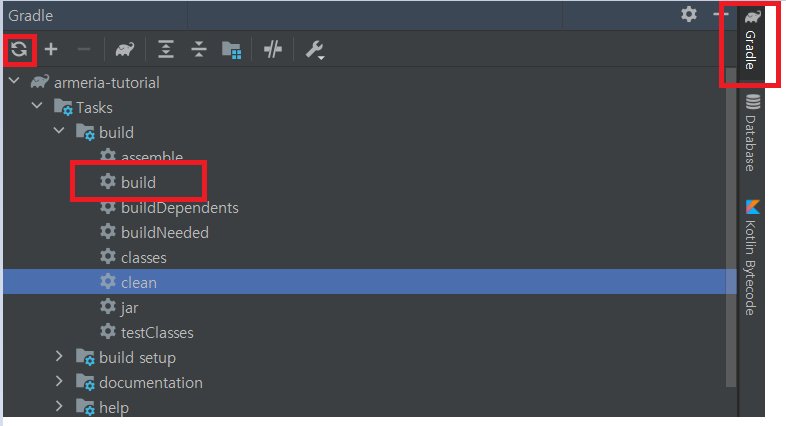
빌드를 마치면 /build/generated안에 소스코드 들이 생성되어 있을 것이다.
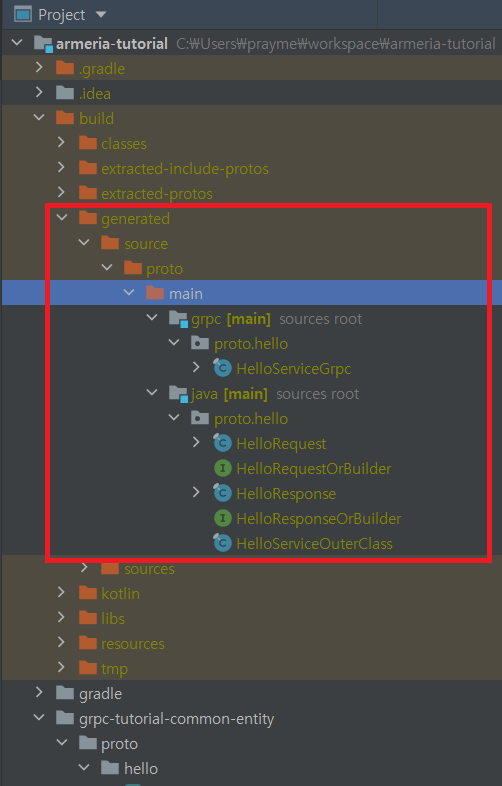
이제 이 녀석들을 사용하기만 하면 된다.
gRPC service 인터페이스 구현하기
우리가 처음에 작성한 HelloService가 protoc에 의해서 HelloServiceGrpc로 컴파일 되었다.
HelloServiceGrpc에는 서버를 위한 HelloServiceImplBase라는 이름의 추상 클래스도 선언이 되어있고, 클라이언트를 위한 HelloServiceStub도 선언이 되어 있다.
Stub는 BlockingStub, Stub, FutureStub 세 가지가 존재한다.
이번 포스팅에서는 BlockingStub만 사용한다.
어쨌든 gRPC service 인터페이스를 구현해서 MVC 패턴 중 Controller를 등록해보자
MVC에서는 controller라고 부르지만 gRPC와 Armeria에서는 service라고 부른다.
그래서 service라는 네이밍을 가지고 코딩을 하려고 한다.
src/main/kotlin/service/HelloGrpcService.kt 에 아래와 같이 코드를 작성하자
class HelloGrpcService : HelloServiceGrpc.HelloServiceImplBase() {
    override fun hello(
    	request: HelloRequest,
        responseObserver: StreamObserver<HelloResponse>
    ) {
    	val name = request.name
        val response = HelloResponse.newBuilder()
	    .setResponse(name)
            .build()

        responseObserver.onNext(response)
        responseObserver.onCompleted()
    }
}
이렇게 작성하면 gRPC 서버에 등록할 service 정의는 끝이다.
이제 service에 요청이 들어오면 request에서 name을 꺼내고 원하는 응답(HelloResponse)를 빌드해서 StreamObserver를 통해 응답을 전송한다.
다시, 코드의 순서를 천천히 살펴보자.
요청에는 우리가 선언한 HelloRequest가 그대로 담겨 있다.
응답도 마찬가지로 우리가 선언한 HelloResponse를 그대로 담아서 리턴하고 있다.
이 녀석들이 어떤 값들을 가지고 빌드 되어야 하는지는 어떻게 알 수 있을까?
우리가 선언한 proto 메세지를 살펴보면 된다.
즉, proto 메세지들이 API 명세가 되며 HTTP body가 되었다.
여기까지 잘 따라 했다면 위의 통신 흐름 그림에서 4, 5에 해당하는 부분을 구현한 것이다.
Armeria gRPC 서버 실행시키기
service를 정의 했으니 서버를 실행시킬 차례다.
서버를 실행시키기 전에 정의 해 놓은 service들을 서버에 등록해줘야 한다.
src/main/kotlin/ServerLauncher.kt에 아래의 코드를 작성하자
fun main() {
    Server.builder().apply {
    	http(8081)
        service(getGrpcService())
        serviceUnder("/docs", DocService())
    }
    	.build()
        .start()
}

private fun getGrpcService() = GrpcService.build()
    .addService(HelloGrpcService())
    .build()
이제 IDE에서 main 함수를 실행시키면 서버가 실행된다.
잘 실행되는지 확인하고 싶다면 localhost:8081/docs를 들어가서 확인하면 된다.
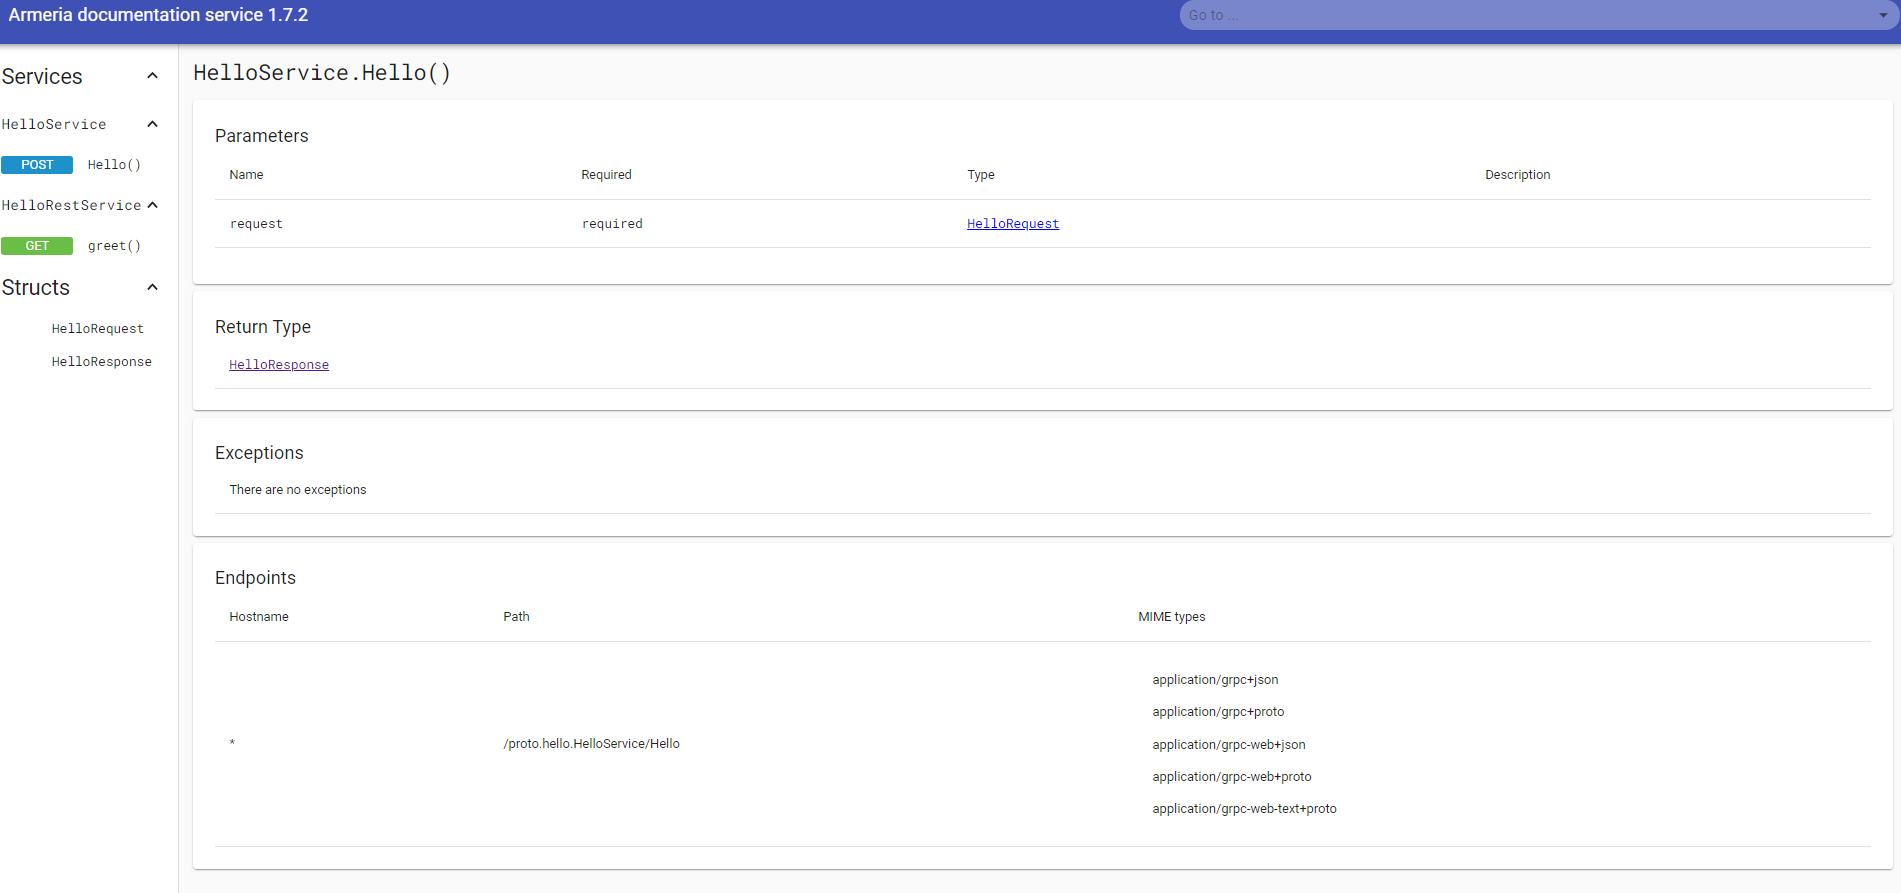
지금까지 잘 따라 했다면 스크린샷과는 다른 화면을 볼 수 있을 것이다.
필자의 경우에는 좌측에 HelloRestService라는 탭이 추가가 되어 있다.
이 글을 읽고 계신 분들은 HelloService 탭만 있는 것이 정상이다.
놀랍게도 serviceUnder("/docs", DocService())를 추가하면 Armeria에서 알아서 API를 문서화 해준다.
REST service를 등록하면 postman 처럼 실제로 웹 페이지에서 요청을 날리고 응답을 받을 수 있다.
[Optional] Rest service 등록하기
또 놀랍게도 Armeria는 Rest 서버와 gRPC 서버를 하나의 포트에서 동시에 실행 시킬 수 있다.
일단 Rest Service를 정의하자
src/main/kotlin/service/HelloRestService.kt에 아래와 같은 코드를 작성하자
object HelloRestService {
    @Get("/hello/{name}")
    fun greet(@Param("name") name: String): HttpResponse {
    	return HttpResponse.of("Hello, %s", name)
    }
}
service를 정의 했으니 서버에 등록할 차례이다.
src/main/kotlin/ServerLauncher.kt의 main 함수에 아래 코드를 추가하자.
fun main() {
    Server.builder().apply {
    	http(8081)
        service(getGrpcService())
        annotatedService(HelloRestService)  // 추가한 부분
        serviceUnder("/docs", DocService())
    }
    	.build()
        .start()
}

private fun getGrpcService() = GrpcService.build()
    .addService(HelloGrpcService())
    .build()
다시 서버를 실행시키고 localhost:8081/docs 에 접속하면 postman처럼 REST API를 테스트할 수 있다.
서버 구축을 완료 했으니 이제는 gRPC Client Server를 구축해보자
SpringBoot gRPC Client 서버 구축하기
마찬가지로 intelliJ에서 New Project를 생성하자.
SpringBoot 에서 Spring Web, Thymeleaf 의존성을 추가해서 생성하자
gradle 설정
armeria와 동일하게 gRPC, slf4j, proto buf에 대한 설정을 하면 된다.
설정을 마친 gradle은 아래와 같다.
plugins {
    id 'org.springframework.boot' version '2.4.5'
    id 'io.spring.dependency-management' version '1.0.11.RELEASE'
    id 'com.google.protobuf' version '0.8.15'
    id 'java'
}

group = 'com.example'
version = '0.0.1-SNAPSHOT'
sourceCompatibility = '11'

repositories {
    mavenCentral()
}

dependencies {
    implementation 'org.springframework.boot:spring-boot-starter-web'
    testImplementation 'org.springframework.boot:spring-boot-starter-test'
    implementation 'org.springframework.boot:spring-boot-starter-thymeleaf'

    // slf4j
    runtimeOnly 'ch.qos.logback:logback-classic:1.2.3'
    runtimeOnly 'org.slf4j:log4j-over-slf4j:1.7.30'

    // gRPC
    implementation 'io.grpc:grpc-netty-shaded:1.37.0'
    implementation 'io.grpc:grpc-protobuf:1.37.0'
    implementation 'io.grpc:grpc-stub:1.37.0'
    compileOnly 'org.apache.tomcat:annotations-api:6.0.53'
    compileOnly 'jakarta.annotation:jakarta.annotation-api:1.3.5'
}

sourceSets {
    main {
        java {
            srcDirs 'build/generated/source/proto/main/grpc'
            srcDirs 'build/generated/source/proto/main/java'
        }
    }
}

test {
    useJUnitPlatform()
}

// code generated
protobuf {
    protoc {
        artifact = "com.google.protobuf:protoc:3.12.0"
    }
    plugins {
        grpc {
            artifact = 'io.grpc:protoc-gen-grpc-java:1.37.0'
        }
    }
    generateProtoTasks {
        all()*.plugins {
            grpc {}
        }
    }
}
proto message 컴파일 하기
서버와 동일한 proto message를 사용하기 위해서 위에 작성한 proto message 컴파일 하기를 그대로 반복한다.
gRPC Client 정의하기
우리가 Armeria에 작성해놓은 서버에 요청을 보낼 Client를 정의해야 한다.
이전 포스팅에서 살펴봤지만 모든 통신은 stub를 통해서 이루어진다.
그래서 stub를 사용하는 Client를 정의해야 한다.
/src/main/java/com/example/demo/controller/HelloController.java 에 아래 코드를 작성하자
@Controller
public class HelloController {
    private final ManagedChannel channel = ManagedChannelBuilder.forAddress("localhost, 8081) // armeria 서버가 실행중인 호스트와 포트
		.usePlaintext()
		.build();

    private final HelloServiceBlockingStub blockingStub = HelloServiceGrpc.newBlockingStub(channel);   // stub가 사용할 채널 등록

    @GetMapping("/")
    public String btn() { return "index"; }

    @GetMapping("/hello")
    public String greeting(@RequestParam String name, Model model) {
    	HelloRequest request = HelloRequest.newBuilder() // 요청 데이터 생성
	    .setName(name)
            .build();

	HelloResponse response = blockingStub.hello(request) // 서버와 통신 발생
    	String responseName = response.getResponse();
        model.addAttribute("name", String.format("%s아 안녕~", responseName));
        return "hello";
    }
}
코드를 천천히 살펴보자.
가장 먼저 channel을 생성해야 한다.
channel은 서버와 통신할 기찻길이라고 생각하면 좋을 것 같다.
서버가 실행중인 호스트 (localhost)와 포트(8081)을 설정하고 인스턴스화 시킨다.
이제 화물을 싣고 기찻길을 달릴 화물 기차가 필요하다. 이 화물 기차를 stub 라고 생각하자.
그러면 화물은 어떤게 될까? 당연히 protoc가 생성해준 Response, Request 객체 들이 된다.
이 예제에서는 HelloRequest, HelloResponse가 된다.
그러니까 화물, 운송 수단을 만들어 주는 친구들은 protoc, 실제로 화물을 보내고 받는 친구들은 gRPC라고 할 수 있다.
stub는 HelloService에 정의해놓은 rpc 들을 멤버 변수로 가지고 있다.
이 규칙에 의해서 stub를 사용하면 서버의 메서드를 마치 로컬에 있는 메서드인 양 호출 할 수가 있게 된다.
사실은 로컬에 있는 메서드를 호출하는 것이 아니라, protoc에 의해 생성된 코드의 메서드를 호출하는 것이다.
여기까지 작성했다면 통신 흐름 그림에서 1,2,3,6을 완성한 것이다.
HTML 작성
이제 Client에서 Web Browser에 보여 줄 HTML을 작성해야 한다.
이어서 src/main/resousrces/templates/index.html에 아래와 같이 작성하자
<!doctype html>
<html lang="ko">
<head>
    <meta charset="UTF-8">
    <meta name="viewport"
          content="width=device-width, user-scalable=no, initial-scale=1.0, maximum-scale=1.0, minimum-scale=1.0">
    <meta http-equiv="X-UA-Compatible" content="ie=edge">
    <title>Document</title>
</head>
<body>
    <form action="/hello">
        <input type="text" name="name" value="성찬">
        <input type="submit" value="전송">
    </form>
</body>
</html>
이어서 src/main/resousrces/templates/hello.html에 아래와 같이 작성하자
<!doctype html>
<html xmlns="http://www.w3.org/1999/xhtml"
      xmlns:th="http://www.thymeleaf.org">
<head>
    <meta charset="UTF-8">
    <meta name="viewport"
          content="width=device-width, user-scalable=no, initial-scale=1.0, maximum-scale=1.0, minimum-scale=1.0">
    <meta http-equiv="X-UA-Compatible" content="ie=edge">
    <title>Document</title>
</head>
<body>
    <h1 th:text="${name}"></h1>
</body>
</html>
SpringBoot gRPC Client 서버 실행시키기
이제 준비가 되었다. SpringBoot는 gRPC에서는 Client이지만 동시에 Web Browser에게는 서버이다.
그래서 Armeria와 마찬가지로 Server를 실행시켜야 한다.
그렇지만 SpringBoot 기반의 서버이기 때문에 그냥 main() 함수를 실행시키기만 하면 된다.
gRPC 통신은 stub가 알아서 해주기 때문에 따로 설정할 필요가 없다.
만약 SpringBoot에서 gRPC Server를 실행시키고 싶다면 Armeria 처럼 Server를 인스턴스화 하면 된다.
테스트 하기
SpringBoot와 Armeria의 호스트는 모두 localhost이고 각각 8080, 8081 포트에서 동작 중 이다.
이제 Web Browser 에서 localhost:8080에 접속해보자

휑한 화면이 맞이해준다. 지체없이 전송을 클릭하자.

또 다시 휑한 화면이 맞이해준다.
첫번째 화면에서 전송 버튼을 클릭하면 "성찬" 이라는 문자열을 스프링부트 서버로 전송한다.
스프링부트 서버에서는 문자열을 받아서 Armeria gRPC 서버로 전송한다.
Armeria gRPC 서버는 Request를 받아서 Response로 응답해주고 있다.
잘 동작하는 것을 확인 했으니 이제 proto message를 왜 서브 모듈로 구성했는지 알아보자
지금은 Request는 name을 받고 있다.
그런데 기획자에 의해 API가 변경되어 Request는 firstName, lastName을 받게 될 위기에 처했다.
변경해보자.
HelloService.proto 파일에서 HelloRequest를 다음과 같이 수정하자
message HelloRequest {
	string first_name = 1;
    string last_name = 1;
}
수정하고 Git 원격 저장소에 푸시하자
이제 Armeria와 SpringBoot의 서브모듈을 업데이트 후 빌드를 하면 이런 에러가 발생한다.
Unresolved reference: name
왜냐하면 HelloRequest에는 더 이상 name 이라는 속성이 없고 first name, last name 이라는 속성만 존재하기 때문이다.
여기서 핵심은 API가 수정된 것이 서브 모듈에 반영이 된다면 API가 수정됐다는 사실을 로컬 프로젝트에서 알 수 있다는 점이다.
더 이상 API를 문서화할 필요가 없고, API가 수정되었는지 확인하기 위해서 API 문서를 정독할 필요도 없다.
이제 우리는 뱅크 샐러드 처럼 source of truth를 달성했다.
그 이후
인턴십동안 서브모듈, gRPC 환경에서 개발을 했다.
이것도 완벽하지는 않다.
API 문서 읽는 것보단 쉽지만 여전히 submodule이 최신화 되었는지 확인해야 했다.
API가 수정되면 해당 API를 사용하던 모든 프로젝트들이 빌드가 안된다.
변수명 짓기가 너무 어렵다.
proto 형태와 entity 형태를 convert 해줘야 한다. 이는 변수명을 짓기가 어려울뿐만 아니라 상당히 헷갈린다. MongoDB, RDS 의 Entity가 존재하고 그냥 Native에서 사용하는 객체도 있기 때문이다.
그래도 업무를 수행하기에는 충분한 지식을 습득한 것 같다.
처음 뱅크 샐러드의 포스팅을 읽었을 때는 이게 무슨 소리지 했지만 이제는 이해가 된다.
조금은 강해진 기분이 들어서 스스로가 기특하다.
해당 포스팅에서 작성한 코드, proto는 아래 저장소에서 확인할 수 있습니다.
.jpg)
좋은 글 감사드립니다!!