HttpServletRequests
기본적으로 spring security는 모든 요청이 인증되어야 한다. 그렇기 때문에 권한 부여 규칙을 선언해주어야 한다. 밑의 코드 예시를 보면 requestMatchers에서 url을 설정하고, 이에 대한 권한을 정한다.
  @Bean
  public SecurityFilterChain securityFilterChain(HttpSecurity http) throws Exception {

    return http
        .authorizeHttpRequests((authorize -> authorize
            .requestMatchers("/login")
            .permitAll() // /login에 대한 요청일시 모든 사용자 접근 가능
            .requestMatchers("/admin").hasRole("ADMIN") // /admin인 경우 admin 권한만 가능
            .anyRequest().authenticated()
        ))
   ...
위의 코드는 login url에 대해서는 모두 페이지에 접근할 수 있고, /admin url은 admin 권한만 가진 사람만 접근할 수 있다. 그 외 요청들은(anyRequest) 권한 인증을 받겠다고 선언한 것이다.
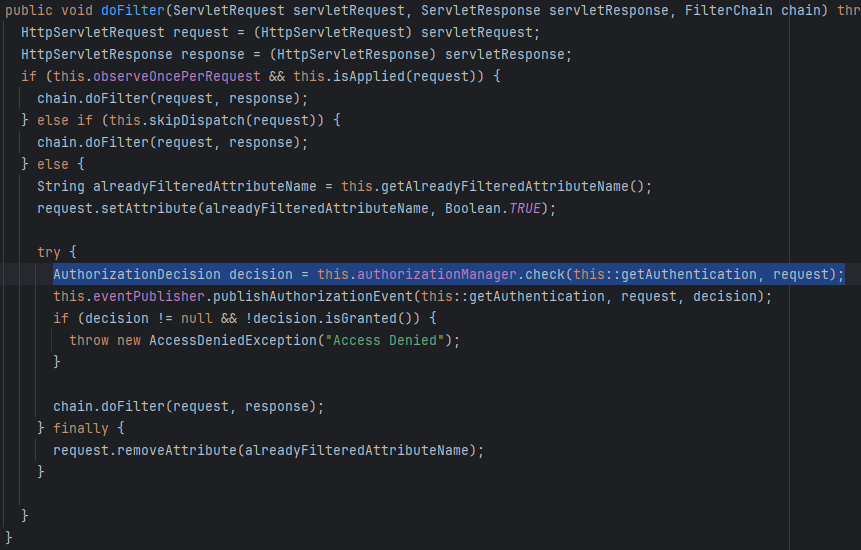
그렇다면 권한의 작동방식을 알아보자. AuthorizationFilter가 동작하면서 1) SecurityContextHolder로 부터 Authentication 객체를 가져온 후, 2) HttpServletRequest와 함께 AuthorizationManger에 넘긴다. 3) AuthorizationManger는 authorizeHttpRequests의 패턴을 일치시키고 규칙을 실행한다. 이때 인증이 되지 않으면 AccessDeniedException 으로 던지고, 인증이 되면 정상처리가 된다.
실제 AuthorizationFilter의 코드를 보면 아래와 같은 코드를 볼 수 있다. 이전 인증 아키텍처 설명했을때와 같이 AuthorizationManger의 check 메서드를 통해서 인증을 진행하고 있는 것을 알 수 있다.
authorizeReuests → authorizeHttpRequests
시큐리티 최신 버전에서 FilterSecurityInterceptor 가 AuthorizationFilter로 변경되면서 해당 부분도 변경이 되었다. 자료를 찾다보면 이전 코드를 쓰는 자료들도 많으니 유의해서 살펴보기를 바란다.(내이야기다) 이전보다 훨씬 단순화 되었으며 spring security공식문서에서 마이그레이션 하는 방법에 대해 설명하고 있으니 참고하길 바란다.
hasRole vs hasAuthority
특정 url에 대한 권한을 설정할때 위의 예시 코드처럼 해당 메서드들을 이용하게 되는데, 둘을 비교하자면 접두사를 붙이냐 아니냐의 차이다. 이전 시간에 스프링 시큐리티는 권한 생성시 prefix로 “ROLE” 을 기본적으로 붙인다고 했는데 hasRole의 경우 동작할때 ROLE_ 을 자동으로 붙이기 때문에, 만약 기본설정이 아닌 권한명을 다르게 준다면 hasAuthority를 붙여야한다. url 패턴은 다양하게 사용할 수 있고 문법이 존재하기 때문에 공식문서를 이용하자
Method Security
HTTP 요청 인증 방식 말고도 메서드별로 인증을 할 수 있는 방법도 있다. spring boot starter security 를 사용한다면 이는 기본적으로 사용하지 않기때문에 @EnableMethodSecurity 를 security config에 추가해야한다. 기본적으로 어노테이션을 기반으로 작동한다.
public class BankService {
	@PreAuthorize("hasRole('ADMIN')")
	public Account readAccount(Long id) {
        // ... is only invoked if the `Authentication` has the `ROLE_ADMIN` authority
	}
}

public class BankService {
	@PostAuthorize("returnObject.owner == authentication.name")
	public Account readAccount(Long id) {
        // ... is only returned if the `Account` belongs to the logged in user
	}
}

public class BankService {
	@PreFilter("filterObject.owner == authentication.name")
	public Collection<Account> updateAccounts(Account... accounts) {
        // ... `accounts` will only contain the accounts owned by the logged-in user
        return updated;
	}
}
코드를 보면 해당 @PreAuthorize 는 메서드가 실행되기전에 권한을 확인하고, 권한이 다를경우에 메서드가 실행되지 않고 예외를 던진다.
@PostAuthorize 는 메서드가 실행되고 결과가 반환될때 권한을 확인한다. 로직을 실행한 후에 현재 로그인한 사용자와 사용자(returnObject.owner)가 다를경우는 403 에러를 던지고, 같을 경우에만 값을 반환한다.
@PreFilter는 전달된 인자에서 인증된 사용자의 정보만 추출하고 싶을때 사용한다.
Method Security가 동작하는 방식은 spring AOP의 개념도 알아야 하고 HTTP방식보다 더 복잡해서 공식문서를 참고하길 바란다. (더 깊이 알아보려다 시간 관계상 포기했다)
동적 권한 커스텀 코드
이전에 설명했던 권한을 동적으로 읽어서 적용하는 법을 알아보자. 아마 실무에서는 기본적인 security config 설정으로는 한계가 있다. 복잡한 권한과 많은 페이지들을 권한 처리하려면 코드로 작성하기보다는 db에서 읽어와서 적용해야할테니 말이다.
spring security 6 이전 버전 코드
//security config

 @Bean
 public SecurityFilterChain securityFilterChain(HttpSecurity http) throws Exception {

    return http
        .authorizeHttpRequests((authorize -> authorize
            .requestMatchers("/login", "/css/**", "/js/**", "/images/**", "/fonts/**",
                "/favicon.ico", "/access-denied")
            .permitAll()
            .anyRequest().access(customAuthorizationManager())
        ))
  }


  @Bean
  public CustomFilterInvocationSecurityMetaSource customFilterInvocationSecurityMetaSource() {
    UrlResourceMapFactoryBean factoryBean = new UrlResourceMapFactoryBean(
        permissionService);
    return new CustomFilterInvocationSecurityMetaSource(factoryBean.getObject(),
        permissionService);
  }

  @Bean //security 6 이전의 코드
  public AccessDecisionManager accessDecisionManager() {
    return new AffirmativeBased(Arrays.asList(new RoleVoter(), new AuthenticatedVoter()));
  }

  @Bean //security 6 이전의 코드
  public AuthorizationManager<RequestAuthorizationContext> customAuthorizationManager() {
    return new CustomAuthorizationManager(customFilterInvocationSecurityMetaSource(),
        accessDecisionManager());

  }
securityFilterChain 코드를 보면 anyRequest().access(customAuthorizationManager()) 가 있는데 이와같이 내가 직접 커스텀한 매니저 클래스(customAuthorizationManager)를 직접 주입해줄수 있다. 다만 6버전 이전에는 filterSecurityInterceptor 가 존재했기때문에(현재는 AuthorizationFilter로 대체) 이전에는 해당 filterSecurityInterceptor 필터를 커스텀(addFilterBefore 이용)하여 적용해주는 자료들을 많이 찾아볼 수 있다.
- 참고로 addFilterBefore을 이용해서 전에 커스텀한 필터에서 권한처리를 하면 기존 권한인증 필터는 자동으로 넘어간다.
나는 authorizeHttpRequests 메서드에서 바로 manager를 주입하는 방법을 사용했다. 보면 customAuthorizationManager 생성자로 customFilterInvocationSecurityMetaSource 과 accessDecisionManager를 파라미터로 넘겨주고 있다.
- AffirmativeBased 클래스는 권한 리스트중 1개만 존재해도 인가 허가를 하는 클래스이다(해당 클래스도 이제는 쓰지 않는다.)
- CustomFilterInvocationSecurityMetaSource 생성자에서 permissionService 는 바로 DB에서 url과 권한을 읽어오는 역할을 한다.
아래는 내가 CustomAuthorizationManager 내용이다.
@RequiredArgsConstructor
public class CustomAuthorizationManager implements AuthorizationManager<RequestAuthorizationContext> {

  //동적 권한을 읽어오기 위한 클래스
  private final CustomFilterInvocationSecurityMetaSource securityMetaSource;
  //권한 인증 처리를 위한 manager 클래스
  private final AccessDecisionManager accessDecisionManager;

  @Override
  public AuthorizationDecision check(Supplier<Authentication> authentication, RequestAuthorizationContext object) {
    try {

    // attributes에 db에 읽어온 권한 정보가 들어있다.
      Collection<ConfigAttribute> attributes = this.securityMetaSource.getAttributes(object);
     // authentication 객체의 권한과 attributes와 비교하여 일치할때 true를 반환하게 된다
      this.accessDecisionManager.decide(authentication.get(), object, attributes);
      return new AuthorizationDecision(true);
    } catch (AccessDeniedException ex) {
      return new AuthorizationDecision(false);
    }

  }

  @Override
  public void verify(Supplier<Authentication> authentication, RequestAuthorizationContext object) {
    Collection<ConfigAttribute> attributes = this.securityMetaSource.getAttributes(object);
    this.accessDecisionManager.decide(authentication.get(), object, attributes);
  }
}
나의 DB에는 url과 그 url에 접근할수있는 권한 정보가 들어있다. 해당 목록 정보를 읽어오는 로직을 통해 동적으로 생성된 url-권한과 현재 요청한 url과 일치하는 권한 목록을 가져오고 accessDecisionManager 에 위임한다. 이때 인증정보에 있는 권한이 위의 권한 목록에 포함되어있는지 확인하고 없으면 false, 있으면 true를 반환하는데 false일때 accessdenied 익셉션을 던진다.
→ 필드에는 내가 구현했던 securityMetaSource 와 AccessDecisionManager 가 있는데, AccessDecisionManager 는 버전 6에서는 지원하지 않는점을 다시 한번 강조한다. 하지만 아예 못쓰이런식으로 사용은 가능하지만 훨씬 간단한 구조로 바뀌었다.
accessDecisionManager 안에서도 보면 AffirmativeBased 객체를 생성하는것을 볼 수 있는데 이것도 이제 지원안한다. 위에서 말했듯이 권한 한개라도 일치하면 허용해주는 클래스다.
spring security 6 버전 코드
그렇다면 6버전에서 사용하는 AuthorizationManager를 구현하는 방식을 알아보자. 위와 비교하면 여러가지 클래스가 존재했으나 이제는 AuthorizationManager만 구현하도록 간단하게 리팩토링 되었다.
@RequiredArgsConstructor
public class CustomAuthorizationMangerV2 implements
    AuthorizationManager<RequestAuthorizationContext> {

  private final CustomFilterInvocationSecurityMetaSource securityMetaSource;
  private RoleHierarchy roleHierarchy = new NullRoleHierarchy();

  public void setRoleHierarchy(RoleHierarchy roleHierarchy) {
    Assert.notNull(roleHierarchy, "roleHierarchy cannot be null");
    this.roleHierarchy = roleHierarchy;
  }

  @Override
  public AuthorizationDecision check(Supplier<Authentication> authentication,
      RequestAuthorizationContext object) {
    //이전 코드와같이 동적 권한 정보를 가져오는 로직
    Collection<ConfigAttribute> attributes = securityMetaSource.getAttributes(object);

    List<String> authorities = attributes.stream().map(ConfigAttribute::getAttribute)
        .collect(Collectors.toList());

    //isGranted 메서드를 통해 권한 일치 확인
    boolean granted = this.isGranted(authentication.get(), authorities);
    return new AuthorityAuthorizationDecision(granted, AuthorityUtils.createAuthorityList(authorities));

  }

  private boolean isGranted(Authentication authentication, Collection<String> authorities) {
    return authentication != null && this.isAuthorized(authentication, authorities);
  }

  private boolean isAuthorized(Authentication authentication, Collection<String> authorities) {
    Iterator var3 = this.getGrantedAuthorities(authentication).iterator();

    GrantedAuthority grantedAuthority;
    do {
      if (!var3.hasNext()) {
        return false;
      }

      grantedAuthority = (GrantedAuthority)var3.next();
    } while(!authorities.contains(grantedAuthority.getAuthority()));

    return true;
  }

  private Collection<? extends GrantedAuthority> getGrantedAuthorities(Authentication authentication) {
    return this.roleHierarchy.getReachableGrantedAuthorities(authentication.getAuthorities());
  }
핵심은 check메서드로 현재 url과 일치하는 권한목록만 가져오는 로직은 똑같다. 이 정보를 통해 인증정보의 권한과 비교만 하면된다. 거의 스프링 시큐리티에서 제공하고 있는 AuthoritiesAuthorizationManager 클래스를 복붙하였는데, 그대로 쓰지않고 커스텀 매니저 클래스를 만든 이유는 security에서 제공하고 있는 구현체들은 전부 final로 되어있어서 동적으로 권한목록을 읽어오는 로직만 넘겨줄 수 있는 방법이 없어서다.
내가 건드린부분은 check 구현밖에 없다. 사실 코드를 분석하면서 느낀게 accessDecisionManager와 voter 클래스를 없앨만하다는 생각이 들었다. 해당 클래스들을 살펴보면 상당히 복잡하게 로직이 짜져있다.
this.isGranted(authentication.get(), authorities) 여기가 권한체크가 진행되는 곳인데 두번째 파라미터를 보면 List를 받고 있다. 내가 만든 securityMetaSource를 해당 객체로 변경만 시켜주면 되는데, 사실 securityMetaSource자체를 해당 객체로 반환하게 만들어도 된다(이전 코드를 재활용하느라 List로 변환하는 코드를 짰다)
→ roleHierarchy 는 위의 계층이 있을 경우 해당 패턴을 등록하지 않아도 허용될 수 있도록 하는 것이다. 동적 url의 경우 모든 권한의 패턴을 db에 저장해야하는데 효율적으로 세팅하기 위해서 이 부분이 있으면 좋을것같아 세팅했다.
→ url패턴의 경우 세부적인 제한이 필요할경우 순서가 중요하다. 예를들어 /user/**, /user/**/add 라는 패턴중에 두번째가 먼저 오도록 순서를 정해야 권한 설정을 보다 세세하게 걸수있다.
