Yarn 3 MonoRepo with Typescript (Next.js, Nest, React Native)
Intro
MonoRepo란 Monolithic Repositories의 약자로 하나의 리포지토리에 여러개의 프로젝트가 구성된 형태를 의미 합니다.
MonoRepo에는 장점과 단점이 있지만, 저에게는 하위폴더로 분리된 여러개의 프로젝트를 한번에 관리 및 코딩할 수 있는점과, 프로젝트간에 공통으로 사용할 코드(라이브러리)를 라이브러리 형태로 구성하여 공유할 수 있다는 장점 때문에 MonoRepo를 사용해 왔습니다.
yarn class MonoRepo를 처음 시도 하였으나, react-native 관련한 설정의 복잡성과 관리의 문제 있어, 이후로는 계속 nx workspace를 이용하여 왔습니다.
nx workspace는 처음에 약간의 공부가 필요하지만, 익숙해지면 많은 편리한 기능과 자동화툴 및 Visual Studio Code의 plugin 형태로 GUI를 사용할 수 있는 장점이 있습니다. (이는 지금도 포기하기 힘든 장점 입니다.)
하지만 중앙집중식 모듈 관리 형태를 기본으로 하고 있기에, 프로젝트가 운영되면서 모듈 또는 프래임웍의 버전업(특히 react-native와 같은 클라이언트)이 필요할때 문제가 발생하였습니다.
package의 버전 업그레이드 시 같은 모듈을 사용하는 모든 프로젝트의 영향을 파악해야 했고, 오래된 프로젝트 까지 모두 손을 대야 하는 상황이 발생 하였습니다.
패키지 생성과 삭제를 반복하다보면 드물게 nx의 패키지 정보가 깨져서 좀비가 발생하여 수작업으로 모두 수정해줘야 하기도 했습니다.
통합된 관리가 장점이자 곧 단점인 것입니다.
최신 버전의 nx도 package-based 방식의 설정이 가능하지만, 편리하게 사용했던 자동화를 지원하는 플러그인들을 사용할 수 없어 yarn workspace와 매우 유사한 것으로 보였습니다. 그렇다면 구지 nx의 package-based로 설정하여 써야할까...
손이 좀 더 가더라도, 다시 기본(?)으로 돌아가 보기로 하고, yarn 3 (berry) + MonoRepo를 시도하게 되었습니다.
목표
- Nest, Next.js, React Native 모두를 하나의 워크스페이스에 넣고 문제없이 동작 해야 한다.
- 소스는 공유하되 같은 플랫폼 이라도, 버전의 변경 등에 대해 독립적인 처리가 가능 해야 한다.
Yarn Berry
node_modules 폴더를 이용한 classic 방식이 의존성 검색등에 비효율 적이고, 공간도 많이 차지하는등을 수정한 새로운 패키지 관리 시스템 입니다.
Plug’n’Play, Zero-Install 등의 기능이 적용 되면서, 복잡한 node_module 디렉토리도 없어지고, 속도도 개선되는 등의 많은 장점이 있습니다.
자세한 설명은 이번 블로그의 주제가 아니여서 지나가도록 하겠습니다.
Yarn berry (v3) + Workspace
yarn의 workspace 기능은 v1 부터 지원해 왔지만, v3까지 업데이트 되었고 성능 및 기능의 향상으로 저에게 필요한 요구 해결할 수 있게 되었습니다.
yarn classic MonoRepo를 포기하게 만들었던 가장 큰 이유인, react-native의 설정도 조금 더 간단해졌습니다.
용어
- 패키지(package): 하나의 독립적인 프로젝트로 React Native 앱, Nest 서버, 하나의 공유 라이브러리 등이 될 수 있습니다.
- 워크스페이스(workspace): MonoRepo로, 하나의 워크스페이스 안에는 여러개의 패키지를 포함하고 있습니다.
워크스페이스 생성
1. 워크스페이스 생성
$ mkdir yarn-mono
$ cd yarn-mono
2. 워크스페이스 설정
# 워크스페이스 폴더에 yarn 3 적용
$ yarn set version berry
# 적용된 버전 확인
$ yarn -v
# 워크스페이스 초기화
$ yarn init -w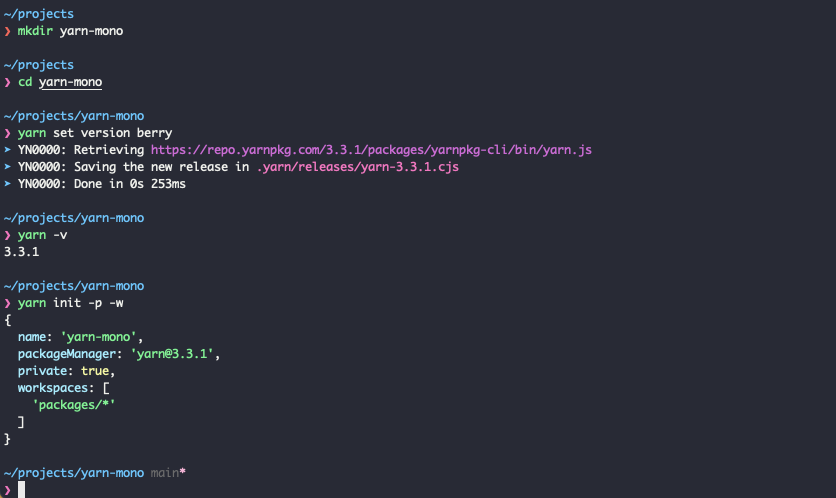
위의 명령으로 워크스페이스는 yarn berry가 적용 됩니다.
'yarn -v' 의 결과로 3.x.x 이여야 합니다.
'yarn init'의 파라메터 -p는 private package 설정을 위한 것이고, -w 는 packages 폴더를 기본으로 하는 workspace 생성 옵션입니다.
3. .yarnrc.yml 수정
yarnPath: .yarn/releases/yarn-3.3.1.cjs
nodeLinker: node-modules #추가
'nodeLinker: node-modules' 항목을 추가합니다.
위의 항목을 추가하게 되면, yarn berry (v3)에서의 zero-install 기능을 포기하는 것 입니다.
아직은 yarn 3 워크스페이스에서의 호환성을 위해 zero-install은 포기하지만 여전히 기존의 yarn classic 보다 나은 성능을 기대할 수 있다고 합니다.
3. typescript 설정
워크스페이스 루트에 패키지가 공통으로 사용할 typescript를 설정 합니다.
$ yarn add -D typescript
$ yarn plugin import typescript
typescript 플러그인은, 패키지 설치 시 typescript 정의 패키지 (@types/xxxx) 를 자동으로 찾아 설치해 줍니다. (이 플러그인 은긴히 편합니다)
tsconfig.spec.json 파일을 생성 합니다.
//
// tsconfig.spec.json
//
{
  "compilerOptions": {
    "target": "es2016",
    "module": "commonjs",
    "esModuleInterop": true,
    "forceConsistentCasingInFileNames": true,
    "strict": true,
    "skipLibCheck": true
  },
  "exclude": ["node_modules", "dist"]
}
전체 워크스페이스에서 공통으로 사용하는 부분 중심으로 설정 합니다.
//
// tsconfig.base.json
//
{
  "extends": "./tsconfig.spec.json",
  "compilerOptions": {
    "baseUrl": ".",
    "paths": {

    }
  },
  "files": [],
  "references": [

  ]
}
path alias 및 패키지간 소스 공유를 위한 타입스크립트 설정 입니다.
4. 유틸리티 (옵션)
yarn plugin import plugin-workspace-tools여러가지 워크스페이스 명령들을 추가로 지원해줍니다.
가장 많이 소개되는 명령은 전체 테스트, 전체 빌드 등, 전체 패키지들을 스캔하면서 한꺼번에 명령들을 실행 해주는 등의 명령어가 있습니다.
5. workspace 설정
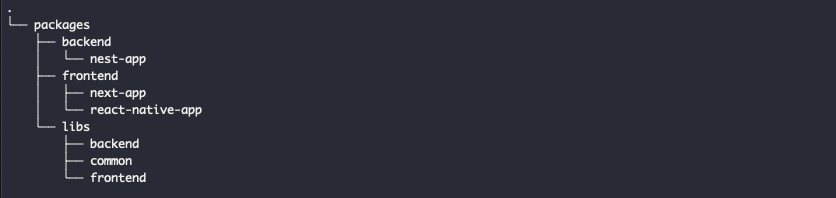
설정할 directory 기본 구조는 위와 같습니다.
libs/frontend(backend)아래에는 components, utils 같은 여러 라이브러리 폴더들이 들어 갈 예정 입니다.
구조에 맞게 package.json의 workspaces 항목을 설정 합니다..
{
  "name": "yarn-mono",
  "packageManager": "yarn@3.3.1",
  "private": true,
  "scripts": {
    "common": "yarn workspace @pnds/common",
    "component": "yarn workspace @pnds/component",
    "nextapp": "yarn workspace next-app",
    "nestapp": "yarn workspace nest-app",
    "nativeapp": "yarn workspace native-app"
  },
  "workspaces": [
    "packages/*/*",
    "packages/libs/frontend/*",
    "packages/libs/backend/*"
  ],
  "devDependencies": {
    "typescript": "^4.9.4"
  }
}
6. 기타
.gitignore를 수정 합니다.
.yarn/*
!.yarn/patches
!.yarn/plugins
!.yarn/releases
!.yarn/sdks
!.yarn/versions

# Swap the comments on the following lines if you don't wish to use zero-installs
# Documentation here: https://yarnpkg.com/features/zero-installs
!.yarn/cache
#.pnp.*

# -- 아래 항목 추가 --
node_modules
dist
nodeLinker: node-modules를 설정 하였기 때문에 node_modules 폴더가 생성 됩니다.
git에 node_modules 및 dist 폴더를 제외하도록 설정 합니다.
전체 공유 라이브러리 패키지 생성
1. common 패키지 폴더 설정
# packages 폴더로 이동
$ cd packages
$ mkdir -p libs/common

# packages/libs/common 폴더로 이동하여 폴더 초기화
$ cd libs/common
$ yarn init -y

# 소스폴더 생성
$ mkdir src
packages/libs/common의 package.json 파일을 수정 합니다.
//
// packages/libs/common/package.json
//
{
  "name": "@pnds/common",
  "packageManager": "yarn@3.3.1",
  "main": "dist/index",
  "types": "dist/index",
  "files": [
    "dist"
  ],
  "scripts": {
    "build": "yarn clean && yarn compile",
    "clean": "rimraf -rf ./dist",
    "compile": "tsc"
  }
}
폴더 삭제 유틸리티 모듈을 설치 합니다.
$ yarn workspace @pnds/common add -D rimraf2. typescript 설정
$ yarn workspace @pnds/common add -D typescriptTIP.
packages/libs/common 폴더로 이동하여 yarn add 명령을 실행 하여도 됩니다.
'yarn workspace (패키지) ...' 명령은 워크스페이스 전용 명령 입니다.
workspace 내에서는 폴더 이동 없이 명령을 실행할 수 있지만 입력이 많아 불편 합니다.
root의 package.json에 script 부분을 추가하여 조금 더 편하게 명령어를 사용할 수 있습니다.{ ... "scripts": { "common": "yarn workspace @pnds/common" ... }, ... }설정 이후에는 루트 폴더에서 조금 짧은 명령으로 워크스페이스 관리 명령을 실행 할 수 있습니다.
$ yarn common add -D typescriptlerna 와 같은 워크스페이스 관리툴을 사용 할 수도 있습니다.
tsconfig.json 파일을 생성 합니다.
//
// packages/libs/common/tsconfig.json
//
{
  "extends": "../../../tsconfig.base.json",
  "compilerOptions": {
    "outDir": "./dist",
    "rootDir": "src",
    "baseUrl": "./",
    "composite": true
  },

  "include": ["src/**/*"]
}
루트의 tsconfig.build.json을 상속받고, 추가 설정을 합니다.
빌드 output 폴더는 dist로 설정 하였습니다.
샘플 라이브러리를 작성 합니다.
//
// packages/libs/common/src/index.ts
//

export const hello = () => {
  console.log("hello common libs");
  return "hello common libs";
};
(옵션) root 폴더의 tsconfig.base.json에 path alias 및 references를 설정 합니다.
//
// tsconfig.base.json
//
{
  {
    "extends": "./tsconfig.spec.json",
    "compilerOptions": {
      "baseUrl": ".",
      "paths": {
        "@pnds/common": ["packages/libs/common/src"]
      }
    },
    "files": [],
    "references": [
      {"path": "./packages/libs/common"},
    ]
  }
}
샘플에서는 간단하게 라이브러리 폴더 생성 및 path alias를 설정을 하였습니다.
마지막으로 빌드를 합니다.
$ yarn workspace @pnds/common buildreact용 공유 콤포넌트 패키지 생성
설정 과정은 위의 common 공유 콤포넌트 생성 과정과 유사합니다.
설명 없이 생성 결과만 나열 하도록 하겠습니다.
패키지 경로는 packages/libs/frontend/components 입니다.
//
// packages/libs/frontend/components/packages.json
//
{
  "name": "@pnds/component",
  "packageManager": "yarn@3.3.1",
  "main": "dist/index",
  "types": "dist/index",
  "files": [
    "dist"
  ],
  "scripts": {
    "build": "yarn clean && yarn compile",
    "clean": "rimraf -rf ./dist",
    "compile": "tsc"
  },
  "devDependencies": {
    "@types/react": "^18",
    "@types/react-dom": "^18",
    "@types/rimraf": "^3",
    "rimraf": "^3.0.2",
    "typescript": "^4.9.4"
  },
  "dependencies": {
    "react": "^18.2.0",
    "react-dom": "^18.2.0"
  }
}
//
// packages/libs/frontend/components/tsconfig.json
//
{
"extends": "../../../../tsconfig.base.json",
"compilerOptions": {
"outDir": "./dist",
"rootDir": "src",
"baseUrl": "./",
"composite": true,
"jsx": "react-jsx",
},
"include": ["src/**/*"]
}
//
// packages/libs/frontend/components/src/index.ts
//
export * from "./name"
//
// packages/libs/frontend/components/src/name.tsx
//
import React from 'react';
export interface NameProps{
name: string;
}
export const Name = (props: NameProps) => {
return <p>my name is {props.name}</p>
}파일 생성을 마치고 build 합니다.
$ yarn workspace @pnds/component buildNext.js
1. Next.js 앱 생성
# packages 폴더로 이동
$ cd packages
$ mkdir frontends && cd frontends

# Next.js 앱 생성
$ npx create-next-app@latest next-app
2. Next.js 앱 설정
package.json 수정
//
// packages/frontend/next-app/package.json
//
{
  "name": "next-app",
  "packageManager": "yarn@3.3.1", // 항목 추가
  ...
}
#
# root 폴더로 이동
#
$ yarn install
# 실행
$ yarn workspace next-app dev위의 명령어를 차례대로 실행하면, 브라우저에서 localhost:3000 으로 생성된 웹 페이지가 정상적으로 실행되는것을 볼 수 있습니다.
3. 공유 패키지 사용 설정
tsconfig.json에 사용할 라이브러에 대한 poth alias를 설정 합니다.
//
// packages/frontend/next-app/tsconfig.json
//
{
  "compilerOptions": {
    ...
    "paths": {
      "@pnds/common": ["../../libs/common/src"],
      "@pnds/component": ["../../libs/frontend/components/src"],
    }
    ...
  },
  ...
}
next가 외부의 콤포넌트를 읽을 수 있도록 next.config.js를 수정 합니다..
//
// packages/frontend/next-app/next.config.js
//

/** @type {import('next').NextConfig} */
const nextConfig = {
  reactStrictMode: true,

  // 아래 항목 추가
  experimental: {
    externalDir: true
  },
}

module.exports = nextConfig
(next.config.js 설정은 Next.js 13 버전의 외부 모듈 참조 설정입니다. 이전 버전의 경우는 설정이 다를 수 있습니다.)
4. 테스트
//
// packages/frontends/next-app/pages/index.tsx
//

...

import { hello } from '@pnds/common';  // 항목 추가.
import { Name } from '@pnds/component'; // 항목 추가.

...

    <Name name={"projaguar " + hello()}/>
...
적당한곳에 위의 Name 태그를 추가하면 화면에 출력되는것을 확인할 수 있습니다.

Nest 패키지 생성
1. Nest 앱 생성
# packages 폴더로 이동하여 backends 폴더 생성
$ cd packages
$ mkdir backends


# backends 폴더에서 Next.js 앱 생성
$ cd backends
$ npx @nestjs/cli@latest new nest-app
2. Nest 앱 설정
//
// packages/frontend/nest-app/package.json
//
{
  "name": "nest-app",
  "packageManager": "yarn@3.3.1", // 항목 추가
  ...
}
root 폴더로 이동하여 패키지들을 설치 한다.
#
# root 폴더로 이동
#
$ yarn install
정상적으로 실행되는지 테스트 합니다.
$ yarn workspace nest-app start:dev3. 공유 라이브러리 설정
이전 설정과 같이 tsconfig.json에 path alias를 설정 합니다.
//
// packages/backends/nest-app/tsconfig.json
//
{
  "compilerOptions": {
    ...
    "paths": {
      "@pnds/common": ["../../libs/common/src"]
    }
  }
}
테스트를 위해 생성된 소스를 수정 합니다.
//
// packages/backends/nest-app/src/app.controller.ts
//

import { Controller, Get } from '@nestjs/common';
import { AppService } from './app.service';

import { hello } from '@pnds/common';  // 추가

@Controller()
export class AppController {
  constructor(private readonly appService: AppService) {}

  @Get()
  getHello(): string {
    console.log('nest-app >', hello()); // 추가
    return this.appService.getHello();
  }
}
앱을 실행합니다.
$ yarn workspace nest-app start:dev예상과 다르게 콘솔에 main 을 못찾는다는 오류가 출력 됩니다.

실행을 위해 컴파일된 dist 폴더를 열어보면 아래 구조와 비슷하게 path가 구성 됩니다.

dist 폴도 하위에, 컴파일 된 main.js가 있어야 합니다. 그런데 backend/nest-app/src 아래에 main.js가 있습니다.
외부 패키지를 컴파일하면서 컴파일 결과의 구조가 바뀐것 입니다.
nest-cli.json에 변경된 path를 지정해서 오류를 해결 합니다.
//
// packages/backends/nest-app/nest-cli.json
//
{
  "$schema": "https://json.schemastore.org/nest-cli",
  "collection": "@nestjs/schematics",
  "sourceRoot": "src",
  "compilerOptions": {
    "deleteOutDir": true
  },
  "entryFile": "backends/nest-app/src/main"   // 항목 추가
}
dist폴더에 생성된 구조를 확인하고,entryFile항목에 main.js의 path를 지정 합니다.
그리고 다시 실행 하면..

정상적으로 실행 되는것을 확인할 수 있습니다.
React Native
안타깝게도 react-native는 yarn berry를 지원하지 않습니다. 여러 블로그 글들을 보아도 앞으로 빠른 시간 내에 지원은 힘들것 같습니다.
그래서 React-native의 경우는 node_modules 폴더가 패키지 내에 생성 되어야 합니다.
그래서 추가로 몇가지 수고가 필요합니다.
1. React Native 앱 생성
# packages 폴더로 이동
$ cd packages

# Next.js 앱 생성
$ npx react-native init NativeApp --directory ./native-app  --template react-native-template-typescript
react native 프로젝트를 생성하면 아래와같은 오류메시지가 나오고 생성이 중단 됩니다.
오류 메시지를 보면 필요한 소스는 생성 된 이후, pod insall시 문제가 발생 하였습니다.
출력

pod install은 패키지 내의 node_modules를 상대 경로로 참조하기 때문에 생긴 문제 입니다.
그래서 node_modules를 패키지 내에 생성 하도록 설정 하여야 합니다.
먼저 native-app의 package.json 파일을 수정합니다.
//
// packages/native-app/package.json 파일 수정
//
{
  "name": "native-app",  // 이름 수정
  "packageManager": "yarn@3.3.1"  // 항목 추가
  ...
}
빈 yarn.lock 파일을 생성하고, 설치중 중단된 yarn install과 pod install을 실행 합니다.
# packages/frontends/native-app 폴더로 이동
$ cd native-app

# 빈 yarn.lock 파일 생성
$ touch yarn.lock

# 'native-app 폴더'에서 yarn install 실행
$ yarn install

# packages/frontends/native-app/ios 폴더로 이동하여 pod install 실행
$ cd ios
$ pod install
# 메트로 서버를 실행
$ yarn workspace native-app start
# 새로운 콘솔을 열어서 ios(또는 android) 앱을 실행 합니다.
$ yarn workspace native-app ios
$ yarn workspace native-app android시뮬레이터에서 앱이 실행되는것을 확인할 수 있습니다.
2. 공유 라이브러리 사용
//
// packages/frontends/native-app/tsconfig.json
//
{
  "extends": "@tsconfig/react-native/tsconfig.json",     /* Recommended React Native TSConfig base */
  "compilerOptions": {
    /* Visit https://aka.ms/tsconfig.json to read more about this file */

    /* Completeness */
    "skipLibCheck": true,                                /* Skip type checking all .d.ts files. */

    // 항목 추가
    "paths": {
      "@pnds/common": ["../../libs/common/src"]
    }
  }
}
메트로 서버의 외부 모듈 참조를 위하여 metro.config.js를 수정 합니다.
/**
 * Metro configuration for React Native
 * https://github.com/facebook/react-native
 *
 * @format
 */

const path = require('path');
const extraNodeModules = {
  '@pnds/common': path.resolve(__dirname, '../../libs/common'),
};
const watchFolders = [path.resolve(__dirname, '../../libs/common')];

module.exports = {
  transformer: {
    getTransformOptions: async () => ({
      transform: {
        experimentalImportSupport: false,
        inlineRequires: true,
      },
    }),
  },
  resolver: {
    extraNodeModules: new Proxy(extraNodeModules, {
      get: (target, name) =>
        name in target
          ? target[name]
          : path.join(process.cwd(), `node_modules/${name}`),
    }),
  },
  watchFolders,
};
마지막으로 공유 라이브러리를 사용하는 샘플을 작성 합니다.
//
// packages/frontends/native-app/App.tsx
//
...

import {hello} from "@pnds/common";
console.log(">>>>>", hello());

...
소스를 수정하고, 실행하면 콘솔에 로그가 출력되는것을 확인할 수 있습니다.
prettier
root에서 prettier 패키지를 설치 합니다.
$ yarn add -D prettier.prettierrc 파일 생성
//
// .prettierrc
//
{
  "singleQuote": true,
  "trailingComma": "all",
  "printWidth: 120
}
간단하게 설정 하였습니다.
취향대로 적절히 설정하고, 하위 폴더의 .prettierrc파일을 지우면 모든 패키지에 적용이 됩니다.
결론
필요한 패키지들을 하나의 워크스페이스에 묶는데는 성공 하였습니다.
유연함을 얻은 대신에, nx에 비해선 손이 많이 간다는건 어쩔수 없는것 같습니다.
과제
- 외부 참조 라이브러리에대한 auto import, auto completion 작동이 잘 안되는 문제
- 외부 라이브러리를 반드시 build해야 참조할 수 있는 문제
이밖에 테스트중 발견하지 못한 문제나, 더 나은 설정 방법을 알고계신분은 꼭 공유 부탁 드립니다.
Reference
https://velog.io/@warmwhiten/yarn-berry-typescript-eslint-prettier-emotion-react
https://medium.com/@alpharder/reusing-code-at-angular-nest-monorepo-oversimplified-f59080e4fa42


정성글 감사합니다! 많은 도움 되었어요