ADC
ADC의 resolution은 아날로그 값을 디지털로 변환할 때 정밀하게 나타내는 정도를 표현한다. bit단위로 표현하며 12bit를 사용한다면 0~4095까지 값을 표현할 수 있다.
그러나 정밀하게 표현할 수 있는 대신 변환시간이 오래 걸릴 수도 있고, 많은 bit수를 처리하기에 전력소비가 늘어날 수 있다.
scan conversion mode는 adc의 활성화된 channel들을 순차적으로 변환하는 기능을 한다.
end of conversion selection은
Polling
adc데이터가 들어오고 CPU가 데이터를 읽는데까지 CPU의 동작이 머물러 있기 때문에 효율적인 방법은 아니다.
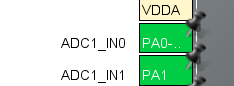
ADC를 사용하기 위해 PA0와 PA1에 가변저항을 연결하고 핀을 셋팅한다.
void User_Task1(void){

	while(1){
		HAL_ADC_Start(&hadc1); // adc conversion 시작

			HAL_ADC_PollForConversion(&hadc1, 10); // conversion 완료될때까지 대기
			adc_value[0]=HAL_ADC_GetValue(&hadc1); // adc 데이터를 읽어서 저장

			HAL_ADC_PollForConversion(&hadc1, 10);
			adc_value[1]=HAL_ADC_GetValue(&hadc1);

			Vout[0]=(3.3/4095.0)*(float)adc_value[0]; // adc값을 3.3V MAX의 전압으로 변환
			Vout[1]=(3.3/4095.0)*(float)adc_value[1];
			sprintf(str, "%5.2f, %5.2f\n", Vout[0], Vout[1]);
			HAL_UART_Transmit(&huart2, (unsigned char*)str, strlen(str), 10);
	}
}
UART
UART(Universal Asynchronous Receiver Transmitter)
- 1대1 직렬통신방식이다
- 비동기식 방식으로 start bit와 stop bit가 있고, baudrate를 맞춰야한다
- RX, TX, GND 3개의 선이 필요하다
- 전이중방식이다
Sampling : UART 통신에서 샘플링은 데이터 비트의 중간 지점에서 신호의 전압 레벨을 읽는 과정이다. 샘플링을 통해 수신 측은 데이터의 논리 상태를 판단한다. 샘플링을 수행하기 위해서는 송수신 측의 보레이트가 일치해야 하고, 샘플링 횟수가 충분해야 하고, 샘플링 타이밍이 정확해야 한다.


설정을 마치고 code generation한다.
/* Private variables ---------------------------------------------------------*/
UART_HandleTypeDef huart2;
/* USER CODE BEGIN PV */
위와 같이 uart관련 코드가 생성된다.
패킷 프로토콜 검사
#include "user.h"
#include <stdio.h>
#include <string.h>

#define UART2_BUFF_SIZE		256

extern UART_HandleTypeDef huart2;

char str[256] = {0, };
unsigned int sec1ms_uart_timeout = 0;
unsigned char uart2_rx_buff[UART2_BUFF_SIZE] = {0, };
unsigned char uart_data[UART2_BUFF_SIZE] = {0, };
unsigned int uart_rx_cnt = 0;

//ABC(헤더)가 들어오면 1,2,3(데이터)에 따라 LED TGG(유효성검사)
void User_Task1(void){
	while(1){
		if (sec1ms_uart_timeout > 500) { // 0.5초 동안 데이터가 없으면 탈락
			sec1ms_uart_timeout = 0;
			uart_rx_cnt = 0;
			sprintf(str, "UART TIMEOUT\n");
			HAL_UART_Transmit(&huart2, (unsigned char*)str, strlen(str), 10);
		}
		if(HAL_UART_Receive(&huart2, uart2_rx_buff, 1, 1) == HAL_OK){ // 데이터가 들어오면 실행
			uart_data[uart_rx_cnt] = uart2_rx_buff[0]; // 데이터를 패킷검사를 위한 버퍼에 저장
			sec1ms_uart_timeout = 0;
			++uart_rx_cnt;

			if (uart_rx_cnt == 1) {
				if (uart_data[uart_rx_cnt-1] != 'A') uart_rx_cnt = 0; // 탈락, 다시 0부터 검사
			}
			else if (uart_rx_cnt == 2) {
				if (uart_data[uart_rx_cnt-1] != 'B') uart_rx_cnt = 0; // 탈락, 다시 0부터 검사
			}
			else if (uart_rx_cnt == 3) {
				if (uart_data[uart_rx_cnt-1] != 'C') uart_rx_cnt = 0; // 탈락, 다시 0부터 검사
			}
			else if (uart_rx_cnt == 4) { // ABC헤더 통과
				if (uart_data[uart_rx_cnt-1] == '1') {
					HAL_GPIO_TogglePin(GPIOA, GPIO_PIN_5);
				}
				else if (uart_data[uart_rx_cnt-1] == '2') {
					HAL_GPIO_TogglePin(GPIOC, GPIO_PIN_10);
				}
				else if (uart_data[uart_rx_cnt-1] == '3') {
					HAL_GPIO_TogglePin(GPIOC, GPIO_PIN_12);
				}
				uart_rx_cnt = 0;
			}
		}
	}
}
PC와 stm32가 uart2를 이용해 통신하고, PC에서 헤더(ABC)데이터(1,2,3)이 연속적으로 들어오면 각각 데이터에 해당하는 LED를 toggle하는 코드다. 이때 헤더 또는 데이터가 입력되는 동안 ABDC1과 같이 다른 값이 있다면 잘못된 데이터로 판단하고 다시 처음부터 확인해야한다. 또한 0.5초 동안 수신받지 못해도 오류로 판단하고 처음부터 다시 확인해야한다.
polling방식의 uart는 수신 동작 시 데이터를 받기 위해 일정시간 머물러있기 때문에 cpu 리소스를 많이 차지하게 된다.
UART 통신 동안 다른 작업을 수행할 수 없으므로 시스템 효율성이 낮을 수 있습니다.
데이터를 수신할 때마다 CPU가 계속 확인해야 하므로 CPU를 효율적으로 활용하지 못한다.
Interrupt 방식

NVIC setting에서 global interrupt를 enable하고 code generation한다.
데이터가 손실되는것을 방지하기 위해 Circular buffer를 사용한다.
#include "user.h"
#include <stdio.h>
#include "uart2.h"

char str[256] = {0, };
unsigned char packet[16] = {0, };
unsigned char packet_cnt = 0;

void User_Task1(void){
	Uart2_Config();
	while(1){
		if (uart2_rx_cnt) { // 읽어야되는 데이터수만큼
			packet[packet_cnt++] = Uart2_Getchar(); // 데이터를 가져와 패킷에 저장
			if (packet[packet_cnt-1] == '\n') { // enter가 입력되면 저장된 데이터 출력
				packet[packet_cnt] = 0;
				sprintf(str, "%s", packet);
				Uart2_Str(str);
				packet_cnt = 0;
			}
			packet_cnt %= 16; // 패킷 사이즈 제한
		}
	}
}#ifndef INC_UART2_H_
#define INC_UART2_H_
#include "stm32f4xx_hal.h"
#include "main.h"
#include <stdio.h>
#include <string.h>
#define UART2_BUFF_SIZE 256
extern unsigned int uart2_rx_cnt;
void Uart2_Config(void);
void Uart2_Str(char *string);
unsigned char Uart2_Getchar(void);
#endif /* INC_UART2_H_ */
#include "uart2.h"

extern UART_HandleTypeDef huart2;

//uart buffer layer 데이터를 놓치지 않고 저장하기 위한 변수
unsigned char uart2_rx_buff[UART2_BUFF_SIZE] = {0, };
unsigned char uart2_rx_data[UART2_BUFF_SIZE] = {0, };
unsigned int uart2_rx_cnt = 0; // 수신된 데이터의 사이즈
unsigned int uart2_wr_cnt = 0, uart2_rd_cnt = 0;

void Uart2_Config(void){ // interrupt를 시작
	HAL_UART_Receive_IT(&huart2, uart2_rx_buff, 1);
}

void Uart2_Str(char *string){ // 데이터 PC로 보내기
	HAL_UART_Transmit(&huart2, (unsigned char*)string, strlen(string), 100);
}

unsigned char Uart2_Getchar(void){ // 데이터 가져오기
	unsigned char buff = 0;

	if (uart2_rx_cnt) {
		buff = uart2_rx_data[uart2_rd_cnt++];
		uart2_rd_cnt %= UART2_BUFF_SIZE; // 버퍼 사이즈 제한
		--uart2_rx_cnt; // 버퍼에서 데이터를 가져가므로 데이터 길이 감소
	}

	return buff;
}

void HAL_UART_RxCpltCallback(UART_HandleTypeDef *huart){ // 데이터가 수신되면 시작
	if (huart->Instance == USART2) {
		HAL_UART_Receive_IT(&huart2, uart2_rx_buff, 1); // interrupt 재활성화
		uart2_rx_data[uart2_wr_cnt++] = uart2_rx_buff[0]; // 링버퍼에 카피
		uart2_wr_cnt %= UART2_BUFF_SIZE; // 링버퍼 사이즈 256으로
		++uart2_rx_cnt; // 버퍼에 데이터를 저장했으므로 데이터 길이 증가
	}
}
데이터가 수신되면 인터럽트가 발생하고 CPU에 의해 데이터를 받아올 수 있다. 그러나 데이터를 매번 수신할 때마다 CPU가 직접 처리해야한다.
DMA방식
DMA는 DMA controller가 직접 CPU대신 메모리에 데이터를 가져오기 때문에 CPU의 리소스를 줄일 수 있다.
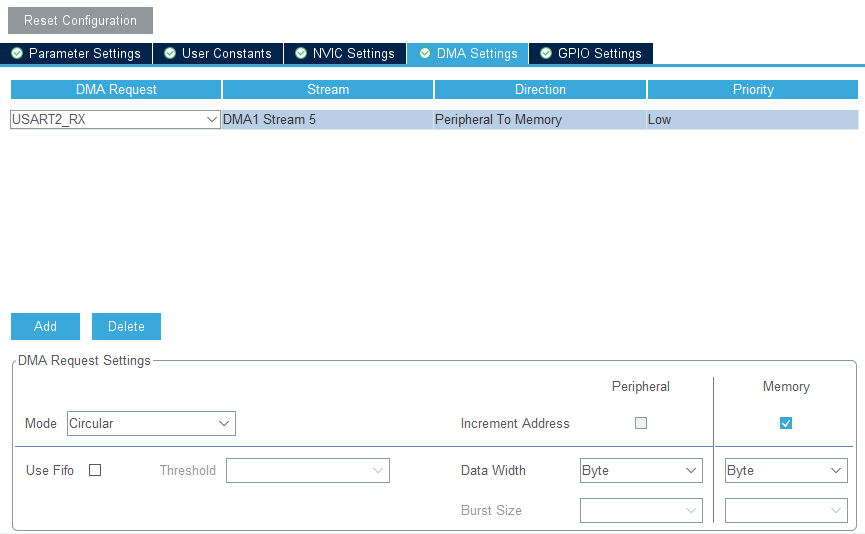
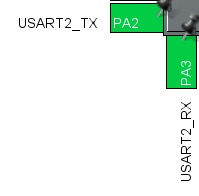
RX DMA를 추가하고, mode를 circular로 변경한다.
아래 코드는 DMA방식의 UART를 이용해 header + data + checksum을 받아 간단한 프로토콜 유효성검사를 수행하는 프로그램이다.
#include "uart2dma.h"

extern UART_HandleTypeDef huart2;

unsigned char uart2_rxdma_buff[UART2_DMA_RXSIZE]={0, };
unsigned char uart2_rxdma_data[UART2_DMA_RXSIZE]={0, };

unsigned int uart2_wr_dma_cnt=0, uart2_rd_dma_cnt=0;
unsigned int uart2_rx_dma_cnt=0;

short unsigned int Uart2_Old_Cnt=0;

unsigned char uart_data[256] = {0, };
unsigned char uart_rx_cnt = 0;

unsigned char Data1 = 0, Data2 = 0, Data3 = 0, Data4 = 0, Data5 = 0;

void Uart2_DMA_Config(void){
	HAL_UART_Receive_DMA(&huart2, uart2_rxdma_buff, UART2_DMA_RXSIZE); // DMA 개시
}

unsigned char Uart2_DMA_Getchar(void){ // 데이터 가져오기
	unsigned char data=0;

	if(uart2_rx_dma_cnt){
		data=uart2_rxdma_data[uart2_rd_dma_cnt++];
		uart2_rd_dma_cnt%=UART2_DMA_RXSIZE; // 버퍼 사이즈 제한
		--uart2_rx_dma_cnt; // 버퍼에서 데이터를 가져가므로 데이터 길이 감소
	}
	return data;
}

void Uart2_Thread(void){
	short unsigned int New_Cnt=0;

	New_Cnt=GET_U2_DMA_MAX_SIZE()-GET_U2_DMA_SIZE(); // DMA buffer의 최대크기 - 현재 수신된 데이터 수 만큼 down-counting
	while(New_Cnt!=Uart2_Old_Cnt){
		uart2_rxdma_data[uart2_wr_dma_cnt++]=uart2_rxdma_buff[Uart2_Old_Cnt];
		uart2_wr_dma_cnt%=UART2_DMA_RXSIZE;
		++uart2_rx_dma_cnt;

		++Uart2_Old_Cnt;
		Uart2_Old_Cnt%=GET_U2_DMA_MAX_SIZE();
	}
}

void UserPacket_Thread(void){
	unsigned char chkSUM = 0;
	Uart2_Thread();

	if(sec1ms_uart_timeout>3000){ // 3초 이상 수신 데이터가 없다면 timeout으로 판정, 다시 패킷을 검사해야함
		sec1ms_uart_timeout=0;
		uart_rx_cnt=0; // 처음부터 검사, 리셋
		sprintf(str, "UART TIMEOUT\n");
		HAL_UART_Transmit(&huart2, (unsigned char*)str, strlen(str), 50);
	}
	if(uart2_rx_dma_cnt){ // 데이터가 있다면
		uart_data[uart_rx_cnt]=Uart2_DMA_Getchar(); // uart_data라면 packet에 저장
		sec1ms_uart_timeout=0; // 데이터가 들어왔으므로 time reset
		++uart_rx_cnt;

		switch(uart_rx_cnt){
		case 1:
			if(uart_data[uart_rx_cnt-1]!=0xAA)uart_rx_cnt=0; // 패킷의 첫번째 byte가 0xAA인지 검사, 틀리면 다시
			break;
		case 2:
			if(uart_data[uart_rx_cnt-1]!=0x55)uart_rx_cnt=0; // 패킷의 두번째 byte가 0x55인지 검사, 틀리면 다시
			break;
		case 8: // checksum을 위해 첫번째 byte부터 7번째까지 더한다.
			chkSUM = uart_data[0] + uart_data[1] + uart_data[2] + uart_data[3] + uart_data[4] + uart_data[5] + uart_data[6];
			if (chkSUM == uart_data[7]) { // 8번째 byte에 checksum값과 일치하면 데이터 저장
				Data1 = uart_data[2];
				Data2 = uart_data[3];
				Data3 = uart_data[4];
				Data4 = uart_data[5];
				Data5 = uart_data[6];

				sprintf(str, "Packet: %3d, %3d, %3d, %3d, %3d\n", Data1, Data2, Data3, Data4, Data5);
				HAL_UART_Transmit(&huart2, (unsigned char*)str, strlen(str), 50);
			}
			uart_rx_cnt = 0;
			break;
		}
	}
}#include "user.h"
char str[256]= {0, };
unsigned int sec1ms_uart_timeout=0;
unsigned char data1_flag = 0;
unsigned char led_cnt = 0;
unsigned int sec1ms1 = 0;
void User_Task1(void){
Uart2_DMA_Config();
while(1){
UserPacket_Thread();
if (Data1 && data1_flag == 0) {
data1_flag = 1;
led_cnt = Data1;
Data1 = 0;
}
if(data1_flag){
if (sec1ms1 > 300) {
if (led_cnt) {
--led_cnt;
HAL_GPIO_TogglePin(GPIOA, GPIO_PIN_5);
}
else {
data1_flag = 0;
}
sec1ms1 = 0;
}
}
}
}Data1의 수의 크기에 따라 PA5 LED가 Toggle한다. Uart_DMA
- 간단한 애플리케이션의 경우 Polling 방식을 사용
- 데이터 처리의 실시간성이 중요하고 다른 작업을 수행해야 하는 경우 Interrupt 방식을 고려
- 대량의 데이터 전송이나 시스템 효율성이 요구되는 경우 DMA 방식을 사용
