데코레이터 패턴이란?
-
객체의 결합을 통해 기능을 무한하게 확장할 수 있는 패턴을 말한다.
- 만약 기본 기능에 추가할 수 있는 기능들이 많이 존재한다면, 필요한 Decorator 클래스를 정의한 후 자신의 목적에 맞게 조합해서 사용하면 된다.(예제)
-
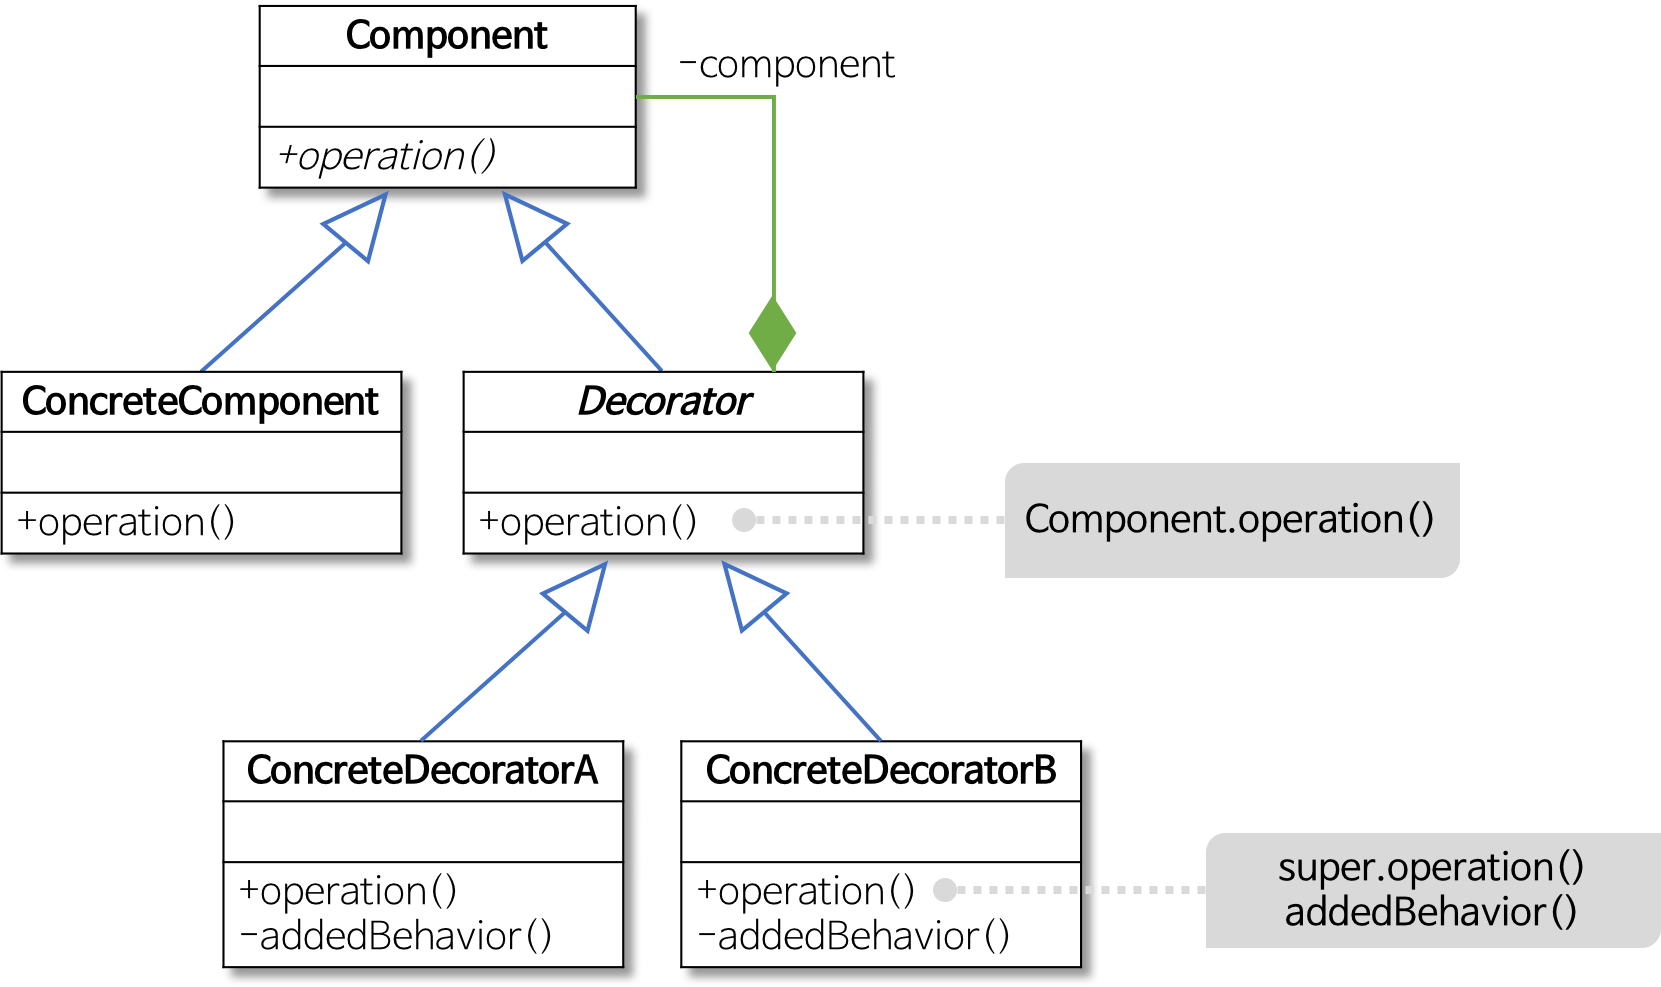
Component
- Client는 이 Component를 이용해서 실제 정의되어 있는 객체들을 실행한다.

- Client는 정의되어 있는 객체들을 알 필요가 없다. Component를 불러 하위 계층의 컴포넌트들을 차례대로 불러와 실행한다.- ConcreteComponent
- 실제 기능이 정의되어 있는 Component.- Decorator
- 존재하는 수 많은 Decorator의 공통 기능.- ConcreteComponentA,B
- Decorator의 하위 클래스로서 여러 추가 기능을 정의해서 사용할 수 있다. Go 언어 데코레이터 패턴 예제
예제의 Decorator Pattern은 사용자가 데이터를 보내면 아래의 로직으로 작동하는 코드를 만들어보겠습니다.
- Sender : Data -> Encrypt -> Zip -> DataSend
- Receiver : ReceiveData -> Unzip -> Decrypt -> Data
구조체, 메소드 구현
// 1
type Component interface {
	Operator(string)
}
// 2
var sendData string
var recvData string

// 3
type SendComponent struct {
}

func (self *SendComponent) Operator(data string) {
	// Send Data
	sendData = data
}

//4
type ZipComponent struct {
	com Component
}

func (self *ZipComponent) Operator(data string) {
	zipData, err := lzw.Write([]byte(data))
	if err != nil {
		panic(err)
	}
	self.com.Operator(string(zipData))
}

type EncryptComponent struct {
	key string
	com Component
}

func (self *EncryptComponent) Operator(data string) {
	encryptData, err := cipher.Encrypt([]byte(data), self.key)
	if err != nil {
		panic(err)
	}
	self.com.Operator(string(encryptData))
}

type DecryptComponent struct {
	key string
	com Component
}

func (self *DecryptComponent) Operator(data string) {
	decryptData, err := cipher.Decrypt([]byte(data), self.key)
	if err != nil {
		panic(err)
	}
	self.com.Operator(string(decryptData))
}

type UnZipComponent struct {
	com Component
}

func (self *UnZipComponent) Operator(data string) {
	unzipData, err := lzw.Read([]byte(data))
	if err != nil {
		panic(err)
	}
	self.com.Operator(string(unzipData))
}

type ReadComponent struct {
}

func (self *ReadComponent) Operator(data string) {
	recvData = data
}
-
사용자가 사용하고 가장 최상위에 존재할 Compent interface를 정의해 줍니다. 사용자는 . 이 interface만 알고 있으면 작동해야할 기능에 따라서 하위 Component들을 불러와 사용합니다.
-
필요한 전역변수들을 선언해줍니다. 여기선 사용자가 보내고 최종적으로 받을 데이터들을 선언해주었습니다.
-
DataSend를 구현해줍니다. DataSend는 Sender부분에서 가장 나중에 사용됩니다. 이 말은 즉, DataSend 밑에는 더 이상 불릴 하위 컴포넌특라 존재하지 않는다는 것 입니다. 따라서 참조하고 있는 하위 컴포넌트가 존재하지 않습니다.
-
이제 다른 필요한 컴포넌트들을 정의해 줍니다. ZipComponent는 이후에 다른 컴포넌트들을 실행해야 하기 때문에 하위 계층에 다른 컴포넌트를 참조하고 있습니다. 그리고 ZipComponent 구조체에 대한 메소드인 Operator를 정의합니다. 모든 압축 작업을 완료하면 다음 구조체에 결과물을 전달해줍니다.
위의 작업을 반복하여 구현에 필요한 모든 컴포넌트들과 메소드들을 정의해 줍니다.
실행
func main() {
	// EncryptComponent가 ZipComponent를 가져오고, 그것이 SendComponent를 가져온다.
	sender := &EncryptComponent{key: "abcdef", com: &ZipComponent{com: &SendComponent{}}}
	sender.Operator("Hello World")
	fmt.Println(sendData)
	// 압축해제 -> 복호화 -> 데이터
	receiver := &UnZipComponent{com: &DecryptComponent{key: "abcdef", com: &ReadComponent{}}}
	receiver.Operator(sendData)
	fmt.Println(recvData)
}
이제 만들어 놓은 작은 조각들을 필요한 기능에 맞춰서 하나로 조립합니다. 미리 설계해 놓은 sender와 receiver에 맞게 각 컴포넌트들을 순서대로 연결해 줍니다. 모두 포인터로 다음 컴포넌트를 지정해주고 필요한 인자들도 함께 넣어 줍니다. 그리고 실행하기 위해서는 Operator를 사용해 각 기능들을 불러와 실행해줍니다.
실행결과
g�&�)5�D�9�(jM�X#�@���"c�\C��[
Hello World
암호화, 압축을 거쳐 전송된 문자열과 원본 문자열 모두 확인가능합니다.