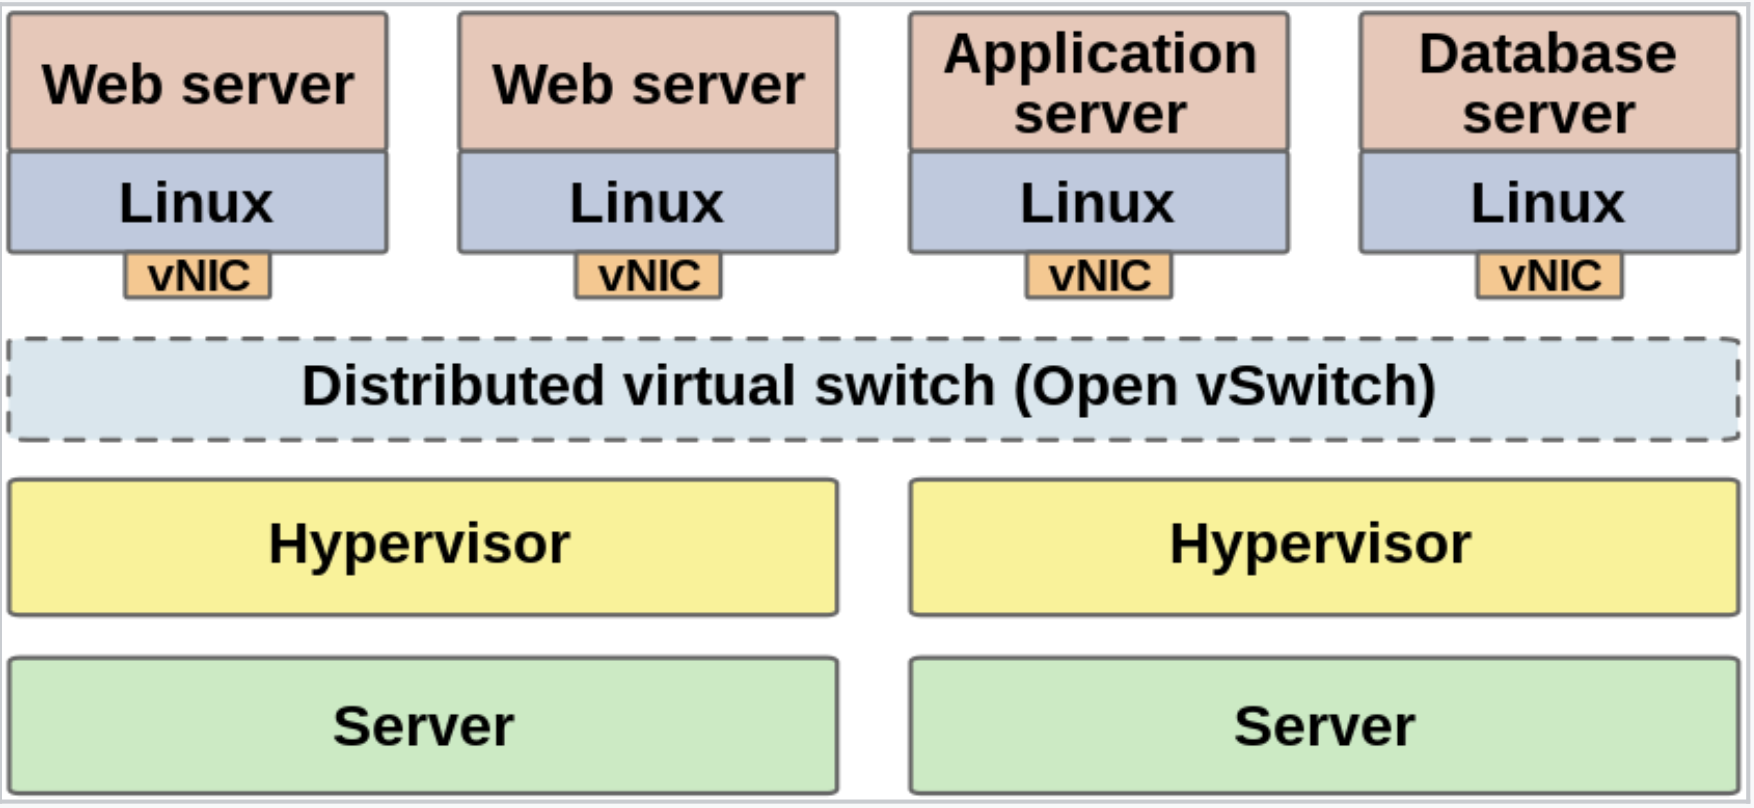
OVS(OpenvSwitch)
- 일반 리눅스 브릿지는 단순한 L2 기능만을 제공한다.
- OVS는 vlan, flow(모니터링), ACL, NAT, QoS, SDN(openflow)을 제공한다.
- OVS에서 제공하는 가장 중요한 기능 중에 하나는 gre, vxlan과 같은 터널링 기술이다. 이를 통해 물리적으로 떨어져있는 가상머신(인스턴스)들을 마치 하나의 스위치에 두고 통신시키는 것과 같은 오버레이 기술을 제공할 수 있다.
- 가상머신을 이용한 실습은 클라우드 환경에서는 적절하지 않다.
-> 사용자가 인스턴스를 생성 요청 시 필요한 디스크(볼륨) 사이즈를 지정할 수 있어야 하고, 각 인스턴습 별로 별도의 퍼블릭 키를 추가할 수 있어야 한다.
-> virt-customize, virt-builder를 이용한 인스턴스 배포

이미지 출처: https://www.fiber-optic-transceiver-module.com/ovs-vs-linux-bridge-who-is-the-winner.html
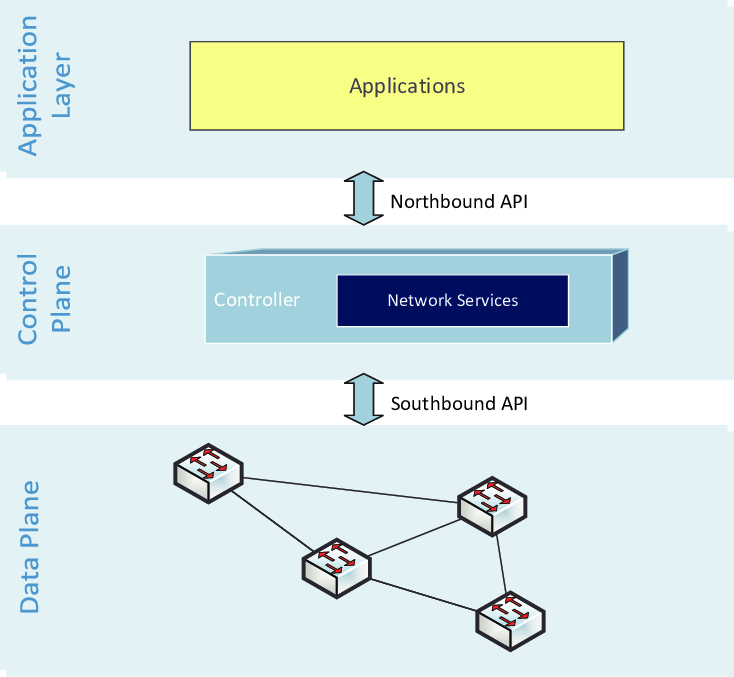
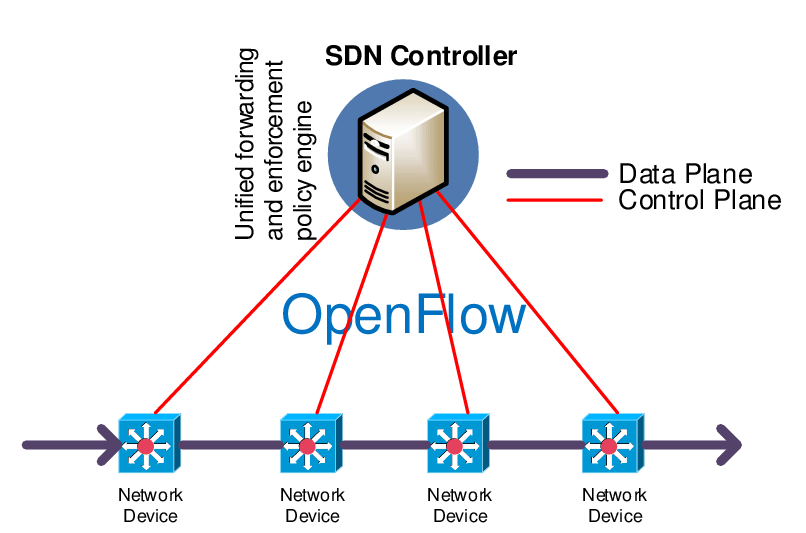
SDN(Software Defined Network)
- 일반적인 L3 스위치의 구조
- SDN은 L3 스위치에서 control plane을 제거하고 전체 control plane을 컨트롤하기 위한 controller로 연결한다. 이 controller에서 openflow를 이용하여 정책(rule)을 각각의 데이터 플레인으로 전송한다. SDN은 NFV(Network Functions Virtualization)와 사용해야 효과가 극대화된다.
- SK는 ONOS 사용

이미지 출처: https://www.researchgate.net/figure/List-of-available-SDN-controllers_tbl1_338703576
SDN 더 알아보기
- OpenFlow: HP VAN SDN Controller and Mininet integration
https://www.youtube.com/watch?v=Wjobes391eI - Basic ONOS Tutorial
https://wiki.onosproject.org/display/ONOS13/Basic+ONOS+Tutorial - OpenFlow: Enabling Innovation in Campus Networks 논문
http://ccr.sigcomm.org/online/files/p69-v38n2n-mckeown.pdf
실습
1. OVS 설치
yum -y install epel-release https://www.rdoproject.org/repos/rdo-release.rpm
yum -y install openvswitch bridge-utils
yum update -y
systemctl start openvswitch && systemctl enable openvswitch
2. 기존 linux bridge 기반의 br0 를 ovs 기반의 vswitch01 로 변경하기
vswitch01 설정
[KVM1/KVM2]
[root@kvm1 ~]# cd /etc/sysconfig/network-scripts/
[root@kvm1 network-scripts]# mv ifcfg-br0 ifcfg-vswitch01
[root@kvm1 network-scripts]# vi ifcfg-vswitch01 TYPE=OVSBridge
BOOTPROTO=none
NAME=vswitch01
DEVICE=vswitch01
DEVICETYPE=ovs
ONBOOT=yes
IPADDR=211.183.3.101
PREFIX=24
GATEWAY=211.183.3.2
DNS1=8.8.8.8TYPE, NAME, DEVICE, DEVICETYPE를 변경
eth0 설정
[root@kvm1 network-scripts]# vi ifcfg-eth0TYPE=OVSPort
BOOTPROTO=none
NAME=eth0
DEVICE=eth0
DEVICETYPE=ovs
ONBOOT=yes
OVS_BRIDGE=vswitch01TYPE, DEVICETYPE, OVS_BRIDGE를 변경
vswitch01 설정 확인
[root@kvm1 ~]# ifconfig vswitch01
vswitch01: flags=4163<UP,BROADCAST,RUNNING,MULTICAST>  mtu 1500
        inet 211.183.3.101  netmask 255.255.255.0  broadcast 211.183.3.255
        inet6 fe80::c4f1:6eff:fe93:5e46  prefixlen 64  scopeid 0x20<link>
        ether 00:0c:29:93:ac:3d  txqueuelen 1000  (Ethernet)
        RX packets 199  bytes 15899 (15.5 KiB)
        RX errors 0  dropped 0  overruns 0  frame 0
        TX packets 148  bytes 18965 (18.5 KiB)
        TX errors 0  dropped 0 overruns 0  carrier 0  collisions 0
vswitch01에 ip주소가 할당되었다.
ovs 설정 확인
[root@kvm1 ~]# ovs-vsctl show
17cd6709-4b17-474e-8fd4-c8f668139677
    Bridge "vswitch01"
        Port "vswitch01"
            Interface "vswitch01"
                type: internal
        Port "eth0"
            Interface "eth0"
    ovs_version: "2.12.0"
[root@kvm1 ~]#
3. 내부에서 사설용으로 사용하는 OVS 스위치 생성하기
[KVM1/KVM2]
[root@kvm1 ~]# ovs-vsctl add-br vswitch024. 인스턴스 생성하기
[KVM1]
[root@kvm1 ~]# virt-install \
> --name centos01 \
> --vcpus 1 \
> --ram 1024 \
> --disk /remote/centos01.qcow2 \
> --import \
> --network bridge:vswitch01,model=virtio,virtualport_type=openvswitch \
> --network bridge:vswitch02,model=virtio,virtualport_type=openvswitch,target=centos01_port1 \
> --graphics vnc \
> --noautoconsole
WARNING  No operating system detected, VM performance may suffer. Specify an OS with --os-variant for optimal results.

Starting install...
Domain creation completed.
target: vswitch02는 centos01과 연결되는데, vswitch02에서 연결되는 포트의 이름을 centos1_port1로 할 것임. 추후에 이 포트에 vlan을 할당할 것임.
[KVM2]
[root@kvm2 ~]# virt-install \
--name centos02 \
--vcpus 1 \
--ram 1024 \
--disk /remote/centos02.qcow2 \
--import \
--network  bridge:vswitch01,model=virtio,virtualport_type=openvswitch \
--network bridge:vswitch02,model=virtio,virtualport_type=openvswitch,target=centos02_port1 \
--graphics vnc \
--noautoconsole
virtual machine manager에서 인스턴스(centos01, centos02) 생성 확인 후 접속하기
만약 로그인이 되지 않고 멈춘다면 5.X대로 커널 업데이트 하기
yum 을 이용한 커널 업데이트 -> https://nirsa.tistory.com/64
rpm --import https://www.elrepo.org/RPM-GPG-KEY-elrepo.org
rpm -Uvh http://www.elrepo.org/elrepo-release-7.0-2.el7.elrepo.noarch.rpm
yum --disablerepo="*" --enablerepo="elrepo-kernel" list available
yum --enablerepo=elrepo-kernel install kernel-ml
재부팅 후 5.X대 커널 선택
5. centos01 / centos02 에서 eth1 에 IP주소 입력하기
        -----vswtich02---------[172.16.123.0/24]
                 |
                 | eth1  <--- .101
             centos01
                 | eth0
                 |
        -----vswitch01---------[211.183.3.0/24]
[centos01/centos02]
cd /etc/sysconfig/network-scripts
cp ifcfg-ens3 ifcfg-eth1
vi ifcfg-eth1TYPE=Ethernet
NAME=eth1
DEVICE=eth1
IPADDR=172.16.123.101
PREFIX=24
ONBOOT=yescentos01은 주소 .101로 설정
centos02는 주소 .102로 설정
이후,
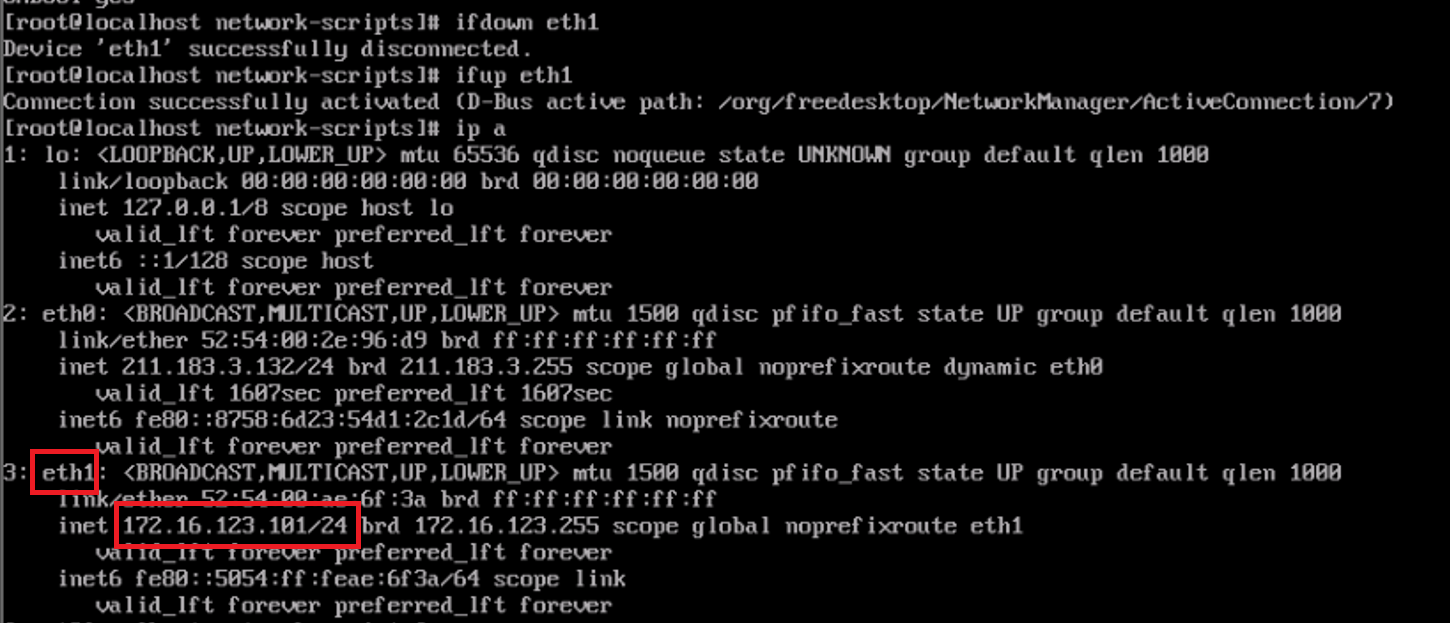
ifdown eth1
ifup eth1
ip a
eth1 에 ip 주소가 보여야 함
6. overlay 구성하기
vswitch02 <-(gre12)--- tunnel ---(gre21)-> vswitch01
[KVM1-centos1]
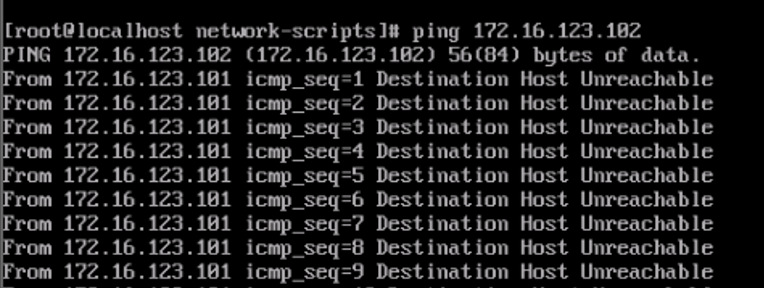
centos02로 ping 보내기
ping 172.16.123.102 지금은 터널이 없기 때문에 안 됨
[KVM1]
[root@kvm1 ~]# ovs-vsctl add-port vswitch02 gre12 \
> -- set interface gre12 type=gre options:remote_ip=211.183.3.102
vswitch02에 포트를 만듦
remote_ip는 centos2의 ip(.102)
[KVM2]
[root@kvm2 ~]# ovs-vsctl add-port vswitch02 gre21 \
> -- set interface gre21 type=gre options:remote_ip=211.183.3.101
vswitch02에 포트를 만듦
remote_ip는 centos1의 ip(.101)
터널 연결 확인
[KVM1-centos1]
centos02로 ping 보내기
ping 211.183.3.102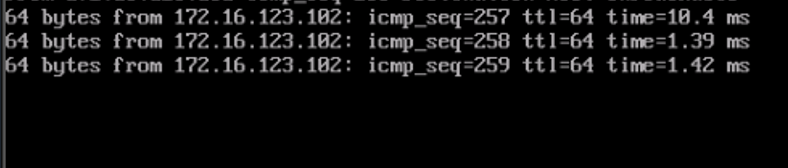
[KVM1-centos2]
centos01로 ping 보내기
ping 211.183.3.101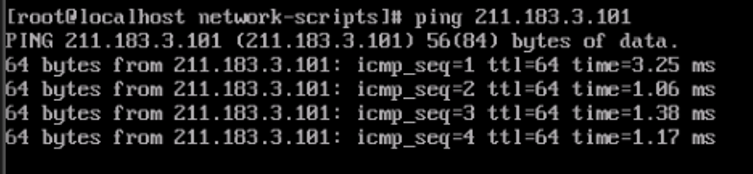
포트 확인
[KVM1]
[root@kvm1 ~]# ovs-vsctl show
17cd6709-4b17-474e-8fd4-c8f668139677
    Bridge "vswitch02"
        Port "vswitch02"
            Interface "vswitch02"
                type: internal
        Port "gre12"
            Interface "gre12"
                type: gre
                options: {remote_ip="211.183.3.102"}
        Port "centos01_port1"
            Interface "centos01_port1"
    Bridge "vswitch01"
        Port "vnet0"
            Interface "vnet0"
        Port "vswitch01"
            Interface "vswitch01"
                type: internal
        Port "eth0"
            Interface "eth0"
    ovs_version: "2.12.0"
centos01_port1가 있음
[KVM2]
[root@kvm2 ~]# ovs-vsctl show
fad52c82-5092-48d0-94da-19cb2e5f6b09
    Bridge "vswitch01"
        Port "vswitch01"
            Interface "vswitch01"
                type: internal
        Port "eth0"
            Interface "eth0"
        Port "vnet0"
            Interface "vnet0"
    Bridge "vswitch02"
        Port "gre21"
            Interface "gre21"
                type: gre
                options: {remote_ip="211.183.3.101"}
        Port "centos02_port1"
            Interface "centos02_port1"
        Port "vswitch02"
            Interface "vswitch02"
                type: internal
    ovs_version: "2.12.0"
centos02_port1이 있음
태그 설정(802.1q)
1) 태그 다르게 설정
[KVM1]
[root@kvm1 ~]# ovs-vsctl set port centos01_port1 tag=123centos01_port1의 태그를 123으로 지정
[KVM2]
[root@kvm2 ~]# ovs-vsctl set port centos02_port1 tag=12centos02_port1의 태그를 12로 지정
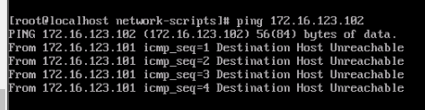
[KVM1-centos01]
centos02로 ping 보내기
ping 211.183.3.102vlan의 태그를 다르게 했으므로 통신 안 됨
2) 태그 같게 설정
[KVM2]
[root@kvm2 ~]# ovs-vsctl set port centos02_port1 tag=123centos02_port1의 태그를 centos01_port1과 같은 123로 설정
[KVM1-centos01]
centos02로 ping 보내기
ping 211.183.3.102vlan의 태그를 같게 했으므로 통신 됨

vlan의 단점
- vlan ID는 12비트로, 0부터 4095까지이다.
- 따라서 4094개까지 생성할 수 있다.
- 이러한 제한된 확장성을 극복하기 위해 VXLAN을 이용할 수 있다.
https://m.blog.naver.com/PostView.naver?isHttpsRedirect=true&blogId=goduck2&logNo=220221579284
virt-customize와 virt-builder를 이용한 인스턴스 배포
인스턴스 또는 VM을 만드는 방법
1. iso 파일을 이용한 설치
2. 클라우드 환경에서는 사용자별 필요한 볼륨의 사이즈, computing 자원 뿐만 아니라 필요한 key-pair 등을 설치 시 즉시 제공할 수 있어야 한다.
볼륨 사이즈 지정 + 웹서버 배포 + index.html 베포
virt-customize는 볼륨 사이즈에 대한 조절은 없다. virt-builder는 virt-customize의 기능과 virt-resize의 기능이 포함되어있어 원하는 크기의 볼륨 지정 및 패스워드, 패키지 설치 등이 가능하다.
virt-builder
[root@kvm1 ~]# virt-builder -l
opensuse-13.1            x86_64     openSUSE 13.1
opensuse-13.2            x86_64     openSUSE 13.2
opensuse-42.1            x86_64     openSUSE Leap 42.1
opensuse-tumbleweed      x86_64     openSUSE Tumbleweed
alma-8.5                 x86_64     AlmaLinux 8.5
centos-6                 x86_64     CentOS 6.6
centos-7.0               x86_64     CentOS 7.0
centos-7.1               x86_64     CentOS 7.1
...[root@kvm1 ~]# virt-builder centos-7.0 \
> --size 20G \
> --format qcow2 \
> -o /remote/test1.qcow2 \
> --root-password password:test123 \
> --install httpd,net-tools \
> --selinux-relabel
[ 14.2] Downloading: http://builder.libguestfs.org/centos-7.0.xz
[ 15.1] Planning how to build this image
[ 15.1] Uncompressing
[ 29.5] Resizing (using virt-resize) to expand the disk to 20.0G
[ 71.4] Opening the new disk
[ 80.0] Setting a random seed
[ 80.1] Setting the machine ID in /etc/machine-id
[ 80.1] Installing packages: httpd net-tools
[ 106.5] Setting passwords
[ 108.4] SELinux relabelling
[ 118.3] Finishing off
Output file: /remote/test1.qcow2
Output size: 20.0G
Output format: qcow2
Total usable space: 18.5G
Free space: 17.6G (94%)virt-builder :
- 인터넷에 있는 클라우드 이미지 다운로드하기 -> centos-7.0 클라우드 이미지(볼륨)
- virt-resize 기능이 포함되어 있어. 클라우드 이미지(볼륨)사이즈를 확장할 수 있다. --size 20G
" 클라우드용 볼륨 이미지를 20GB 로 확장시킴" -> 볼륨의 이름은 "test1.qcow2"
--root-password password:test123 -> 볼륨내에 설치되어 있는 centos 의 루트패스워드를 test123 으로 설정하겠다.
--install -> 볼륨내에 미리 필요한 패키지를 설치해 두겠다.
--install httpd,net-tools => (yum -y install httpd net-tools)
--selinux-relabel: selinux를 활성화하여 로그인창으로 넘어갈 수 있게 됨
인스턴스 생성
[root@kvm1 ~]# virt-install \
> --name test1 \
> --vcpus 1 \
> --ram 1024 \
> --network bridge:vswitch01,model=virtio,virtualport_type=openvswitch \
> --disk /remote/test1.qcow2 \
> --import \
> --graphics none
noautoconsole 옵션을 안 주었기 때문에 명령어 실행 후 바로 해당 인스턴스의 콘솔로 접속됨
virt-builder 옵션
https://libguestfs.org/virt-builder.1.html
--upload: 로컬 파일을 인스턴스에 업로드
--install: 볼륨 자체에 필요한 패키지를 설치하는 것
--firstboot-install: virt-install을 통해 인스턴스로 배포될 때 처음 부팅하면서 설치할 페키지
--run '스크립트파일': 스크립트 파일 -> 호스트에 스크립트를 작성해두고 이 내용을 볼륨에 적용하는 것
--runcommand '명령어': 명령어 -> 한 개 정도의 간단한 명령어를 볼륨에 적용하고자 하는 경우
--firstboot-command '명령어': 명령어 -> 인스턴스로 처음 부팅될 때 인스턴스 내에서 실행할 명령어
--mkdir DIR: 볼륨 내에 미리 필요한 디렉토리를 생성해 두고 싶을 때
--selinux-relabel: selinux 활성화
quiz. 나는 생성된 이미지가 인스턴스화 될 때 자동으로 웹서비스가 실행되도록 하고 싶다.
방법 1)
--install httpd --run-command 'systemctl enable httpd'run command -> enable
방법 2)
--install httpd --firstboot-command 'systemctl start httpd'firstboot-command -> start
quiz.
1. 로컬(kvm1 또는 kvm2)에 index.html 파일을 간단히 만드세요
[KVM1]
[root@kvm1 ~]# echo "<center><h2>DEFAULT WEG PAGE</h2></center>" > index.html- test2.qcow2를 생성하되, 20GB이고 미리 httpd를 설치해두세요.
- 로컬에 있는 index.html 파일을 웹서버의 기본 홈 디렉토리로 이동시키세요
- 웹서버는 인스턴스로 실행과 동시에 동작해야 하며 외부에서 해당 IP 주소로 접속했을 때 웹페이지가 보여야 합니다.
- 루트의 패스워드는 test123으로 해주세요.
virt-builder centos-7.0 \
--size 20G \
--format qcow2 \
-o /remote/test1.qcow2 \
--root-password password:test123 \
--install httpd,net-tools \
--upload index.html:/var/www/html/index.html \
--run-command 'systemctl enable httpd' \
--run-command 'systemctl disable firewalld' \
--selinux-relabel
virt-install \
--name test1 \
--vcpus 1 \
--ram 1024 \
--network bridge:vswitch01,model=virtio,virtualport_type=openvswitch \
--disk /remote/test1.qcow2 \
--import \
--graphics none [KVM1-test1]
ip주소 확인
[root@localhost ~]# ifconfig eth0
eth0: flags=4163<UP,BROADCAST,RUNNING,MULTICAST>  mtu 1500
        inet 211.183.3.136  netmask 255.255.255.0  broadcast 211.183.3.255
        inet6 fe80::5054:ff:fef9:dc6b  prefixlen 64  scopeid 0x20<link>
        ether 52:54:00:f9:dc:6b  txqueuelen 1000  (Ethernet)
        RX packets 60  bytes 8761 (8.5 KiB)
        RX errors 0  dropped 0  overruns 0  frame 0
        TX packets 35  bytes 5678 (5.5 KiB)
        TX errors 0  dropped 0 overruns 0  carrier 0  collisions 0
윈도우에서 해당 ip로 접속

현재 eth0은 dhcp 방식으로 ip를 할당해준다.
[root@localhost ~]# cd /etc/sysconfig/network-scripts/
[root@localhost network-scripts]# cat ifcfg-eth0
# Generated by dracut initrd
DEVICE="eth0"
ONBOOT=yes
NETBOOT=yes
UUID="05aa7060-4f43-416b-a9d0-5bfceb397193"
IPV6INIT=yes
BOOTPROTO=dhcp
TYPE=Ethernet
NAME="eth0"
인스턴스를 생성한 뒤 eth0 인터페이스를 수정해 ip를 고정할 수 있다.
quiz. 우리는 위의 실습과제를 그대로 반영한 인스턴스를 추가로 하나 더 만든다.
단 아래의 조건을 만족해야 한다.
1. IP 주소는 211.183.3.222 를 사용해야 한다.
2. kvm1 또는 kvm2 의 ~/.ssh/authorized_keys 에 있는 퍼블릭 키를 가상머신에도 입력하여
kvm1 에 있는 사설키를 통해 가상머신에 접근할 수 있어야 한다!!!
3. --root-password 는 적용하지 않는다. 개인키로 kvm1 에서 접속할 수 있어야 한다.