전반적 흐름
- Google Cloud Console 설정
- Calendar API 활성화
- OAuth 동의 화면 설정
- OAuth Client Id(Desktop) 발급 & credentials.json 다운
- 브라우저 기반 OAuth 흐름 실행
tokens/폴더에 Access/Refresh Token 저장- Google Calendar API 호출
1. Google Cloud Console 설정
- 프로젝트 생성 or 선택
1. API 활성화
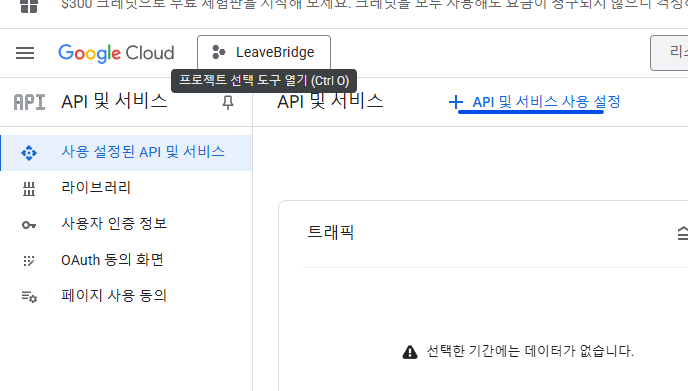
- API 및 서비스 -> 사용 설정된 API 및 서비스
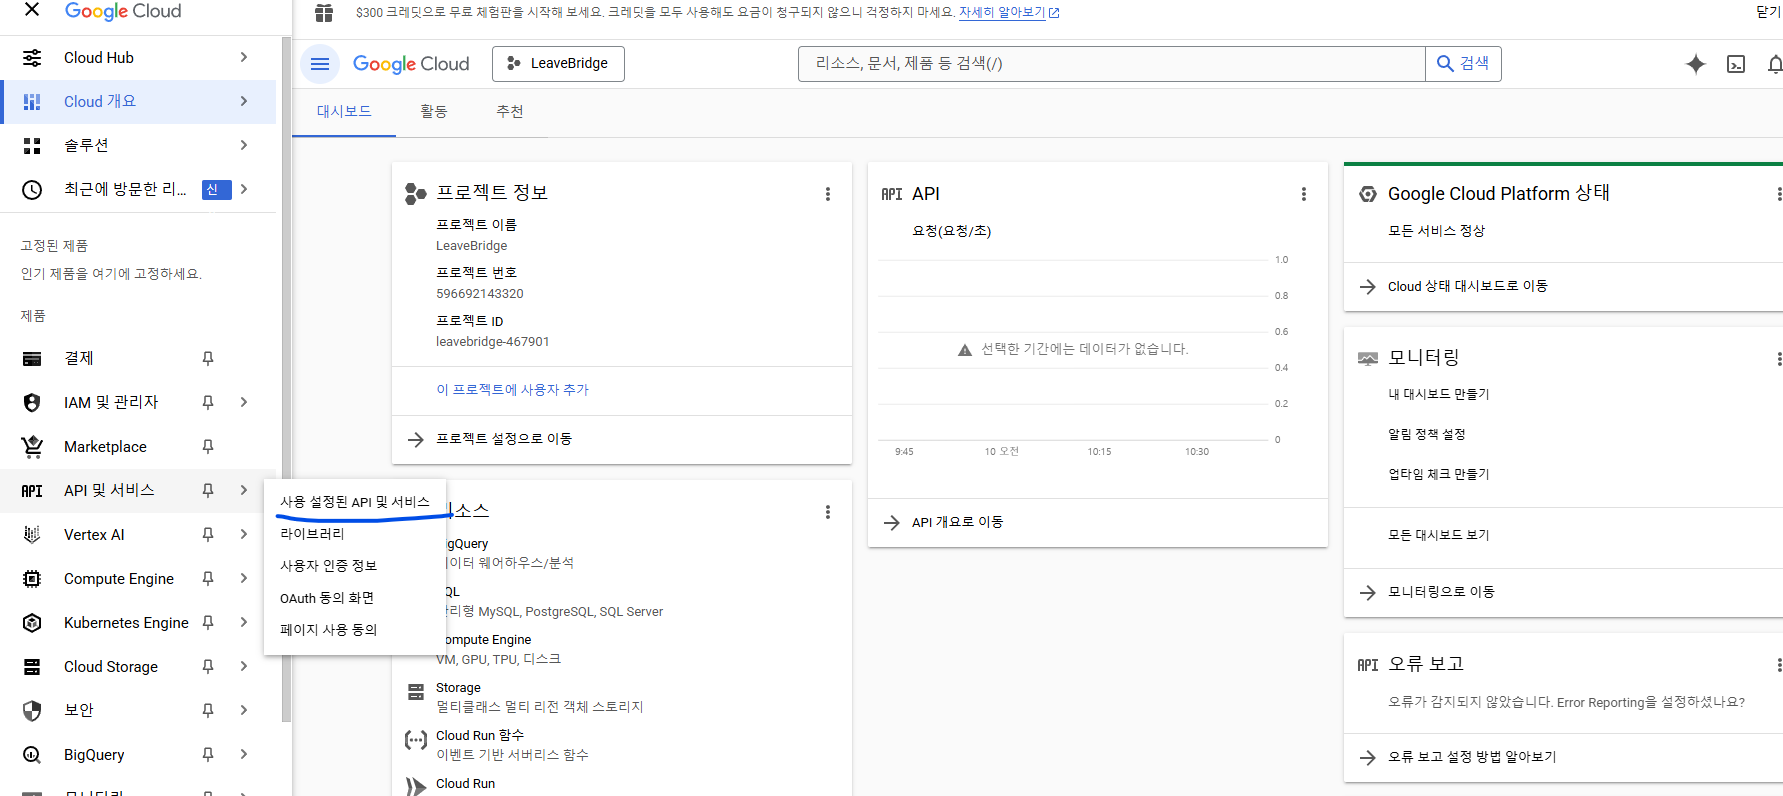
- API 및 서비스 사용 설정
- 검색창에
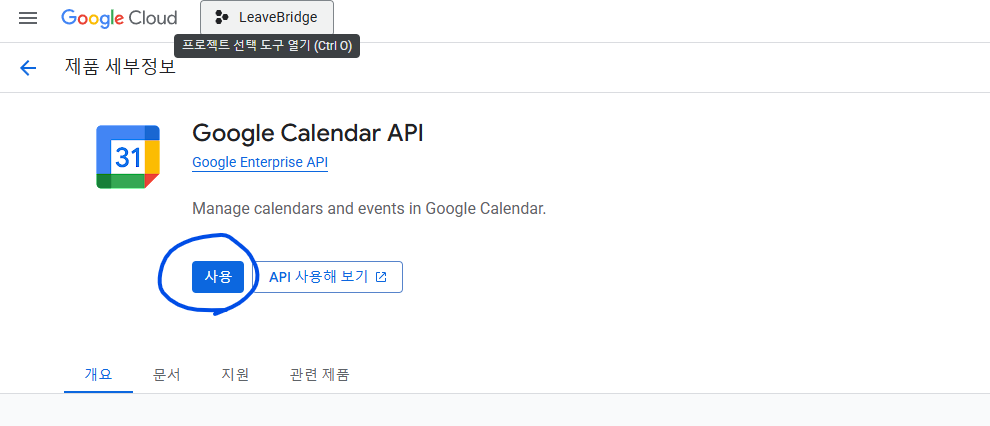
Google Calendar API->사용버튼
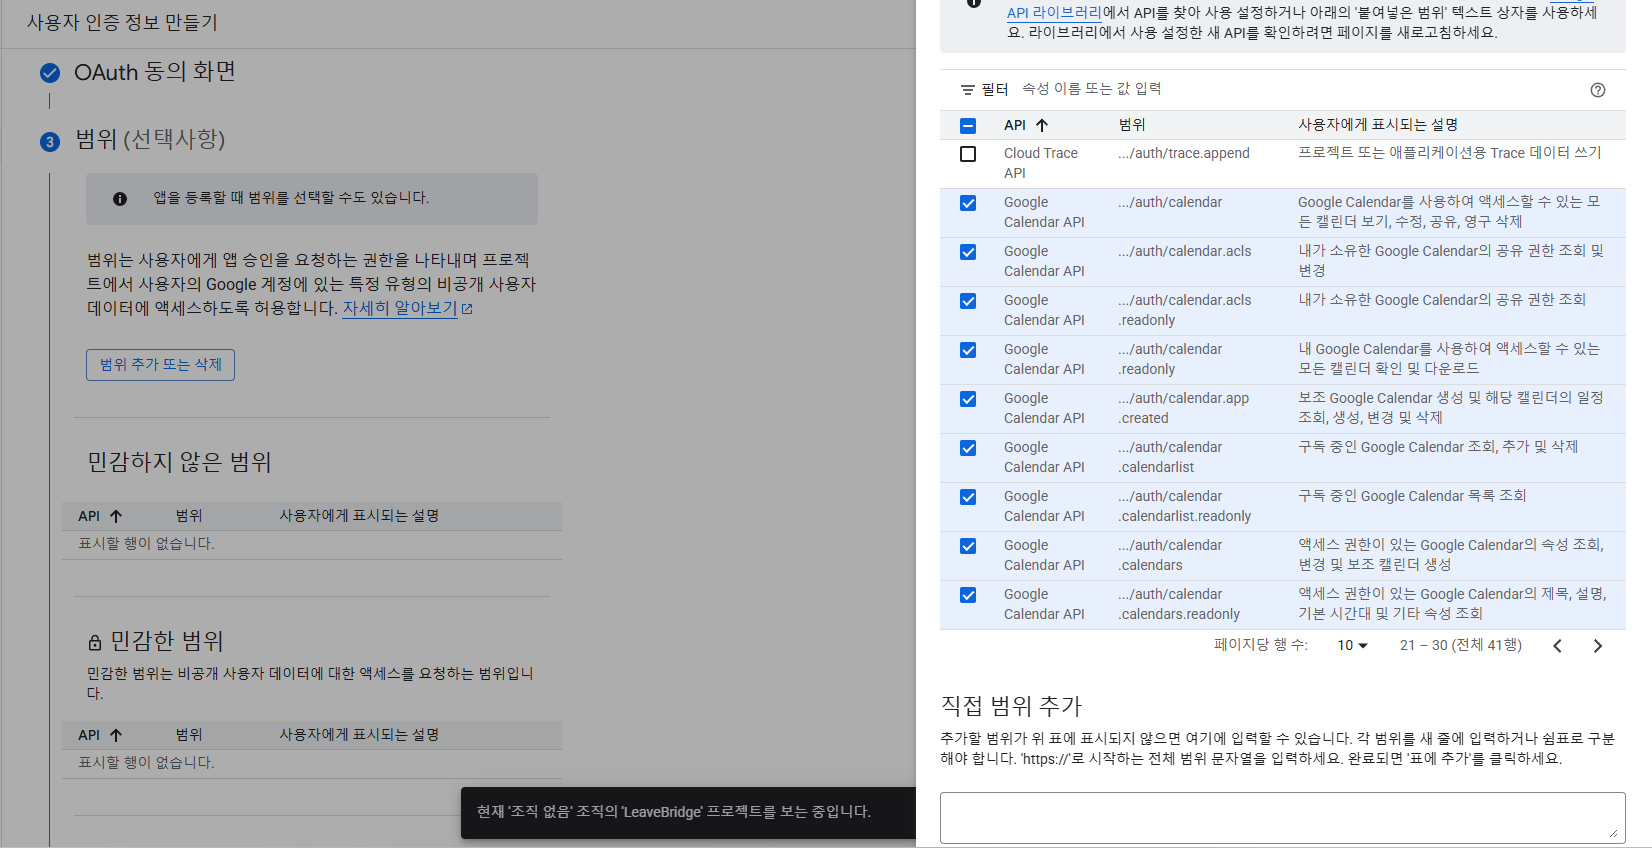
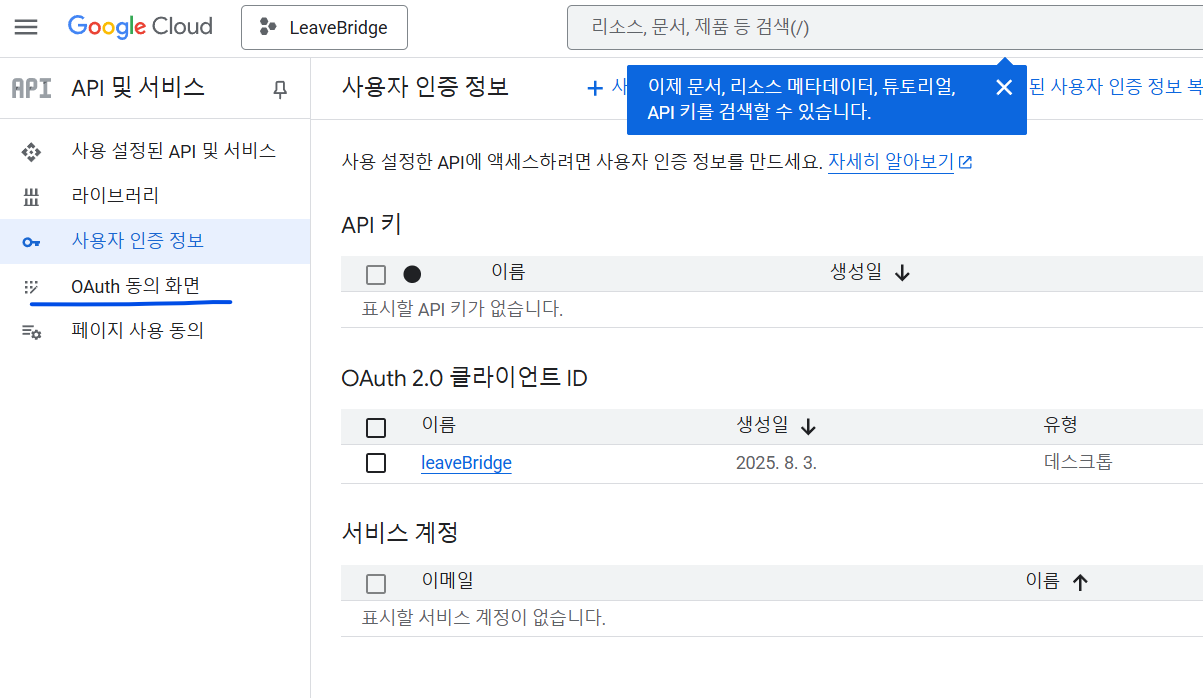
2. 사용자 인증 정보 등록

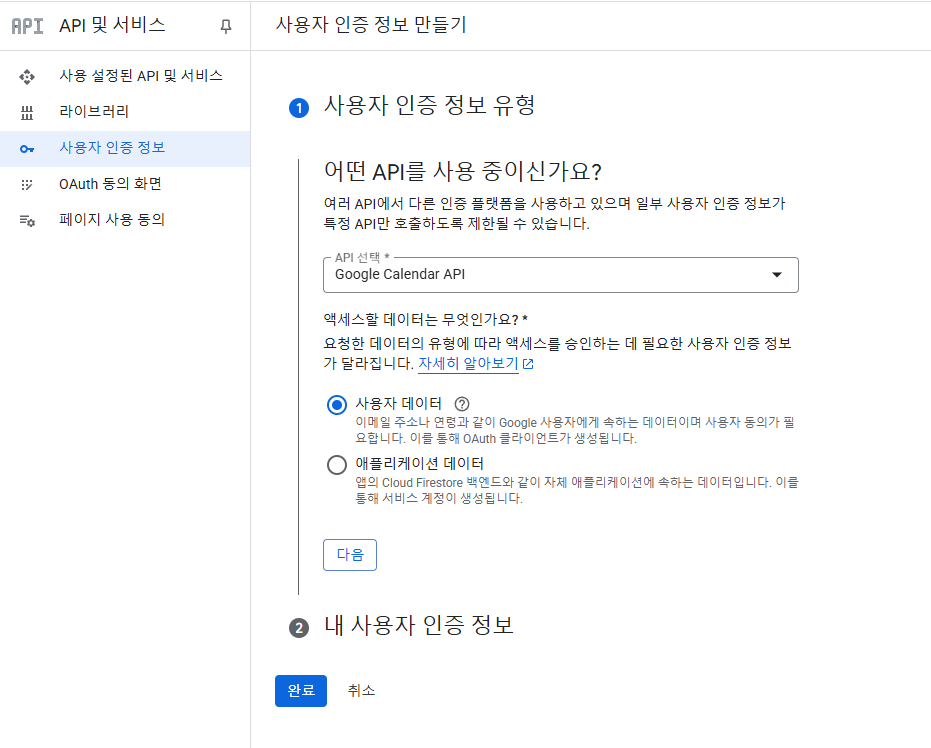
- 범위 : Google Calendar 전부 선택
- 다음 페이지에도 있으나 캡처 생략
- 하단 저장 후 계속 클릭
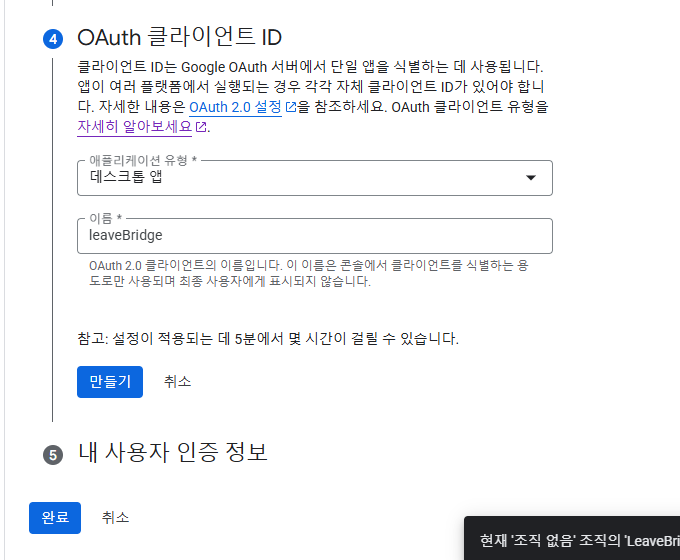
OAuth Client ID 유형 설정
-
OAuth Client ID 유형
-
Web application: Spring Boot + Spring Security OAuth2 Client, SPA 등 서버가 있는 웹. -
Desktop app: LocalServerReceiver 등 로컬 실행 전용- Redirect URI는 loopback URI만 허용
- ex) localhost
-
-
왜 Desktop app을 선택했나?
- 사용자 단일(내 계정 1개) & 검수 불필요
- 개인용이므로 실사용자가 100명을 넘지 않아 Google OAuth 브랜드·보안 검증이 면제됩니다.
- 하나의 Google 계정으로 캘린더 일정을 관리하는 시나리오라 충분합니다.
- 개발 속도를 최우선
- 별도 도메인·HTTPS·Redirect URI 배포 설정이 필요 없습니다.
- Spring Security OAuth2 Client,
/login/oauth2/code/*엔드포인트 등 추가 설정이 없어도 곧바로 토큰 발급 예제가 동작합니다.
- 다중 사용자/웹 로그인 필요 시에는 Web application을 선택
- 예: 사용자마다 Google 로그인 후 자신의 캘린더를 연동해야 하는 서비스라면
Web application플로우가 필수입니다.
- 예: 사용자마다 Google 로그인 후 자신의 캘린더를 연동해야 하는 서비스라면
- 사용자 단일(내 계정 1개) & 검수 불필요
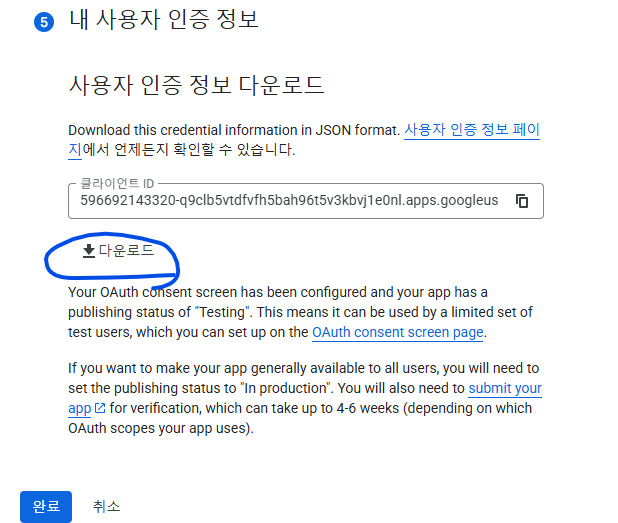
내 사용자 인증 정보
- 다운로드 받음
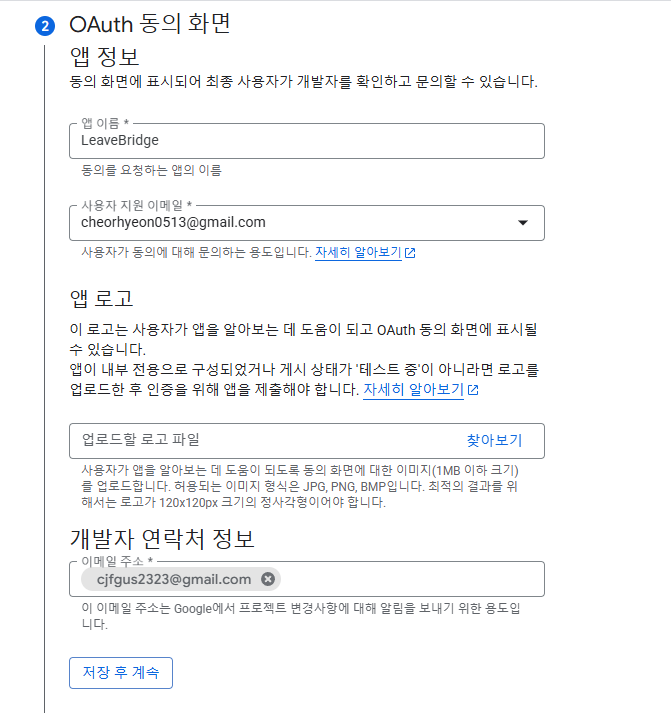
3. OAuth 동의 화면 설정
- 대상 메뉴 클릭 -> 앱 게시 클릭 -> 확인
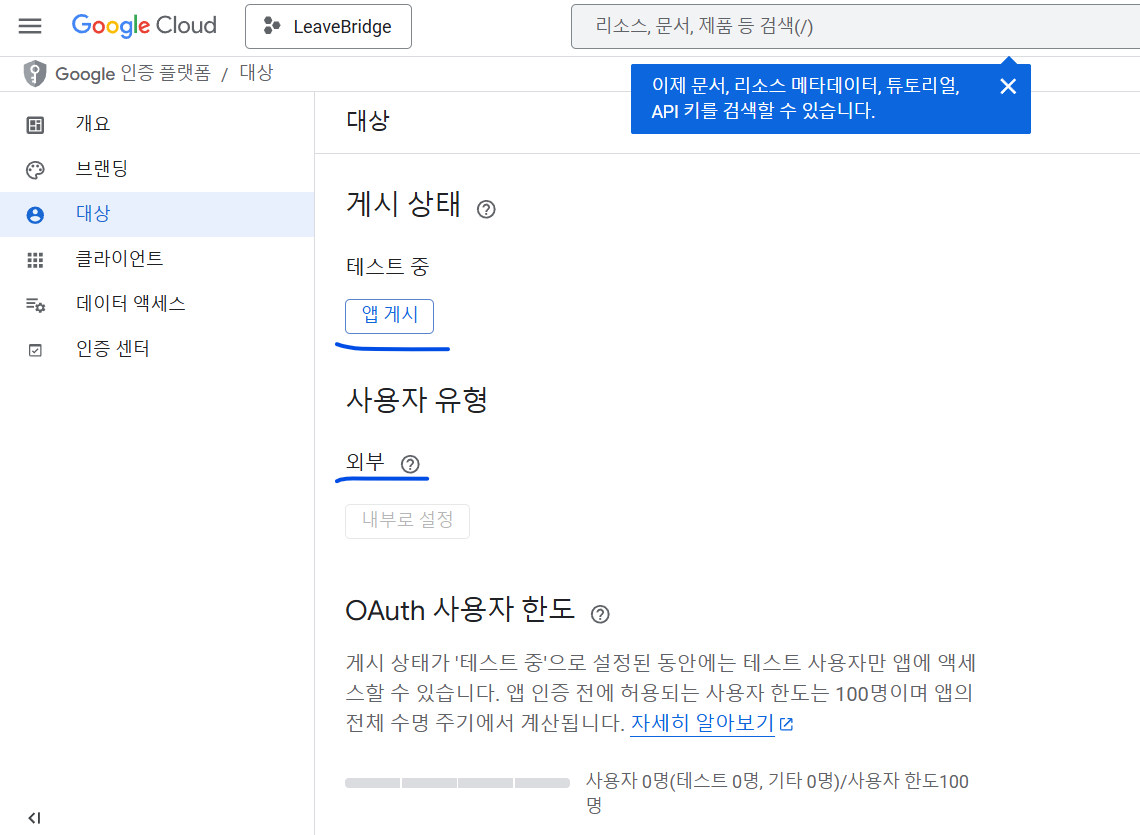
- 인증을 진행하면 100명을 넘긴 사용자까지 가능하지만 제가 만든 프로젝트 적용할때는 제 개인 계정 1개만 필요하여 인증하지 않겠습니다.
2. IntelliJ 실행
- intelliJ 프로젝트 열기 -> 파일 넣기
- 파일명 변경하여 넣었습니다. 코드에서 읽는 파일명 정해두었기 때문
private static final String CREDENTIALS_PATH = "/credentials.json";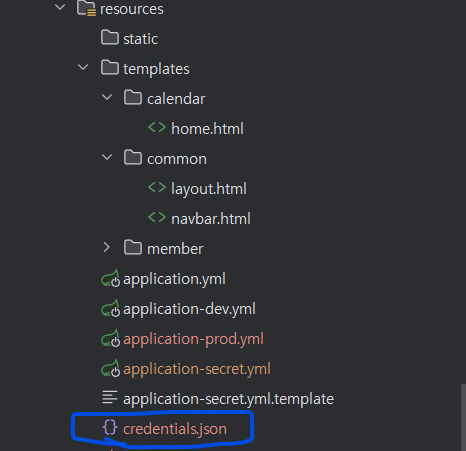
의존성 추가
    implementation("com.google.api-client:google-api-client:2.8.0")
    implementation 'com.google.oauth-client:google-oauth-client-jetty:1.34.1'
    implementation 'com.google.apis:google-api-services-calendar:v3-rev20250404-2.0.0'
예시 코드
@Configuration
public class GoogleCalendarConfig {
	private static final String APPLICATION_NAME = "LeaveBridge";
	private static final JsonFactory JSON_FACTORY = GsonFactory.getDefaultInstance();
	private static final String TOKENS_DIR = "tokens";
	private static final List<String> SCOPES = Collections.singletonList(CalendarScopes.CALENDAR);
	private static final String CREDENTIALS_PATH = "/credentials.json";

	@Bean
	public Calendar calendarClient() throws Exception {
		// 1) HTTP transport 생성
		final NetHttpTransport httpTransport = GoogleNetHttpTransport.newTrustedTransport();

		// 2) credentials.json 로드
		InputStream in = getClass().getResourceAsStream(CREDENTIALS_PATH);
		GoogleClientSecrets clientSecrets = GoogleClientSecrets.load(
			JSON_FACTORY, new InputStreamReader(in));

		// 3) OAuth 흐름 구성
		GoogleAuthorizationCodeFlow flow = new GoogleAuthorizationCodeFlow.Builder(
			httpTransport, JSON_FACTORY, clientSecrets, SCOPES)
			.setDataStoreFactory(new FileDataStoreFactory(new java.io.File(TOKENS_DIR)))
			.setAccessType("offline")
			.build();

		// 4) 로컬 서버로 인증 코드 수신
		LocalServerReceiver receiver = new LocalServerReceiver.Builder()
			.setPort(8888)
			.build();

		// 5) 사용자 인증 및 Credential 생성
		Credential credential = new AuthorizationCodeInstalledApp(flow, receiver)
			.authorize("user");

		// 6) Calendar 클라이언트 빌드 - 사용자가 소유하거나 구독중인 캘린더
		return new Calendar.Builder(httpTransport, JSON_FACTORY, credential)
			.setApplicationName(APPLICATION_NAME)
			.build();
	}
}
상수들
| 상수 | 한-줄 개념 | 초심자 포인트 |
|---|---|---|
APPLICATION_NAME | 구글 API 대시보드에 찍힐 클라이언트 이름 | 아무 문자열이지만, 나중에 사용량 그래프에서 이 이름으로 집계됩니다. |
JSON_FACTORY | JSON 직렬화/역직렬화를 담당 | GsonFactory 외에 JacksonFactory 등 교체 가능 |
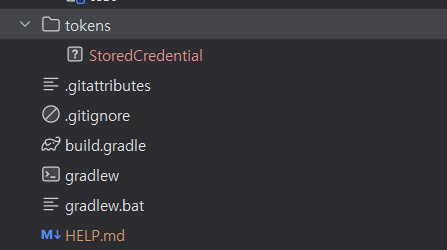
TOKENS_DIR | Access·Refresh Token 파일을 저장할 로컬 폴더 | .gitignore 등록 필수! |
SCOPES | 앱이 요청할 권한 범위 | CALENDAR 는 읽기·쓰기 모두 포함. 읽기 전용은 CalendarScopes.CALENDAR_READONLY |
CREDENTIALS_PATH | OAuth Client ID/Secret 이 담긴 JSON(다운로드 파일) 경로 | resources/ 아래에 두고 classpath: 로 불러옴 |
HTTP Transport 생성
NetHttpTransport httpTransport = GoogleNetHttpTransport.newTrustedTransport();- TLS(HTTPS) 설정이 이미 끝나 있는 구글 공식 HTTP 클라이언트 생성
- 네트워크 연결 준비 완료 단계
credentials.json 로드
InputStream in = getClass().getResourceAsStream(CREDENTIALS_PATH);

GoogleClientSecrets clientSecrets = GoogleClientSecrets.load(JSON_FACTORY, new InputStreamReader(in));- Json 파일을 읽어
Client Id,Secret,Redirect Uri등 메모리 객체로 변환
OAuth 흐름(Authorization Code Flow) 설정
GoogleAuthorizationCodeFlow flow = new GoogleAuthorizationCodeFlow.Builder(
        httpTransport, JSON_FACTORY, clientSecrets, SCOPES)
    .setDataStoreFactory(new FileDataStoreFactory(new File(TOKENS_DIR)))
    .setAccessType("offline")
.build();| 세부 설정 | 의미 |
|---|---|
SCOPES | 캘린더 접근 권한 요구 |
FileDataStoreFactory | 토큰 파일을 tokens/ 폴더에 자동 저장·갱신 |
setAccessType("offline") | Refresh Token 도 달라고 요청 → 한 번 로그인 후 재인증 없이 장기간 사용 가능 |
online ve offline ??
| 값 | 의미 | 언제 사용? |
|---|---|---|
"online" | Refresh Token 없음. 사용자가 브라우저 앞에 있을 때만 API 호출(Access Token) 가능 | 짧은 세션·배치 필요 없을 때 |
"offline" | Refresh Token 포함. 토큰이 만료돼도 앱이 백그라운드에서 새 Access Token을 자동 교환 | 데스크톱·서버·배치 작업처럼 “재로그인 없이 장기간” 동작해야 할 때 |
null (생략) | 타입에 따라 기본값 자동 적용 • 웹 클라이언트: "online"• Installed/데스크톱 클라이언트: "offline" | 특별한 이유가 없으면 그대로 두어도 무방 |
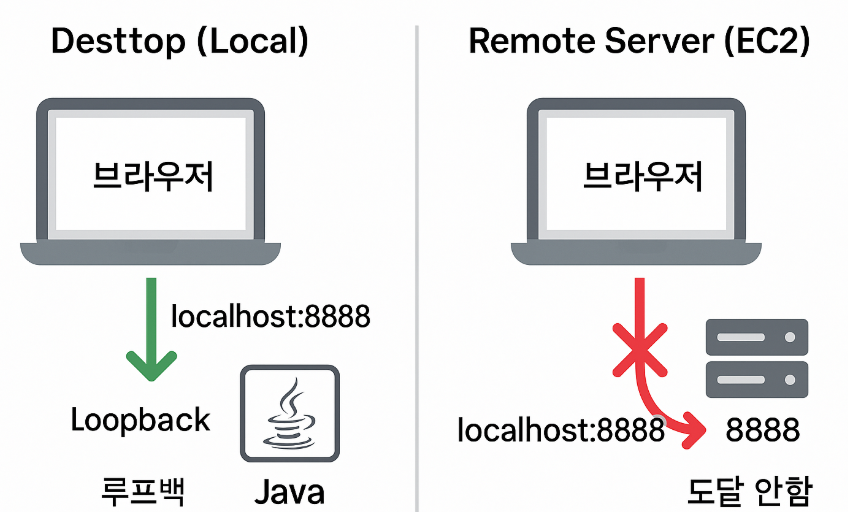
LocalServerReceiver (8888 포트) 준비
LocalServerReceiver receiver = new LocalServerReceiver.Builder()
    .setPort(8888)
.build();- 브라우저가 로그인 후 http://localhost:8888/...?code=xxx 로 리다이렉트하면, 이 임시 서버가 코드를 받아 3단계 flow 에 전달합니다.
- 이 방식은 내 PC에서 실행을 전제로 합니다.
- EC2 같은 원격 서버로 배포할 땐 Web-Server Flow 로 바꿔야 합니다.
사용자 로그인, 토큰 수령
Credential credential = new AuthorizationCodeInstalledApp(flow, receiver)
.authorize("user");- 처음 실행 시 브라우저가 열려 Google 로그인 → 사용자 동의 → 코드 수신 → Access+Refresh Token 저장(tokens/).
- 이후부터는 저장된 토큰을 재사용하므로 브라우저가 다시 뜨지 않습니다.
Calendar 서비스 객체 생성
return new Calendar.Builder(httpTransport, JSON_FACTORY, credential)
    .setApplicationName(APPLICATION_NAME)
.build();- Bean으로 등록, 이후 의존성 주입받아 이벤트 API 호출 가능
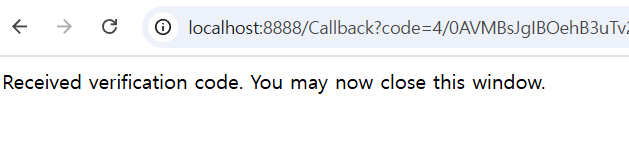
앱을 실행하여 Access Token 발급

- 콘솔에 로그인 링크 생김
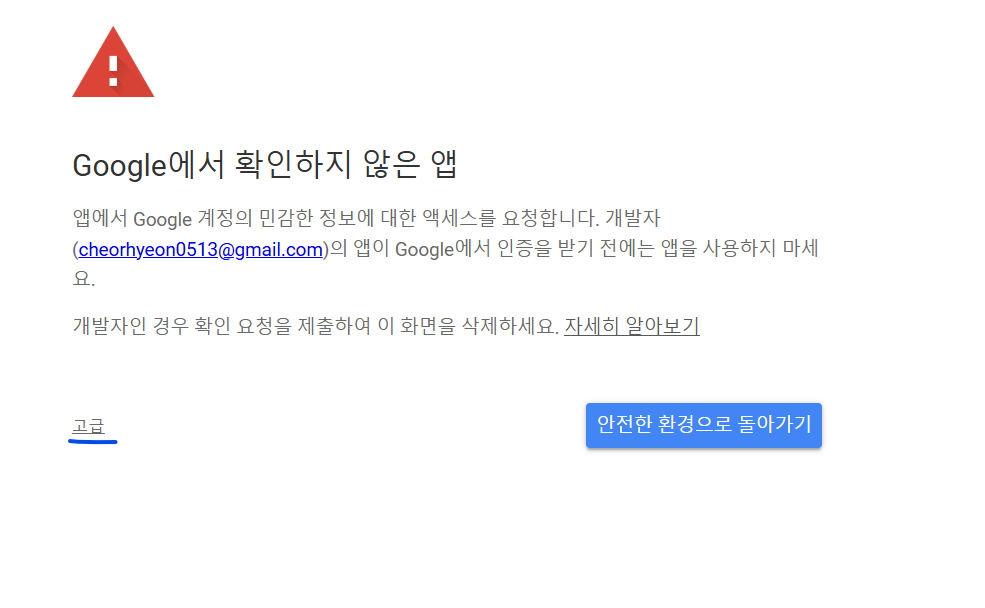
- 로그인 후 고급 -> 허용
- 앱을 게시 하고 인증을 받지 않았기 때문
-
위 메시지가 뜨고 Access Token이 발행되었다면 성공
-
이제 이걸 EC2 등 배포한 서버에 옮겨주면 재인증 없이도 사용 가능
발행받은 토큰을 배포 서버에 직접 넣어줘야 하는 이유?
- 인증 유형을
Desktop으로 설정해서localhost(127.0.0.1)로만 redirect uri 가능 LocalServerReceiver클래스는 이 정책에 맞춰8888port에서만 대기- EC2 배포 상태에서 포트를 열어도, 브라우저가
http://localhost:8888/...로 이동하면 사용자 PC로 향함 - EC2의 8888 포트로는 전혀 닿지 않음
- EC2 배포 상태에서 포트를 열어도, 브라우저가
Desk top인증 흐름은 브라우저와 인증 서버 코드가 같은 컴퓨터에 있을 때만 작동- 서버에서 직접 인증 받기 위해서는
Web application유형으로 변경 - redirect Uri를 서버 도메인으로 등록하는 방식 필요
- 서버에서 직접 인증 받기 위해서는
- 반드시 github에 올라가지 않도록!!
API 호출 샘플
- Calendar Bean 주입 받음
- 메소드 호출로 API 호출
깃허브 - GoogleCalendarAPIService.java
Google Workspace API 인증 및 승인
- Google Cloud 프로젝트 및 앱 구성: Google Cloud 콘솔에 앱을 등록하여 API 키, 최종 사용자 사용자 인증 정보 또는 서비스 계정 사용자 인증 정보로 앱을 인증하기 위한 승인 범위와 액세스 사용자 인증 정보 정의
- 액세스 권한을 위해 앱 인증: 앱이 실행되면 등록된 액세스 사용자 인증 정보가 평가됩니다. 앱이 최종 사용자로 인증하는 경우 로그인 프롬프트가 표시될 수 있습니다.
3, 리소스 요청: 앱에서 Google 리소스에 액세스해야 하는 경우 이전에 등록한 관련 액세스 범위를 사용하여 Google에 요청합니다.
- 사용자 동의 요청: 앱이 최종 사용자로 인증되는 경우 사용자가 요청된 데이터에 대한 앱 액세스 권한을 부여할지 결정할 수 있도록 Google에서 OAuth 동의 화면을 표시합니다.
- 승인된 리소스 요청 전송: 사용자가 액세스 범위에 동의하면 앱은 사용자 승인 액세스 범위와 사용자 인증 정보를 요청에 번들로 묶습니다. 액세스 토큰을 획득하기 위해 요청이 Google 승인 서버로 전송됩니다.
- Google에서 액세스 토큰을 반환합니다. 액세스 토큰에는 부여된 액세스 범위 목록이 포함됩니다. 반환된 범위 목록이 요청된 액세스 범위보다 제한적인 경우 앱은 토큰으로 제한된 기능을 사용 중지합니다.
- 요청된 리소스에 액세스: 앱은 Google의 액세스 토큰을 사용하여 관련 API를 호출하고 리소스에 액세스합니다.
- 갱신 토큰 가져오기 (선택사항): 앱이 단일 액세스 토큰의 수명을 초과하여 Google API에 액세스해야 하는 경우 갱신 토큰을 가져올 수 있습니다.
- 추가 리소스 요청: 추가 액세스가 필요한 경우 앱에서 사용자에게 새 액세스 범위를 부여하도록 요청하여 액세스 토큰을 가져오는 새 요청이 발생합니다 (3~6단계).
- 위 과정 중 8, 9번 제외한 모두 위에서 구현했습니다.
회고
Web application유형으로 redirect uri를 직접 지정해서 소셜 로그인은 구현해본 경험이 있어도,desktop으로 단독 유형은 처음 경험- 덕분에 둘의 차이를 명확히 알 수 있었다.
- 조만간 구글 로그인 다시 해보면서 redirect url도 해봐야지..ㅎ
추천 자료
- OAuth 과정 및 개념에 대해 보고 싶다면 아래 포스팅 참고하세요~!
[영상후기] WEB2-OAuth

비슷한 어려움을 겪는 누군가에게 도움이 되길