
0. Introduction & 1. Setup
설치되어 있어야하는 것
- node.js
- npm(node.js 설치시 자동으로 설치된다)
- npx
- git
강의 선수 지식
- HTML, CSS (div, span, flexbox, display, block, ...)
- JavaScript (function, return, argument, variable, constants, class, ...)
📌 CRA(create-react-app)
리액트만으로는 어플리케이션이 동작할 수 없다. 브라우저에서 코드를 이해할 수 있게 webpack, babel 등의 여러 환경 설정이 필요하다. 이 환경을 구성하는 과정이 좀 복잡하다. 그런데
create-react-app을 이용하면 리액트 웹 앱 환경설정을 알아서 해결해준다.
📌 React의 동작방식
- React는 자바스크립트로 element를 만들어 이를 HTML안에 넣는 역할을 담당한다.
- 소스코드에 처음부터 HTML을 넣지 않고 HTML에서 HTML을 추가하거나 제거하는 방식으로 동작한다. 처음 어플리케이션을 로드할 때는 빈 HTML을 로드하게 되고, 그런 다음에 리액트가 HTML(우리가 컴포넌트에 작성해뒀던 것들)을 밀어넣게된다.
- 컴포넌트를 작성해도 앱을 실행했을 때
소스보기에서는 해당 컴포넌트의 내용이 보이지 않는다.(id가 "root"인 div만 보임) 이렇게 보이지 않기 때문에 가상돔(Virtual DOM) 이라고한다. 이게 리액트가 빠른 이유이다.
# create-react-app 파일구조

public/
	favicon.ico 탭의 아이콘
	manifest.json PWA 관련 작업(이 수업에선 다루지 않을 것)

src/
2. JSX & Props
2.0 Creating your first React Component
- 리액트의 핵심은 Component(컴포넌트)이다. 리액트는 컴포넌트를 가져와서 브라우저가 이해할 수 있는 HTML을 만드는 방식으로 동작한다.
- 컴포넌트에
react를 import 해주어야(import React from 'react';) 리액트가 JSX가 있는 컴포넌트를 인식할 수 있다. -> (변경된 사항) 새로운 버전의 CRA에서는 이렇게 import를 해주지 않아도 동작하도록 바뀌었다. - 리액트 어플리케이션은 한번에 하나의 컴포넌트만을 렌더링(rendering) 할 수 있다. -> (변경된 사항) 리액트 업데이트로
ReactDOM.render에 여러 컴포넌트를 넣어도 된다.
📌 Component(컴포넌트)
Component(컴포넌트)란 HTML을 반환하는 함수이다. 예를들어
<App />는 HTML이 아니라 컴포넌트이다. 이렇게 JavaScript와 HTML이 조합된 것을 JSX라고 한다.컴포넌트명은 대문자로 시작해야한다.
2.1 Resuable Components with JSX + Props
- JSX와 props를 사용하면 컴포넌트에 정보를 보낼 수 있다. (컴포넌트->컴포넌트, 부모 컴포넌트->자식 컴포넌트)
- 컴포넌트에 property name과 value를 명시하면 된다. 그럼 리액트는 그 속성들을 가져와 해당 컴포넌트의 인자(argument)로 넘겨주려는 정보들을 넣는다.
- Destructuring Assignment 문법(ES6)을 사용하면 보다 간편하게 props를 넘겨주고 이를 쉽게 사용할 수 있다. ex)
props.fav대신fav사용 가능 - 이렇게 JSX와 props를 통해 리액트에서 재사용가능한 컴포넌트를 만들 수 있다.
function Food(props){
  console.log(props.fav);
	//...
}

function App(){
	return (
		<Food fav="taco" something={true}/>
	)
}

// 혹은 컴포넌트에서 props를 받을 때 Destructuring Assignment 사용
function Food({fav, something}){
	console.log(fav, something);
  // ...
}
2.2 Dynamic Component Generation & 2.3 map Recap
웹사이트에 동적 데이터를 추가하는 방법
김밥, 돈까스, 떡볶이, ... 등 여러 Food를 추가할 때마다 Food 컴포넌트를 복붙(copy&paste)하는 것은 번거롭다. 또한 웹사이트에서는 미리 정해진 데이터를 컴포넌트로 추가하는게 아니라 동적으로 데이터를 추가해야하는 상황이 발생한다. 웹사이트에 동적 데이터를 추가하는 방법 알아보자.
API로 받은 데이터가 있다고 상상해보자.(자바스크립트 객체형태로된 아이템들이 여러 개 들어있는 배열)
JavaScript의 map()을 사용하면 쉽게 구현할 수 있다.
map을 이용해 API로 받은 배열(데이터)를 돌면서 Food 컴포넌트에 담아 배열로 리턴해보자.
📌
map()
map()은 배열의 각각의 아이템에 인자로 전달한 함수를 적용한 후, 그 결과를 새로운 배열로 리턴하는 메서드이다.
🚨 [에러] Warning: Each child in a list should have a unique "key" prop.
동적 데이터를
map()으로 돌려가며 여러 개의 컴포넌트를 만들었을 때, 위와 같은 에러를 만나게 될 것이다. 이는 리액트의 element가 유일해야하는데, 리스트로 넣어질 경우 유일성을 잃어버려서 발생하는 에러이다. element의 내용이 다른걸 우리가 알아도 고유한 key값이 없으면 리액트는 그게 서로 다른 컴포넌트인지 알 수 없다.해결방법: 데이터에 고유 id를 이용하던지 해서, 컴포넌트의
key로 고유값을 넘겨주자. (key prop은 리액트 내부에서 사용하기 위한 것으로 넘겨주기만하고 사용하진 않아도 된다.)리액트에서는 같아보이는 element들을 구별하기 위해 key가 필요하다는 것을 잊지말자 ⭐
기타 정리
- JSX에선 중괄호
{}안에 작성하면 JavaScript이다. 그냥 쓰면 text- [에러]
imgelement는altproperty가 반드시 있어야 하므로 추가해주자. (시각장애인들을 위한것)
2.4 Protection with PropTypes
prop을 넘길 때, prop이 적절하게 들어온건지 확인하는 것도 필요하다.(값이 안 들어오거나 적절하지 않거나 등을 판단하기 위함) 이를 위해 PropTypes를 사용한다.
$ npm install prop-types- 타입(숫자, 문자열, Boolean, ... 등등) 체크 가능
- 들어와야하는 prop명이 없는 경우도 걸러낼 수 있음
- 값이 있는지 없는지 체크 가능
isRequired를 쓰면 꼭 받아야하는 prop임을 나타낸다. 필수적이지 않은 prop이라면isRequired생략 가능- 꼭
propTypes를 사용해서 prop type을 정의해야한다. ex) Food 컴포넌트의 prop type에 대해 명시하는 예를 생각해보자.Food.propTypes = {...}로 작성해야한다.Food.newTypes와 같이 이름을 바꿔 사용할 수 없다.
PropTypes를 어떻게 작성해야하는지는 다음 링크를 참고: PropTypes와 함께 하는 타입 검사 - React
3. State
3.0 Class Components and State
Class Component를 사용하여 State를 다뤄보자.
📌 State
Component의 데이터를 넣는 공간. 이 State는 변한다. 즉 변하는 데이터를 다루기 위해 State를 사용한다. 또한 객체(Object)이다.
- Class Component는 React Component를 상속하도록 작성했다.(
render등의 기능을 받기 위함) - React에서
button에는onClick이라는 속성이 기본적으로 있다. (자바스크립트였으면 onclick이나 addeventlistener를 등록해야했을 것) - 함수에
()를 붙이면 함수를 즉시 실행(호출)하는 것이므로, 이벤트 리스너에서는 함수 뒤에()를 붙이지 않아야 한다. 그래야 이벤트가 발생했을 때만 함수가 호출된다.
💡 Class Component(클래스형 컴포넌트) vs Functional Component(함수형 컴포넌트)
Class Component는
render를 사용해 화면에 HTML을 뿌리고(React는 자동적으로 모든 클래스 컴포넌트의render를 실행한다), Functional Component는 함수이기에return문을 이용해 화면에 HTML을 뿌린다.[참고] 요즘엔 Class Component보다 Functional Component를 많이 사용한다. (
useState()) Functional Component도 React Hook을 이용해서 State를 다룰 수 있다.
3.1 All you need to know about State
- state는
setState를 통해서만 변경해야 한다. 그렇지 않고 state를 직접 변경할 경우 제대로 동작하지 않는다.(why? 이 경우renderfunction이 다시 호출되지 않기 때문이다.) - ⭐
setState를 호출할 때마다 React는 새로운 state와 함께renderfunction을 호출한다. - 이렇게
render를 다시 호출하긴 하지만 React는 가상 돔(Virtual DOM) 을 이용해 변화가 생긴 부분만 업데이트한다. 그래서 동작이 빠르고 화면이 깜빡거리지도 않는다는 장점이 있다.
💡 State를 직접 참조하는 것은 좋지 않다.
State를 직접 참조하는 경우 ex)
this.setState({ count: this.state.count + 1 });
setState는 비동기로 처리된다.setState작업 도중에 다른 곳에서this.state.count값이 변경되는 상황을 생각해보자. 그러면this.state.count값은 바뀔 것이고 이 코드는 우리가 원하는대로 동작하지 않을 수 있다.- 즉, 외부의 상태(state)에 의존적인 것이 문제이다.
해결 방법 ex)
this.setState(current => ({count: current.count + 1}));
- 이렇게
setState에 콜백함수를 사용하면 딱 '현재'의 state를(current에 받아) 확실하게 사용할 수 있다는 장점이 있다. State를 직접 참조했을 때의 문제점을 해결할 수 있는 것이다. 현재 상태를 받아오면서도 외부의 상태(state)에 의존하지 않는 방법이다.
💡 State 관련 코드가 두 번 실행되는 이유
Strict Mode 때문이다. 버그가 아니라 의도된 기능이다. 이 기능은 사이드 이펙트를 발견할 수 있도록 도와준다. 더 자세히 알아보기
3.2 Component Life Cycle
📌 Component Life Cycle
React.Component에는render말고도 많은 기능들이 있다.- Life cycle method가 있는데 이건 리액트가 컴포넌트를 생성하고, 없애는 방법을 의미한다.
- 컴포넌트가 생성될 때,
render이전, 이후에 호출되는 몇가지 function들이 있다. 컴포넌트가 업데이트될 때 호출되는 function들도 있다. 대표적으로 Mounting, Updating, Unmounting이 있다.
Mounting
"태어나는 것"
constructor: 리액트가 아닌 자바스크립트 기능이다.(클래스를 만들 때 호출된다)render보다 먼저 실행된다. 컴포넌트가 mount될 때, 스크린에 표시될 때, 우리의 웹사이트에 갈 때constructor가 호출된다.
아래 코드를 보면 constructor의 'hello'가 render의 console.log보다 먼저 출력되는 것을 알 수 있다.
import React from 'react';

class App extends React.Component {
  constructor(props) {
    super(props);
    console.log('hello');
  }

  //...

  render() {
    console.log('render');
    return (
      <div>
        <h1>Welcome</h1>
      </div>
    );
  }
}

export default App;
static getDerivedStateFromProps()render()componentDidMount(): 이 컴포넌트가 처음 render 됐을 때 발생한다.
아래 코드의 결과로 im rendering가 먼저 출력되고 그 다음 component rendered가 출력될 것이다.
import React from 'react';

class App extends React.Component {

  //...

  componentdidMount(){
  	console.log('component rendered');
  }

  render() {
    console.log('im rendering');
    return (
      <div>
        <h1>Welcome</h1>
      </div>
    );
  }
}

export default App;
Updating
말그대로 업데이트. state를 변경할 때, 그게 업데이트이다. 컴포넌트가 업데이트될 때 호출되는 많은 function들이 있다.
getDerivedStateFromProps()shouldComponentUpdate(): 업데이트를 할지말지 결정하는 것과 관련된 function인데 자세히 배우진 않을 것이다.setState를 할 때마다 발생한다.render(): 그리고 위 과정이 수행되면render()도 호출된다.componentDidUpdate(): 업데이트 됐는지를 알려준다. (업데이트가 완료되면 호출되는 것이다.)
아래 코드에서 Add와 Minus 버튼으로 state를 변경하게 되면, 업데이트가 되어 render()와 componentDidUpdate()가 차례로 수행된다.
import React from 'react';

class App extends React.Component {
  state = {
    count: 0,
  };

  add = () => {
    this.setState((current) => ({ count: current.count + 1 }));
  };

  minus = () => {
    this.setState((current) => ({ count: current.count - 1 }));
  };

  componentDidMount() {
    console.log('component rendered');
  }

  componentDidUpdate() {
    console.log('I just updated');
  }

  render() {
    console.log('im rendering');
    return (
      <div>
        <h1>The number is {this.state.count}</h1>
        <button onClick={this.add}>Add</button>
        <button onClick={this.minus}>Minus</button>
      </div>
    );
  }
}

export default App;
Unmounting
컴포넌트가 죽는 것. (컴포넌트가 죽는데엔 여러가지 방법이 있다. 페이지가 바뀌거나, state를 사용해 컴포넌트가 교체되는 경우거나, ... 등등등)
componentWillUnmout(): 컴포넌트가 죽을 때 호출된다.
3.3 Planning the Movie Component
우리의 어플리케이션은 mount되자마자(생겨나자마자)는 로딩되고 있는 상태라고 말할 수 있다. state에 isLoading의 값을 true로 작성해놓자.
여기서 퀴즈! 우리가 처음 render를 하면 호출되는 Life Cycle Method는 무엇일까? 정답은 componentDidMount()이다.
아래 코드를 보자. 위에서 정한대로, 최초에 isLoading의 값은 true이다. 최초로 render가 실행된 후에 componentDidMount()가 실행되는데, 이때 setTimeout과 setState를 사용하여 4초 후에 isLoading의 값을 false로 바꾸기로 한다. 실행시켜보면 처음엔 화면에 Loading...가 뜨다가 4초 후에 We are ready로 바뀌는 것을 볼 수 있다.
(삼항 연산자와 setTimeout은 리액트가 아닌 자바스크립트의 기능이다.)
import React from 'react';

class App extends React.Component {
  state = {
    isLoading: true,
  };

  componentDidMount() {
    setTimeout(() => {
      this.setState({ isLoading: false });
    }, 4000);
  }

  render() {
    const { isLoading } = this.state;
    return <div>{isLoading ? 'Loading...' : 'We are ready'}</div>;
  }
}

export default App;
이론적으로 우리가 구현할 것은 다음과 같다.
componentDidMount에서 데이터를 fetch 한다.- 그 다음, API로 부터 데이터 fetching이 완료되면,
map()을 사용해 movie들을render한다.
4. Making the Movie App
4.0 Fetching Movies from API
- 자바스크립트에서 데이터를 fetch하는 방법에는 크게 fetch와 axios가 있다. 우리는 axios를 사용할 것이다.
- 우리가 사용할 API는 YTS에서 제공하는 API인데 YTS API의 주소가 매번 바뀌기 때문에 우리는
https://yts-proxy.now.sh이라는 URL뒤에 YTS에 나와있는/list_movies.json와 같이 endpoint의 일부분을 붙여서 API요청을 할 것이다. - YTS API
- yts-proxy - 노마드코더
📌 axios
npm install axios로 설치
componentDidMount 안에 axios 요청을 넣어보자. axios는 시간이 좀 걸리기 때문에 우리는 componentDidMount 함수가 끝날 때까지 시간이 약간 걸릴 수 있다는 걸 알려줘야한다. (이걸 기다려야한다는 말이다.) async와 await을 이용해 axios가 끝날 때까지 기다리도록 한다.
아래 코드의 과정 살펴보기: 어플리케이션이 render된다. 처음에는 isLoading이 true이다. 그래서 화면에 Loading을 볼 수 있을 것임. 이렇게 mount가 되면 componentDidMount에서 getMovies가 호출된다. getMovies는 axios를 사용하고, axios는 완료되기까지 시간이 조금 필요하기 때문에 await을 사용했다.(그렇지 않으면 자바스크립트는 axios를 기다리지 않을 것이다.) await은 async를 사용해야 쓸 수 있다.
import React from 'react';
import axios from 'axios';

class App extends React.Component {
  state = {
    isLoading: true,
    movies: [],
  };

  getMovies = async () => {
    const movies = await axios.get('https://yts-proxy.now.sh/list_movies.json');
  };

  componentDidMount() {
    this.getMovies();
  }

  render() {
    const { isLoading } = this.state;
    return <div>{isLoading ? 'Loading...' : 'We are ready'}</div>;
  }
}

export default App;
🤔 constructor에서가 아닌
componentDidMount에서 데이터를 받아오는 이유
constructor는 Class가 생성될 때 실행된다. 이때 데이터를 가져오게 되면 리액트가 아직 로드되지 않은 상태이다. 리액트가 로드될 때까지 기다렸다가 데이터를 가져와야하기 때문에 componentDidMount`에서 데이터를 받아오는 것이 적절하다.(만약 DOM이 생성되기 이전부터 데이터를 받아오고싶다면 리액트가 아닌 SSR을 사용해야한다.)
4.1 Rendering the Movies
API 요청 결과

우리에게 필요한 정보는, API로 받은 데이터 안에, data 안에, data 안에, movies이다.
getMovies = async () => {
    const movies = await axios.get('https://yts-proxy.now.sh/list_movies.json');
    console.log(movies.data.data.movies); // 뭔가 코드가 좀 지저분하다 🤔
  };

// 위 방법 대신 아래 방법을 사용하자.(ES6)
getMovies = async () => {
    const {
      data: {
        data: { movies },
      },
    } = await axios.get('https://yts-proxy.now.sh/list_movies.json');
    console.log(movies);
  };
API로 받아온 movies 정보를 setState를 이용해서 state에 저장해보자. + axios 요청이 완료되면 isLoading이 false값이 되게하였다.
import React from 'react';
import axios from 'axios';

class App extends React.Component {
  state = {
    isLoading: true,
    movies: [],
  };

  getMovies = async () => {
    const {
      data: {
        data: { movies },
      },
    } = await axios.get('https://yts-proxy.now.sh/list_movies.json');

    // this.setState({movies: movies});
    this.setState({ movies, isLoading: false }); // 위 코드는 이처럼 축약할 수 있다.(ES6)
  };

  componentDidMount() {
    this.getMovies();
  }

  render() {
    const { isLoading } = this.state;
    return <div>{isLoading ? 'Loading...' : 'We are ready'}</div>;
  }
}

export default App;
지금은 API 요청이 완료되면 We are ready가 화면에 출력된다. 그러나 API 요청이 완료되고나서 우리가 실제로 해야할 일은 movies를 렌더하는 것이다. 코드를 추가해보자.
Movie.js 파일을 생성하자. Movie 컴포넌트는 state를 필요로 하지 않기 때문에 클래스 컴포넌트로 만들 필요는 없다. 함수형 컴포넌트로 만들어보자.
// 📁 Movie.js
import React from 'react';
import PropTypes from 'prop-types';

function Movie({ id, year, title, summary, poster }) {
  return <h5>{title}</h5>;
}

Movie.propTypes = {
  id: PropTypes.number.isRequired,
  year: PropTypes.number.isRequired,
  title: PropTypes.string.isRequired,
  summary: PropTypes.string.isRequired,
  poster: PropTypes.string.isRequired,
};

export default Movie;
// 📁 App.js
import React from 'react';
import axios from 'axios';
import Movie from './Movie';

class App extends React.Component {
  state = {
    isLoading: true,
    movies: [],
  };

  getMovies = async () => {
    const {
      data: {
        data: { movies },
      },
    } = await axios.get(
      'https://yts-proxy.now.sh/list_movies.json?sort_by=rating'
    );
    this.setState({ movies, isLoading: false });
  };

  componentDidMount() {
    this.getMovies();
  }

  render() {
    const { isLoading, movies } = this.state;
    return (
      <div>
        {isLoading
          ? 'Loading...'
          : movies.map((movie) => (
              <Movie
                key={movie.id}
                id={movie.id}
                year={movie.year}
                title={movie.title}
                summary={movie.summary}
                poster={movie.medium_cover_image}
              />
            ))}
      </div>
    );
  }
}

export default App;
4.2 Styling the Movies
// 📁 App.js
import React from 'react';
import axios from 'axios';
import Movie from './Movie';

class App extends React.Component {
  state = {
    isLoading: true,
    movies: [],
  };

  getMovies = async () => {
    const {
      data: {
        data: { movies },
      },
    } = await axios.get(
      'https://yts-proxy.now.sh/list_movies.json?sort_by=rating'
    );
    this.setState({ movies, isLoading: false });
  };

  componentDidMount() {
    this.getMovies();
  }

  render() {
    const { isLoading, movies } = this.state;
    return (
      <section className="container">
        {isLoading ? (
          <div className="loader">
            <span className="loader__text">Loading...</span>
          </div>
        ) : (
          <div className="movies">
            {movies.map((movie) => (
              <Movie
                key={movie.id}
                id={movie.id}
                year={movie.year}
                title={movie.title}
                summary={movie.summary}
                poster={movie.medium_cover_image}
              />
            ))}
          </div>
        )}
      </section>
    );
  }
}

export default App;
// 📁 Movie.js
import React from 'react';
import PropTypes from 'prop-types';

function Movie({ year, title, summary, poster }) {
  return (
    <div className="movies__movie">
      <img src={poster} alt={title} title={title} />
      <div className="movie__data">
        <h3 className="movie__title">{title}</h3>
        <h5 className="movie__year">{year}</h5>
        <p className="movie__summary">{summary}</p>
      </div>
    </div>
  );
}

Movie.propTypes = {
  id: PropTypes.number.isRequired,
  year: PropTypes.number.isRequired,
  title: PropTypes.string.isRequired,
  summary: PropTypes.string.isRequired,
  poster: PropTypes.string.isRequired,
};

export default Movie;
4.3 Adding Genres
아래 그림처럼 디자인을 해보자.

우선 영화의 장르 데이터를 가져와서 화면에 추가해볼 것이다.
JSX에서
classNameJSX에서 HTML 태그의 클래스명을 지정할 때는 HTML에서 썼던
class가 아니라className을 써야한다.class로 쓰면 자바스크립트의class와 혼동되기 때문이다.
label태그의for속성도for반복문과 헷갈리기 때문에for가 아닌htmlFor로 쓴다.
// 📁 App.js
import React from 'react';
import axios from 'axios';
import Movie from './Movie';
import './App.css';

class App extends React.Component {
  state = {
    isLoading: true,
    movies: [],
  };

  getMovies = async () => {
    const {
      data: {
        data: { movies },
      },
    } = await axios.get(
      'https://yts-proxy.now.sh/list_movies.json?sort_by=rating'
    );
    this.setState({ movies, isLoading: false });
  };

  componentDidMount() {
    this.getMovies();
  }

  render() {
    const { isLoading, movies } = this.state;
    return (
      <section className="container">
        {isLoading ? (
          <div className="loader">
            <span className="loader__text">Loading...</span>
          </div>
        ) : (
          <div className="movies">
            {movies.map((movie) => (
              <Movie
                key={movie.id}
                id={movie.id}
                year={movie.year}
                title={movie.title}
                summary={movie.summary}
                poster={movie.medium_cover_image}
                genres={movie.genres}
              />
            ))}
          </div>
        )}
      </section>
    );
  }
}

export default App;
// 📁 Movie.js
import React from 'react';
import PropTypes from 'prop-types';
import './Movie.css';

function Movie({ year, title, summary, poster, genres }) {
  return (
    <div className="movie">
      <img src={poster} alt={title} title={title} />
      <div className="movie__data">
        <h3 className="movie__title">{title}</h3>
        <h5 className="movie__year">{year}</h5>
        <ul className="movie__genres">
          {genres.map((genre, index) => (
            <li key={index} className="genres__genre">
              {genre}
            </li>
          ))}
        </ul>
        <p className="movie__summary">{summary}</p>
      </div>
    </div>
  );
}

Movie.propTypes = {
  id: PropTypes.number.isRequired,
  year: PropTypes.number.isRequired,
  title: PropTypes.string.isRequired,
  summary: PropTypes.string.isRequired,
  poster: PropTypes.string.isRequired,
  genres: PropTypes.arrayOf(PropTypes.string).isRequired,
};

export default Movie;
4.4 Styles Timelapse
📁 App.css
* {
  box-sizing: border-box;
}

body {
  margin: 0;
  padding: 0;
  font-family: -apple-system, BlinkMacSystemFont, 'Segoe UI', Roboto, Oxygen,
    Ubuntu, Cantarell, 'Open Sans', 'Helvetica Neue', sans-serif;
  background-color: #eff3f7;
  height: 100%;
}

html,
body,
#root,
.container {
  height: 100%;
  display: flex;
  justify-content: center;
}

.loader {
  width: 100%;
  height: 100%;
  display: flex;
  justify-content: center;
  align-items: center;
  font-weight: 300;
}

.movies {
  display: flex;
  justify-content: space-between;
  align-items: flex-start;
  flex-wrap: wrap;
  padding: 50px;
  padding-top: 70px;
  width: 80%;
}
📁 Movie.css
.movies .movie {
  width: 45%;
  background-color: white;
  margin-bottom: 70px;
  display: flex;
  align-items: flex-start;
  justify-content: space-between;
  font-weight: 300;
  padding: 20px;
  color: #adaeb9;
  border-radius: 5px;
  box-shadow: 0 13px 27px -5px rgba(50, 50, 93, 0.25),
    0 8px 16px -8px rgba(0, 0, 0, 0.3), 0 -6px 16px -6px rgba(0, 0, 0, 0.025);
}

.movie img {
  position: relative;
  top: -50px;
  max-width: 150px;
  width: 100%;
  margin-right: 30px;
  box-shadow: 0 30px 60px -12px rgba(50, 50, 93, 0.25),
    0 18px 36px -18px rgba(0, 0, 0, 0.3), 0 -12px 36px -8px rgba(0, 0, 0, 0.025);
}

.movie .movie__title,
.movie .movie__year {
  margin: 0;
  font-weight: 300;
}

.movie .movie__title {
  margin-bottom: 5px;
  font-size: 24px;

  color: #2c2c2c;
}

.movie .movie__genres {
  list-style: none;
  padding: 0;
  margin: 0;
  display: flex;
  margin: 5px 0px;
}

.movie__genres li {
  margin-right: 10px;
  font-size: 14px;
}
4.5 Cutting the summary
긴 summary(영화 설명)를 일정길이로 자르기 위해 slice()를 이용해서 코드를 수정했다.(string도 일종의 array)
// 📁 App.js
import React from 'react';
import axios from 'axios';
import Movie from './Movie';
import './App.css';

class App extends React.Component {
  state = {
    isLoading: true,
    movies: [],
  };

  getMovies = async () => {
    const {
      data: {
        data: { movies },
      },
    } = await axios.get(
      'https://yts-proxy.now.sh/list_movies.json?sort_by=rating'
    );
    this.setState({ movies, isLoading: false });
  };

  componentDidMount() {
    this.getMovies();
  }

  render() {
    const { isLoading, movies } = this.state;
    return (
      <section className="container">
        {isLoading ? (
          <div className="loader">
            <span className="loader__text">Loading...</span>
          </div>
        ) : (
          <div className="movies">
            {movies.map((movie) => (
              <Movie
                key={movie.id}
                id={movie.id}
                year={movie.year}
                title={movie.title}
                summary={movie.summary}
                poster={movie.medium_cover_image}
                genres={movie.genres}
              />
            ))}
          </div>
        )}
      </section>
    );
  }
}

export default App;
// 📁 Movie.js
import React from 'react';
import PropTypes from 'prop-types';
import './Movie.css';

function Movie({ year, title, summary, poster, genres }) {
  return (
    <div className="movie">
      <img src={poster} alt={title} title={title} />
      <div className="movie__data">
        <h3 className="movie__title">{title}</h3>
        <h5 className="movie__year">{year}</h5>
        <ul className="movie__genres">
          {genres.map((genre, index) => (
            <li key={index} className="genres__genre">
              {genre}
            </li>
          ))}
        </ul>
        <p className="movie__summary">{summary.slice(0, 180)}...</p>
      </div>
    </div>
  );
}

Movie.propTypes = {
  id: PropTypes.number.isRequired,
  year: PropTypes.number.isRequired,
  title: PropTypes.string.isRequired,
  summary: PropTypes.string.isRequired,
  poster: PropTypes.string.isRequired,
  genres: PropTypes.arrayOf(PropTypes.string).isRequired,
};

export default Movie;
CSS 클래스명을 지을 때 언더바(
_) 2개를 넣는 이유는?자식 태그의 클래스 이름을 지어줄 때, 부모 클래스 이름을 쓰고 언더바
_를 2번 써준 후 자식의 특성을 잘 설명하는 이름을 붙여주는 방식을 BEM 방식이라고 한다. ex)movie__title이때 언더바를 하나가 아니라 두개를 사용하는 이유는 좀 더 명확한 구분을 하기 위해서이다.출처: 도서 - 비전공자를 위한 첫 코딩 챌린지 with HTML&CSS
5. Conclusions
5.0 Deploying to Gihub Pages
- gh-page 설치
gh-page는 우리가 만든 어플리케이션을 github의 github page 도메인에 배포할 수 있게 해주는 모듈이다. github에서 우리의 프로젝트를 가져오는 방식으로 동작한다.
$ npm install gh-pages- package.json 파일에
homepage프로퍼티 추가하기 (소문자여야하고 띄어쓰기는 안된다)
...
"homepage": "https://{username}.github.io/{project_name}/"- package.json 파일에
script추가
npm run build를 실행하면 build 폴더가 생긴다.(빌드된다)
이 build 폴더를 gh-pages로 배포해야한다.
predeploy 스크립트를 아래처럼 지정해보자. 이렇게 하면 deploy 스크립트를 실행할 시 자동적으로 predeploy 스크립트가 먼저 실행된다. (단, 무조건 'predeploy' 라는 이름으로 설정해야함) 결국 npm run build가 실행된 후 gh-pages -d build가 실행되게 되는 것이다.
"scripts":{
	...
    "deploy": "gh-pages -d build",
    "predeploy": "npm run build"
}- 성공적으로
Published됐다면,https://{username}.github.io/{project_name}/에 접속해보자.
5.1 Are we done?
-
우리는 지금까지 state를 사용하기 위해 클래스 컴포넌트(class component)를 썼지만 더이상 이렇게 작성하지 않아도 된다. -> React Hook이라는 새로운 방법이 더 많이 쓰이고 있기 때문이다!
-
React hook에 대해 더 공부해보기
-
React hook에 대한 강의 추천 (무료) - 실전형 리액트 Hooks 10개
-
React로 여러 페이지를 가진 영화 웹서비스를 만드는 강의 추천 (유료) - 초보를 위한 React JS
-
React Native로 iOS/Android 앱 만들기 강의 추천 (무료) - 왕초보를 위한 React Native 101
지금까지 완성된 코드
- 📁 index.js
import React from 'react';
import ReactDOM from 'react-dom';
import App from './App';

ReactDOM.render(
  <React.StrictMode>
    <App />
  </React.StrictMode>,
  document.getElementById('root')
);- 📁 App.js
import React from 'react';
import axios from 'axios';
import Movie from './Movie';
import './App.css';

class App extends React.Component {
  state = {
    isLoading: true,
    movies: [],
  };

  getMovies = async () => {
    const {
      data: {
        data: { movies },
      },
    } = await axios.get(
      'https://yts-proxy.now.sh/list_movies.json?sort_by=rating'
    );
    this.setState({ movies, isLoading: false });
  };

  componentDidMount() {
    this.getMovies();
  }

  render() {
    const { isLoading, movies } = this.state;
    return (
      <section className="container">
        {isLoading ? (
          <div className="loader">
            <span className="loader__text">Loading...</span>
          </div>
        ) : (
          <div className="movies">
            {movies.map((movie) => (
              <Movie
                key={movie.id}
                id={movie.id}
                year={movie.year}
                title={movie.title}
                summary={movie.summary}
                poster={movie.medium_cover_image}
                genres={movie.genres}
              />
            ))}
          </div>
        )}
      </section>
    );
  }
}

export default App;
- 📁 Movie.js
import React from 'react';
import PropTypes from 'prop-types';
import './Movie.css';

function Movie({ year, title, summary, poster, genres }) {
  return (
    <div className="movie">
      <img src={poster} alt={title} title={title} />
      <div className="movie__data">
        <h3 className="movie__title">{title}</h3>
        <h5 className="movie__year">{year}</h5>
        <ul className="movie__genres">
          {genres.map((genre, index) => (
            <li key={index} className="genres__genre">
              {genre}
            </li>
          ))}
        </ul>
        <p className="movie__summary">{summary.slice(0, 180)}...</p>
      </div>
    </div>
  );
}

Movie.propTypes = {
  id: PropTypes.number.isRequired,
  year: PropTypes.number.isRequired,
  title: PropTypes.string.isRequired,
  summary: PropTypes.string.isRequired,
  poster: PropTypes.string.isRequired,
  genres: PropTypes.arrayOf(PropTypes.string).isRequired,
};

export default Movie;
- 📁 App.css
* {
  box-sizing: border-box;
}

body {
  margin: 0;
  padding: 0;
  font-family: -apple-system, BlinkMacSystemFont, 'Segoe UI', Roboto, Oxygen,
    Ubuntu, Cantarell, 'Open Sans', 'Helvetica Neue', sans-serif;
  background-color: #eff3f7;
  height: 100%;
}

html,
body,
#root,
.container {
  height: 100%;
  display: flex;
  justify-content: center;
}

.loader {
  width: 100%;
  height: 100%;
  display: flex;
  justify-content: center;
  align-items: center;
  font-weight: 300;
}

.movies {
  display: flex;
  justify-content: space-between;
  align-items: flex-start;
  flex-wrap: wrap;
  padding: 50px;
  padding-top: 70px;
  width: 80%;
}
- 📁 Movie.css
.movies .movie {
  width: 45%;
  background-color: white;
  margin-bottom: 70px;
  display: flex;
  align-items: flex-start;
  justify-content: space-between;
  font-weight: 300;
  padding: 20px;
  color: #adaeb9;
  border-radius: 5px;
  box-shadow: 0 13px 27px -5px rgba(50, 50, 93, 0.25),
    0 8px 16px -8px rgba(0, 0, 0, 0.3), 0 -6px 16px -6px rgba(0, 0, 0, 0.025);
}

.movie img {
  position: relative;
  top: -50px;
  max-width: 150px;
  width: 100%;
  margin-right: 30px;
  box-shadow: 0 30px 60px -12px rgba(50, 50, 93, 0.25),
    0 18px 36px -18px rgba(0, 0, 0, 0.3), 0 -12px 36px -8px rgba(0, 0, 0, 0.025);
}

.movie .movie__title,
.movie .movie__year {
  margin: 0;
  font-weight: 300;
}

.movie .movie__title {
  margin-bottom: 5px;
  font-size: 24px;

  color: #2c2c2c;
}

.movie .movie__genres {
  list-style: none;
  padding: 0;
  margin: 0;
  display: flex;
  margin: 5px 0px;
}

.movie__genres li {
  margin-right: 10px;
  font-size: 14px;
}
6. Routing Bonus
6.0 Getting Ready for the Router
지금까지 만든 페이지에 상단메뉴바(navigation)를 추가해보자. 리액트에서 navigation을 구현하려면 react-router-dom을 사용하면 된다. Home(지금까지 만든 영화 목록이 쭉 뜨는 페이지)과 About 페이지를 만들 것이다.
📌 router란?
url에 따라 어떤 컴포넌트를 보여줄지 정하는 것
-
react-router-dom 설치
-
route 기능을 추가하기 위해서, 폴더를 분리하여 지금까지 작성한 파일들 정리
파일구조

/src
	/components
    	Movie.js
        Movie.css
	/routes
    	Home.js # 기존에 App.js에 있던 코드를 Home.js로 옮긴다.
        About.js
        Home.css
    App.js # App.js에 라우터 관련 코드를 작성할 것이다.
    index.js
6.1 Building the Router
- App.js
<HashRouter>
  <Route path="/" component={Home}/>
  <Route path="/about" component={About}/>
</HashRouter>
<Route path="" component={} />어떤 경로가 요청될 경우 특정 화면(Component)를 뿌리라는 것- 그러나 이렇게만 작성할 경우,
/about페이지 요청시 Home, About 두 개의 컴포넌트 모두가 렌더링된다. 그 이유는 리액트가 라우터가 동작하는 방식 때문이다./abouturl을 보고 매치되는 url이/도 있고/about도 있다고 인식하기 때문이다. 그래서 매치되는 컴포넌트 모두를 렌더링하는 것이다. - 이걸 고치려면
exactprops값을 true로 주면 된다.exact값을 주면 url이path일 때만 해당 컴포넌트를 렌더링한다.
// 수정된 코드
<HashRouter>
  <Route path="/" exact={true} component={Home}/>
  <Route path="/about" exact={true} component={About}/>
</HashRouter>
6.2 Building the Navigation
이제 라우터 두 개 사이를 어떻게 네비게이션할지 알아보자.
// 📁 /components/Navigation.js
import React from 'react';

function Navigation() {
  return (
    <div>
      <a href="/">Home</a>
      <a href="/about">About</a>
    </div>
  );
}

export default Navigation;


// 📁 App.js

import React from 'react';
import { HashRouter, Route } from 'react-router-dom';
import Home from './routes/Home';
import About from './routes/About';
import Navigation from './components/Navigation';

function App() {
  return (
    <HashRouter>
      <Navigation />
      <Route path="/" component={Home} />
      <Route path="/about" component={About} />
    </HashRouter>
  );
}

export default App;- HTML의 a태그와 href로 네비게이션을 만들면 a태그를 눌렀을 때 페이지가 새로고침되게 된다. 리액트가 죽고 새 페이지가 강제로 새로고침되는 것이다. 우리가 원하는 것은 이게 아니다(리액트를 죽일거면 리액트를 왜 써 그죠)
- 위 문제를 해결하기 위해서, a와 href 대신
Link를 사용하자. Link는 Router 안에서 써야한다.HashRouter말고BrowserRouter도 써보기. (주소 형식에 차이가 있음)BrowserRouter는 Github Pages로 배포할 때 까다롭다.- 수정한 코드는 아래를 참고할 것
파일구조

/src
	/components
    	Movie.js
        Movie.css
        Navigation.js
        Navigation.css
	/routes
    	Home.js
        About.js
        Home.css
        About.css
    App.js # 라우터 관련 코드 담겨있음
    App.css
    index.js
// 📁 Navigation.js
import React from 'react';
import { Link } from 'react-router-dom';
import './Navigation.css';
function Navigation() {
return (
<div className="nav">
<Link to="/">Home</Link>
<Link to="/about">About</Link>
</div>
);
}
export default Navigation;
// 📁 App.js
import React from 'react';
import { HashRouter, Route } from 'react-router-dom';
import Home from './routes/Home';
import About from './routes/About';
import Navigation from './components/Navigation';
function App() {
return (
<HashRouter>
<Navigation />
<Route path="/" exact={true} component={Home} />
<Route path="/about" component={About} />
</HashRouter>
);
}
export default App;
// 📁 Home.js
import React from 'react';
import axios from 'axios';
import Movie from '../components/Movie';
import './Home.css';
class Home extends React.Component {
state = {
isLoading: true,
movies: [],
};
getMovies = async () => {
const {
data: {
data: { movies },
},
} = await axios.get(
'https://yts-proxy.now.sh/list_movies.json?sort_by=rating'
);
this.setState({ movies, isLoading: false });
};
componentDidMount() {
this.getMovies();
}
render() {
const { isLoading, movies } = this.state;
return (
<section className="container">
{isLoading ? (
<div className="loader">
<span className="loader__text">Loading...</span>
</div>
) : (
<div className="movies">
{movies.map((movie) => (
<Movie
key={movie.id}
id={movie.id}
year={movie.year}
title={movie.title}
summary={movie.summary}
poster={movie.medium_cover_image}
genres={movie.genres}
/>
))}
</div>
)}
</section>
);
}
}
export default Home;
// 📁 About.js
import React from 'react';
import './About.css';
function About() {
return (
<div className="about__container">
<span>
“Freedom is the freedom to say that two plus two make four. If that is
granted, all else follows.”
</span>
<span>− George Orwell, 1984</span>
</div>
);
}
export default About;
// 📁 Navigation.css
.nav {
  position: fixed;
  top: 50px;
  left: 10px;
  display: flex;
  flex-direction: column;
  background-color: white;
  padding: 10px 20px;
  box-shadow: 0 13px 27px -5px rgba(50, 50, 93, 0.25),
    0 8px 16px -8px rgba(0, 0, 0, 0.3), 0 -6px 16px -6px rgba(0, 0, 0, 0.025);
  border-radius: 5px;
}

.nav a {
  text-decoration: none;
  color: #0008fc;
  text-transform: uppercase;
  font-size: 12px;
  text-align: center;
  font-weight: 600;
}

.nav a:not(:last-child) {
  margin-bottom: 20px;
}

// 📁 App.css
* {
  box-sizing: border-box;
}

body {
  margin: 0;
  padding: 0;
  font-family: -apple-system, BlinkMacSystemFont, 'Segoe UI', Roboto, Oxygen,
    Ubuntu, Cantarell, 'Open Sans', 'Helvetica Neue', sans-serif;
  background-color: #eff3f7;
  height: 100%;
}

// 📁 Home.css
.container {
  height: 100%;
  display: flex;
  justify-content: center;
}

.loader {
  width: 100%;
  height: 100vh;
  display: flex;
  justify-content: center;
  align-items: center;
  font-weight: 300;
}

.movies {
  display: flex;
  justify-content: space-between;
  align-items: flex-start;
  flex-wrap: wrap;
  padding: 50px;
  padding-top: 70px;
  width: 80%;
}

// 📁 About.css
.about__container {
  box-shadow: 0 13px 27px -5px rgba(50, 50, 93, 0.25),
    0 8px 16px -8px rgba(0, 0, 0, 0.3), 0 -6px 16px -6px rgba(0, 0, 0, 0.025);
  padding: 20px;
  border-radius: 5px;
  background-color: white;
  margin: 0 auto;
  margin-top: 100px;
  max-width: 25%;
  font-weight: 300;
}

.about__container span:first-child {
  font-size: 20px;
}

.about__container span:last-child {
  display: block;
  margin-top: 10px;
}
Movie.js, Movie.css 파일은 이전 코드와 같아서 생략했음
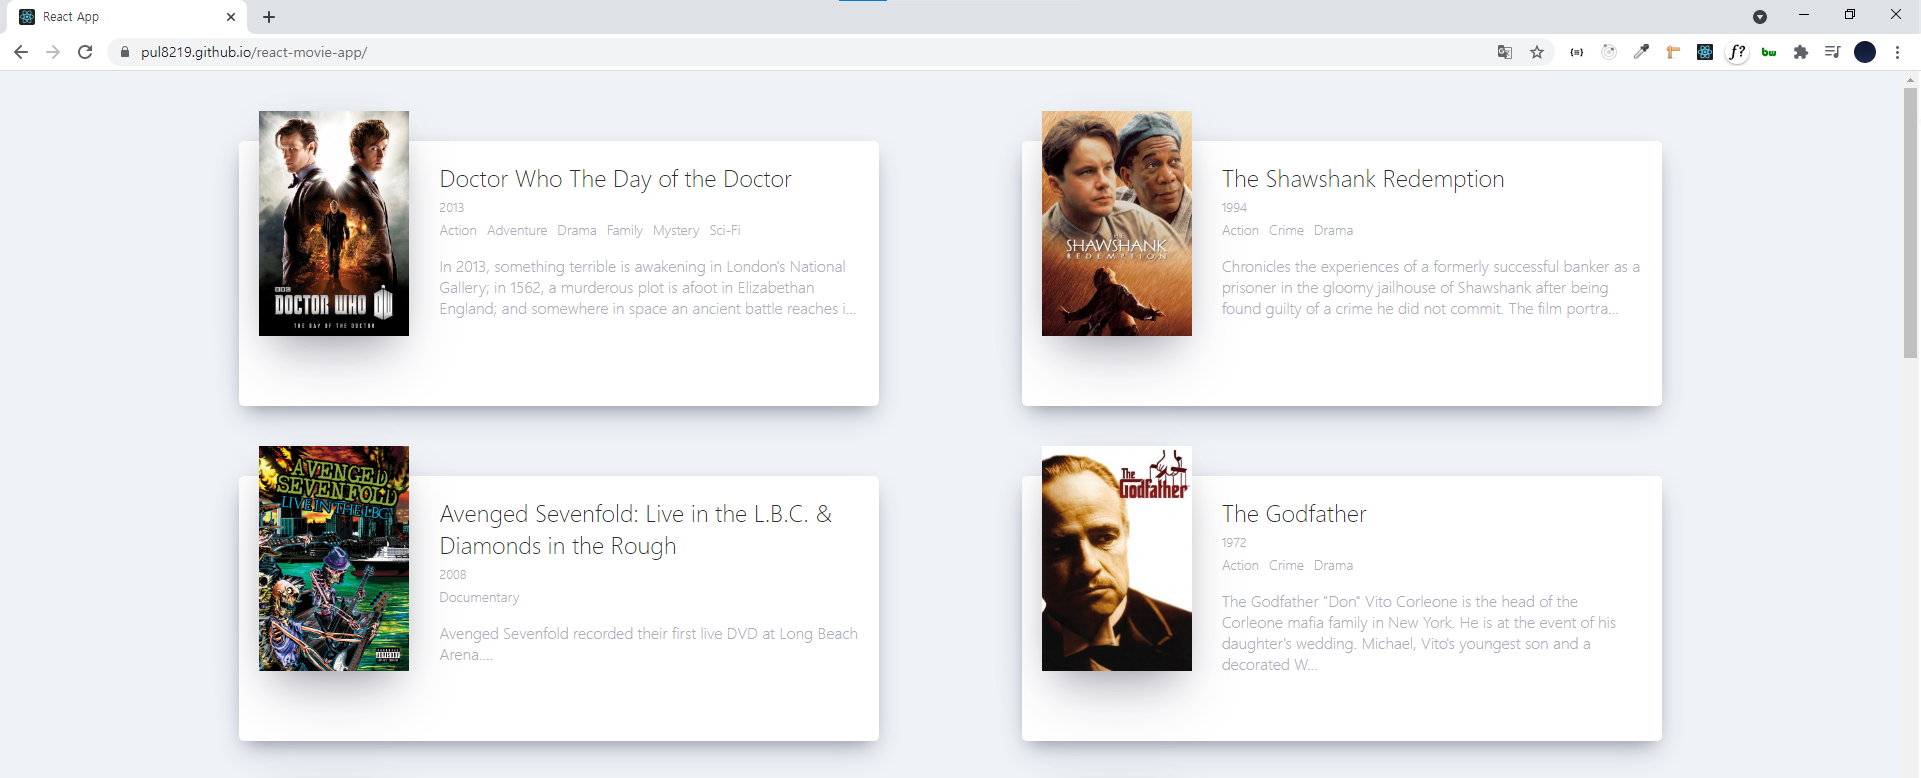
url: /

url: '/about'

6.3 Sharing Props Between Routes
이제 영화 목록 페이지에서 영화를 클릭하면 해당 영화의 상세 설명 페이지로 가는 것을 구현해볼 것이다.
- router props: router들은 기본적으로 props를 갖는다. (
Home.js에서 props를 명시하고 콘솔에 출력해보면 알 수 있음) - React router 공식 문서 참고
- 네비게이션 링크를 클릭하면 지정된 path로 이동하게 해주고 router로 정보를 보낼 수도 있다.(state로 객체를 주는 방식으로)
라우터에 자동으로 전달되는 props를 콘솔에 출력해본 결과

- router props의 loacation을 이용하여(이중에서 pathname, state를 사용할 것) 기존의 Movie.js에서 특정 영화를 클릭하면 지정한 url로 이동하고 해당 router로 영화 정보(year, poster, summary, ...) 를 props로 보낼 수 있도록 해보자.
6.4 Redirecting
- 단 특정 영화를 클릭하지 않으면 (영화를 클릭한 후 새로고침을 하거나, 해당 url을 직접 입력해서 접근할 경우) 우리가 작성한 영화 정보 props가 전달되지 않아 state를 출력해도 undefined가 나온다. 이는 코드를 추가하여 영화를 클릭한 경우가 아니라면 리다이렉트되도록 해서 해결하자.
- props.location.state가 값이 없을 경우(undefined) props의 history 객체를 이용해서 홈화면으로 리다이렉트시킨다.
- history의 push, go, goFoward, goBack 등을 이용하면 url을 바꿀 수 있다.
집중적으로 수정한 코드
// 📁 src/App.js
import React from 'react';
import { HashRouter, Route } from 'react-router-dom';
import Home from './routes/Home';
import About from './routes/About';
import Detail from './routes/Detail';
import Navigation from './components/Navigation';

function App() {
  return (
    <HashRouter>
      <Navigation />
      <Route path="/" exact={true} component={Home} />
      <Route path="/about" component={About} />
      <Route path="/movie/:id" component={Detail} /> {/*여기 주목!*/}
    </HashRouter>
  );
}

export default App;

// 📁 src/components/Movie.js
import React from 'react';
import { Link } from 'react-router-dom';
import PropTypes from 'prop-types';
import './Movie.css';

function Movie({ id, year, title, summary, poster, genres }) {
  return (
    <Link
      to={{
        pathname: `/movie/${id}`,
        state: {
          id,
          year,
          title,
          summary,
          poster,
          genres,
        },
      }}
    >
      <div className="movie">
        <img src={poster} alt={title} title={title} />
        <div className="movie__data">
          <h3 className="movie__title">{title}</h3>
          <h5 className="movie__year">{year}</h5>
          <ul className="movie__genres">
            {genres.map((genre, index) => (
              <li key={index} className="genres__genre">
                {genre}
              </li>
            ))}
          </ul>
          <p className="movie__summary">{summary.slice(0, 180)}...</p>
        </div>
      </div>
    </Link>
  );
}

Movie.propTypes = {
  id: PropTypes.number.isRequired,
  year: PropTypes.number.isRequired,
  title: PropTypes.string.isRequired,
  summary: PropTypes.string.isRequired,
  poster: PropTypes.string.isRequired,
  genres: PropTypes.arrayOf(PropTypes.string).isRequired,
};

export default Movie;

// 📁 src/routes/Detail.js
import React from 'react';

class Detail extends React.Component {
  componentDidMount() {
    const { location, history } = this.props;
    if (location.state === undefined) {
      history.push('/');
    }
  }

  render() {
    const { location } = this.props;
    if (location.state) {
      return (
        <div>
          <img
            src={location.state.poster}
            alt={location.state.title}
            title={location.state.title}
          />
          <div>
            <h3>{location.state.title}</h3>
            <h5>{location.state.year}</h5>
            <ul>
              {location.state.genres.map((genre, index) => (
                <li key={index}>{genre}</li>
              ))}
            </ul>
            <p>{location.state.summary}</p>
          </div>
        </div>
      );
    } else {
      return null;
    }
  }
}

export default Detail;
지금까지 작성했던 다른 파일들(바뀐 부분은 거의 없다)
// 📁 src/components/Navigation.js
import React from 'react';
import { Link } from 'react-router-dom';
import './Navigation.css';

function Navigation() {
  return (
    <div className="nav">
      <Link to="/">Home</Link>
      <Link to="/about">About</Link>
    </div>
  );
}

export default Navigation;

// 📁 src/routes/Home.js
import React from 'react';
import axios from 'axios';
import Movie from '../components/Movie';
import './Home.css';

class Home extends React.Component {
  state = {
    isLoading: true,
    movies: [],
  };

  getMovies = async () => {
    const {
      data: {
        data: { movies },
      },
    } = await axios.get(
      'https://yts-proxy.now.sh/list_movies.json?sort_by=rating'
    );
    this.setState({ movies, isLoading: false });
  };

  componentDidMount() {
    this.getMovies();
  }

  render() {
    const { isLoading, movies } = this.state;
    return (
      <section className="container">
        {isLoading ? (
          <div className="loader">
            <span className="loader__text">Loading...</span>
          </div>
        ) : (
          <div className="movies">
            {movies.map((movie) => (
              <Movie
                key={movie.id}
                id={movie.id}
                year={movie.year}
                title={movie.title}
                summary={movie.summary}
                poster={movie.medium_cover_image}
                genres={movie.genres}
              />
            ))}
          </div>
        )}
      </section>
    );
  }
}

export default Home;

// 📁 src/routes/About.js
import React from 'react';
import './About.css';

function About(props) {
  return (
    <div className="about__container">
      <span>
        “Freedom is the freedom to say that two plus two make four. If that is
        granted, all else follows.”
      </span>
      <span>− George Orwell, 1984</span>
    </div>
  );
}

export default About;

// 📁 src/index.js
import React from 'react';
import ReactDOM from 'react-dom';
import App from './App';

ReactDOM.render(
  <React.StrictMode>
    <App />
  </React.StrictMode>,
  document.getElementById('root')
);
CSS 파일 모음
/* 📁 src/App.css*/
* {
  box-sizing: border-box;
}

body {
  margin: 0;
  padding: 0;
  font-family: -apple-system, BlinkMacSystemFont, 'Segoe UI', Roboto, Oxygen,
    Ubuntu, Cantarell, 'Open Sans', 'Helvetica Neue', sans-serif;
  background-color: #eff3f7;
  height: 100%;
}

/* 📁 src/routes/Home.css */
.container {
  height: 100%;
  display: flex;
  justify-content: center;
}

.loader {
  width: 100%;
  height: 100vh;
  display: flex;
  justify-content: center;
  align-items: center;
  font-weight: 300;
}

.movies {
  display: flex;
  justify-content: space-between;
  align-items: flex-start;
  flex-wrap: wrap;
  padding: 50px;
  padding-top: 70px;
  width: 80%;
}

/* 📁 src/routes/About.css */
.about__container {
  box-shadow: 0 13px 27px -5px rgba(50, 50, 93, 0.25),
    0 8px 16px -8px rgba(0, 0, 0, 0.3), 0 -6px 16px -6px rgba(0, 0, 0, 0.025);
  padding: 20px;
  border-radius: 5px;
  background-color: white;
  margin: 0 auto;
  margin-top: 100px;
  max-width: 25%;
  font-weight: 300;
}

.about__container span:first-child {
  font-size: 20px;
}

.about__container span:last-child {
  display: block;
  margin-top: 10px;
}

/* 📁 src/components/Movie.css */
.movies .movie {
  width: 45%;
  background-color: white;
  margin-bottom: 70px;
  font-weight: 300;
  padding: 20px;
  color: #adaeb9;
  border-radius: 5px;
  box-shadow: 0 13px 27px -5px rgba(50, 50, 93, 0.25),
    0 8px 16px -8px rgba(0, 0, 0, 0.3), 0 -6px 16px -6px rgba(0, 0, 0, 0.025);
}

.movies .movie a {
  display: flex;
  align-items: flex-start;
  justify-content: space-between;
  text-decoration: none;
  color: inherit;
}

.movie img {
  position: relative;
  top: -50px;
  max-width: 150px;
  width: 100%;
  margin-right: 30px;
  box-shadow: 0 30px 60px -12px rgba(50, 50, 93, 0.25),
    0 18px 36px -18px rgba(0, 0, 0, 0.3), 0 -12px 36px -8px rgba(0, 0, 0, 0.025);
}

.movie .movie__title,
.movie .movie__year {
  margin: 0;
  font-weight: 300;
}

.movie .movie__title {
  margin-bottom: 5px;
  font-size: 24px;

  color: #2c2c2c;
}

.movie .movie__genres {
  list-style: none;
  padding: 0;
  margin: 0;
  display: flex;
  margin: 5px 0px;
}

.movie__genres li {
  margin-right: 10px;
  font-size: 14px;
}


/* 📁 src/componnets/Navigation.css */
.nav {
  position: fixed;
  top: 50px;
  left: 10px;
  display: flex;
  flex-direction: column;
  background-color: white;
  padding: 10px 20px;
  box-shadow: 0 13px 27px -5px rgba(50, 50, 93, 0.25),
    0 8px 16px -8px rgba(0, 0, 0, 0.3), 0 -6px 16px -6px rgba(0, 0, 0, 0.025);
  border-radius: 5px;
}

.nav a {
  text-decoration: none;
  color: #0008fc;
  text-transform: uppercase;
  font-size: 12px;
  text-align: center;
  font-weight: 600;
}

.nav a:not(:last-child) {
  margin-bottom: 20px;
}