들어가며
오늘은 제 개인 Flutter 프로젝트에서 Snap Style ListView를 구현했던 경험을 여러분께 소개해드리고자 합니다.
What is Snap Style?
Snap은 보통 DraggableScrollableSheet에서 확인할 수 있는 기능으로, 사용자의 스크롤이 멈췄을 때(ScrollEndNotification) 현재 스크롤 위치가 특정 포인트(snap point)에 가까우면 해당 위치로 자동으로 정렬되듯 스크롤되는 동작을 말합니다.
제가 개인적으로 진행하고 있는 해결일기 프로젝트에서는 사용자가 달력 위젯을 스크롤링해서 다른 날짜를 선택할 수 있습니다. 이러한 Snap을 적용하여 사용자가 정확하게 스크롤을 하지 않아도 가장 가까운 날짜가 선택될 수 있도록 사용자 경험을 추가하고자 하였습니다.
자, 그럼 이제 본격적으로 구현을 해보도록 하겠습니다.
구현해볼 UI
구현해볼 UI는 단순하게 Vertical형식의 ListView를 구현해볼 것입니다. 다만, 사용자의 스크롤 이벤트가 종료되면 현재 상단에 걸쳐진 Container의 너비에 따라서 가장 근처의 Container가 상단에 올 수 있도록할 예정입니다.
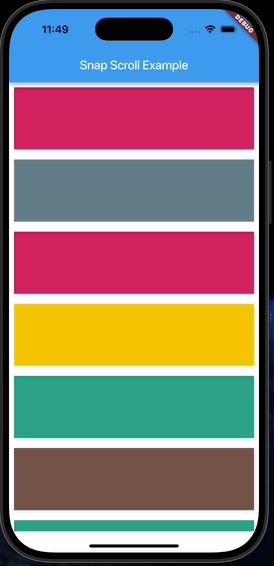
기본 ListView 구현
가장 기본이 될 ListView부터 구현하겠습니다. 또한, 편의상 SafeArea를 적용하도록 하겠습니다.
class SnapExample extends StatelessWidget {
const SnapExample({super.key});
Widget build(BuildContext context) {
const itemHeight = 100.0;
const itemCount = 1000;
return Scaffold(
appBar: AppBar(
title: const Text("Snap Scroll Example"),
),
body: SafeArea(
child: ListView.builder(
itemCount: itemCount,
itemBuilder: (context, index) {
return Padding(
padding: const EdgeInsets.all(8.0),
child: Container(
height: itemHeight,
color: Colors
.primaries[Random().nextInt(Colors.primaries.length)],
),
);
}),
),
);
}
}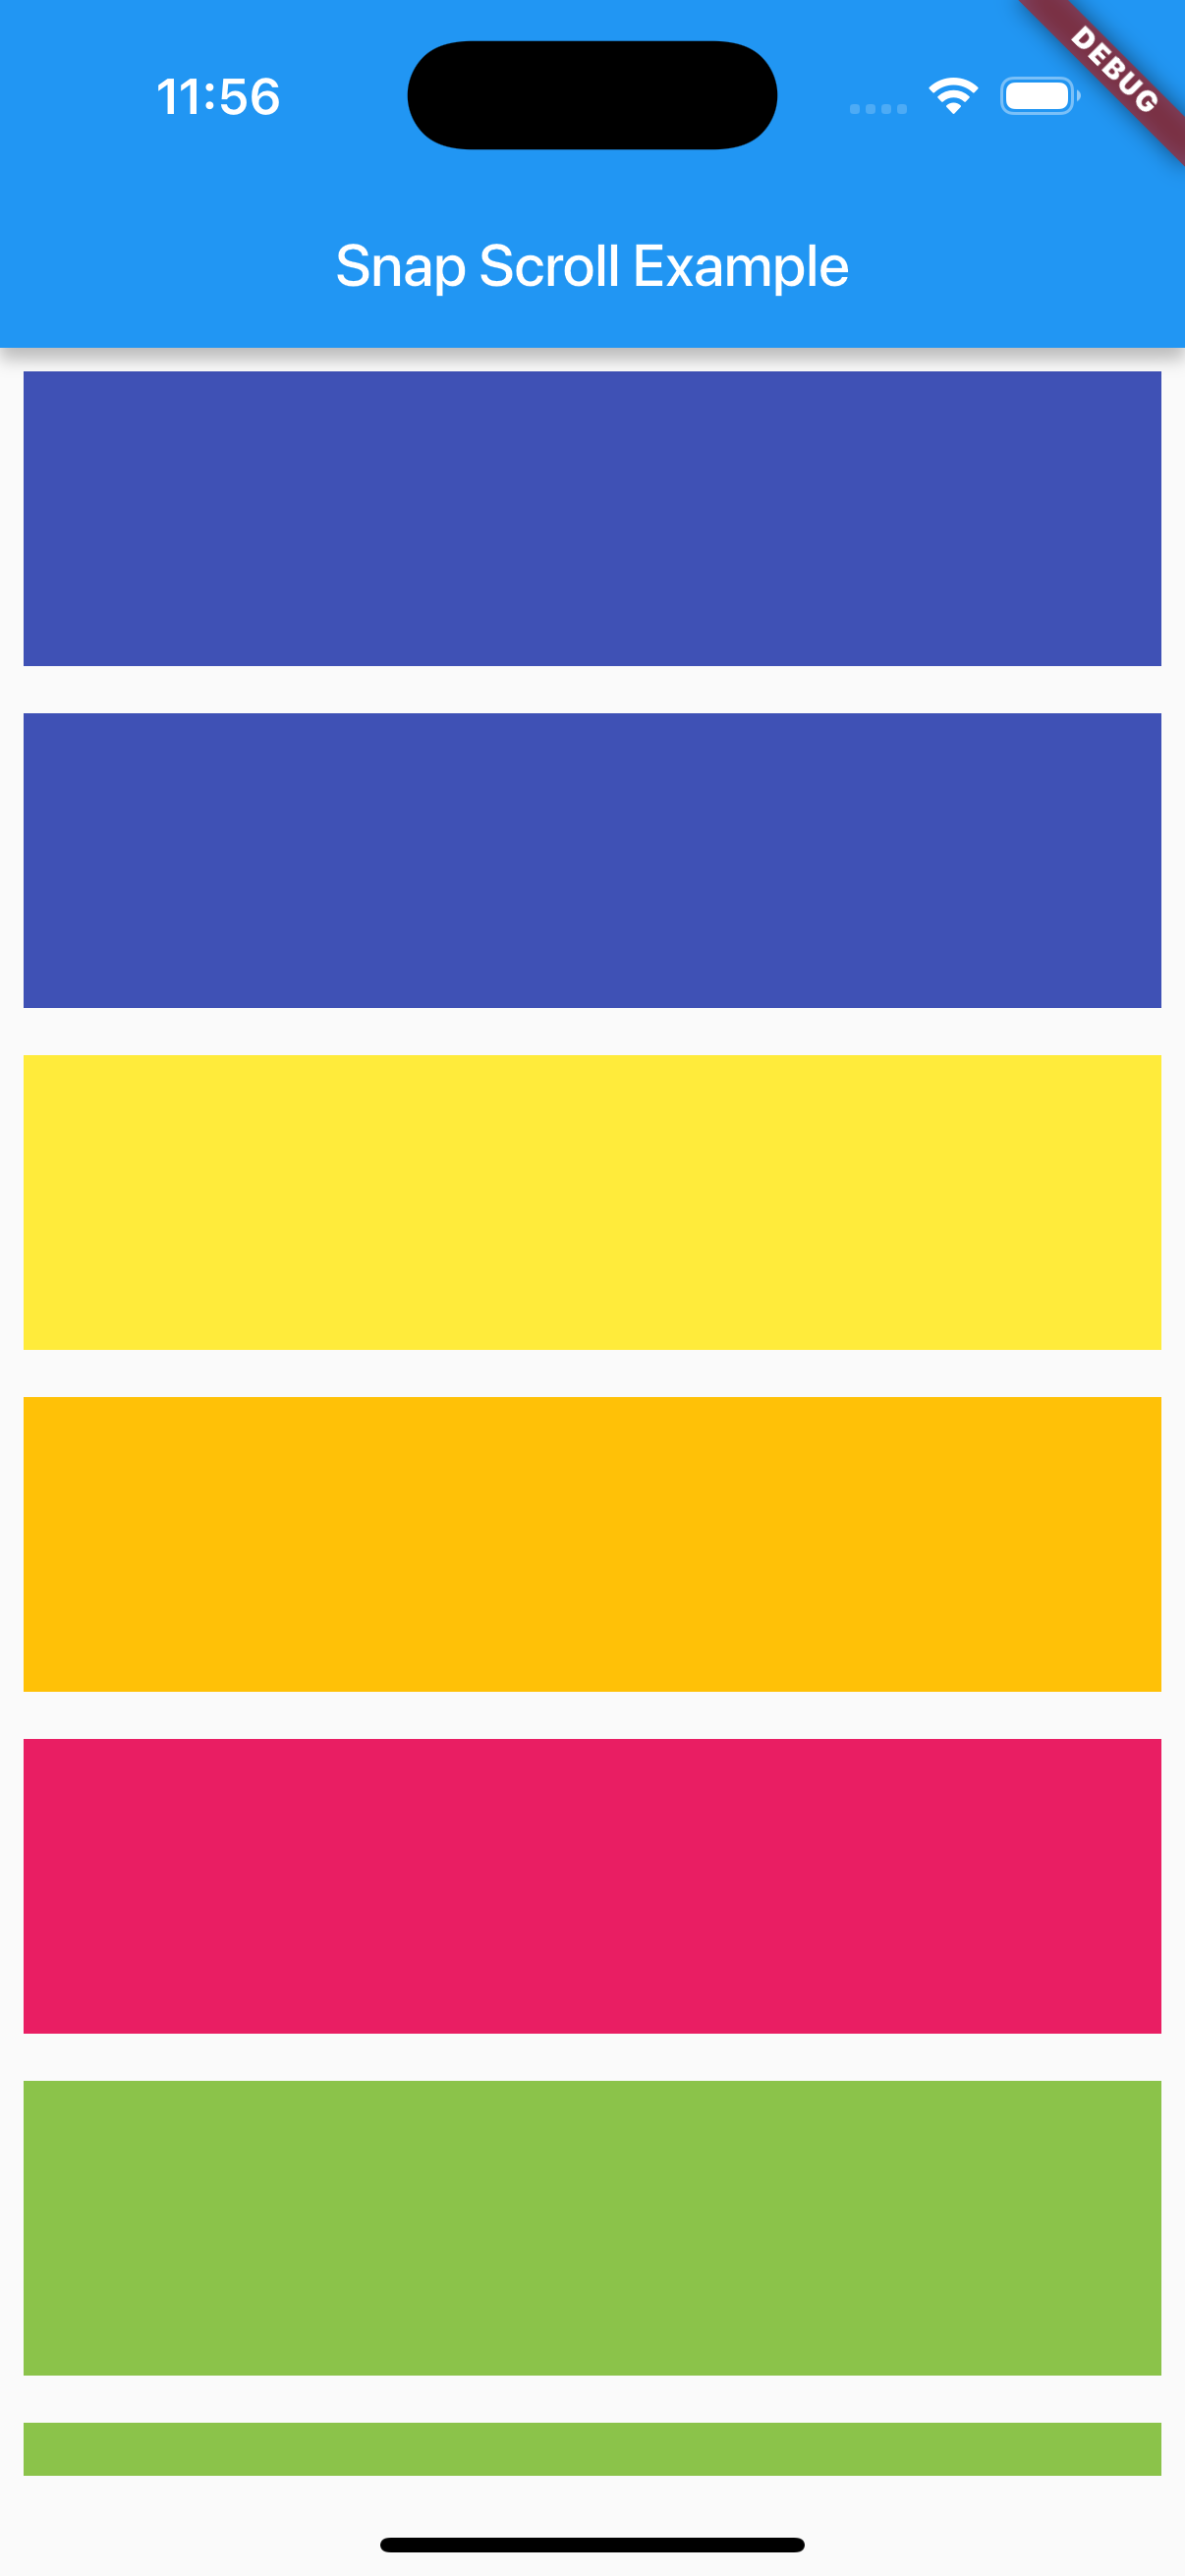
ListView의 Item이 될 Container는 100의 높이를 지정하였으며, 총 1000개를 렌더링합니다. 여기서 색상은 랜덤색상이 적용될 수 있도록 지정하였습니다.
snap을 구현하기 위한 설계
상단에서 snap을 구현하기 위해서는 현재 사용자의 스크롤 위치를 통해 가장 가까운 item의 index를 구하여 이동시키면 될 것입니다.
이 index는 현재 스크를 위치를 item이 차지하는 높이만큼으로 나누어 반올림하게 된다면 정확하게 item의 중앙을 기준으로 가장 가까운 item의 index를 구할 수 있게 됩니다.
단, 현재 item이 차지하는 높이는 단순히 Container의 전달된 itemHeight뿐만 아니라 padding으로 지정된 8px이 추가로 적용되어 16px을 더한 값이 되는 것을 주의해주세요.
  int offsetToNearIndex(double offset, double itemHeight) {
    return (offset / itemHeight).round();
  }
위 함수를 통해서 스크롤 위치와 item의 크기를 전달하면 가장 가까운 item의 index를 구할 수 있습니다. 이제 현재 스크롤 위치에 접근해보도록 하겠습니다.
현재 스크롤 위치와 같은 위젯의 스크롤 정보는 모두 ScrollController를 전달하여 해당 Controller로 관리할 수 있습니다. 예를 들어, 총 스크롤 가능 영역의 크기는 ScrollController의 position.maxScrollExtent를 통해 접근이 가능합니다.
그리고 사용자의 현재 스크롤 위치는 ScrollController의 offset을 통해 접근이 가능합니다. 더 자세한 내용은 공식문서에서 확인이 가능합니다.
https://api.flutter.dev/flutter/widgets/ScrollController-class.html즉, ListView에 ScrollController를 전달하여 해당 위치 정보를 가져올 수 있습니다.
ScrollController 지정하고 Snap 완성하기
보통 이러한 Controller는 단순한 StatelessWidget에서 사용되지 않고, StatefulWidget을 사용합니다. 하지만 저는 이러한 controller를 쉽게 다룰 수 있도록 도와주는 flutter_hooks 패키지를 사용하겠습니다.
flutter_hooks는 개발자가 controller를 초기화하고 전달하고 listener이벤트를 주는 등의 코드를 굉장히 수월하게 할 수 있도록 도와줍니다.
import 'dart:math';
import 'package:flutter/material.dart';
import 'package:flutter/rendering.dart';
import 'package:flutter_hooks/flutter_hooks.dart';
// HookWidget을 상속
class SnapExample extends HookWidget {
const SnapExample({super.key});
int offsetToNearIndex(double offset, double itemHeight) {
return (offset / itemHeight).round();
}
Widget build(BuildContext context) {
// 이 방식으로 ScrollController 초기화
final controller = useScrollController();
const itemHeight = 100.0;
const itemCount = 1000;
return Scaffold(
appBar: AppBar(
title: const Text("Snap Scroll Example"),
),
body: SafeArea(
child: ListView.builder(
controller: controller,
itemCount: itemCount,
itemBuilder: (context, index) {
return Padding(
padding: const EdgeInsets.all(8.0),
child: Container(
height: itemHeight,
color: Colors
.primaries[Random().nextInt(Colors.primaries.length)],
),
);
}),
));
}
}flutter_hooks에서는 HookWidget을 상속받도록하여 controller를 초기화하게 됩니다. 그리고 사용하고 싶은 controller의 초기화 메소드를 사용하면 됩니다. 굉장히 간단하죠? 강추합니다.
이제 Controller초기화도 메소드도 만들었으니, 사용자의 스크롤 이벤트가 종료되는 시점에 가장 가까운 인덱스의 위치로 이동시키는 코드를 적용하면 됩니다.
flutter에서는 NotificationListner위젯을 통해 사용자의 여러 Notification을 읽을 수 있습니다. 그리고 Scroll은 ScrollNotification을 통해서 감지하게 됩니다.
class SnapExample extends HookWidget {
const SnapExample({super.key});
int offsetToNearIndex(double offset, double itemHeight) {
return (offset / itemHeight).round();
}
Widget build(BuildContext context) {
final controller = useScrollController();
final scrollEndTimer = useRef<Timer?>(null);
const itemHeight = 100.0;
const itemCount = 1000;
return Scaffold(
appBar: AppBar(
title: const Text("Snap Scroll Example"),
),
body: SafeArea(
child: NotificationListener<ScrollNotification>(
onNotification: (notification) {
// 사용자가 스크롤을 종료할 때 수행
if (notification is UserScrollNotification &&
notification.direction == ScrollDirection.idle) {
// 현재 스크롤 위치
final offset = controller.offset;
// 현재 스크롤 위치와 가까운 인덱스
final nearIndex = offsetToNearIndex(offset, itemHeight + 16);
// 해당 인덱스로 이동
controller.animateTo((itemHeight + 16) * nearIndex,
duration: const Duration(milliseconds: 300),
curve: Curves.linear);
}
return false;
},
child: ListView.builder(
controller: controller,
itemCount: itemCount,
itemBuilder: (context, index) {
return Padding(
padding: const EdgeInsets.all(8.0),
child: Container(
height: itemHeight,
color: Colors
.primaries[Random().nextInt(Colors.primaries.length)],
),
);
}),
),
));
}
}사용자가 스크롤을 종료하게 되면 UserScrollNotification이 발생하고 notification의 방향은 ScrollDirection.idle과 같습니다. 궁금하시면 notification을 한번 로그 찍어보는 것도 추천드립니다. 이를 통해 사용자가 스크롤을 종료하게 되는 시점에 스크롤 위치를 이동시키면 snap기능은 완성됩니다.
버그 수정하기
위 과정까지 완성된 코드는 사용자가 한번만 스크롤 할 경우 정확한 위치로 이동하게 되지만, 스크롤 도중 다시 스크롤을 시도하게 된다면 버벅이는 현상이 발생합니다. 사용자가 스크롤 시도를 위해서 위젯을 터치하는 행위로 인하여 스크롤이 종료되고, 스크롤이 종료되었다고 감지되기 때문입니다.
이러한 예외 상황을 처리하기 위해서는 사용자의 스크롤 종료를 명확하게 지정해주어야 합니다.
사용자는 여러번 스크롤을 시도할 수 있습니다. 한번 스크롤을 끝마친후에 다시 스크롤 하는 행위는 괜찮지만, 스크롤 도중 발생하는 스크롤 시작 이벤트는 하나의 스크롤 이벤트로 처리해야합니다.
저는 이러한 상황을 처리하기 위해서 Timer를 사용하여 사용자의 스크롤이 종료되는 시점으로부터 특정 시간이 종료된 후 스크롤 위치 이동 이벤트를 시작하도록 설계하였습니다.
import 'dart:async';
import 'dart:math';
import 'package:flutter/material.dart';
import 'package:flutter/rendering.dart';
import 'package:flutter_hooks/flutter_hooks.dart';
class SnapExample extends HookWidget {
const SnapExample({super.key});
int offsetToNearIndex(double offset, double itemHeight) {
return (offset / itemHeight).round();
}
Widget build(BuildContext context) {
final controller = useScrollController();
// 스크롤 종료후부터 사용되는 Timer
final scrollEndTimer = useRef<Timer?>(null);
const itemHeight = 100.0;
const itemCount = 1000;
return Scaffold(
appBar: AppBar(
title: const Text("Snap Scroll Example"),
),
body: SafeArea(
child: NotificationListener<ScrollNotification>(
onNotification: (notification) {
// 스크롤이 시작되면 타이머 강제 종료
if (notification is UserScrollNotification &&
notification.direction != ScrollDirection.idle) {
scrollEndTimer.value?.cancel();
}
if (notification is UserScrollNotification &&
notification.direction == ScrollDirection.idle) {
// 스크롤 종료 시 150ms가 경과되면 스크롤이 최종 종료된 것
scrollEndTimer.value =
Timer(const Duration(milliseconds: 150), () async {
final offset = controller.offset;
final nearIndex = offsetToNearIndex(offset, itemHeight + 16);
controller.animateTo((itemHeight + 16) * nearIndex,
duration: const Duration(milliseconds: 300),
curve: Curves.linear);
});
}
return false;
},
child: ListView.builder(
controller: controller,
itemCount: itemCount,
itemBuilder: (context, index) {
return Padding(
padding: const EdgeInsets.all(8.0),
child: Container(
height: itemHeight,
color: Colors
.primaries[Random().nextInt(Colors.primaries.length)],
),
);
}),
),
));
}
}
이로써, Snap Style의 ListView가 완성되었습니다.