들어가며
이 글은 Spring Boot를 공부하며 정리한 글입니다.
데이터베이스의 관계
관계형 데이터베이스의 가장 대표적인 특징은 테이블 간 관계를 형성하고 있다는 것입니다. 그렇기에 이번에는 데이터베이스의 관계 중 일대다 관계에 대해서 알아보도록 하겠습니다.
관계 정의
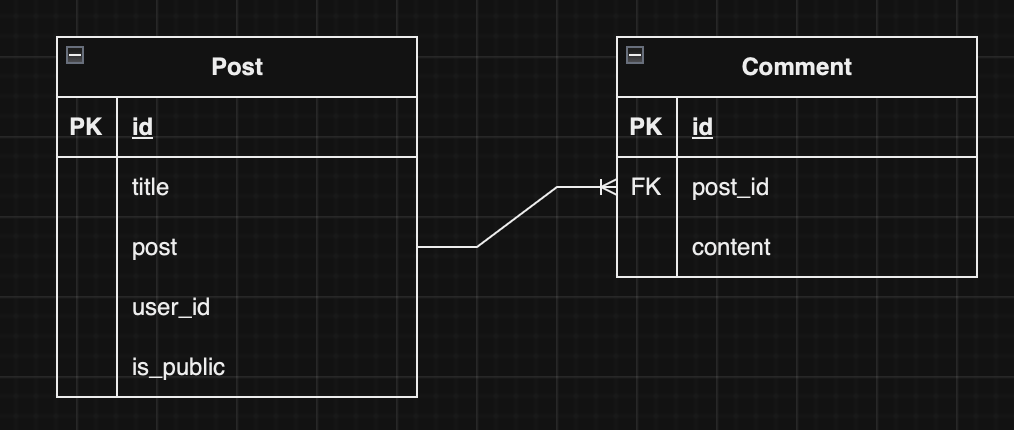
현재 게시판 서비스에서는 사용자가 게시글을 조회, 등록, 수정 등등을 할 수 있습니다. 여기서, 게시글에 대한 댓글을 작성할 수 있도록 댓글기능을 완성해보도록 하겠습니다. 게시글 테이블과 댓글 테이블은 아래와 같이 1:N 관계를 형성하고 있다고 하겠습니다.
Comment 테이블은 post_id라는 FK 필드로 게시글과 1:N 관계를 맺고 있습니다.
@OneToMany
// Post.kt

@Entity
class Post (
    @Id
    @GeneratedValue(strategy = GenerationType.AUTO)
    val id : Long?,

    @Column(nullable = false, length = 100)
    var title : String,

    @Column(nullable = false, length = 2000)
    var post : String,

    @Column(nullable = false, length = 50)
    var userId : Long,

    @Column(nullable = false, length = 10)
    var isPublic : Boolean = true
) {

    // 1:N 관계, LAZY 타입으로 지정
    @OneToMany(fetch = FetchType.LAZY, mappedBy = "post", cascade = [CascadeType.ALL])
    var comments : List<Comment>? = null

    fun toResponse() : PostResponseDto = PostResponseDto(
        id = id,
        title = title,
        post = post,
        userId = userId,
        isPublic = isPublic,
        comments = comments?.map { it.toResponse() }
    )
}
관계를 지정할 대상으로 @OneToMany 어노테이션을 통해서 관계를 등록할 수 있습니다. 여기서 타입은 LAZY하게 등록해주겠습니다.
@Entity
class Comment(

    @Id
    @GeneratedValue(strategy = GenerationType.AUTO)
    val id : Long?,

    @Column(nullable = false, length = 1000)
    var content : String,

    // N:1 관계 설정
    @ManyToOne(fetch = FetchType.LAZY)
    @JoinColumn(foreignKey = ForeignKey(name = "fk_comment_post_id"))
    val post : Post,
) {
    fun toResponse() : CommentResponseDto = CommentResponseDto(
        id = id,
        content = content
    )
}
이제 Comment 테이블에서의 N:1 관계 지정입니다. @ManyToOne을 통해서 N:1 관계를 설정할 수 있습니다. @JoinColumn 어노테이션을 통해서 게시글과의 외래키 지정을 해줍니다.
DTO 생성
import com.example.msyql_example.post.entity.Comment
import com.example.msyql_example.post.entity.Post

data class CommentRequestDto(
    val id : Long?,
    val content : String,
    var post : Post?,
) {
    fun toEntity() : Comment = Comment(
        id = id,
        content = content,
        post = post!!
    )
}

data class CommentResponseDto(
    val id : Long?,
    val content : String,
)
이제 댓글을 생성하기 위하여 DTO를 정의해주겠습니다. DTO에서 Post는 후에 비즈니스 로직의 Setter를 통해 등록하기 때문에 실제로 사용자에게는 게시글 정보를 받지 않습니다.
Service, Repository
//CommentRepository.kt

interface CommentRepository : JpaRepository<Comment, Long?>
마찬가지로 댓글을 저장하기 위해 Repository를 등록하겠습니다.
@Service
class CommentService {

    @Autowired
    private lateinit var commentRepository: CommentRepository

    @Autowired
    private lateinit var postRepository: PostRepository


    /**
     * 댓글 가져오기 기능
     */
    fun getComments() : List<CommentResponseDto> {
        val result = commentRepository.findAll()
        return result.map { it.toResponse() }
    }

    /**
     * 댓글 달기 기능
     */
    fun postComment(id : Long, commentRequestDto: CommentRequestDto) : CommentResponseDto {
        val post : Post = postRepository.findByIdOrNull(id)
            ?: throw PostException("게시글이 존재하지 않습니다!")

        commentRequestDto.post = post

        val result = commentRepository.save(commentRequestDto.toEntity())
        return result.toResponse()
    }
}
댓글을 등록하기 위해서는 우선 게시글을 찾을 필요가 있습니다. 따라서, 미리 제작한 PostRepository도 함께 사용해주겠습니다. 게시글이 존재하지 않는다면 에러가 반환됩니다. 게시글을 찾아서 해당 DTO에 setter를 통해 변경해줍니다. 그리고 데이터베이스에 저장하게 됩니다.
Controller
@RestController
@RequestMapping("/api/posts/comments")
class CommentController {

    @Autowired
    private lateinit var commentService: CommentService

    /**
     * 전체 댓글 조회 Api
     */
    @GetMapping
    private fun getComments() :
            ResponseEntity<BaseResponse<List<CommentResponseDto>>> {
        val result = commentService.getComments()
        return ResponseEntity
            .status(HttpStatus.OK).body(BaseResponse(data = result))
    }

    /**
     * 게시판 댓글 등록 Api
     */
    @PostMapping("/{id}")
    private fun postComment(@PathVariable id : Long, @RequestBody commentRequestDto: CommentRequestDto) :
            ResponseEntity<BaseResponse<CommentResponseDto>> {
        val result = commentService.postComment(id, commentRequestDto)
        return ResponseEntity.status(HttpStatus.CREATED).body(BaseResponse(data = result))
    }
}
컨트롤러에서는 api url을 통해서 게시글의 Id를 전달받는 것으로 하겠습니다. 이를 통해서 후에 서비스에서 게시글을 찾게 됩니다. 이제 게시글에 대한 댓글을 생성할 수 있습니다.
DTO 변경
이제 게시글을 조회하면 해당 게시글의 댓글도 함께 불러올 것입니다. 그에 따라서 댓글에 대한 필드를 추가해줍니다.
data class PostRequestDto(
    var id : Long?,

    @field:NotBlank(message = "제목은 반드시 입력해야 됩니다!")
    var title : String,

    @field:NotBlank(message = "내용은 반드시 입력해야 됩니다!")
    var post : String,

    @field:Min(value = 1, message = "유효하지 않은 사용자입니다.")
    var userId : Long,

    var isPublic : Boolean
) {
    fun toEntity() : Post = Post(
        id = id,
        title = title,
        post = post,
        userId = userId,
        isPublic = isPublic
    )
}


data class PostResponseDto(
    var id : Long?,
    var title : String,
    var post : String,
    var userId : Long,
    var isPublic : Boolean,
    var comments : List<CommentResponseDto>?
)
댓글을 전달받아야 하므로 엔티티에서 toResponse() 메소드도 변경되어야 합니다.
	...
    @OneToMany(fetch = FetchType.LAZY, mappedBy = "post", cascade = [CascadeType.ALL])
    var comments : List<Comment>? = null

    fun toResponse() : PostResponseDto = PostResponseDto(
        id = id,
        title = title,
        post = post,
        userId = userId,
        isPublic = isPublic,
        comments = comments?.map { it.toResponse() }
    )
    ...
toResponse에서는 해당 댓글이 존재한다면 map 을 통하여 댓글 DTO로 변환됩니다. 이로써, 게시글에서의 댓글까지 모두 사용자에게 반환할 수 있습니다.