Spring을 사용하여 DB와 연결하기
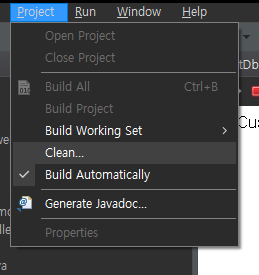
실행에 문제가 있을 경우 clean
1
com.code.testdb
TestDbServlet.java
package com.code.testdb;

import java.io.IOException;
import java.io.PrintWriter;
import java.sql.Connection;
import java.sql.DriverManager;

import javax.servlet.ServletException;
import javax.servlet.annotation.WebServlet;
import javax.servlet.http.HttpServlet;
import javax.servlet.http.HttpServletRequest;
import javax.servlet.http.HttpServletResponse;

/**
 * Servlet implementation class TestDbServlet
 */
@WebServlet("/TestDbServlet")
public class TestDbServlet extends HttpServlet {
   private static final long serialVersionUID = 1L;

   /**
    * @see HttpServlet#doGet(HttpServletRequest request, HttpServletResponse response)
    */
   protected void doGet(HttpServletRequest request, HttpServletResponse response) throws ServletException, IOException {
      // TODO Auto-generated method stub
      String user="springstudent";
      String pass="springstudent";
      String jdbcUrl = "jdbc:mysql://localhost:3306/web_customer_tracker?useSSL=false&serverTimezone=UTC";
      String driver="com.mysql.cj.jdbc.Driver";
      try{
         PrintWriter out = response.getWriter();
         out.println("Connection to database"+jdbcUrl);
         Class.forName(driver);
         Connection myConn = DriverManager.getConnection(jdbcUrl,user,pass);
         out.println("SUCCESS!!!");
         myConn.close();

      }catch(Exception exc) {
         exc.printStackTrace();
         throw new ServletException(exc);
      }

   }

}
코드실행결과

2
com.code.springdemo.controller
CustomerController
package com.code.springdemo.controller;

import org.springframework.stereotype.Controller;
import org.springframework.ui.Model;
import org.springframework.web.bind.annotation.RequestMapping;

@Controller //MVC의 컨트롤러라는 것을 알려줌
@RequestMapping("/customer") //URL 주소 매핑
public class CustomerController {

	@RequestMapping("/list")
	public String listCustomer(Model theModel) {
		return "list-customers";
	}
}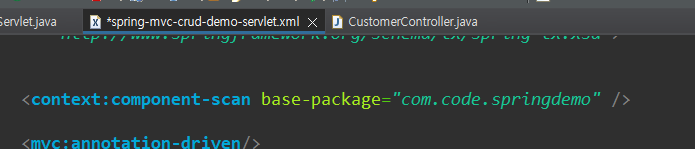
xml에 선언 되어있어서 사용할수 있습
3
view
list-customers.jsp
<%@ page language="java" contentType="text/html; charset=EUC-KR"
    pageEncoding="EUC-KR"%>
<!DOCTYPE html>
<html>

<head>
	<title>List Customers</title>
</head>


<body>
	List Customers are coming soon...

	http://localhost:8080/web-customer-tracker/WEB-INF/classes/com/code/springdemo/controller/CustomerController.java
	http://localhost:8080/web-customer-tracker/WEB-INF/view/list-customers.jsp
	http://localhost:8080/web-customer-tracker/customer/list
</body>

</html>
실행결과
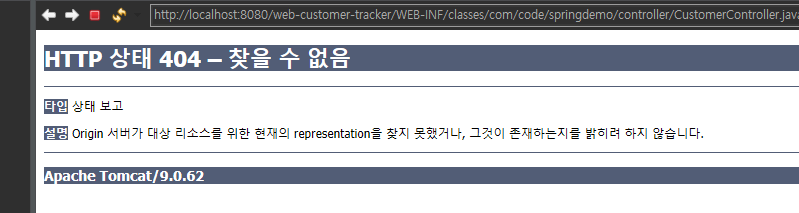
url 변경 해주어야함

4. DTO
com.code.springdemo.entity
Customer.java
package com.code.springdemo.entity;
import javax.persistence.Column;
import javax.persistence.Entity;
import javax.persistence.GeneratedValue;
import javax.persistence.GenerationType;
import javax.persistence.Id;
import javax.persistence.Table;
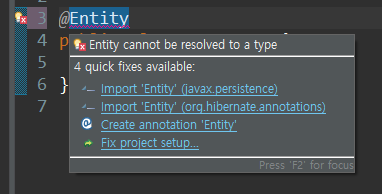
@Entity
@Table(name = "customer")
public class Customer {
//데이터베이스 테이블의 기본 키(PK)와 객체의 필드를 매핑시켜주는 어노테이션입니다.
@Id
//기본 키를 자동 생성해주는 어노테이션입니다.
@GeneratedValue(strategy=GenerationType.IDENTITY)
@Column(name = "id")
private int id;
@Column(name = "first_name")
private String firstName;
@Column(name = "last_name")
private String lastName;
@Column(name = "email")
private String email;
public Customer() {
}
public Customer(int id, String firstName, String lastName, String email) {
this.id = id;
this.firstName = firstName;
this.lastName = lastName;
this.email = email;
}
public int getId() {
return id;
}
public void setId(int id) {
this.id = id;
}
public String getFirstName() {
return firstName;
}
public void setFirstName(String firstName) {
this.firstName = firstName;
}
public String getLastName() {
return lastName;
}
public void setLastName(String lastName) {
this.lastName = lastName;
}
public String getEmail() {
return email;
}
public void setEmail(String email) {
this.email = email;
}
@Override
public String toString() {
return "Customer [id=" + id + ", firstName=" + firstName + ", lastName=" + lastName + ", email=" + email + "]";
}
}
import 하면서 입력
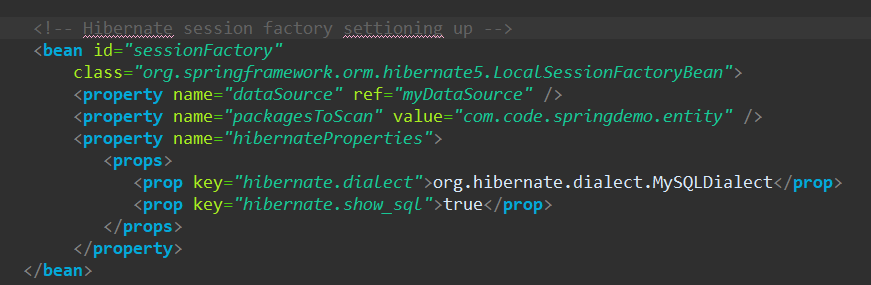
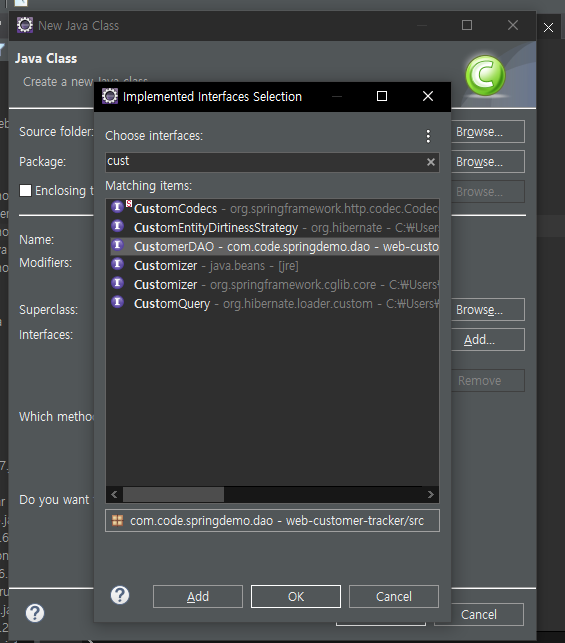
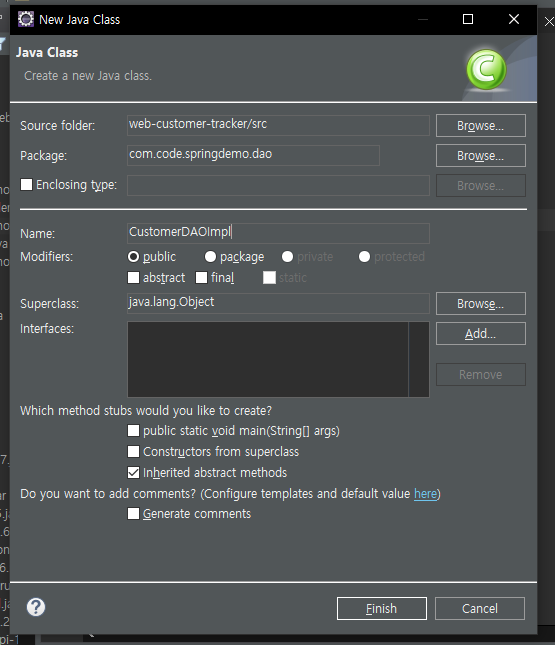
5. DAO
com.code.springdemo.dao
CustomerDAO.java(interface)
package com.code.springdemo.dao;

import java.util.List;

import com.code.springdemo.entity.Customer;

public interface CustomerDAO {

	public List<Customer> getCustomers();

}
com.code.springdemo.dao
CustomerDAOImpl.java
package com.code.springdemo.dao;
import java.util.List;
import org.hibernate.Session;
import org.hibernate.SessionFactory;
import org.hibernate.query.Query;
import org.springframework.beans.factory.annotation.Autowired;
import org.springframework.stereotype.Repository;
import org.springframework.transaction.annotation.Transactional;
import com.code.springdemo.entity.Customer;
@Repository
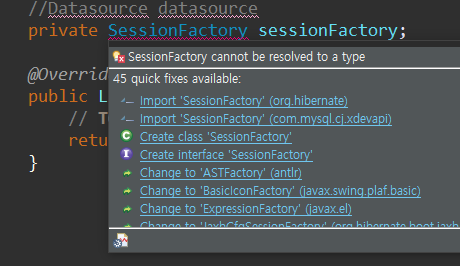
public class CustomerDAOImpl implements CustomerDAO {
@Autowired
//dependency injection : 의존성주입
//Datasource datasource
private SessionFactory sessionFactory;
@Override
@Transactional
//트렌잭션이란?
//데이터베이스의 상태를 변화시키기 위해 수행하는 작업 단위
public List<Customer> getCustomers() {
//현제 hibernate세션을 가져옴
Session currentSession = sessionFactory.getCurrentSession();
Query<Customer> theQuery = currentSession.createQuery("from Customer", Customer.class);
List<Customer> customers = theQuery.getResultList();
return customers;
}
}
이부분 구현화
import hibernate
import com.code.springdemo.entity.Customer;
자동으로 하는법
2. 컨트롤러 수정하기
com.code.springdemo.controller
CustomerController
package com.code.springdemo.controller;

import java.util.List;

import org.hibernate.SessionFactory;
import org.springframework.beans.factory.annotation.Autowired;
import org.springframework.stereotype.Controller;
import org.springframework.ui.Model;
import org.springframework.web.bind.annotation.RequestMapping;

import com.code.springdemo.dao.CustomerDAO;
import com.code.springdemo.entity.Customer;

@Controller //MVC의 컨트롤러라는 것을 알려줌
@RequestMapping("/customer") //URL 주소 매핑
public class CustomerController {

	//customerdao를 inject 하세요
	@Autowired
	private CustomerDAO customerDAO;


	@RequestMapping("/list")
	public String listCustomer(Model theModel) {

		//customers라는 이름으로 customerDAO의 return값을 받아오도록 코딩하세요.
		List<Customer> theCustomers = customerDAO.getCustomers();

		theModel.addAttribute("customers",theCustomers);

		return "list-customers";
	}
}
3 뷰단 수정하기
view
list-customers.jsp
<%@ page language="java" contentType="text/html; charset=utf-8" pageEncoding="utf-8"%>
<%@ taglib uri="http://java.sun.com/jsp/jstl/core" prefix="c" %>
<!DOCTYPE html>
<html>
<head>
   <title>List Customers</title>
   <!--  css파일 적용-->
	   <link type= "text/css"
      rel="stylesheet"
      href="${pageContext.request.contextPath}/resources/css/style.css"/>
</head>
<body>
   <div id="wrapper">
      <div id="header">
         <h2>Customer Management</h2>
      </div>
   </div>

   <div id="container">

      <div id="content">

         <!-- add our html table here -->
         <table>
            <tr>
               <th>First Name</th>
               <th>Last Name</th>
               <th>Email</th>
            </tr>

            <!-- loop over and print our customers -->
            <c:forEach var="tempCustomer" items="${customers}">

               <tr>
                  <td> ${tempCustomer.firstName} </td>
                  <td> ${tempCustomer.lastName} </td>
                  <td> ${tempCustomer.email} </td>
               </tr>

            </c:forEach>

         </table>

      </div>

   </div>

</body>
</html>
웹 개발자