
디자인 시스템 도입과 문제
프로젝트를 진행하면서 일관적이고 통일성 있는 디자인 적용을 위해서 디자인 시스템을 도입했습니다. 하지만 디자인 시스템을 도입하면서 여러 가지 문제가 발생했습니다.
디자인 시스템 도입 후 발생한 문제
-
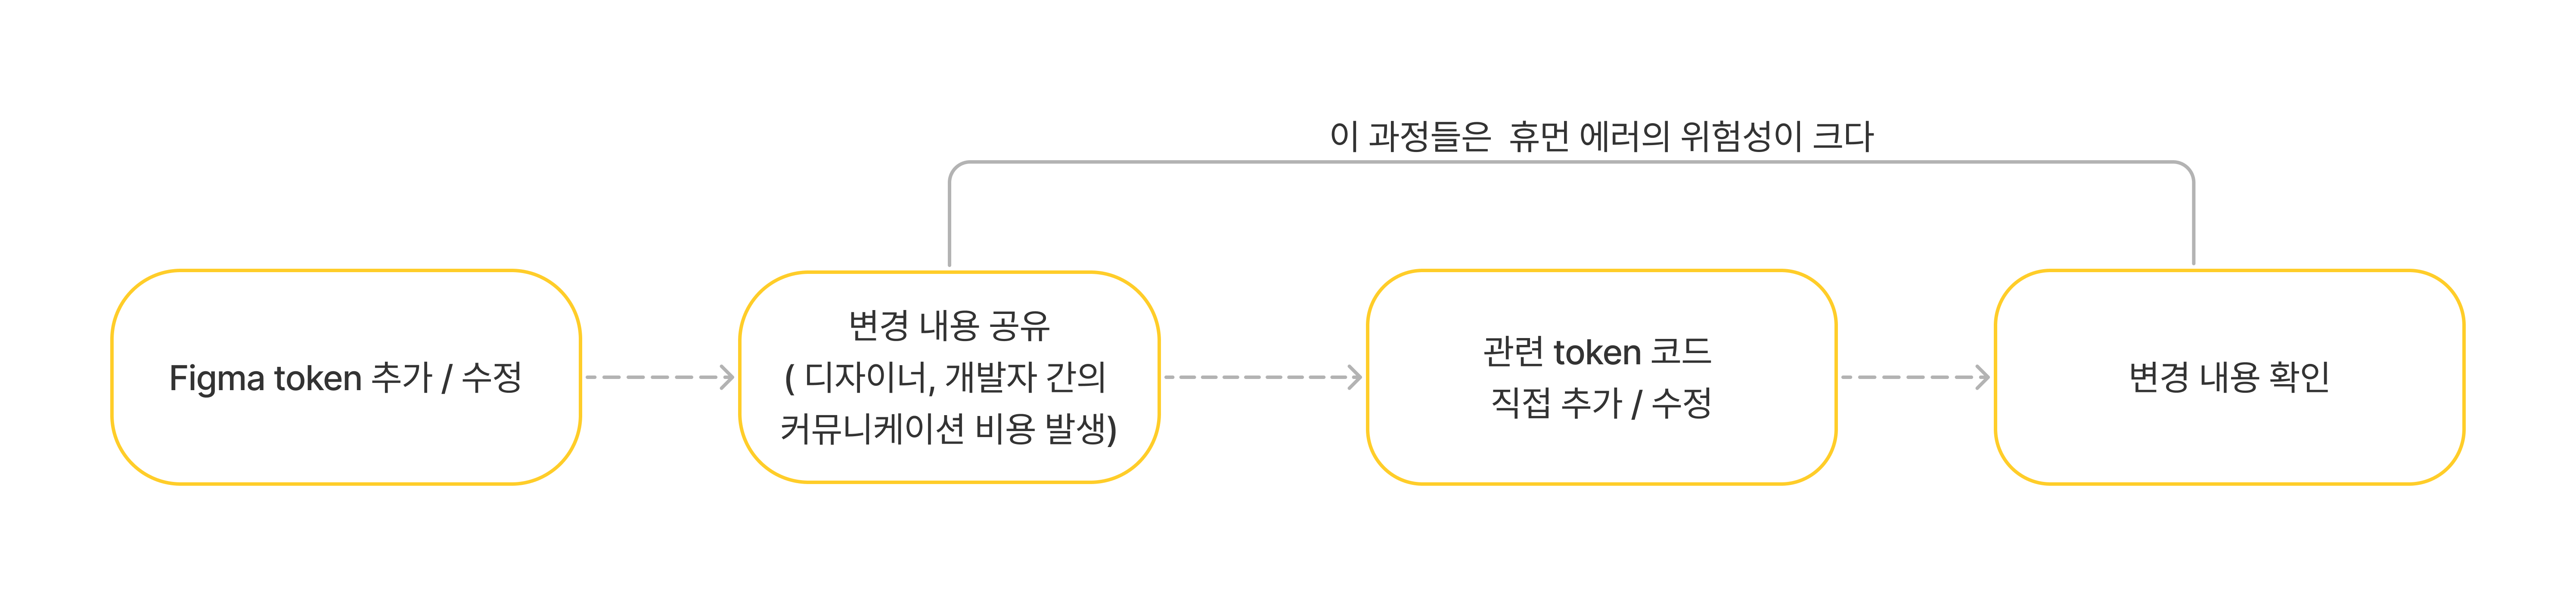
수동 입력의 비효율성
Figma에서 관리하는 토큰 값을 코드에 반영하기 위해 직접 타이핑해야 했습니다. 이번 프로젝트는 규모가 크지 않았기 때문에 수작업으로도 큰 문제가 없었지만, 프로젝트가 커질 경우 오타나 잘못된 값이 입력될 가능성이 커지고, 반복적인 작업이 비효율적으로 느껴졌습니다.
-
디자인 원천의 이원화
Figma에서 토큰 값을 관리하지만, 코드에서 동일한 값을 수동으로 입력해야 했기 때문에 사실상 디자인 원천이 두 개로 나뉘는 문제가 있었습니다. 변경 사항이 있을 때마다 Figma의 토큰 값과 코드의 값을 각각 수정해야 하므로, 작업이 번거로울 뿐만 아니라 Figma와 코드가 불일치할 위험도 존재했습니다.
-
협업 과정에서의 커뮤니케이션 비용
현재는 프론트엔드에서 디자인까지 함께 작업하고 있어 큰 문제가 없었지만, 만약 디자이너와 협업하는 상황이라면 토큰 변경에 대한 커뮤니케이션 과정이 필수적입니다. 이는 단순히 변경 내용을 전달하는 것을 넘어, 변경 사항이 제대로 반영되었는지 추가 확인 작업까지 필요하게 됩니다.
문제 해결
디자인 토큰 관리는 Figma Tokens Studio plugin에서만 추가 수정 하고, 변경된 내용을 바로 repo에 push 하도록 했습니다. 그리고 GitHub Actions와 Style Dictionary를 활용해 토큰 변경 사항을 코드로 자동 변환하도록 구현하여, 직접 코드를 입력하는 과정을 최소화했습니다.

적용 과정
1. Tokens Studio
Tokens Studio plugin은 Figma에서 token을 관리하는 plugin이다. token 관리를 편하게 할 수 있고 토큰 정보를 json형식으로 export 할 수 있다. 그리고 Tokens Studio는 변경된 token 정보를 project repo에 바로 push 할 수 있다.
Tokens Studio for Figma: Onboarding (korea) | Figma
Token Studio 온보딩 페이지로 design token에 대한 설명과 Tokens studio에 대한 간단한 사용법을 잘 설명해준다.👍
저는 color, lineHeight, fontWeight, fontSize, typography(fontSize, fontWieight, lineHeight를 묶어서 사용)를 디자인 토큰을 만들어서 사용했습니다.
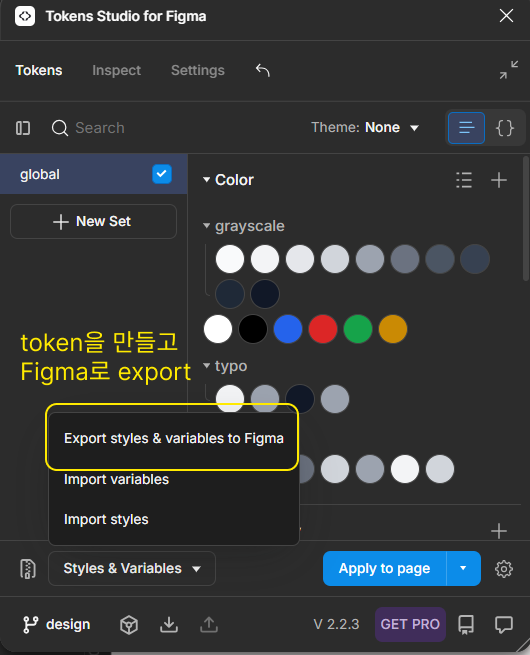
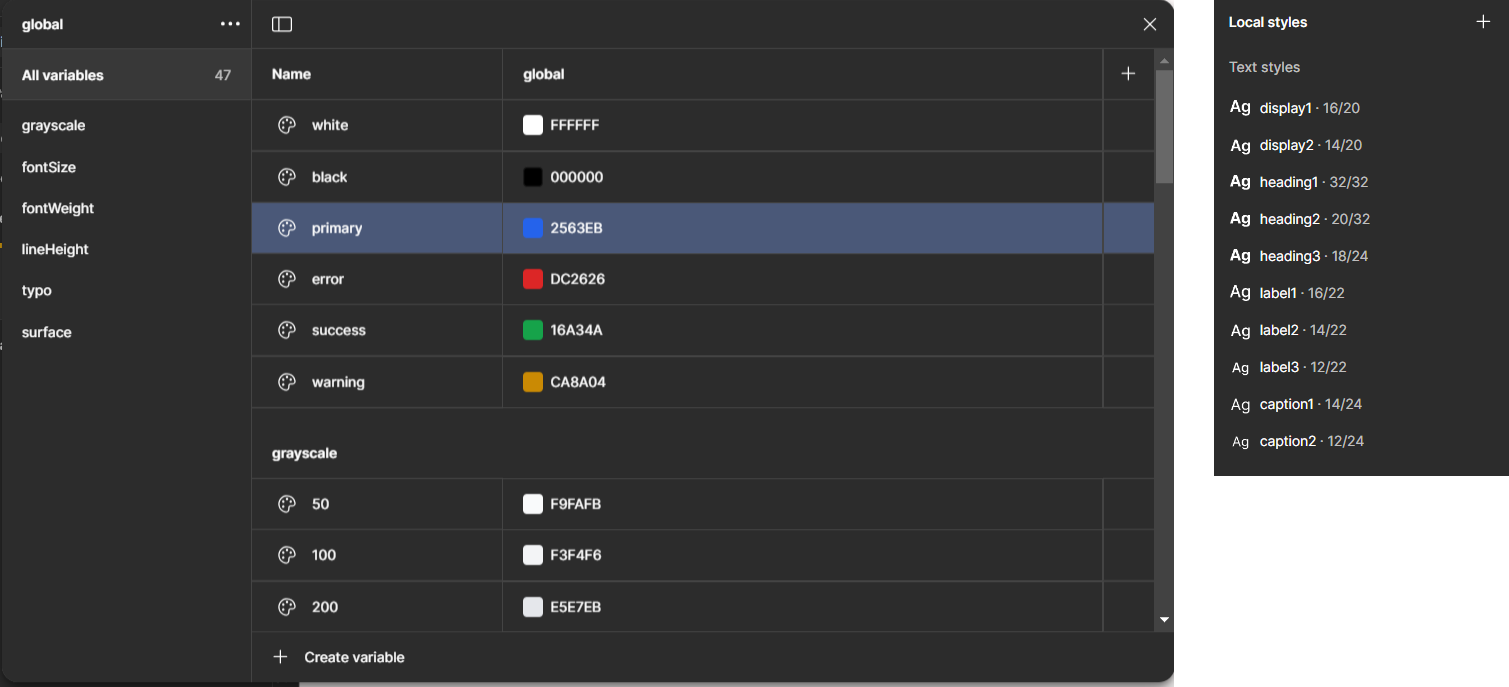 token을 다 만들고 Figma로 export를 해주시면 variables와 style이 만들어지고 Figma에서 이 값들을 사용해서 디자인에 이용하면 됩니다.
다른 곳에서 토큰 데이터를 사용하고 싶다면 JSON 파일로 export하시면 됩니다.
//token을 JSON으로 export
{
  "global": { //set으로 설정한 이름이 온다.
    "grayscale": {
      "50": {
        "$type": "color",  // color, fontSize, lineHeight, fontWieght 타입 등이 온다.
        "$value": "#f9fafb" //해당 token 값으로 다른 값을 참조할 수 있다.
      },
      "100": {
        "$type": "color",
        "$value": "#f3f4f6"
      },
	    ...
    },
    "white": {
      "$type": "color",
      "$value": "#ffffff"
    },
    "black": {
      "$type": "color",
      "$value": "#000000"
    },
    "fontSize": {
      "sx": {
        "$type": "fontSizes",
        "$value": "0.75rem"
      },
      "sm": {
        "$type": "fontSizes",
        "$value": "0.875rem"
      },
      ...
    },
    "fontWeight": {
      "light": {
        "$type": "fontWeights",
        "$value": "300"
      },
      "normal": {
        "$type": "fontWeights",
        "$value": "400"
      },
      ...

    },
    "display1": {
      "$type": "typography",
      "$value": {
        "fontSize": "{fontSize.base}", //다른 token 값을 참조할 수 있다.
        "fontWeight": "{fontWeight.semibold}",
        "lineHeight": "{lineHeight.tight}"
      }
    },
    "surface": {
      ...,
      "DEFAULT": {
        "$type": "color",
        "$value": "{grayscale.800}"
      },
      "disabled": {
        "$type": "color",
        "$value": "{grayscale.300}"
      },
   ...
    }
  },
  "$themes": [],
  "$metadata": {
    "tokenSetOrder": [
      "global"
    ]
  }
}
⚠️ 사이즈관련 token 주의사항
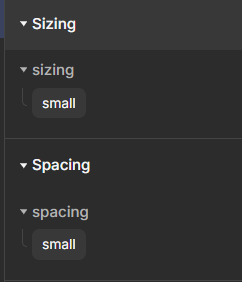
사이즈 관련 token에서는 'small', 'large' 같은 단어들을 많이 사용하는데, 각 타입별로 최상단에 바로 사용하시면 다른 타입 값들과 이름이 충돌되서 한 곳에서만 사용할 수 있습니다. 그래서 사이즈 관련해서는 각 타입별로 한번씩 묶어서 사용했습니다.
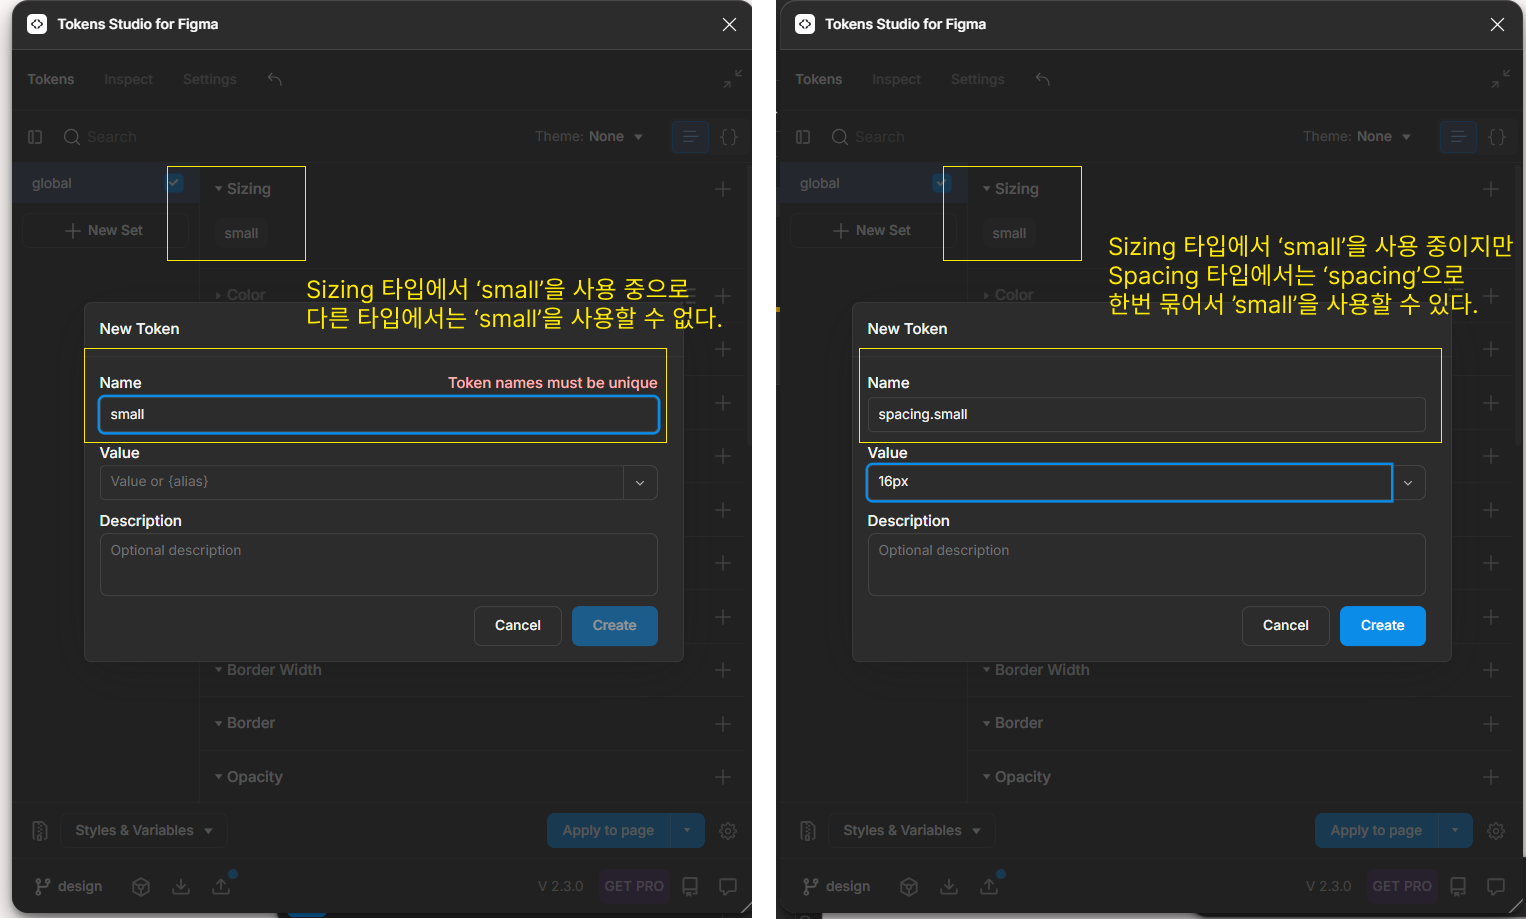
//tokens.json
//sizing타입과 spacing 타입에서 'small'이라는 key값이 충돌된다.
//type별로 분리가 필요하다
  {...
    "small": {
      "$type": "sizing",
      "$value": "12px"
    },
     "small": {
      "$type": "spacing",
      "$value": "12px"
    }
  }
//타입별로 한번 더 묶어서 분리 'small'이라는 키값을 사용 가능하다.
{ ...
  "sizing": {
    "small": {
      "$type": "sizing",
      "$value": "12px"
    }
  },
  "spacing": {
    "small": {
      "$type": "spacing",
      "$value": "12px"
    }
  }
  ...
  }
이렇게 export된 token.json을 가공해서 원하는 형태로 사용하시면 됩니다. 저는 이 디자인 토큰들을 tailwnidcss에서 사용하기 위해서 객체 형태로 변환이 필요한데, 이 변환 작업을Style Dictionary를 사용해서 변환했습니다.
2. Style Dictionary
Style Dictionary is a build-system that runs in both NodeJS and browsers (natively), to parse and transform your design tokens to then export them to any platform: iOS, Android, CSS, JS, HTML, sketch files, style documentation, or anything you can think of.
”Style-Dictionary은 NodeJS와 브라우저에서 모두 실행되는 빌드 시스템으로, 디자인 토큰을 파싱하고 변환하여 iOS, Android, CSS, JS, HTML, 스케치 파일, 스타일 문서 등 모든 플랫폼으로 내보낼 수 있습니다.”
Style Dictionary는 디자인 토큰 데이터를 다양한 형태로 변환해주는 도구로, 변환 과정에서 여러 유용한 기능을 제공합니다.
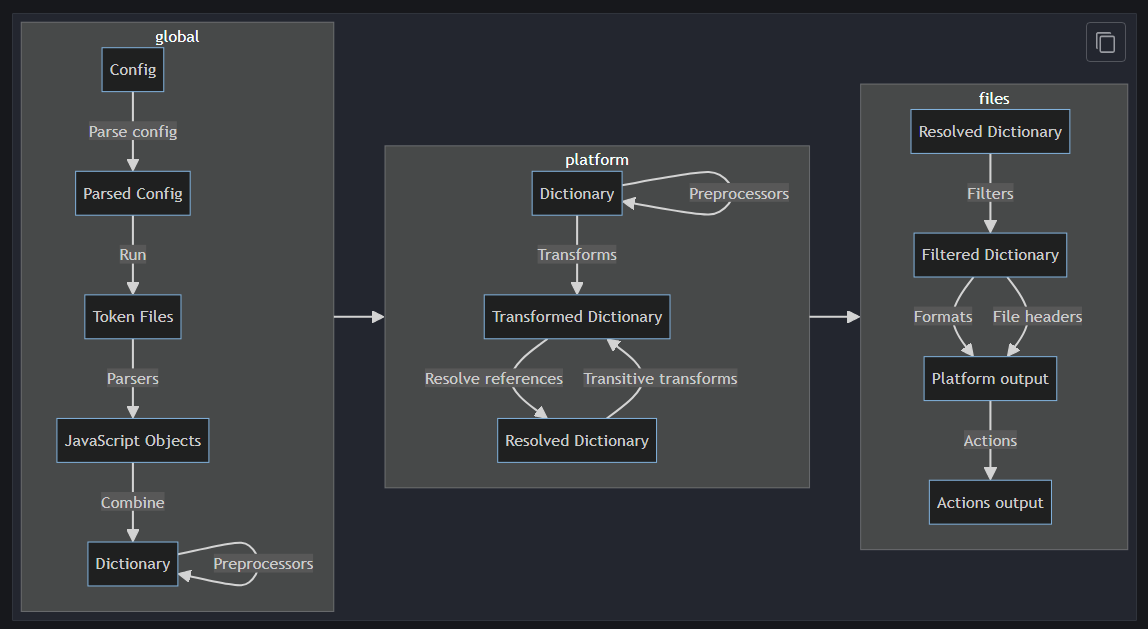 Style-Dictionary가 실행되는 순서입니다. Style-Dictionary는 각 단계에 대해서 hook을 제공하고 있어서 각 단계에 대해서 설정해서 사용할 수 있습니다.
- Parse
token들을 parse한다. - Preprocessor
parse되고 merge된 dictionary에 대해서 추가적인 로직을 실행할 수 있다. - Transform
dictionary 을 내가 원하는 형태로 변환 시킨다. style-dictionary에서 기본적으로 제공하는 transformer도 있지만 내가 원하는 형태를 설정할 수 있다. - Filter
변환된 dictionary을 filtering 한다. filter가 transform전에 실행되는 줄 알고 많이 헷갈렸다. - Format
변환된 dictionary로 output 파일을 만든다. 여기서 output 파일에 주석을 넣거나 추가적인 코드를 넣을 수 있다. - Action
output 파일을 생성하고 추가적인 로직을 실행시킬 수 있다.
실제로 이번 프로젝트에 Style Dictionary를 적용하면서 대부분 transform 단계에 대해서 설정해서 사용했습니다. 아직 복잡한 내용을 변환 하는게 아니라서 다른 hook에 대한 필요성을 못 느꼈던 것 같습니다.
🛠️ Style Dictionary 설정 파일
Style Dcitonary 해야하는 작업은 TokenStudio에서 설정했던 'global'이라는 set이름으로 묶어둔 것을 제거하고, color 타입 토큰은 colors.ts 파일로 분리, typography 타입은 형태 변환하고 fontSize.ts 파일로 분리하는 작업입니다
//style.config.js
//Style Dictionary를 설정하는 파일입니다.
import StyleDictionary from 'style-dictionary';

StyleDictionary.registerPreprocessor({ //preprocessor 단계에서 실행할 수 있는 로직 등록
  name: 'removeGlobalKey', // 이 로직 사용할 때 호출하는 이름
  preprocessor: (dict) => { // merge된 dictionary
  //export시 set 이름으로 한번 감싸찌는걸 없애는 용도
    const [key, ...rest] = Object.keys(dict);
    if (key === 'global') {
      return dict[key];
    }
    return dict;
  },
});


StyleDictionary.registerTransform({ //transform 단계에서 실행할 수 있는 로직 등록
  type: 'value',
  transitive: true,
  name: 'tailwind/fontSize', // 이 transform 사용할 때 호출하는 이름, 원하는 이름 넣어주면 된다.
  filter: (token) => { //token 중 type이 'typography'
    return token.$type === 'typography';
  },
  transform: (token) => { //여기 로직이 token 형태를 변환시키는 로직
    const { fontWeight, fontSize, lineHeight } = token.$value;
    //tailwind에 fontSize를  '[fontSize, { lineHeight?, letterSpacing?, fontWeight? }]'형태로 사용할 수 있다.
    return [fontSize, { lineHeight, fontWeight }];
  },
});

const sdConfig = {
  log: {
    verbosity: 'verbose',
  },
  preprocessors: ['removeGlobalKey'], //preprocessors 단계에서 실행시킬 로직 이름들을 넣는다. 위에서 등록했던 'removeGolbalKey'
  source: ['./tokens/**/*.json'], //token 위치
  platforms: { //token 변환에 대한 설정
    js: { // built in format인 js 형식으로 변환
      buildPath: './styles/', //output 위치
      transformGroup: 'js',
      transforms: ['tailwind/fontSize'], //위에서 등록했던 Transform
      files: [
        {
          format: 'javascript/esm',// output되는 파일 형식,style-dictionary에서 기본 제공하는 형식이다.
          destination: 'colors.ts', //output되는 파일 이름, 확장자
          options: {
            minify: true,
          },
          filter: {
            $type: 'color',
          },
        },
        {
          format: 'javascript/esm',
          destination: 'fontSize.ts',
          options: {
            minify: true,
          },
          filter: {
            $type: 'typography',
          },
        },
      ],
    },
  },
};


const sd = new StyleDictionary(sdConfig); // 설정
await sd.buildAllPlatforms(); //token 변환 실행
preprocessor 단계에서 'global'이라는 set을 제거하는 이유는 token 중에는 다른 token을 참조하는 token들이 있습니다. 하지만 참조하는 형태를 보면 'global'에 접근하지 않고 바로 token 값에 접근합니다. 이렇게 사용하면 참조 에러가 나와서 제거가 필요했습니다.
StyleDictionary.registerPreprocessor({ //preprocessor 단계에서 실행할 수 있는 로직 등록
  name: 'removeGlobalKey', // 이 로직 사용할 때 호출하는 이름
  preprocessor: (dict) => { // merge된 dictionary
  //export시 set 이름으로 한번 감싸지는걸 없애는 용도
    const [key, ...rest] = Object.keys(dict);
    if (key === 'global') {
      return dict[key];
    }
    return dict;
  },
});

//token.json
//참조시 global.grayscale.800이 아닌 grayscale.800으로 참조해서 참조에러가 난다.

	"global":
    	"grayscale":{
			"800":{
            	"$type": "color",
        		"$value":"#1f2937"
            }
		},
    	"surface": {
      		"DEFAULT": {
        		"$type": "color",
        		"$value": "{grayscale.800}" //다른 token 참조
      		},
        }

//preprocessor에서 global을 제거
//prepreocessor가 적용된 후
  "grayscale":{
    "800":{
      "$type": "color",
        "$value":"#1f2937"
    }
		},
  	"surface": {
     	"DEFAULT": {
        	"$type": "color",
        	"$value": "{grayscale.800}" //다른 token 참조
      	},
	}
transform 단계에서 typography 타입의 token을 tailwind에서 사용하려면 tailwind가 지원하는 형태로 변환이 필요했습니다.
StyleDictionary.registerTransform({ //transform 단계에서 실행할 수 있는 로직 등록
  type: 'value',
  transitive: true,
  name: 'tailwind/fontSize', // 이 transform 사용할 때 호출하는 이름, 원하는 이름 넣어주면 된다.
  filter: (token) => { //token 중 type이 'typography'
    return token.$type === 'typography';
  },
  transform: (token) => { //여기 로직이 token 형태를 변환시키는 로직
    const { fontWeight, fontSize, lineHeight } = token.$value;
    //tailwind에 fontSize를  '[fontSize, { lineHeight?, letterSpacing?, fontWeight? }]'형태로 사용할 수 있다.
    return [fontSize, { lineHeight, fontWeight }];
  },
});

//token.json
{
...,
   "display1": {
      "$type": "typography",
      "$value": {
        "fontSize": "{fontSize.base}",
        "fontWeight": "{fontWeight.semibold}",
        "lineHeight": "{lineHeight.tight}"
      }
    },
}
// 위 token이 밑에 형식으로 변환
//fontSize.ts
{
  display1: [
    "1rem", //fontSize
    {
      lineHeight: "1.25rem",
      fontWeight: "600",
    },
  ],
}
📝 실행 스크립트 추가
이제 cli로 Style Dictionary를 실행 할 수 있게 package.json에서 스크립트를 등록해주면 됩니다.
//pakage.json
{
...,
 "scripts": {
   ...,
    "build-style": "node style.config.js"
  //token 변환 실행 스크립트, 설정파일을 실행해준다.
  },

}
📁 output 파일들
//color 타입의 토큰들이 변환된 결과
//styles/colors.ts

/**
 * Do not edit directly, this file was auto-generated.
 */

export default {
  grayscale: {
    50: "#f9fafb",
    100: "#f3f4f6",
    200: "#e5e7eb",
    300: "#d1d5db",
    400: "#9ca3af",
    500: "#6b7280",
    600: "#4b5563",
    700: "#374151",
    800: "#1f2937",
    900: "#111827",
  },
  white: "#ffffff",
  black: "#000000",
  primary: "#2563eb",
  error: "#dc2626",
  success: "#16a34a",
  warning: "#ca8a04",
  typo: {
    display: "#f3f4f6",
    disable: "#9ca3af",
    DEFAULT: "#111827",
    sub: "#9ca3af",
  },
  surface: {
    card: "#f3f4f6",
    DEFAULT: "#1f2937",
    cancle: "#6b7280",
    disabled: "#d1d5db",
    sub: "#9ca3af",
    hover: "#f3f4f6",
    cardBorder: "#d1d5db",
  },
};
//typography 타입의 토큰들이 변환된 결과
//styles/fontSize.ts

/**
 * Do not edit directly, this file was auto-generated.
 */

export default {
  display1: [
    "1rem",
    {
      lineHeight: "1.25rem",
      fontWeight: "600",
    },
  ],
  display2: [
    "0.875rem",
    {
      lineHeight: "1.25rem",
      fontWeight: "600",
    },
  ],
  heading1: [
    "2rem",
    {
      lineHeight: "2rem",
      fontWeight: "700",
    },
  ],
  heading2: [
    "1.25rem",
    {
      lineHeight: "2rem",
      fontWeight: "700",
    },
  ],
  heading3: [
    "1.125rem",
    {
      lineHeight: "1.5rem",
      fontWeight: "700",
    },
  ],
  label1: [
    "1rem",
    {
      lineHeight: "1.375rem",
      fontWeight: "500",
    },
  ],
  label2: [
    "0.875rem",
    {
      lineHeight: "1.375rem",
      fontWeight: "500",
    },
  ],
  label3: [
    "0.75rem",
    {
      lineHeight: "1.375rem",
      fontWeight: "500",
    },
  ],
  caption1: [
    "0.875rem",
    {
      lineHeight: "1.5rem",
      fontWeight: "400",
    },
  ],
  caption2: [
    "0.75rem",
    {
      lineHeight: "1.5rem",
      fontWeight: "400",
    },
  ],
};
이렇게 변환된 파일들은 tailwind 설정 파일에서 import해서 사용하시면 됩니다.
//taiiwind.config.js
//tailwind 설정 파일
import colors from './styles/colors.ts'; //token을 변환한 color 값들
import fontSize from './styles/fontSize.ts';//token을 변환한 fontSize 값들

/** @type {import('tailwindcss').Config} */

export default {
 ...,
  theme: {
  ...,
    extend: {
      colors, //color 추가
      fontSize, // fontSize 추가
    },
  },

};

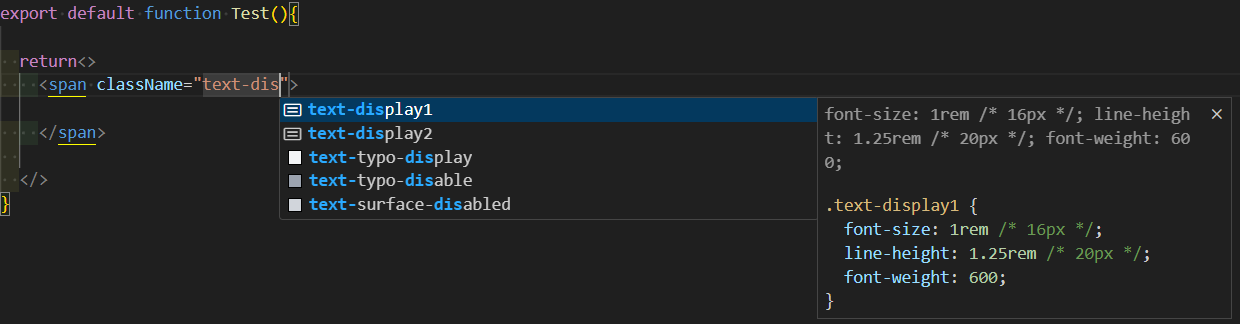
tailwind에 잘 적용된 모습입니다.
3. GitHub Actions를 이용한 토큰 자동 변환, PR 작성
Tokens Studio와 GitHub 연결, GitHub Actions 적용을 이 블로그를 참고했습니다.👍
Tokens Studio에서 design 브랜치에 commit을 push 할 수 있습니다.이것을 트리거 토큰 변환 스크립트를 실행시켜서 token을 새로 변환합니다. 그리고 변환이 완료되면 dev 브랜치에 PR을 작성해서 올립니다.
# 자동화 작업 이름
name: Create PR from design to dev
# design 브랜치의 tokens.json 파일에 대한 push를 trigger로 해서 작업을 실행
on:
push:
branches:
- design
path:
- "front/tokens/tokens.json"
jobs:
createPullRequest:
runs-on: ubuntu-latest
steps:
- uses: actions/checkout@v3
- uses: actions/setup-node@v3
with:
node-version: '18'
# style-dictionary는 node-version 18이 필수입니다.
# run에서 프론트 폴더로 이동 후 package.json에 만들어 둔 scritp 'buil-style' 실행
- name: Run Token Transformer
run: |
cd front
npm i style-dictionary
npm run build-style
git config --global user.name "GitHub 디자인 계정 이름"
git config --global user.email "GitHub 디자인 계정 이메일"
git add .
git commit -m '피그마 디자인 파일 변환'
git push
env:
GITHUB_TOKEN: ${{ secrets.ACCESS_TOKEN }}
- name: Create Pull Request
run: gh pr create -B dev -H design --title '💄 디자인 토큰 업데이트' --body '디자인 토큰이 업데이트 후 변환작업을 수행했습니다.'
env:
GITHUB_TOKEN: ${{ secrets.ACCESS_TOKEN }}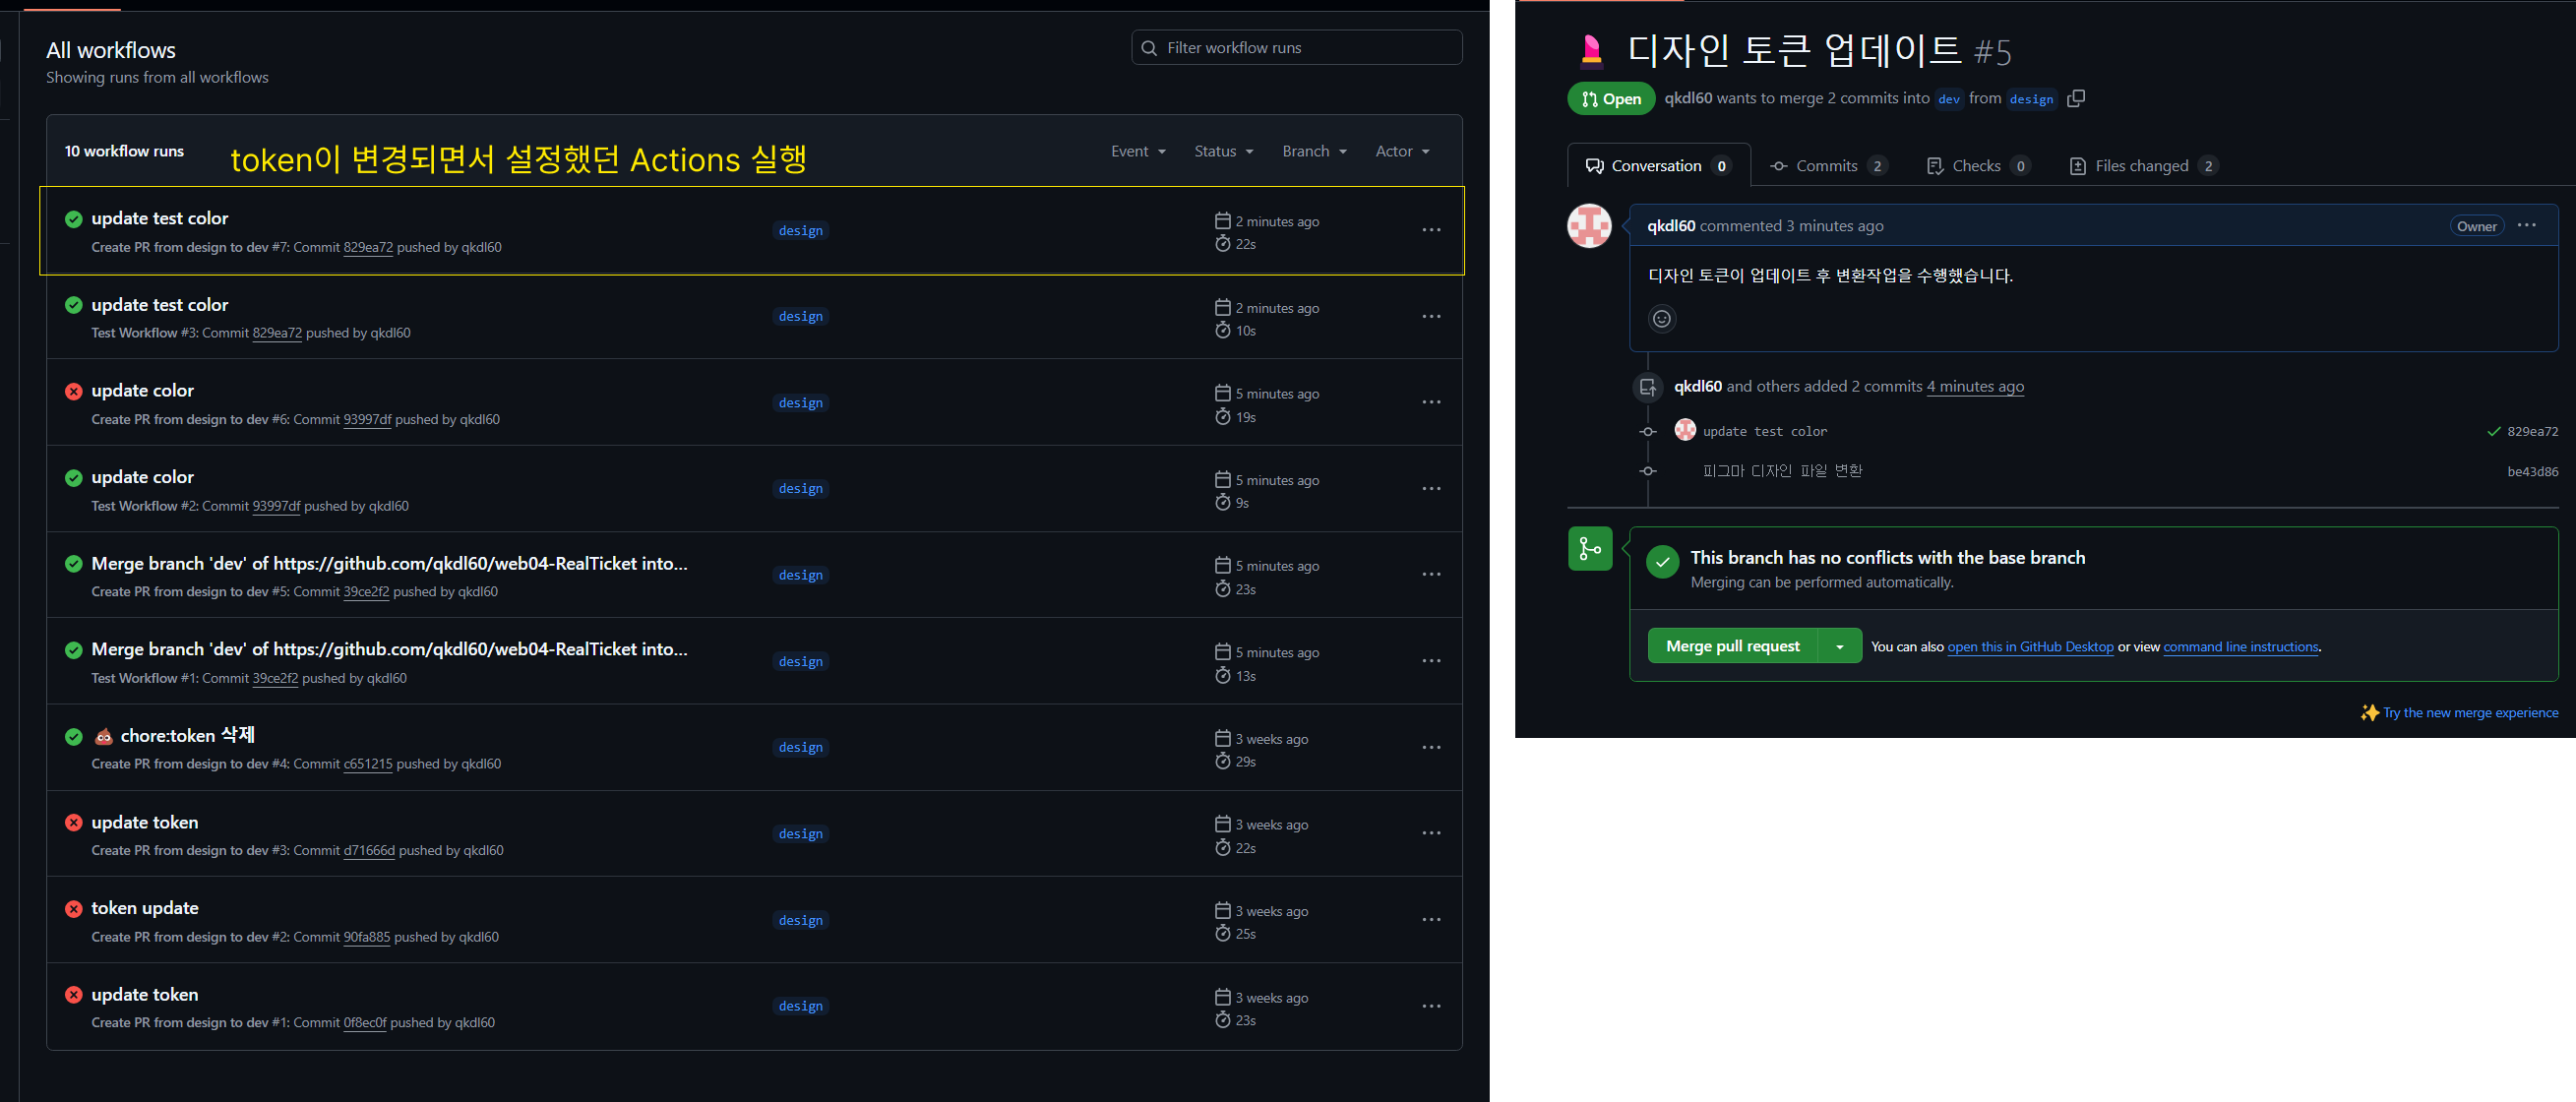 design branch에 token 변경 내용이 push되면 이 변경 내용으로 style-dictionary를 통해서 코드로 변환하고, 이 내용이 PR로 작성됩니다.
결과 및 후기
 이제 디자인 토큰은 Figma에서만 변경하면 되고, 변경된 내용이 브랜치로 푸시되면 자동으로 코드로 변환된 후 PR이 생성됩니다. 덕분에 팀원들과 변경 사항을 공유하는 데 드는 커뮤니케이션 비용이 크게 줄었고, 디자인 요소 변경 작업에 대한 부담도 덜어졌습니다. 무엇보다 변경된 내용과 실제 코드 간의 불일치 문제가 완전히 사라졌다는 점이 가장 큰 장점이었습니다.
출처
Style Dictionary 사용 방법 정리(feat. 피그마 디자인 토큰 가공하기) — 코딩못하는컴공
Tokens Studio + Tailwind CSS: 피그마 디자인 시스템 자동 업데이트 구축하기
