지난 시간에 이어서 지금 저희가 만들고 있는 ViewController는 밑에 사진에서 메인 서블릿의 역할을 합니다.
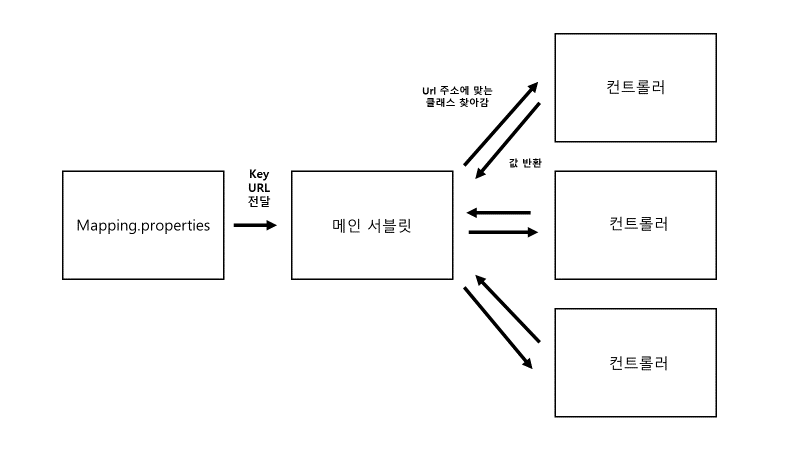
properties에서 얻은 매핑정보를 토대로 컨트롤러 클래스의 인스턴스를 만들어서 값을 받아오는 것입니다.
ViewController 전체코드
import java.io.*;
import java.util.Enumeration;
import java.util.Map;
import java.util.Properties;

import javax.servlet.*;
import javax.servlet.annotation.*;
import javax.servlet.annotation.WebServlet;
import javax.servlet.http.*;


@WebServlet(
		urlPatterns = { "*.book" },
		initParams = {
				@WebInitParam(name = "propertyConfig", value = "properties가 있는 경로", description = "*.book")
		})
public class ViewController extends HttpServlet {
	private static final long serialVersionUID = 1L;

	Map<String, Object> cmdMap = new HashMap<>();

	public void init(ServletConfig config) throws ServletException {

		FileInputStream fis = null;

		String props = config.getInitParameter("propertyConfig");

		try {
			fis = new FileInputStream(props);

			Properties pr = new Properties();

			pr.load(fis);

			Enumeration<Object> en = pr.keys();

            while(en.hasMoreElements()) {
				String key = (String)en.nextElement();

				String className = pr.getProperty(key);
                // 클래스 이름 가져오기

				if(className != null) {
					className = className.trim();
                    // 클래스 이름 공백 없애기

					Class<?> cls = Class.forName(className);
                    // 클래스 이름을 토대로 클래스 생성

					Constructor<?> constrt = cls.getDeclaredConstructor();
                    // 생성자 만들기


					Object obj = constrt.newInstance();
					// 인스턴스 만들기

					cmdMap.put(key, obj);


				}
			}
		}

		catch (FileNotFoundException e) {
			System.out.println(">>> C:/NCS/workspace(jsp)/MyMVC/src/main/webapp/WEB-INF/Command.properties 파일이 없습니다 <<<");
			e.printStackTrace();
		} catch (IOException e) {
			e.printStackTrace();
		} catch (ClassNotFoundException e) {

			System.out.println("문자열로 명명되어진 클래스가 존재하지 않습니다.");
			e.printStackTrace();
		} catch (Exception e) {

		}
	}

	protected void doGet(HttpServletRequest request, HttpServletResponse response) throws ServletException, IOException {
		String uri = request.getRequestURI();

		String key = uri.substring(request.getContextPath().length());

		AbstractController action = (AbstractController)cmdMap.get(key);

		if(action == null) {

		}
		else {
			request.setCharacterEncoding("UTF-8");

			action.execute(request, response);
			boolean bool = action.isRedirect();
			String viewPage = action.getViewPage();

			if(!bool) {
				// forward를 하는 경우
				if(viewPage != null) {
					RequestDispatcher dispatcher = request.getRequestDispatcher(viewPage);
					dispatcher.forward(request, response);
				}
			}
			else {
				if(viewPage != null) {
					response.sendRedirect(viewPage);
				}
			}
		}

	}


	protected void doPost(HttpServletRequest request, HttpServletResponse response) throws ServletException, IOException {

		doGet(request, response);
	}

}
나눠서 설명해보겠습니다.
Map<String, Object> cmdMap = new HashMap<>();

	public void inti(ServletConfig config) throws ServletException {

		FileInputStream fis = null;

		String props = config.getInitParameter("propertyConfig");

		try {
			fis = new FileInputStream(props);

			Properties pr = new Properties();

			pr.load(fis);

			Enumeration<Object> en = pr.keys();

            while(en.hasMoreElements()) {
				String key = (String)en.nextElement();

				String className = pr.getProperty(key);
                // 클래스 이름 가져오기

				if(className != null) {
					className = className.trim();
                    // 클래스 이름 공백 없애기

					Class<?> cls = Class.forName(className);
                    // 클래스 이름을 토대로 클래스 생성

					Constructor<?> constrt = cls.getDeclaredConstructor();
                    // 생성자 만들기


					Object obj = constrt.newInstance();
					// 인스턴스 만들기

					cmdMap.put(key, obj);


				}
			}

		}

		catch (FileNotFoundException e) {
			System.out.println("WEB-INF/Command.properties 파일이 없습니다 <<<");
			e.printStackTrace();
		} catch (IOException e) {
			e.printStackTrace();
		} catch (ClassNotFoundException e) {

			System.out.println("클래스가 존재하지 않습니다.");
			e.printStackTrace();
		} catch (Exception e) {

		}
	}
Map<String, Object> cmdMap = new HashMap<>(); <- 이 부분은
url이라는 key와 controller 클래스의 인스턴스를 받아오는 HashMap 입니다.
그리고 FileInputStream은 WEB-INF에 저장한 Command.properties의 매핑 정보를 가져오는 부분입니다.
가져온 key 값은 enumeration 인터페이스를 통해 en이라는 변수로 저장합니다.
이 en을 String key 변수로 활용해서 관련된 클래스의 인스턴스를 가져올 수 있도록 합니다.
protected void doGet(HttpServletRequest request, HttpServletResponse response) throws ServletException, IOException {
		String uri = request.getRequestURI();
        // get을 통해 전달받은 웹의 url 주소를 가져옵니다.

		String key = uri.substring(request.getContextPath().length());
        // url 주소에서 프로젝트 이름부분만큼 뺍니다. 그러면 우리가 properties에서 매핑했던 key를 가져올 수 있습니다.

		AbstractController action = (AbstractController)cmdMap.get(key);
		// 다음 단계에서 만들 클래스
        //key 값을 통해 부모 컨트롤러 인스턴스인 action을 만들예정

		if(action == null) {
			// url과 매핑된 클래스가 없으면 예외처리하는 곳
		}
		else {
			request.setCharacterEncoding("UTF-8");

			action.execute(request, response);
            // 부모클래스의 execute 메소드를 실행합니다.

			boolean bool = action.isRedirect();
            // bool이 true인 경우에는 redirect를

			String viewPage = action.getViewPage();

			if(!bool) {
				// bool이 false인 경우에는 forward를 할 것입니다.

				if(viewPage != null) {
					RequestDispatcher dispatcher = request.getRequestDispatcher(viewPage);
					dispatcher.forward(request, response);
				}
			}
			else {
				if(viewPage != null) {
					response.sendRedirect(viewPage);
				}
			}
		}

	}


	protected void doPost(HttpServletRequest request, HttpServletResponse response) throws ServletException, IOException {

		doGet(request, response);
	}
결국 이 메인서블릿을 통해서 properties에 속한 key와 value에 맞는 컨트롤러의 화면을 view에 띄워줄 수 있게 됩니다.
위 코드에서 uri, key, action을 잠깐 출력해보겠습니다.
만약 테스트 Controller를 만들어서 실행한다면

이렇게 출력됩니다.
테스트 컨틀롤러는 다음과 같이 만들었습니다.
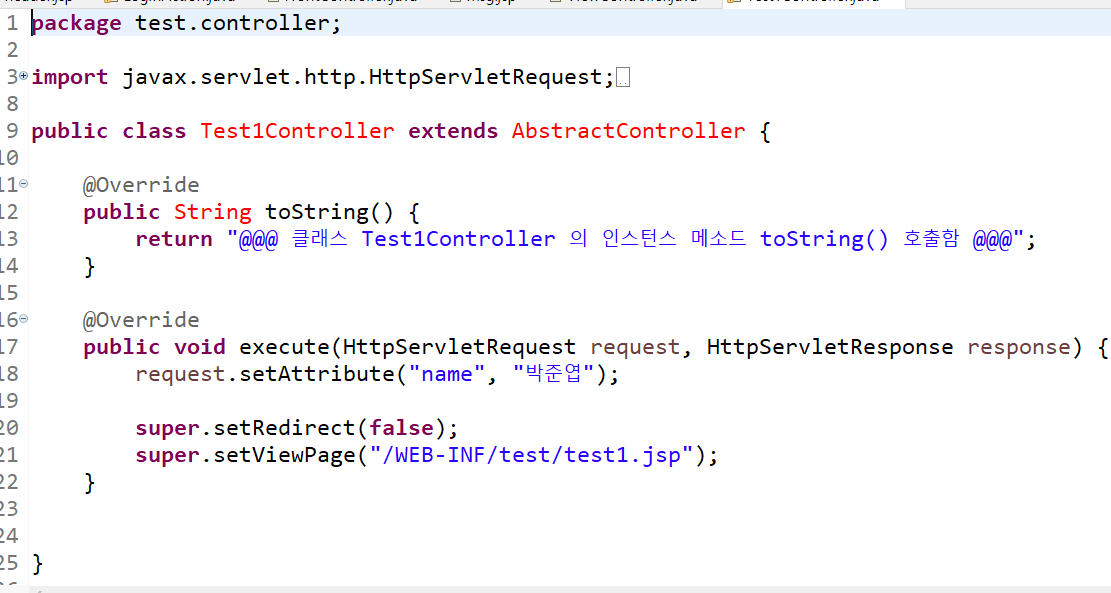
이렇게 나오기 위해서는 다음 글에서 부모 Controller 클래스까지 구현해야 출력됩니다!
현재 구성 현황


정확한 정보를 전달할려고 노력합니다.
정리 잘 봤습니다 :)