목표
- board 모듈 입력값 유효성 검증
- POST /board
- ParseIntPipe로 id 타입 int로 변경
- PATCH /board/:id
- POST /board/:id/image
- AuthGuard 적용
- 트러블 슈팅 1 : Custom Guard 의존성 문제
- 트러블 슈팅 2 : Sign Out, RefreshToken 삭제 로직 누락됨
- @UseGuard(CookieAuthGuard) 적용
board 모듈 유효성 검증
POST /board
// board.controller.ts
@Post()
@UsePipes(ValidationPipe)
createBoard(@Body() createBoardDto: CreateBoardDto): Promise<Board> {
  return this.boardService.createBoard(createBoardDto);
}
@UsePipes(ValidationPipe) 등록해주고
// create-board.dto.ts
import { ApiProperty } from '@nestjs/swagger';
import { IsNotEmpty, IsString, Max, MaxLength } from 'class-validator';

export class CreateBoardDto {
	@IsNotEmpty({ message: '게시글 제목은 필수 입력입니다.' })
	@IsString({ message: '게시글 제목은 문자열로 입력해야 합니다.' })
	@MaxLength(255, { message: '게시글 제목은 255자 이내로 입력해야 합니다.' })
	title: string;

	@IsNotEmpty({ message: '게시글 내용은 필수 입력입니다.' })
	@IsString({ message: '게시글 내용은 문자열로 입력해야 합니다.' })
	content: string;

	@IsNotEmpty({ message: '게시글 작성자는 필수 입력입니다.' })
	@IsString({ message: '게시글 작성자는 문자열로 입력해야 합니다.' })
	@MaxLength(50, { message: '게시글 작성자는 50자 이내로 입력해야 합니다.' })
	author: string;
}
Entity의 제약사항에 맞게 Class-Validator 어노테이션과 에러 메세지를 적절히 작성해준다.
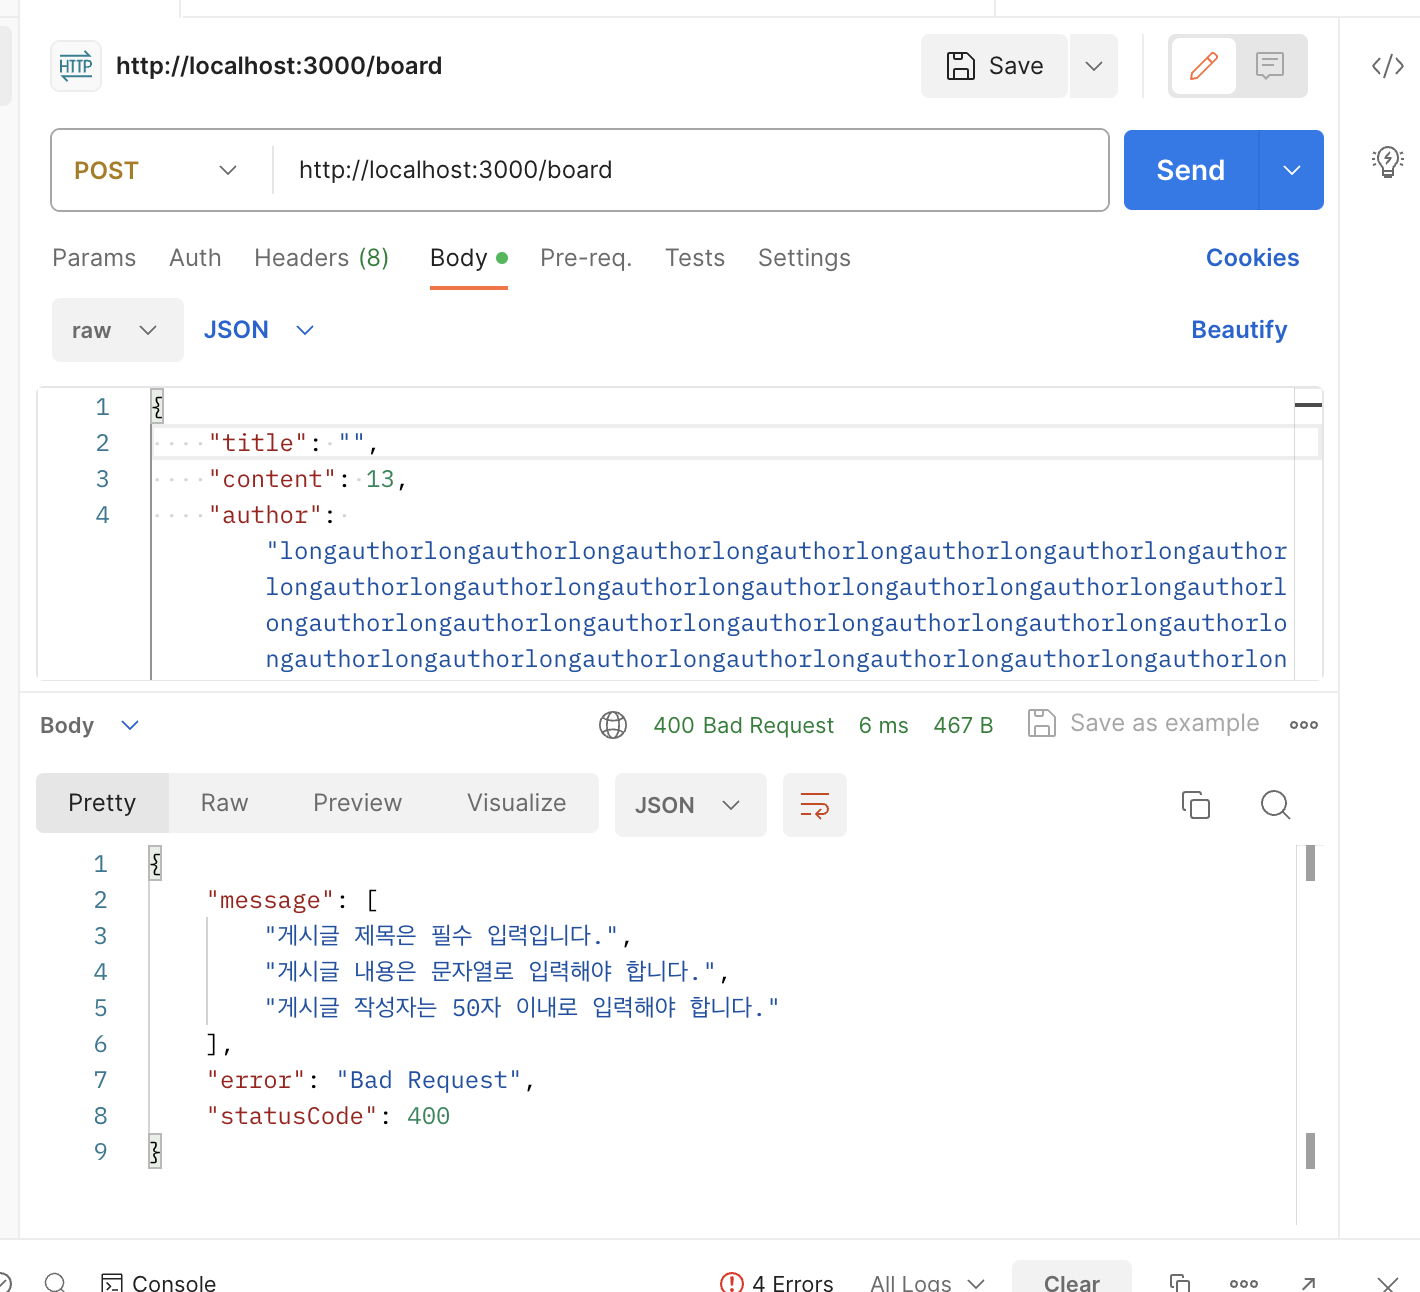
다양한 에러에 대한 처리를 유발시켜봤다. 잘 된다!
ParseIntPipe로 id 타입 int로 변경
@Patch(':id')
@UsePipes(ValidationPipe)
updateBoard(
  @Param('id', ParseIntPipe) id: number,
  @Body() updateBoardDto: UpdateBoardDto,
) {
  return this.boardService.updateBoard(id, updateBoardDto);
}ParseIntPipe를 @Param 에 추가해서 +id 대신 숫자로 깔끔하게 처리해줬다.
:id가 사용되는 모든 부분에 적용하고 타입도 number로 변경 +id는 id로 변경.
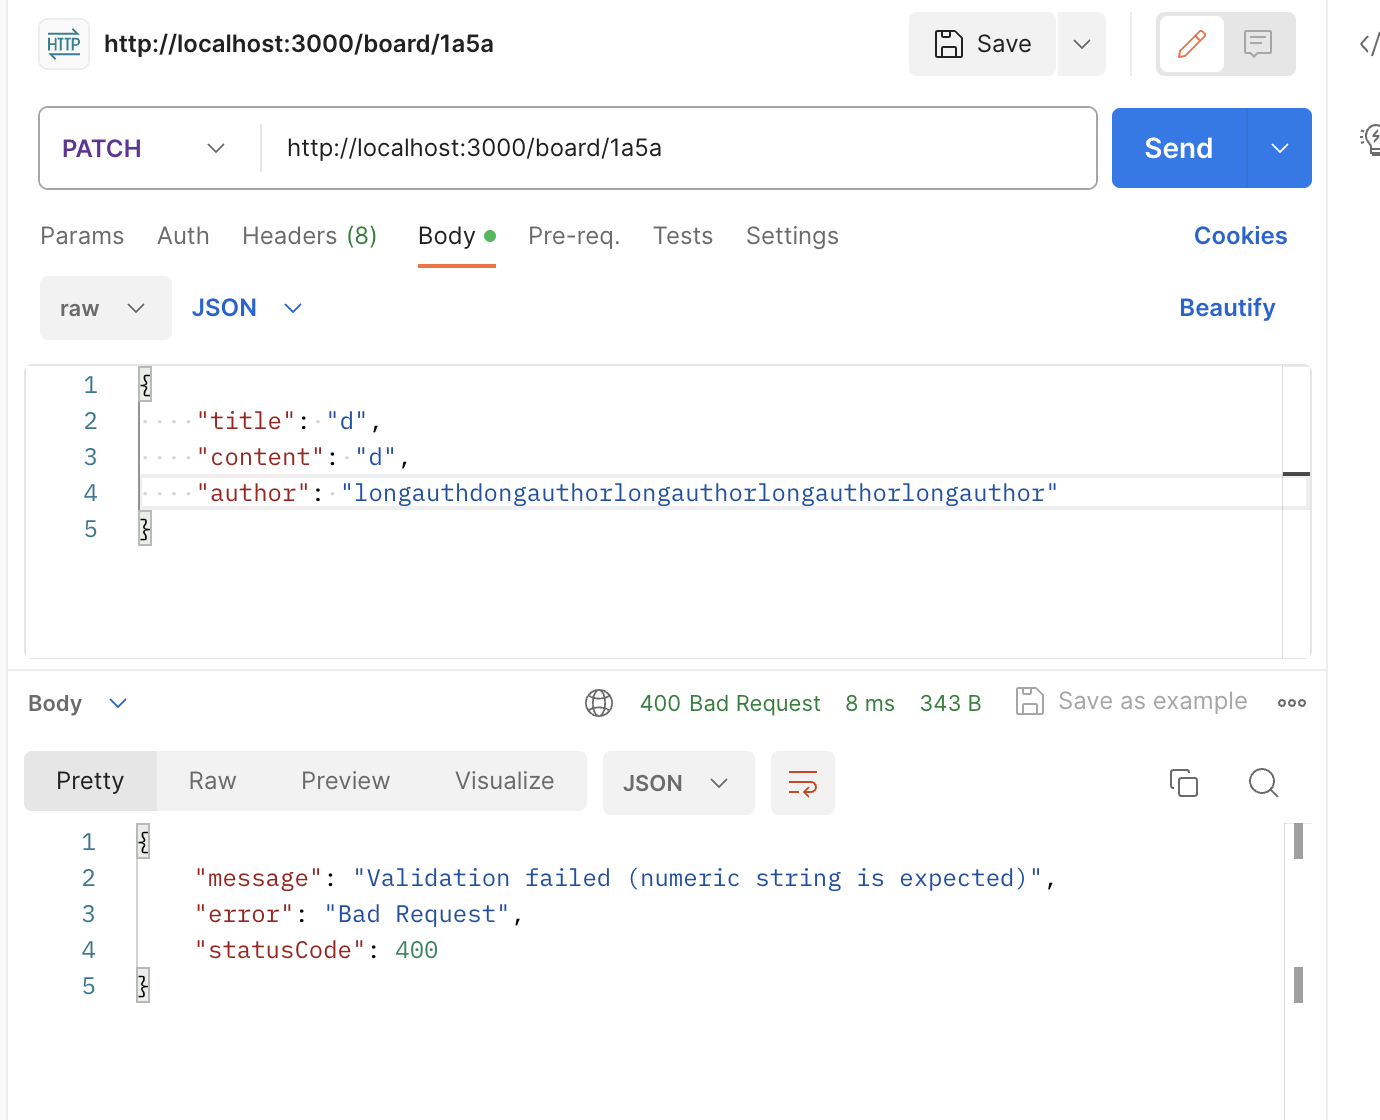
잘 적용된다.
PATCH /board/:id
@Patch(':id')
@UsePipes(ValidationPipe)
updateBoard(@Param('id') id: string, @Body() updateBoardDto: UpdateBoardDto) {
return this.boardService.updateBoard(+id, updateBoardDto);
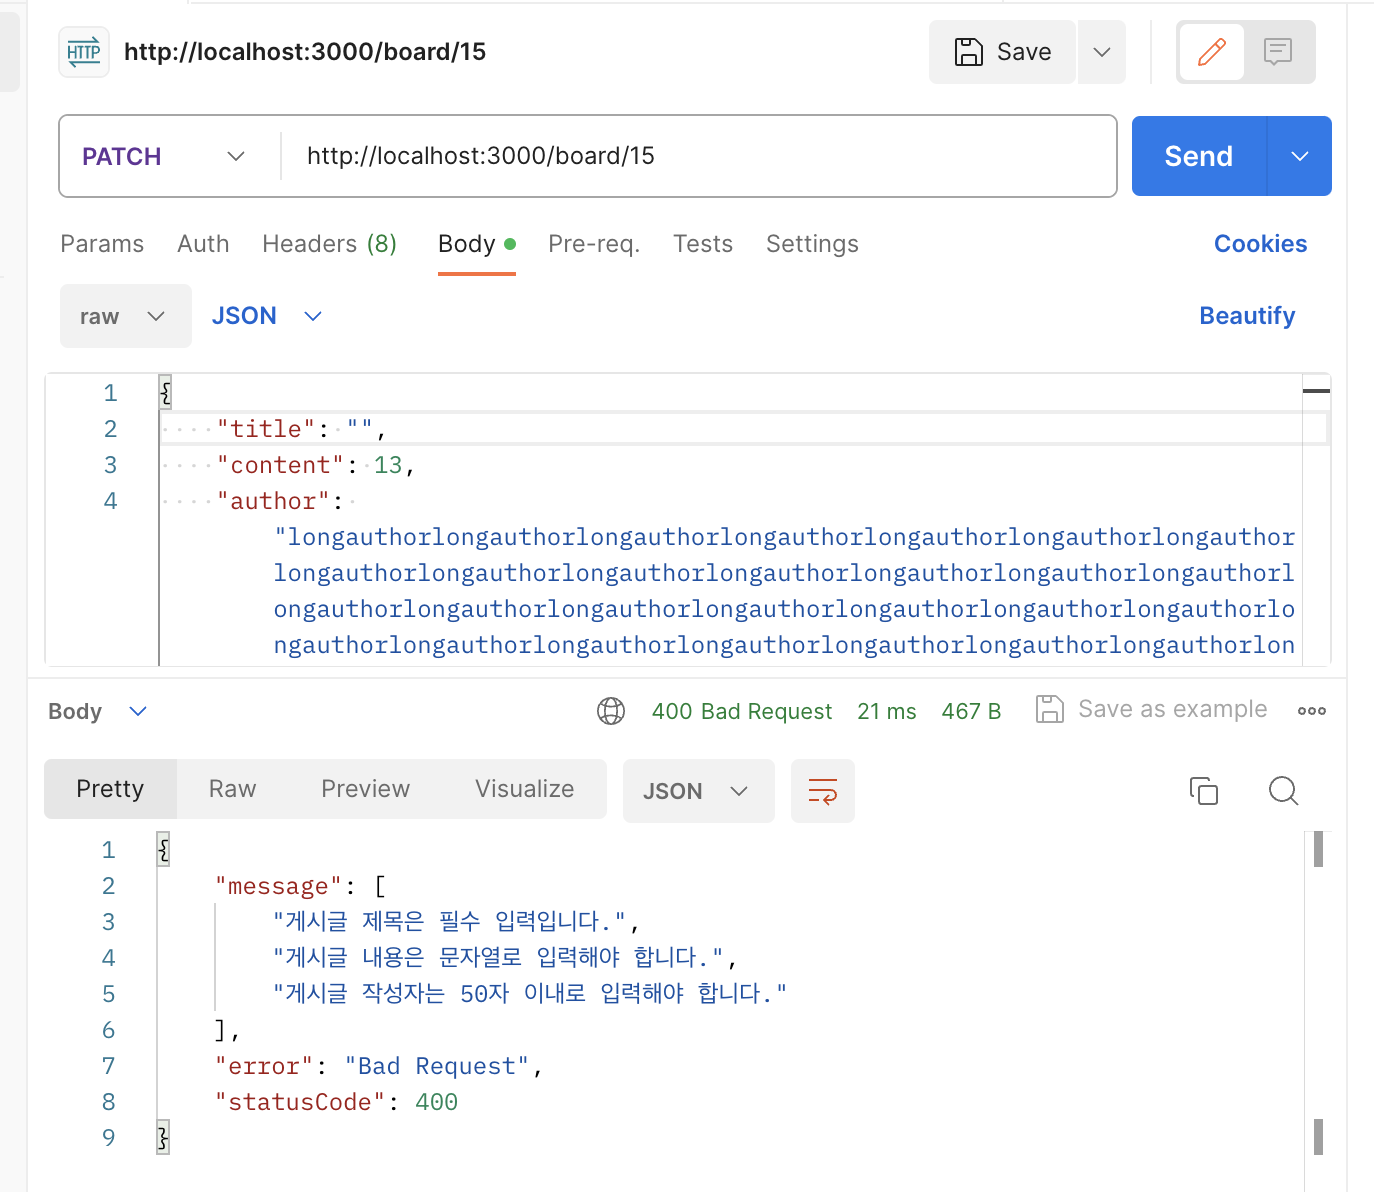
}여긴 CreateBoardDto의 Partial 타입이라 별 거 없다.
Pipe 데코레이터만 추가시켜주면 된다.
POST /board/:id/image
NestJS Request Lifecycle 공식문서를 확인해보면, Interceptor가 Pipe보다 먼저 와서,
Interceptor 결과에 대한 유효성 검증이 가능함을 확인할 수 있다.
마음놓고 추가해주자.
@Post(':id/image')
@UseInterceptors(FileInterceptor('file', { dest: './uploads' }))
@UsePipes(ValidationPipe)
uploadFile(
  @Param('id', ParseIntPipe) board_id: number,
  @UploadedFile() file: CreateImageDto,
): Promise<Board> {
  return this.boardService.uploadFile(board_id, file);
}
// create-image.dto.ts
import { IsInt, IsNotEmpty } from 'class-validator';
export class CreateImageDto {
@IsNotEmpty({ message: 'fieldname이 누락되었습니다.' })
fieldname: string;
@IsNotEmpty({ message: 'originalname이 누락되었습니다.' })
originalname: string;
@IsNotEmpty({ message: 'encoding이 누락되었습니다.' })
encoding: string;
@IsNotEmpty({ message: 'mimetype이 누락되었습니다.' })
mimetype: string;
@IsNotEmpty({ message: 'destination이 누락되었습니다.' })
destination: string;
@IsNotEmpty({ message: 'filename이 누락되었습니다.' })
filename: string;
@IsNotEmpty({ message: 'path가 누락되었습니다.' })
path: string;
@IsNotEmpty({ message: 'size가 누락되었습니다.' })
@IsInt({ message: 'size는 숫자로 입력해야 합니다.' })
size: number;
}AuthGuard 적용
대망의 AuthGuard 적용. 잘 동작할까..?
트러블 슈팅 1 : Custom Guard 의존성 문제

안됨. AuthModule을 board에서 import해도 안되는데, 학습메모 4 참고하면
AuthModule에서 guard 사용에 필요한 PassportModule과 JwtStrategy를 export해주지 않았기 때문인듯.
import { AuthModule } from 'src/auth/auth.module';

@Module({
	imports: [TypeOrmModule.forFeature([Board, Image]), AuthModule],
	controllers: [BoardController],
	providers: [BoardService],
})
export class BoardModule {}@Module({
imports: [
PassportModule.register({ defaultStrategy: 'jwt' }),
JwtModule.register(jwtConfig),
TypeOrmModule.forFeature([User]),
],
controllers: [AuthController],
providers: [AuthService, CookieAuthGuard, RedisRepository],
exports: [CookieAuthGuard, PassportModule],
})
export class AuthModule {}근데 JwtStrategy가 없다. 거기에 해당하는 게(validate 로직이 들어가는 게)
CookieAuthGuard라는 페어분이 만드신 custom guard인데, 이걸 export해줘야 한다. (그래서 strategy 만들었다 지움)

그래도 안됨. 동작은 하는데 로그인을 해서 쿠키가 있는데도 통과가 안됨
코드도 보고 console.log()로 어디서 Unauthorized가 나오나 봤는데
// cookie auth guard
...

@Injectable()
export class CookieAuthGuard extends AuthGuard('jwt') {
	constructor(
		private readonly jwtService: JwtService,
		private readonly redisRepository: RedisRepository,
	) {
		super();
	}
	...

	async canActivate(context: ExecutionContext): Promise<boolean> {
		...

		const refreshToken = request.cookies['refreshToken'];
		try {
			const { userId, username, nickname } =
				this.jwtService.verify(refreshToken);
			request.user = { userId, username, nickname };
		} catch (error) {
			response.clearCookie(JwtEnum.ACCESS_TOKEN_COOKIE_NAME);
			response.clearCookie(JwtEnum.REFRESH_TOKEN_COOKIE_NAME);
      console.log(2);
			throw new UnauthorizedException('로그인이 필요합니다.');
		}
    ...
  }
}
이 jwtService 파트에서 try catch문으로 에러가 나는거였다.
verify가 안된 게 아니라 그냥 jwtService가 정의가 안돼서 그런거임 의존성 주입이 제대로 안돼서!
따라서 저 CookieAuthGuard에서 의존하는 JwtService와 RedisRepository를 함께 export 및 import를 시켜줘야 한다 이말씀.
추가로 이 상황에선 PassportModule모듈은 필요없다.
import { Module } from '@nestjs/common';
import { AuthService } from './auth.service';
import { AuthController } from './auth.controller';
import { TypeOrmModule } from '@nestjs/typeorm';
import { User } from './entities/user.entity';
import { PassportModule } from '@nestjs/passport';
import { JwtModule } from '@nestjs/jwt';
import { jwtConfig } from '../config/jwt.config';
import { RedisRepository } from './redis.repository';
import { CookieAuthGuard } from './cookie-auth.guard';

@Module({
	imports: [
		PassportModule.register({ defaultStrategy: 'jwt' }),
		JwtModule.register(jwtConfig),
		TypeOrmModule.forFeature([User]),
	],
	controllers: [AuthController],
	providers: [AuthService, CookieAuthGuard, RedisRepository],
	exports: [JwtModule, CookieAuthGuard, RedisRepository],
})
export class AuthModule {}
최종적으로 AuthModule에선 [JwtModule, CookieAuthGuard, RedisRepository] export.

로그인 하면

이제 Guard로 막혔던 게 잘 접근이 된다.
트러블 슈팅 2 : Sign Out, RefreshToken 삭제 로직 누락됨

로그아웃하면 다시 안돼야하는데 된다.
HTTP 로그를 보니 accessToken만 지워가지고 소스코드를 봤다.
@Get('signout')
async signOut(@Res({ passthrough: true }) res: Response) {
  res.clearCookie('accessToken', { path: '/', httpOnly: true });
  return { message: 'success' };
}
accessToken만 지우고 refreshToken이 살아있으니 현재 인증관리 로직 상 guard를 통과할 때 요청 없이 자동으로 refresh되어서 다시 accessToken을 발급받아 인증이 되어버리는 것.
// auth.controller.ts
@Get('signout')
@UseGuards(CookieAuthGuard)
async signOut(@Req() req, @Res({ passthrough: true }) res: Response) {
	res.clearCookie('accessToken', { path: '/', httpOnly: true });
	res.clearCookie('refreshToken', { path: '/', httpOnly: true });
	await this.authService.signOut(req.user.username);
	return { message: 'success' };
}
// auth.service.ts
async signOut(username: string) {
// redis에 저장된 refreshToken 삭제
await this.redisRepository.del(username);
}// redis.repository.ts
@Injectable()
export class RedisRepository {
...
async del(key: string) {
return this.redisClient.del(key);
}
}기능은 다 만들어뒀는데 이러면 로그인 안한 상태에서 로그아웃을 하면 Unauthorized가 뜨긴함. 음..!


아무튼 이제 잘 제거되어 다시 UnauthorizedException을 받을 수 있게 된다.
@UseGuard(CookieAuthGuard) 적용
이제 검증이 완료됐으니 게시글 CRUD의 모든 기능에 가드를 넣어준다.
...
@Controller('board')
@ApiTags('게시글 API')
export class BoardController {
	constructor(private readonly boardService: BoardService) {}

	@Post()
	@UseGuards(CookieAuthGuard)
	@UsePipes(ValidationPipe)
	createBoard(@Body() createBoardDto: CreateBoardDto): Promise<Board> {
		return this.boardService.createBoard(createBoardDto);
	}

	@Get()
	@UseGuards(CookieAuthGuard)
	findAllBoards(): Promise<Board[]> {
		return this.boardService.findAllBoards();
	}

	@Get('by-author')
	@UseGuards(CookieAuthGuard)
	findAllBoardsByAuthor(@Query('author') author: string): Promise<Board[]> {
		return this.boardService.findAllBoardsByAuthor(author);
	}

	@Get(':id')
	@UseGuards(CookieAuthGuard)
	findBoardById(@Param('id', ParseIntPipe) id: number): Promise<Board> {
		return this.boardService.findBoardById(id);
	}

	@Patch(':id')
	@UseGuards(CookieAuthGuard)
	@UsePipes(ValidationPipe)
	updateBoard(
		@Param('id', ParseIntPipe) id: number,
		@Body() updateBoardDto: UpdateBoardDto,
	) {
		return this.boardService.updateBoard(id, updateBoardDto);
	}

	@Patch(':id/like')
	@UseGuards(CookieAuthGuard)
	patchLike(@Param('id', ParseIntPipe) id: number): Promise<Partial<Board>> {
		return this.boardService.patchLike(id);
	}

	@Patch(':id/unlike')
	@UseGuards(CookieAuthGuard)
	patchUnlike(@Param('id', ParseIntPipe) id: number): Promise<Partial<Board>> {
		return this.boardService.patchUnlike(id);
	}

	@Delete(':id')
	@UseGuards(CookieAuthGuard)
	deleteBoard(@Param('id', ParseIntPipe) id: number): Promise<void> {
		return this.boardService.deleteBoard(id);
	}

	@Post(':id/image')
	@UseGuards(CookieAuthGuard)
	@UseInterceptors(FileInterceptor('file', { dest: './uploads' }))
	@UsePipes(ValidationPipe)
	uploadFile(
		@Param('id', ParseIntPipe) board_id: number,
		@UploadedFile() file: CreateImageDto,
	): Promise<Board> {
		return this.boardService.uploadFile(board_id, file);
	}
}
결과 화면
로그인 했을 때
로그아웃 했을 때
## 학습 메모
Validation Pipe
NestJS Request Lifecycle 공식문서
만들면서 배우는 NestJS 기초
class-validator 사용법
Guards
