위스타그램이 종료 후 금 토 일 동안 나온 과제를 만들고있었다.
리액트의 기초들을 이 과제로 정리해보세요 라는 느낌이 큰 과제를 이 monster 과제로 정리하는 시간을 보냈다.
Task 1. API 호출
- 파일:
Monsters.js- 아래 키워드들을 활용해 데이터 로딩을 처리해주세요!
componentDidMount()fetch()→ 호출할 API 주소: https://jsonplaceholder.typicode.com/userssetState()→ state 객체 내에monsters라는 key 값에 저장
class Monsters extends Component {
  constructor() {
    super();
    this.state = {
      monsters: [],
    };
  }

 // 데이터 로딩
  componentDidMount() {
    fetch("https://jsonplaceholder.typicode.com/users")
      .then(res => {
        //console.log(res);
        return res.json();
      })
      .then(res => {
        this.setState({
          monsters: res
        });
      });
  }


// SearchBox 에 props로 넘겨줄 handleChange 메소드 정의

  render() {
    );
    return (
      <div className="Monsters">
        <h1>컴포넌트 재사용 연습!</h1>
        {<SearchBox />}
        {<CardList />}
      </div>
    );
  }
}- componentDidMount() - react 기본함수이며 render 실행 후 초기 1번만 실행되는 함수이다. 초기 데이터를 불러올때 사용한다.
- fetch("API주소", {method: 'GET'}) fetch 함수를 이용해서 데이터를 받아 올 수있다. method:'GET'은 default 값이라 생략 가능
- fetch를 통해 받아온 데이터는 string 형태이다. json()파일로 형변환을 한 뒤 state값에 담아 활용하자. (반대로 서버에 js에서 데이터를 넘길때(method : 'POST') 는 stringify로 문자열로 변환하여 전달한다)
Task 2. API 호출의 결과값 props 로 자식에게 전달
- 파일:
Monsters.js- API 호출 후 저장한 배열을 자식 컴포넌트인
<CardList />에 넘겨주세요. (props 활용)- 넘겨준 후
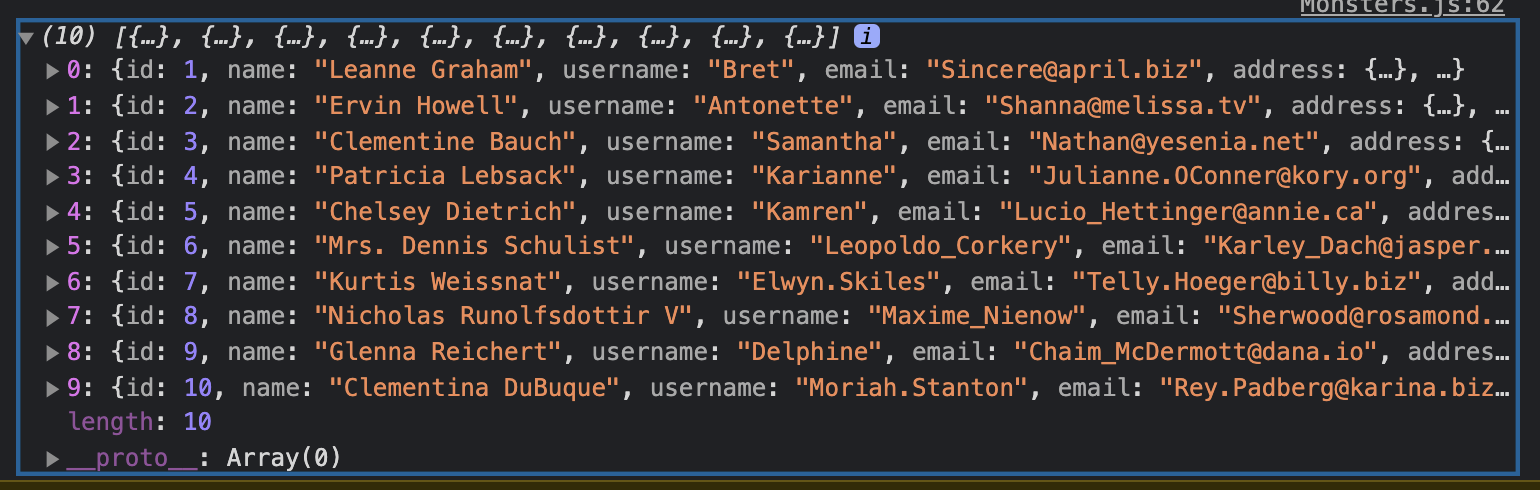
CardList.js에서 props 를 콘솔에 찍어 확인해주세요.
(개발 단계에서 확인하는 용도이니 확인 완료 후 push 하기 전에는 지워주세요!)
monster.js
<CardList monster={monsterFiltered} />CardList.js
class CardList extends Component {
  render() {
    //console.log(this.props);
    return (
      <div className="card-list">
        {this.props.monster.map(monster => (
          <Card
            key={monster.id}
            id={monster.id}
            name={monster.name}
            email={monster.email}
          />
        ))}
      </div>
    );
  }
}- props를 자식에게 넘긴 뒤 자식컴포넌트에서 render함수 내 console.log(this.props)를 통해 잘 넘어왔는지 확인한다.
Task 3. Array.map( ) 사용
- 파일:
CardList.js- 🚨
Array.map()함수 사용법을 꼭 익히고 시작해주세요!- 넘겨받은 배열을 기준으로
Array.map()함수를 활용하여<Card />컴포넌트를 리턴해주세요.Card.js에게 넘겨줘야하는 props 는 각 몬스터 객체의id,name,
class CardList extends Component {
  render() {
    //console.log(this.props);
    return (
      <div className="card-list">
        {this.props.monster.map(monster => (
          <Card
            key={monster.id}
            id={monster.id}
            name={monster.name}
            email={monster.email}
          />
        ))}
      </div>
    );
  }
}
CaldList 에서 card로 monster라는 인자를 넘겨준다.
key값은 리액트에서 중요한 꼭 필요한 인자이다.
- map() 함수
arr.map(callback(currentValue[, index]))
배열 내의 모든 요소 각각에 함수를 적용해 새로운 배열로 반환한다.
여기서는 monsters 배열을 하나씩 돌면서 Card 컴포넌트를 그려준다. 그리고 Card컴포넌트에 monsters 배열 내 각각의 정보를 넘겨준다.
Task 4. props 활용
-
파일:
Card.js -
Card.js 컴포넌트 모양 및 구조
<div className="card-container"> <img src=이미지주소 alt="" /> <h2>Name</h2> <p>Email</p> </div> -
이미지 주소 (
src)https://robohash.org/숫자?set=set2&size=180x180
카드마다 다른 이미지를 보여주기 위해 위 주소의숫자부분을 props 로 내려받은id로 대체해주세요.예시)
https://robohash.org/1?set=set2&size=180x180
https://robohash.org/2?set=set2&size=180x180
https://robohash.org/3?set=set2&size=180x180
class Card extends Component {
  render() {
    return (
      <div className="card-container">
        <img
          src={`https://robohash.org/${this.props.id}?set=set2&size=180x180`}
          alt="몬스터"
        />
        <h2>{this.props.name}</h2>
        <p>{this.props.Email}</p>
      </div>
    );
  }
}

export default Card;- 부모 컴포넌트로 전달받은 props를 활용하는 것은 동일지만, 이미지 주소에 state을 활용하면서 동적인 url을 만들어 이미지를 세팅한다.
- 소괄호로 감싸고 그걸 또 백틱으로 감싸는데 가끔 백틱이 안먹을 때가 있다.(외부에서 백틱 복사해서 섰음...확인 잘해줘야함)
Array.filter() 를 통한 검색기능을 구현
  render() {
    //console.log(this.state.monsters);
    // console.log("userInput : ", this.state.userInput, this.state.monsters);
    // console.log(this.setState.userInput);
    const monsterFiltered = this.state.monsters.filter(monster =>
      monster.name.toLowerCase().includes(this.state.userInput.toLowerCase())
    );
    console.log(monsterFiltered);
    return (
      <div className="Monsters">
        <h1>컴포넌트 재사용 연습!</h1>
        {/* <SearchBox handleChange=정의한메소드 /> */}
        {<SearchBox handleChange={this.handleChange} />}
        {/* <CardList monsters=몬스터리스트 /> */}
        <CardList monster={monsterFiltered} />
      </div>
    );
  }
}- array.filiter.()의 기능을 살펴본다.
- 변수를 설정한 구현기능은 render(){}안에서 구현해준다
- this.state.userInput을 includes 로 가져와monster.name과 일치 시켜준다.
부모에서 자식의 자식컴포넌트의 전달방법을 배우게되었다.
그리고 filiter을 쓸때 render를 하고 나서 그안의 변수를 적용해 써주는 것을 알게되었다.
과제를 진행하게되면 하나씩 하나씩 배우개된다.

성공을 위해선 과정만 있을 뿐이다