기본 설정
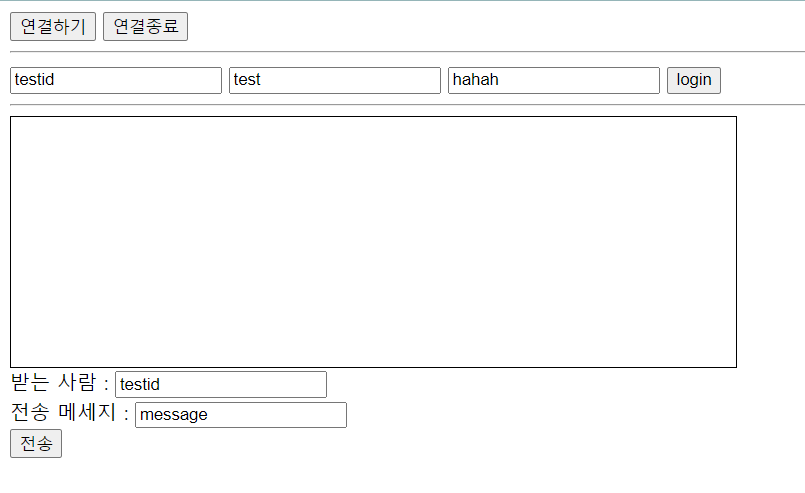
<script src="/socket.io/socket.io.js"></script>위 상단 이미지와 같이 HTML을 배치하고 클라이언트 사이드에 socket.io 라이브러리를 추가해준다.
// clienet
var socket = null;
function connection()  {
	socket = io.connect("http://localhost:3000");
    socket.on("connect", function() {
    	console.log("socket server에 연결 됨.");
}
$('#connectBtn').click(function(e){
	connection();
});
$('#closeBtn').click(function(e){
	if(socket){
		socket.close();
	}
});
연결하기 버튼을 클릭 시 제이쿼리를 사용하여 클릭 이벤트를 소켓 서버를 생성하여 연결하도록 선언한다. 연결 종료 버튼 클릭 시 소켓 서버가 있다면 그 소켓을 종료 시키도록 했다.
//server.js
const server = http.createServer(app);
const {Server} = require("socket.io");
const io = new Server(server);
서버 측에 socket.io 사용을 위한 묘듈을 선언해준다.
//server.js
io.sockets.on("connection", (socket)=>{
  console.log("소켓으로 접속 됨.");

  socket.on("disconnect", function() {
    console.log("/chat 클라이언트 접속이 해제 됨.");
  });
});
클라이언트가 소켓 서버에 접속하면 실행된다. 로그인과 메세지 보내기 등의 기능은 클라이언트가 소켓 서버를 접속한 후에 수행되어야하므로 io.sockets.on 핸들러 안에 on, emit 메소드를 생성 할 예정이다.
로그인 기능
// client
$("#loginBtn").click(function(e){
	if(socket){
		userId = $('#userId').val();
        socket.emit('login',{
              userId: $('#userId').val(),
              userName: $('#userName').val(),
              userMessage: $('#userMessage').val()
         });
     }else{
        alert("연결이 안되어있습니다");
     }
});
로그인 버튼 클릭 시, 소켓 서버가 있다면 socket.emit 메소드를 불러온다. login으로 input의 userId, userName, userMessage vlaue를 객체 형태로 데이터를 보낸다.
// server.js
const clientSocketMap = {};
io.sockets.on("connection", (socket)=>{
  socket.on("login", function(data) {
    data.socketId = socket.id;
    clientSocketMap[data.userId] = data;
  });
...
서버에서 login 요청을 읽으면 전달 받은 데이터를 data를 알기 위해 console.log(data);로 콘솔에 출력해보면 위와 같이 출력된다.
이때 1:1 채팅 기능 구현을 위해 해당 소켓의 id를 함께 저장해야하는데 data.socketId = socket.id;로 {userId: 'testId', userName: 'test', userMessage: 'hahah', socketId: socket.id}를 추가해주고 이 객체를 clientSocketMap[data.userId] = data;로 선언해준다.
clientSocketMap['testId'] = {
	userId: 'testId',
    userName: 'test',
    userMessage: 'hahah',
    socketId: socket.id
 }
즉, userId가 testId일 때 clientSocketMap['testId']는 위와 같은 데이터가 된다.
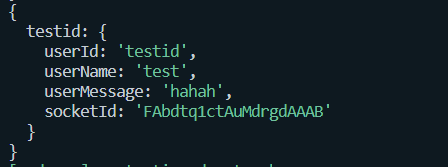
실제 데이터를 입력하여 console.dir(clientSocketMap);을 하면 위와 같은 결과가 출력된다.
여기까지 로그인으로 사용자 데이터와 소켓 id를 받아오는 기능이다.
채팅 기능
<div id="messageView"></div>
받는 사람 : <input id="receiveId" value="testid" /> <br/>
전송 메세지 : <input id="sendMsg" value="message" /> <br/>
<button id="sendBtn">전송</button>
messageView div는 주고받은 메세지를 보여줄 메세지 창이고 받는 사람과 메세지를 입력하고 전송 버튼을 만ㄷ
// client
$('#sendBtn').click(function(e){
	if(socket){
		let sendData = {
			sender : userId,
			receive : $("#receiveId").val(),
			msg : $("#sendMsg").val()
		}
		socket.emit("send", sendData);
		let newLine = $("#messageView").html() + sendData.sender+": " + sendData.msg + "<br/>";
		$("#messageView").html(newLine);
	}
});
클라이언트 측에서 받는 사람(receiveId)와 보낼 메세지(sendMsg)을 input으로 받아 전송 버튼을 클릭하면 발생할 이벤트이다. 소켓이 있다면 로그인된 해당 userId를 sender, input으로 입력 받은 값을 각각 receive, msg로 하여 sendData를 생성한다. socket.emit("send", sendData); 에서 send로 sendData를 전송한다.
이때 전송한 메세지를 [ 보낸 사람의 id : 메세지 ] 형식으로 메세지 창인 messageView div에 출력한다.
//server.js
 socket.on("send", function(data) {
    let test01SocketId = clientSocketMap[data.receive].socketId;
    if(test01SocketId) {
      let test01Socket = io.sockets.sockets.get(test01SocketId);
      test01Socket.emit("send message", data);
    }
  });
send로 데이터(sendData)를 전송받은 서버는 data.receive로 받을 사람의 id를 알 수 있다.
let test01SocketId = clientSocketMap[data.receive].socketId;이를 이용해서 clientSocketMap[data.receive].socketId 메세지를 받을 사람의 소켓id를 test01SocketId로 선언한다.
let test01Socket = io.sockets.sockets.get(test01SocketId);
test01Socket.emit("send message", data);
해당 소켓 id가 있다면 해당 소켓의 id로 소켓 서버를 찾아 그 소켓에게 send message으로 emit 메소드로 메세지를 전송한다.
// client
 socket.on("send message", function(data) {
	let newLine = $("#messageView").html() + data.sender+": " + data.msg + "<br/>";
	$("#messageView").html(newLine);
});
해당 소켓을 가진 클라이언트에서는 send message으로 socket.on 메소드로 데이터를 전달 받는다. 메세지 창에 기존 대화 내역과 함께 [ 보낸 사람의 id : 메세지 ] 형식으로 메세지 창인 messageView div에 출력한다.
이 메소드는 접속 중일때 send message 송신이 들어오면 호출되어야하므로 socket.on("connect", function() {}); 안에 작성되어야한다.
모든 유저에게 전송
// server.js
socket.on("send", function(data) {
    if(data.receive === "All") {
      io.sockets.emit("send message", data);
      return;
    }
    let test01SocketId = clientSocketMap[data.receive].socketId;
    if(test01SocketId) {
      let test01Socket = io.sockets.sockets.get(test01SocketId);
      test01Socket.emit("send message", data);
    }
  });
받는 사람 아이디를 'All'으로 입력하여 전송하면 모든 유저에게 메세지가 전송이 되도록 io.sockets.emit("send message", data);를 추가하였다.
실행결과

testId3 -> testId
testId -> testId3
testId2 -> testId
위 순서대로 메세지를 전송하였다. 메세지 창에서는 보낸 메세지와 받은 메세지를 함께 출력하였다. 보낸 사람과 받은 사람 이외의 사람은 메세지를 전달 받을 수도 없고, 메세지 창에도 출력되지 않는다.