
FastApi 공식문서에서 사용할 수 있는 ORM 을 찾는 중 하나의 글을 발견했다.
https://fastapi.tiangolo.com/tutorial/sql-databases/
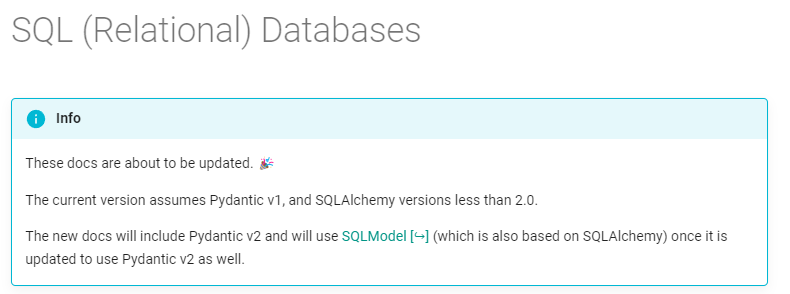
해석하자면 현재 문서는 Pydantic v1 , SQLAlchemy v2.0 미만으로 설명되었다고 작성되어있고,
앞으로 Pydantic v2 와 SQLModel(SQLAlchemy)를 사용한 문서가 업데이트 될 예정이라고 한다.
따라서 위 두개의 라이브러리와 호환된 SQLModel 라이브러리르 사용하여 DB 웹 서버를 만들어 볼 예정이다.
SQLModel를 사용하여 PostGreSQL 구축
SQLModel 공식 문서는 아래 링크로 들어가면 된다.
SQLModel : https://sqlmodel.tiangolo.com/
공식문서에 있는 예제는 sqlite로 연동하여 설명하고 있고, PostgreSQL로 사용한 문서는 검색해도 잘 나오지 않아 SQLModel 원작자가 제공해준 git 소스를 분석하면서 개발하였다.
SQLModel로 사용하여 PostgreSQL DB연동 : https://github.com/tiangolo/full-stack-fastapi-template
현재 PC 환경

Docker에 PostGreSQL까지 띄울까 하다, 이미 로컬에 테스트한다고 설치가 되어있어 위와 같이 연동해서 사용하려한다.
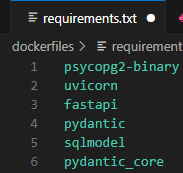
필요한 라이브러리
PostgreSQL DB 연동 설정
from pydantic import PostgresDsn
from pydantic_core import MultiHostUrl
class Config:

    SCHEME = "postgresql"
    USERNAME = "DB 접속 id"
    PASSWORD = "DB 접속 pw"
    HOST = "host.docker.internal"  #PC local에 위치한 DB접속하기 위한 주소
    PORT = 5432 #DB Port
    PATH = "user" #DB

    @property
    def SQLALCHEMY_DATABASE_URI(self) -> PostgresDsn:
        return MultiHostUrl.build(
            scheme=self.SCHEME,
            username=self.USERNAME,
            password=self.PASSWORD,
            host=self.HOST,
            port=self.PORT,
            path=self.PATH,
        )

config = Config()
위 코드를 작성하면서 궁금했던 부분을 문답식으로 정리하였다.
❓SCHEME이 뭔가요?
➡️사용할 프로토콜을 정의하는 곳으로, 어떻게 요청,처리 할것인지 명시하는 곳입니다.
❓HOST를 "localhost" 로 사용하면 안되나요?
➡️Pc local 과 Docker local 은 다르다. 말 그대로 Pc환경에서의 local, Docker환경에서의 local 이기에 Docker local에서 Pc local로 들어가려면 위와같이 "host.docker.internal"을 사용해야한다. 만약 Docker를 띄우지 않고 사용한다면 "localhost"를 사용하면 된다.
❓@property가 뭔가요?
➡️객체의 프로퍼티를 감싸주는 함수라고 보면 된다.
자세한 내용은 다음 글을 참고
Property : https://blog.naver.com/codeitofficial/221684462326
❓PostgresDsn 타입?
➡️pydantic 에서 제공해주는 타입 이다. 정의는 다음과 같다.
PostgresDsn = Annotated[
    MultiHostUrl,
    UrlConstraints(
        host_required=True,
        allowed_schemes=[
            'postgres',
            'postgresql',
            'postgresql+asyncpg',
            'postgresql+pg8000',
            'postgresql+psycopg',
            'postgresql+psycopg2',
            'postgresql+psycopg2cffi',
            'postgresql+py-postgresql',
            'postgresql+pygresql',
        ],
    ),
]
직접 create engine에 전체 URL 넣어서 사용해도 좋지만, pydantic을 이용하면 어느 부분이 잘못 적용되었는지를 확인할 수 있고, URL를 분리를 해놓아서 관리하기 더 용이하다.
❓MultiHostUrl 이 뭔가요?
➡️말 그대로 여러개의 DB에 접근이 되도록 해준다.
MultiHostUrl.build에 들어가는 매개변수들을 살펴보자.
    @classmethod
    def build(
        cls,
        *,
        scheme: str,
        hosts: list[MultiHostHost] | None = None,
        username: str | None = None,
        password: str | None = None,
        host: str | None = None,
        port: int | None = None,
        path: str | None = None,
        query: str | None = None,
        fragment: str | None = None,
    ) -> Self:
현재 나는 하나의 DB만 사용했기에 'host' 를 사용하였지만, 여러개의 DB를 연동하려면 'hosts'
사용하면 된다.
hosts 내부는 다음과 같다.
class MultiHostHost(_TypedDict):
    """
    A host part of a multi-host URL.
    """

    username: str | None
    """The username part of this host, or `None`."""
    password: str | None
    """The password part of this host, or `None`."""
    host: str | None
    """The host part of this host, or `None`."""
    port: int | None
    """The port part of this host, or `None`."""
즉, 여러 DB에 연동 설정하면 다음과 같이 리스트로 나오는 것을 확인할 수 있다.
from pydantic_core import MultiHostUrl

mhu = MultiHostUrl('https://foo.com:123,foo:bar@bar.com/path')
print(mhu.hosts())
"""
[
    {'username': None, 'password': None, 'host': 'foo.com', 'port': 123},
    {'username': 'foo', 'password': 'bar', 'host': 'bar.com', 'port': 443}
]
관련 자세한 내용은 pydandic 공식문서를 확인하면 된다.
https://docs.pydantic.dev/latest/api/networks/#pydantic.networks.PostgresDsn
db model 구축
db 설정은 완료 하였으니 실제로 연동되도록 해보려한다.
#헤더
from sqlmodel import Field, SQLModel, create_engine, Session
from sqlconf import config

engine = create_engine(str(config.SQLALCHEMY_DATABASE_URI))
Field : db 컬럼 옵션을 설정할 수 있다.
create_engine : DB 연동
Session : DB ORM을 사용하기위한 라이브러리
config : 앞서 설정한 DB 설정 파일
engine : DB 연동
신기하게도 SQLModel은 Class명이 db명이다. 이해하기 쉽게하고자 예시코드를 가져왔다.
간단하게 테스트 하고자 이름(name),나이(age) 컬럼을 가진 "myuser" 이름의 테이블을 만들었다.
class myuser(SQLModel, table=True):
    name: str | None = Field(default=None, primary_key=True)
    age: int | None = None
위 코드에 대해 설명
- "myuser" = table명
- "name" = 문자열, insert시 안 넣으면 None
- Field(기본값 = None, 주 키 = 설정(True))
- "age" = 정수형 , insert시 안 넣으면 None
즉 위 Class에 SQLModel을 상속하면 "myuser"라는 테이블 모델이된다.
table=True는 SQLModel에 이 클래스는 table 모델이라고 알려주는 값이다.
다음은 DB table 생성이다.
SQLModel.metadata.create_all(engine)별거 없다. 위 함수에 연동한 engine만 넣으면 알아서 table이 생긴다.
⚠️이미 PostgreSQL에 직접 table을 만들었울 경우, 사용할 필요 없다.
CRUD
Create
insert 문은 SQLAlchemy로 사용한 것처럼 작성하면 된다.
def insert(u:myuser):
    with Session(engine) as session:
        session.add(u)
        session.commit()
Read
select 문은 sqlmodel Select함수를 상속하여 다음과 같이 간단하게 read를 할 수 있다.
우선 SQLModel에 있는 select 를 import 한다.
from sqlmodel import Field, SQLModel, create_engine, Session, select #<- 추가그 후 다음과 같이 작성한다.
def selects():
    with Session(engine) as session:
        statement = select(myuser)
        res = session.exec(statement).all()
        s = {'res':[x.__dict__ for x in res]}
return s- select(myuser)는 이미 myuser 테이블을 사용한다고 매개변수에 넣은 것이므로 select from [myuser] 가 된다.
- session.exec(statement).all() :모든 데이터를 가져온다는 것이다.
- response : list(dict())
- 리스트로 response로 오기 때문에 모든 데이터를 화면에 표시하려면 dictionary로 바꿔주면 된다.
Update
간단하게 나이(age)만 수정하도록 작성하였다.
def update(u:myuser):
    with Session(engine) as session:
        statement = select(myuser).where(myuser.name == u.name)
        res = session.exec(statement).one()
        if (res.age != u.age) and u.age != None:
            res.age = u.age
        session.add(res)
        session.commit()
select 뒤에 where 함수가 있다. 쿼리로 변환하면
select * from myuser where myuser.name == u.name으로 보면 된다.
select 문으로 이름(name)과 일치한 데이타를 가져와 나이(age)를 수정하고 insert와 같이 add, commit 하면 된다.
Delete
삭제는 특정 이름가진 데이터만 삭제되도록 작성하였다.
def delete(name:str):
    with Session(engine) as session:
        statement = select(myuser).where(myuser.name == name)
        res = session.exec(statement).one()
        session.delete(res)
        session.commit()
update와 똑같이 삭제할 이름(name)과 일치한 데이타를 가져와 삭제하면된다.
fast api 설정
이제 DB와 연동하여 test하기 위하여 서버를 구축한다.
from fastapi import FastAPI
from sqlconnect import myuser,insert,selects,update,delete
app = FastAPI()


@app.get("/")
def root():
    return {"message": "root test"}

@app.post("/user/insert")
def user_insert(u:myuser):
    insert(u)
    return {"message": "insert success!"}

@app.get("/user/list")
def user_select():
    return selects()

@app.patch("/user/put")
def user_put(u:myuser):
    update(u)
    return {"message": "update success!"}

@app.delete("/user/delete")
def delete_user(name:str):
    delete(name)
    return {"message" : f'{name} delete success!'}
간단하게 테스트하기 위하여 최초경로('/') 와 CRUD만 작성하였다.
실행은 다음 커맨드로 실행하면 된다.
command: uvicorn main:app --reload --host=0.0.0.0 --port=8000