
웹개발 종합반 2주차
📝배운것
- jQuery로 간단한 HTML 조작
- Ajax로 서버 API에 데이터를 주고, 결과를 받아온다.
✏️JS 복습
- 짝/홀수에 따라 다른 alert 띄우기
<script>
  // 전역변수 설정
  let count = 1;

  function hey() {
      // count를 2로 나눈 나머지가 0이라면
      if(count % 2 === 0)
        alert('짝수입니다.')
      else
        alert('홀수입니다.')

      count++
  }
</script>- 버튼의 색깔을 바꾸고 싶다면?
- div 박스를 하나 감추고 싶다면?
→ 이런 것들 쉽게 해주는 것이, jQuery!
✏️jQuery
HTML의 요소들을 조작하는, 편리한 Javascript를 미리 작성해둔 라이브러리
-
Javascript로도 모든 기능(예 - 버튼 글씨 바꾸기 등)을 구현할 수는 있지만,
-
1) 코드가 복잡하고, 2) 브라우저 간 호환성 문제도 고려해야해서, jQuery라는 라이브러리가 등장
-
jQuery는 Javascript와 다른 특별한 소프트웨어가 아니라 미리 작성된 Javascript 코드입니다. 전문 개발자들이 짜둔 코드를 잘 가져와서 사용하는 것임을 기억해주세요! (그렇게 때문에, 쓰기 전에 "임포트"를 해야합니다!)
비교
// js
document.getElementById('element').style.display = 'none';

// jQuery
$('#element').hide();- 보다 직관적으로 코드를 작성할 수 있다.
jQuery CDN 임포트
https://www.w3schools.com/jquery/jquery_get_started.asp
<script src="https://ajax.googleapis.com/ajax/libs/jquery/3.4.1/jquery.min.js"></script>- 부트스트랩을 사용할 경우 jQuery CDN이 임포트되어있다.
연습
- input 박스의 값 가져오기
// input 박스 값 가져오기
$('#article-url').val();

// Input 박스 값 변경하기
$('#article-url').val('안녕');- div 숨기기 / 보이기
// id 값이 post-box인 곳을 가리키고, hide()로 안보이게 한다.
$('#post-box').hide();

// show()로 보이게 한다. (= css의 display 값을 block으로 바꾼다.)
$('#post-box').show();- css 값 가져오기
$('#post-box').hide();
$('#post-box').css('display');

$('#post-box').show();
$('#post-box').css('display');- 태그 내 텍스트 입력
// input 박스인 경우
$('#post-url').val('여기에 텍스트를 입력하면!');

// button등 인 경우
$('#btn-posting-box').text('포스팅 박스 닫기');- 태그 내 html 입력하기
let temp_html = '<button>나는 추가될 버튼이다!</button>';
$('#cards-box').append(temp_html);
연습 - 나홀로 메모장 토글
- 포스팅박스 열기 버튼에 id값 추가
<button id="btn-posting-box" onclick="openclose()" class="btn btn-primary btn-lg">포스팅박스 열기</a>- 버튼 텍스트를 바꿔주기
<script>
    function openclose() {
    	// id가 post-box인 태그의 display값 가져오기
        let status = $('#post-box').css('display');

    	// display값이 block 이면
        if (status == 'block') {
            // post-box의 display 숨기기
            $('#post-box').hide();
            // btn-posting-box의 텍스트값 변경
            $('#btn-posting-box').text('포스팅박스 열기');
        } else { // display값이 none 이면
            // post-box의 display 보이기
            $('#post-box').show();
            // btn-posting-box의 텍스트값 변경
            $('#btn-posting-box').text('포스팅박스 닫기');
        }
    }
</script>
연습 - jQuery 연습하기
<!doctype html>
<html lang="ko">

<head>
    <meta charset="UTF-8">
    <title>jQuery 연습하고 가기!</title>

    <!-- JQuery를 import 합니다 -->
    <script src="https://ajax.googleapis.com/ajax/libs/jquery/3.4.1/jquery.min.js"></script>

    <style type="text/css">
        div.question-box {
            margin: 10px 0 20px 0;
        }
    </style>

    <script>
      	// 빈칸 체크 함수 만들기
        function q1() {
            // 1. input-q1의 입력값을 가져온다. $('# .... ').val() 이렇게!
            // 2. 만약 입력값이 빈칸이면 if(입력값=='')
            // 3. alert('입력하세요!') 띄우기
            // 4. alert(입력값) 띄우기
            let input_text = $('#input-q1').val();

            if (input_text === '') {
                alert('입력하세요!');
                $('#input-q1').focus();
                return;
            }
        }

      	// 이메일 판별 함수 만들기
        function q2() {
            // 1. input-q2 값을 가져온다.
            // 2. 만약 가져온 값에 @가 있으면 (includes 이용하기 - 구글링!)
            // 3. info.spartacoding@gmail.com -> gmail 만 추출해서 ( .split('@') 을 이용하자!)
            // 4. alert(도메인 값);으로 띄우기
            // 5. 만약 이메일이 아니면 '이메일이 아닙니다.' 라는 얼럿 띄우기
            let input_text = $('#input-q2').val();

            if (!input_text.includes('@')){
                alert('이메일이 아닙니다.');
                $('#input-q2').focus();
                return;
            }

            let email = input_text.split('@')[1];
            let domain = email.split('.')[0];

            alert(domain);
        }

      	// HTML 붙이기/지우기 연습
        function q3() {
            // 1. input-q3 값을 가져온다. let txt = ... q1, q2에서 했던 걸 참고!
            // 2. 가져온 값을 이용해 names-q3에 붙일 태그를 만든다. (let temp_html = `<li>${txt}</li>`) 요렇게!
            // 3. 만들어둔 temp_html을 names-q3에 붙인다.(jQuery의 $('...').append(temp_html)을 이용하면 굿!)

            let text = $('#input-q3').val();
            if (text === '') {
                alert('이름을 입력하세요');
                $('#input-q3').focus();
                return;
            }

            let temp_html = `<li>${text}</li>`;

            $('#names-q3').append(temp_html);
            $('#input-q3').val('');
        }

        function q3_remove() {
            // 1. names-q3의 내부 태그를 모두 비운다.(jQuery의 $('....').empty()를 이용하면 굿!)
            $('#names-q3').empty();
        }

    </script>

</head>

<body>
    <h1>jQuery + Javascript의 조합을 연습하자!</h1>

    <div class="question-box">
        <h2>1. 빈칸 체크 함수 만들기</h2>
        <h5>1-1. 버튼을 눌렀을 때 입력한 글자로 얼럿 띄우기</h5>
        <h5>[완성본]1-2. 버튼을 눌렀을 때 칸에 아무것도 없으면 "입력하세요!" 얼럿 띄우기</h5>
        <input id="input-q1" type="text" /> <button onclick="q1()">클릭</button>
    </div>
    <hr />
    <div class="question-box">
        <h2>2. 이메일 판별 함수 만들기</h2>
        <h5>2-1. 버튼을 눌렀을 때 입력받은 이메일로 얼럿 띄우기</h5>
        <h5>2-2. 이메일이 아니면(@가 없으면) '이메일이 아닙니다'라는 얼럿 띄우기</h5>
        <h5>[완성본]2-3. 이메일 도메인만 얼럿 띄우기</h5>
        <input id="input-q2" type="text" /> <button onclick="q2()">클릭</button>
    </div>
    <hr />
    <div class="question-box">
        <h2>3. HTML 붙이기/지우기 연습</h2>
        <h5>3-1. 이름을 입력하면 아래 나오게 하기</h5>
        <h5>[완성본]3-2. 다지우기 버튼을 만들기</h5>
        <input id="input-q3" type="text" placeholder="여기에 이름을 입력" />
        <button onclick="q3()">이름 붙이기</button>
        <button onclick="q3_remove()">다지우기</button>
        <ul id="names-q3">
            <li>세종대왕</li>
            <li>임꺽정</li>
        </ul>
    </div>
</body>

</html>
✏️서버->클라이언트 통신 이해하기
JSON 이해
서버와 클라이언트 간의 교류에서 일반적으로 많이 사용된다.
(이전에는 XML로 많이 쓰였으나 현재는 json으로 많이 사용)
- JSON 문서 형식은 자바스크립트 객체의 형식을 기반으로 만들어졌다.
- 자바스크립트의 문법과 굉장히 유사하지만 텍스트 형식일 뿐이다.
- 다른 프로그래밍 언어를 이용해서도 쉽게 만들 수 있다.
- 특정 언어에 종속되지 않으며, 대부분의 프로그래밍 언어에서 JSON 포맷의
데이터를 핸들링 할 수 있는 라이브러리를 제공한다.
JSON 형식
- name-value 형식
{
  "name":"moon",
  "age":27
}- 값들의 순서화된 리스트 형식
{
"name":"moon",
"hobby":["soccer","swimming"]
}
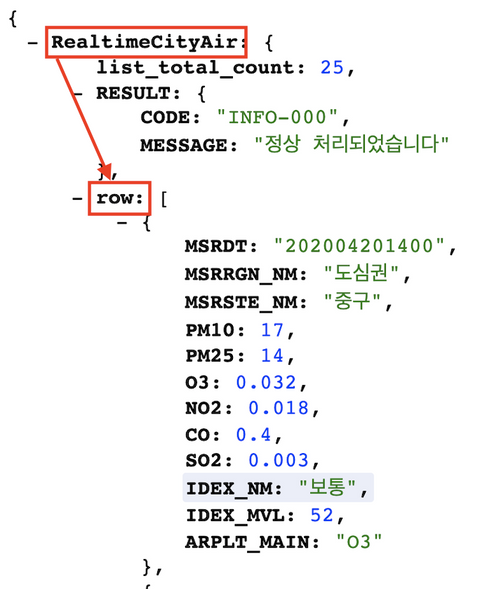
------------------------------------
{
"RealtimeCityAir": {
"list_total_count": 25,
"RESULT": {},
"row": []
}
}JSON 형식 변환
let jsonText = '{"name":"moon", "age":27}';
let realObjext = JSON.parse(jsonText);
let jsonText2 = JSON.stringify(realdObject);- JSON.parse(JSON 형식의 텍스트) : JSON 형식의 텍스트를 자바스크립트 객체로 변환
- JSON.stringify(JSON 형식(문자열)으로 변환할 값) : 자바스크립트 객체를 JSON 텍스트로 변환
✏️클라이언트->서버 통신 이해하기
API 요청
👉 API는 은행 창구와 같은 것!
같은 예금 창구에서도 개인 고객이냐 기업 고객이냐에 따라
가져와야 하는 것 / 처리해주는 것이 다른 것처럼,클라이언트가 요청 할 때에도, "타입"이라는 것이 존재합니다.
GET → 통상적으로! 데이터 조회(Read)를 요청할 때
예) 영화 목록 조회POST → 통상적으로! 데이터 생성(Create), 변경(Update), 삭제(Delete) 요청 할 때
예) 회원가입, 회원탈퇴, 비밀번호 수정
서버와 클라이언트간의 통신 정리
- 클라이언트가 서버(API로)에 요청을 하면 서버에서는 JSON 포멧 형식으로 클라이언트에 응답해준다.
✏️Ajax 시작하기
-
Ajax는 jQuery를 임포트한 페이지에서만 동작 가능
-
기본골격
$.ajax({
  type: "GET",
  url: "여기에URL을입력",
  data: {},
  success: function(response){
    console.log(response)
  }
})- 예시
$.ajax({
  type: "GET", // GET 방식으로 요청한다.
  url: "http://openapi.seoul.go.kr:8088/6d4d776b466c656533356a4b4b5872/json/RealtimeCityAir/1/99",
  data: {}, // 요청하면서 함께 줄 데이터 (GET 요청시엔 비워두세요)
  success: function(response){ // 서버에서 준 결과를 response라는 변수에 담음
    console.log(response) // 서버에서 준 결과를 이용해서 나머지 코드를 작성
  }
})
👉 리마인드
GET 요청은, url뒤에 아래와 같이 붙여서 데이터를 가져갑니다.
http://naver.com?param=value¶m2=value2
POST 요청은, data : {} 에 넣어서 데이터를 가져갑니다.
data: { param: 'value', param2: 'value2' },
Ajax 연습하기
- 모든 구의 미세먼지 값을 찍어보기
$.ajax({
    type: 'GET'
    url: 'http://openapi.seoul.go.kr:8088/6d4d776b466c656533356a4b4b5872/json/RealtimeCityAir/1/99',
    data: {},
    success: function(response){
	let rows = response['RealtimeCityAir']['row'];

    	for (let i = 0; i < rows.length; i++) {
            let gu_name = rows[i]['MSRSTE_NM'];
            let gu_mise = rows[i]['IDEX_MVL'];
            console.log(gu_name, gu_mise);
        }
    }
})
결과
중구 175
종로구 190
용산구 97
은평구 196
서대문구 190
마포구 100
광진구 154
성동구 127
연습 - 따릉이 개수 보여주기
<script>
        function q1() {
            // 여기에 코드를 입력하세요
            $.ajax({
                type: 'GET',
                url: 'http://spartacodingclub.shop/sparta_api/seoulbike',
                data: {},
                success: function (response) {
                    $('#names-q1').empty();

                    let rows = response['getStationList']['row'];

                    for (let i = 0; i < rows.length; i++) {
                        let row = rows[i];

                        let rack_name = row['stationName'];
                        let rack_cnt = row['rackTotCnt'];
                        let bike_cnt = row['parkingBikeTotCnt'];

                        let tmp_html = '';

                        if (bike_cnt < 5) {
                            tmp_html = `<tr class="urgent">
                                            <td>${rack_name}</td>
                                            <td>${rack_cnt}</td>
                                            <td>${bike_cnt}</td>
                                        </tr>`;
                        } else {
                            tmp_html = `<tr>
                                            <td>${rack_name}</td>
                                            <td>${rack_cnt}</td>
                                            <td>${bike_cnt}</td>
                                        </tr>`;
                        }


                        $('#names-q1').append(tmp_html);
                    }


                }
            })
        }
    </script>
결과
연습 - 랜덤 고양이 사진 API
<div class="question-box">
      <h2>3. 랜덤 고양이 사진 API를 이용하기</h2>
      <p>예쁜 고양이 사진을 보여주세요</p>
      <p>업데이트 버튼을 누를 때마다 지웠다 새로 씌여져야 합니다.</p>
      <button onclick="q1()">고양이를 보자</button>
      <div>
        <img id="img-cat" src="https://www.google.com/images/branding/googlelogo/1x/googlelogo_color_272x92dp.png"/>
      </div>
</div><script>
function q1() {
// 여기에 코드를 입력하세요
$.ajax({
type: 'GET',
url: 'https://api.thecatapi.com/v1/images/search',
data: {},
success: function (response) {
let imgurl = response[0]['url'];
$('#img-cat').attr('src', imgurl);
}
})
}
</script>- 이미지 태그의 속성을 바꾸기 위해서
.attr('src', url);사용