Annotation 방식은 Spring에서 흔히 사용되는 방식이기 때문에 친숙한 편이지만, spring cloud stream 3버전부터 Annotation 방식의 구현은 deprecated 되었습니다.
대신 StreamBridge와 Supplier, Consumer, Function 등 FuntionalInterface를 이용한 방식으로 구현하는 것을 권장합니다.
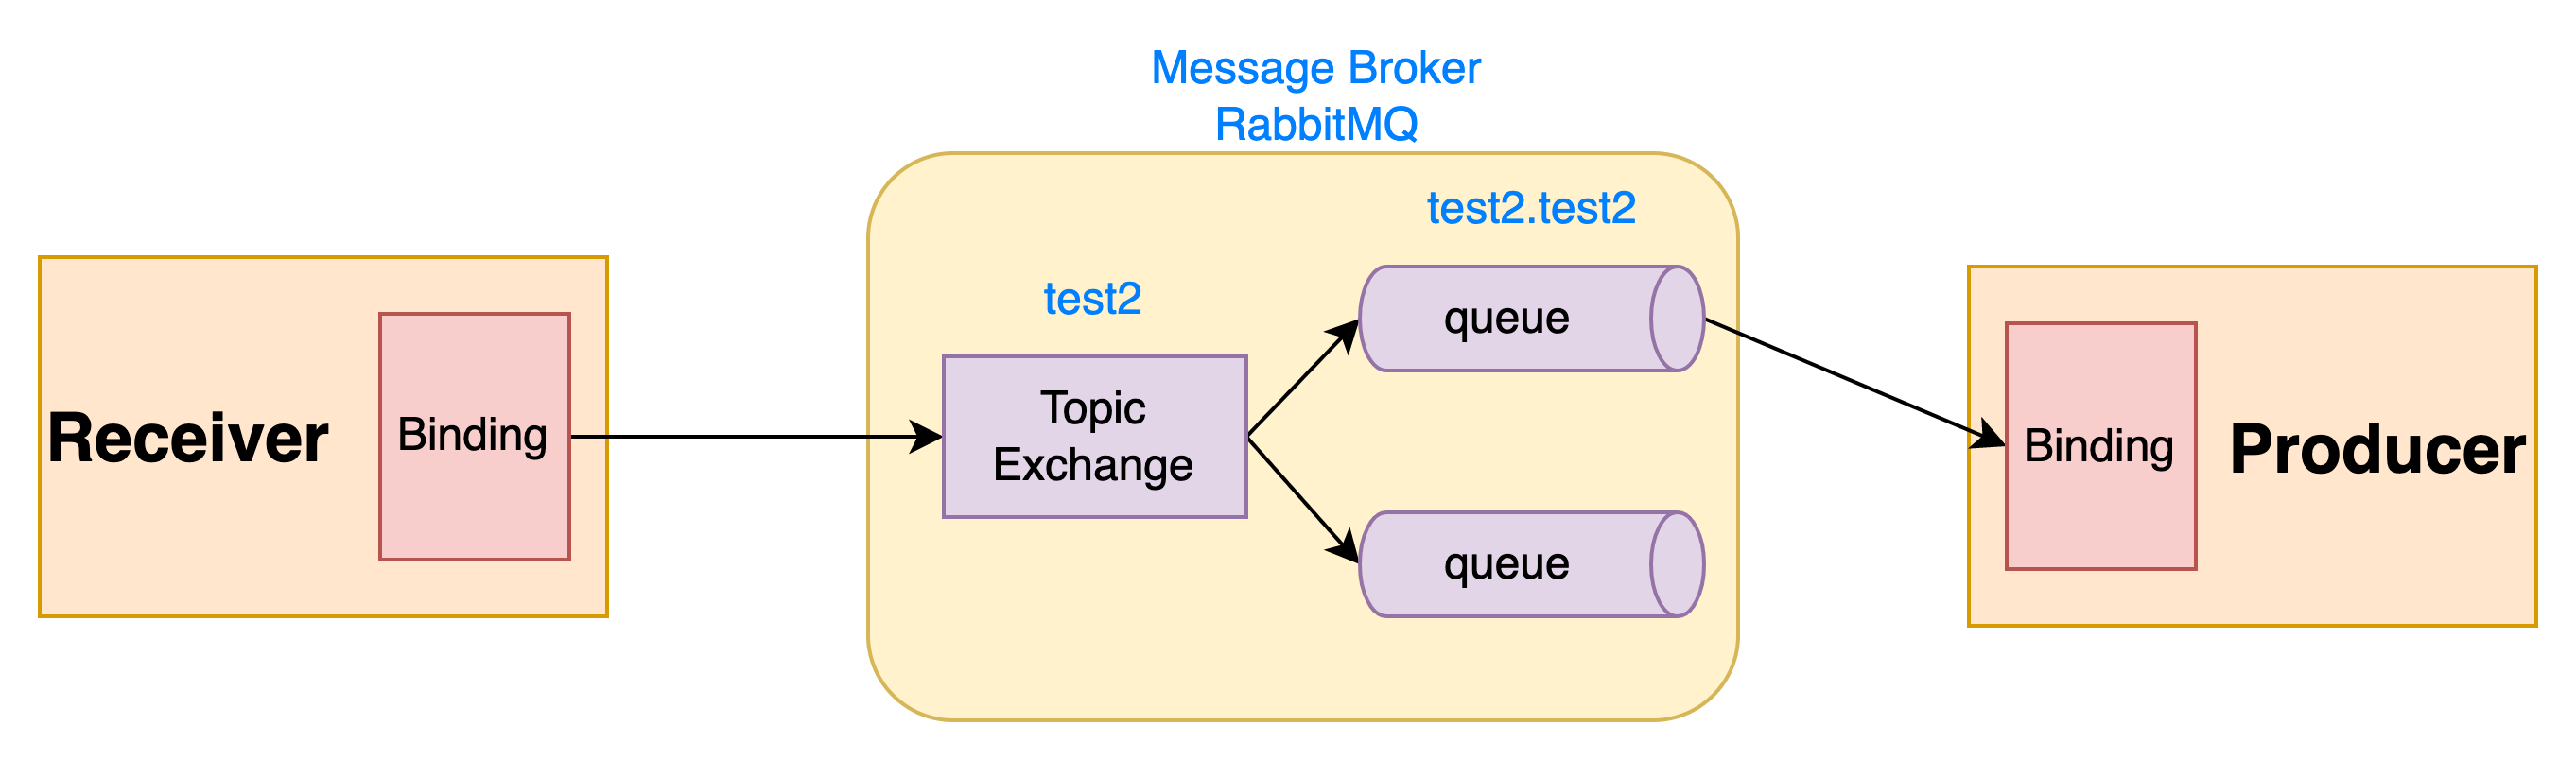
이번 과정에서는 동일한 구성을 Functional Programming 방식으로 구현하는 방법을 살펴보도록 하겠습니다.

Producer 애플리케이션 구현
우선 application.properties의 구성을 변경합니다.
src/main/resources/application.properties
server.port=18081

# RabbitMQ
spring.rabbitmq.addresses=${RABBITMQ_HOST:localhost}:${RABBITMQ_PORT:5672}
spring.rabbitmq.username=${RABBITMQ_USER:guest}
spring.rabbitmq.password=${RABBITMQ_PASSWORD:guest}

# spring cloud stream
spring.cloud.function.definition=producerConsume

#spring.cloud.stream.bindings.producerPublish-out-0.binder=rabbit
spring.cloud.stream.bindings.producerPublish-out-0.destination=test1

#spring.cloud.stream.bindings.producerConsume-in-0.binder=rabbit
spring.cloud.stream.bindings.producerConsume-in-0.destination=test2
spring.cloud.stream.bindings.producerConsume-in-0.group=test2spring.cloud.function.definition이 추가되고, binding 이름 뒤에 -{in/out}-0가 추가된 것을 확인할 수 있습니다.
기존의 output 바인딩의 경우 binding 이름 뒤에 out을 붙이고, input 바인딩의 경우 in을 붙이는 규칙이 추가되었습니다.
숫자 0은 인덱스를 의미합니다.
기존에 @StreamListener 애노테이션을 이용해서 메시지를 받았을 때의 로직을 메소드 내부에 구현했는데,
Functional programming 방식에서는 binding의 이름과 동일한 이름을 spring.cloud.function.definition에 등록하고 같은 이름을 Supplier, Consumer, Function 인터페이스를 리턴하는 메소드를 Bean으로 등록하는 방식으로 변경되었습니다.
Supplier는 일정한 간격으로 메시지를 전송하는 경우에 실행하는 로직을 구현하고,
Consumer는 메시지를 전달받았을 때 실행하는 로직을 구현합니다.
Function에는 메시지를 전달받았을 때 실행되는 로직과 리턴 값을 두도록 구현하여 output 바인딩을 통해 리턴 값을 메시지로 전송하는 경우에 사용됩니다.
애노테이션으로 구현되던 부분은 모두 삭제합니다.
ProducerEventMessageChannels.java는 삭제합니다.
ProducerApplication에는 @EnableBinding을 제거합니다.
src/main/java
com.github.questcollector.producer
ProducerApplication.java
package com.github.questcollector.producer;

import org.springframework.boot.SpringApplication;
import org.springframework.boot.autoconfigure.SpringBootApplication;

@SpringBootApplication
public class ProducerApplication {

	public static void main(String[] args) {
		SpringApplication.run(ProducerApplication.class, args);
	}

}ProducerRestController에는 ProducerEventMessageChannels 의존성을 삭제하고 대신 StreamBridge 의존성을 추가합니다.
MessageChannel로 메시지를 전송하는 로직을 StreamBridge를 이용하도록 수정합니다.
StreamBridge의 send() 메소드를 활용하여 특정 binding으로 메시지를 보내도록 구현할 수 있습니다.
src/main/java
com.github.questcollector.producer
ProducerRestController.java
package com.github.questcollector.producer;

import lombok.extern.slf4j.Slf4j;
import org.springframework.cloud.stream.function.StreamBridge;
import org.springframework.http.ResponseEntity;
import org.springframework.web.bind.annotation.GetMapping;
import org.springframework.web.bind.annotation.RequestParam;
import org.springframework.web.bind.annotation.RestController;

import java.util.Random;

@RestController
@Slf4j
public class ProducerRestController {

    private final StreamBridge streamBridge;
    private static final String PRODUCER_PUBLISH = "producerPublish-out-0";

    public ProducerRestController(StreamBridge streamBridge) {
        this.streamBridge = streamBridge;
    }

    @GetMapping("/")
    public ResponseEntity<MyMessage> produceMessage(
            @RequestParam(value = "content", defaultValue = "Hello World") String content) {
        // return 객체 생성
        Random random = new Random(System.currentTimeMillis());
        MyMessage myMessage = new MyMessage(
                Math.abs(random.nextLong()),
                content
        );

        // MessageChannel로 메시지 전송
        streamBridge.send(PRODUCER_PUBLISH, myMessage);

        log.info("published message to producerPublish binding");
        if (log.isDebugEnabled()) {
            log.debug("payload: " + myMessage.toString());
        }

        return ResponseEntity.ok(myMessage);
    }

}ProducerMessageListener에는 consumeEvent() 메소드를 producerConsume()으로 이름을 변경하고, @Bean 애노테이션을 추가합니다.
리턴 형식은 void에서 Consumer<MyMessage>로 변경합니다.
그리고 메소드 내부의 로직은 lambda 식으로 구현합니다.
추가로 ProducerMessageListener 클래스는 @Component에서 @Configuration으로 변경하였습니다.
src/main/java
com.github.questcollector.producer
ProducerMessageListener.java
package com.github.questcollector.producer;

import lombok.extern.slf4j.Slf4j;
import org.springframework.context.annotation.Bean;
import org.springframework.context.annotation.Configuration;

import java.util.function.Consumer;

@Configuration
@Slf4j
public class ProducerMessageListener {

    @Bean
    public Consumer<MyMessage> producerConsume() {
        return myMessage -> log.info("received message: " + myMessage.toString());
    }
}
Receiver 애플리케이션 구현
Receiver 애플리케이션은 메시지를 전송받으면 MyMessage의 content에 "2" 값만 추가해서 바로 output binding으로 전송합니다.
이러한 경우 Function을 이용해서 input binding에서 메시지를 전달받고 나서 특정 로직을 실행하고 바로 output binding으로 메시지를 보내도록 구현할 수 있습니다.
우선 application.properties에서 binding의 구성을 수정하도록 합니다.
src/main/resources/application.properties
server.port=18082

# RabbitMQ
spring.rabbitmq.addresses=${RABBITMQ_HOST:localhost}:${RABBITMQ_PORT:5672}
spring.rabbitmq.username=${RABBITMQ_USER:guest}
spring.rabbitmq.password=${RABBITMQ_PASSWORD:guest}

# spring cloud stream
spring.cloud.function.definition=receiverMessageHandler

#spring.cloud.stream.bindings.receiverMessageHandler-in-0.binder=rabbit
spring.cloud.stream.bindings.receiverMessageHandler-in-0.destination=test1
spring.cloud.stream.bindings.receiverMessageHandler-in-0.group=test1

#spring.cloud.stream.bindings.receiverMessageHandler-out-0.binder=rabbit
spring.cloud.stream.bindings.receiverMessageHandler-out-0.destination=test2
input과 output 바인딩의 이름을 모두 통일하고 같은 이름의 함수를 spring.cloud.function.definition에 등록하였습니다.
마찬가지로 더 이상 사용되지 않는 ReceiverEventMessageChannels.java를 삭제하고 ReceiverApplication에 있는 @EnableBinding 애노테이션을 삭제합니다.
src/main/java
com.github.questcollector.receiver
ReceiverApplication.java
package com.github.questcollector.receiver;

import org.springframework.boot.SpringApplication;
import org.springframework.boot.autoconfigure.SpringBootApplication;

@SpringBootApplication
public class ReceiverApplication {

	public static void main(String[] args) {
		SpringApplication.run(ReceiverApplication.class, args);
	}

}ReceiverMessageListener의 consumeEvent() 메소드는 receiverMessageHandler()로 이름을 변경하고, 리턴 타입을 Function<MyMessage, MyMessage>으로 변경합니다.
그리고 메소드에 @Bean 애노테이션으로 추가하여 Bean으로 등록합니다.
추가로 @Component 애노테이션을 @Configuration으로 변경하였습니다.
src/main/java
com.github.questcollector.receiver
ReceiverMessageListener.java
package com.github.questcollector.receiver;

import lombok.extern.slf4j.Slf4j;
import org.springframework.context.annotation.Bean;
import org.springframework.context.annotation.Configuration;
import org.springframework.stereotype.Component;

import java.util.function.Function;

@Configuration
@Slf4j
public class ReceiverMessageListener {

    @Bean
    public Function<MyMessage, MyMessage> receiverMessageHandler() {
        return myMessage -> {
            log.info("received message: " + myMessage.toString());

            MyMessage newMessage = new MyMessage(
                    myMessage.id(), myMessage.content() + "2"
            );

            log.info("publish message to receiverPublish binding");
            if (log.isDebugEnabled()) {
                log.debug("payload: " + newMessage.toString());
            }
            return newMessage;
        };
    }
}
실행해보기
동일한 과정으로 Producer와 Receiver를 실행합니다.
localhost:18081로 접속하여 GET / API를 실행해보면 동일하게 content에 "2" 값이 추가되어 메시지가 오고 가는 것을 확인할 수 있습니다.
Producer 로그
...  INFO 4681 --- [io-18081-exec-2] c.g.q.producer.ProducerRestController    : published message to producerPublish binding
...  INFO 4681 --- [  test2.test2-1] c.g.q.producer.ProducerMessageListener   : received message: MyMessage(id=2821629155677529393, content=Hello World2)
Receiver 로그
...  INFO 4684 --- [  test1.test1-1] c.g.q.receiver.ReceiverMessageListener   : received message: MyMessage(id=2821629155677529393, content=Hello World)
...  INFO 4684 --- [  test1.test1-1] c.g.q.receiver.ReceiverMessageListener   : publish message to receiverPublish binding