spring cloud stream의 RabbitMQ 바인더를 이용해서 RabbitMQ를 통해 메시지를 주고 받았지만, 서비스가 많이 커져서 더 파워풀한 성능을 내는 Kafka 클러스터로 전환해야 할 때가 올 수도 있을 것입니다.
지난 과정에 두 가지 경로로 메시지가 두 서비스 간에 오고 가는 것을 확인할 수 있었습니다.
Producer -> Receiver
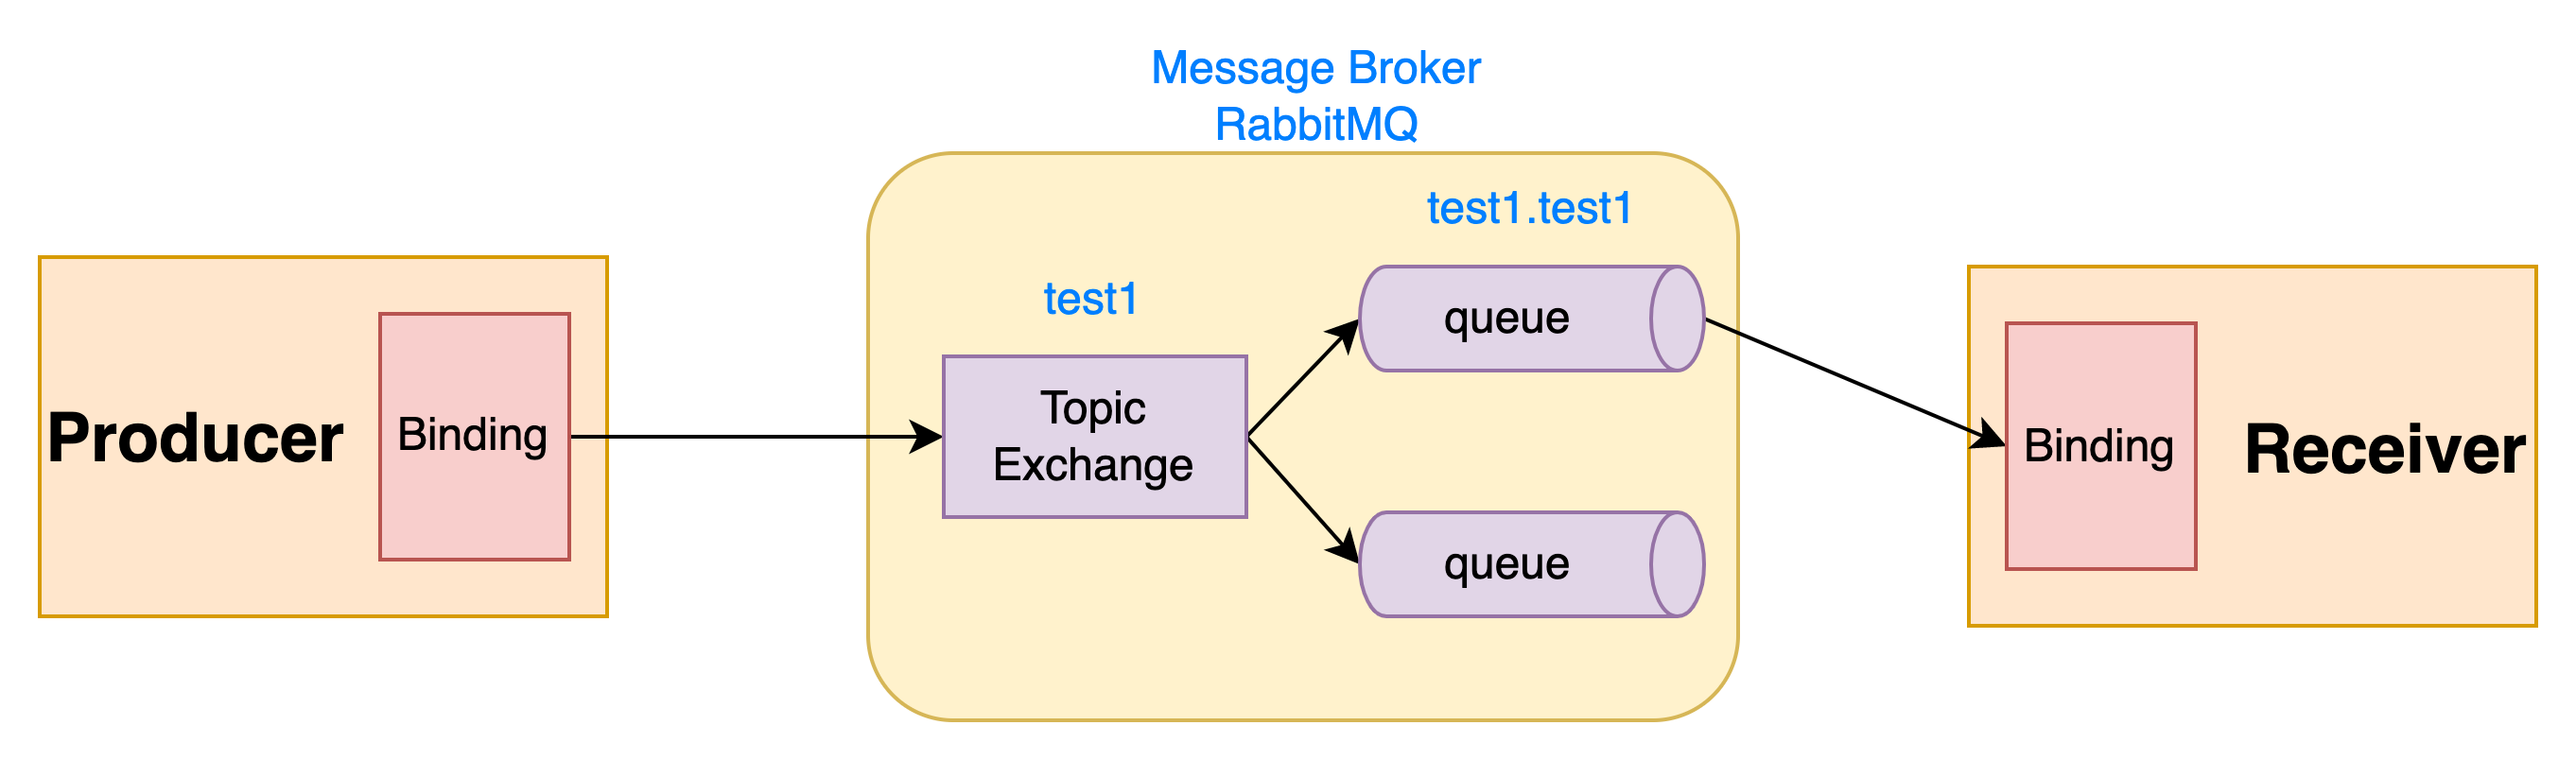
Receiver -> Producer

이 중 2번째인 Receiver에서 Producer로 메시지를 전달하는 것을 Kafka로 전환해 보도록 하겠습니다.
Producer와 Receiver 프로젝트는 Functional 방식으로 구현한 프로젝트로 진행하겠습니다.
kafka 실행하기
간단하게 kafka는 docker compose를 이용하여 실행하도록 하겠습니다.
docker-compose.yml
version: '3.8'
services:
  zookeeper:
    image: confluentinc/cp-zookeeper
    ports:
      - '2181:2181'
    environment:
      ZOOKEEPER_CLIENT_PORT: 2181
      ZOOKEEPER_TICK_TIME: 2000
  kafka-1:
    image: confluentinc/cp-kafka
    ports:
      - '9092:9092'
    depends_on:
      - zookeeper
    environment:
      KAFKA_BROKER_ID: 1
      KAFKA_ZOOKEEPER_CONNECT: zookeeper:2181
      KAFKA_LISTENER_SECURITY_PROTOCOL_MAP: INTERNAL:PLAINTEXT,EXTERNAL:PLAINTEXT
      KAFKA_INTER_BROKER_LISTENER_NAME: INTERNAL
      KAFKA_ADVERTISED_LISTENERS: INTERNAL://kafka-1:29092,EXTERNAL://localhost:9092
  kafka-2:
    image: confluentinc/cp-kafka
    ports:
      - '9093:9093'
    depends_on:
      - zookeeper
    environment:
      KAFKA_BROKER_ID: 2
      KAFKA_ZOOKEEPER_CONNECT: zookeeper:2181
      KAFKA_LISTENER_SECURITY_PROTOCOL_MAP: INTERNAL:PLAINTEXT,EXTERNAL:PLAINTEXT
      KAFKA_INTER_BROKER_LISTENER_NAME: INTERNAL
      KAFKA_ADVERTISED_LISTENERS: INTERNAL://kafka-2:29093,EXTERNAL://localhost:9093
  kafka-3:
    image: confluentinc/cp-kafka
    ports:
      - '9094:9094'
    depends_on:
      - zookeeper
    environment:
      KAFKA_BROKER_ID: 3
      KAFKA_ZOOKEEPER_CONNECT: zookeeper:2181
      KAFKA_LISTENER_SECURITY_PROTOCOL_MAP: INTERNAL:PLAINTEXT,EXTERNAL:PLAINTEXT
      KAFKA_INTER_BROKER_LISTENER_NAME: INTERNAL
      KAFKA_ADVERTISED_LISTENERS: INTERNAL://kafka-3:29094,EXTERNAL://localhost:9094
  kafka-ui:
    image: provectuslabs/kafka-ui
    container_name: kafka-ui
    ports:
      - "9000:8080"
    restart: always
    environment:
      - KAFKA_CLUSTERS_0_NAME=local
      - KAFKA_CLUSTERS_0_BOOTSTRAPSERVERS=kafka-1:29092,kafka-2:29093,kafka-3:29094
      - KAFKA_CLUSTERS_0_ZOOKEEPER=zookeeper:2181
docker-compose.yml 파일이 있는 디렉토리에서
docker compose up -d 명령어를 실행하여 컨테이너를 시작시킵니다.
kafka 설정 추가
Receiver 애플리케이션의 build.gradle에 spring-cloud-starter-stream-kafka 라이브러리를 추가하도록 하겠습니다.
receiver/build.gradle
...

dependencies {
	implementation 'org.springframework.boot:spring-boot-starter'
	compileOnly 'org.projectlombok:lombok'
	annotationProcessor 'org.projectlombok:lombok'
	testImplementation 'org.springframework.boot:spring-boot-starter-test'

	// spring cloud stream rabbitmq
	implementation 'org.springframework.cloud:spring-cloud-starter-stream-rabbit:4.0.4'
    // 추가
	implementation 'org.springframework.cloud:spring-cloud-starter-stream-kafka:4.0.4'
	testImplementation 'org.springframework.cloud:spring-cloud-stream-test-binder:4.0.4'
}

...
그리고 application.properties에 kafka의 설정과 binding의 binder를 명시적으로 지정해 주도록 합니다.
rabbitmq binder를 추가할 경우 rabbit이라는 이름의 바인더가 자동으로 생성되고,
kafka binder를 추가할 경우 kafka라는 이름의 바인더가 자동으로 생성됩니다.
2개 이상의 rabbitmq나 kafka를 등록하는 것도 가능합니다.
receiver/src/main/resources/application.properties
server.port=18082

# RabbitMQ
spring.rabbitmq.addresses=${RABBITMQ_HOST:localhost}:${RABBITMQ_PORT:5672}
spring.rabbitmq.username=${RABBITMQ_USER:guest}
spring.rabbitmq.password=${RABBITMQ_PASSWORD:guest}

# 추가
# Kafka
spring.cloud.stream.kafka.binder.brokers=${KAFKA_HOST:localhost}:${KAFKA_PORT:9092}

# spring cloud stream
spring.cloud.function.definition=receiverMessageHandler

# 추가
spring.cloud.stream.bindings.receiverMessageHandler-in-0.binder=rabbit
spring.cloud.stream.bindings.receiverMessageHandler-in-0.destination=test1
spring.cloud.stream.bindings.receiverMessageHandler-in-0.group=test1

# 추가
spring.cloud.stream.bindings.receiverMessageHandler-out-0.binder=kafka
spring.cloud.stream.bindings.receiverMessageHandler-out-0.destination=test2
Producer 애플리케이션의 build.gradle과 application.properties도 같은 과정으로 수정합니다.
producer/build.gradle
...
dependencies {
	implementation 'org.springframework.boot:spring-boot-starter-web'
	compileOnly 'org.projectlombok:lombok'
	annotationProcessor 'org.projectlombok:lombok'
	testImplementation 'org.springframework.boot:spring-boot-starter-test'

	// spring cloud stream rabbitmq
	implementation 'org.springframework.cloud:spring-cloud-starter-stream-rabbit:4.0.4'
	// 추가
    implementation 'org.springframework.cloud:spring-cloud-starter-stream-kafka:4.0.4'
	testImplementation 'org.springframework.cloud:spring-cloud-stream-test-binder:4.0.4'
}
...
producer/src/main/resources/application.properties
server.port=18081

# RabbitMQ
spring.rabbitmq.addresses=${RABBITMQ_HOST:localhost}:${RABBITMQ_PORT:5672}
spring.rabbitmq.username=${RABBITMQ_USER:guest}
spring.rabbitmq.password=${RABBITMQ_PASSWORD:guest}

# 추가
# Kafka
spring.cloud.stream.kafka.binder.brokers=${KAFKA_HOST:localhost}:${KAFKA_PORT:9092}

# spring cloud stream
spring.cloud.function.definition=producerConsume

# 추가
spring.cloud.stream.bindings.producerPublish-out-0.binder=rabbit
spring.cloud.stream.bindings.producerPublish-out-0.destination=test1

# 추가
spring.cloud.stream.bindings.producerConsume-in-0.binder=kafka
spring.cloud.stream.bindings.producerConsume-in-0.destination=test2
spring.cloud.stream.bindings.producerConsume-in-0.group=test2
테스트 케이스 실행해보기
테스트 케이스를 실행해보아 문제가 없는지 살펴봅니다.
Producer 애플리케이션에서 테스트 케이스를 실행하니 두 테스트 케이스가 실패했습니다.
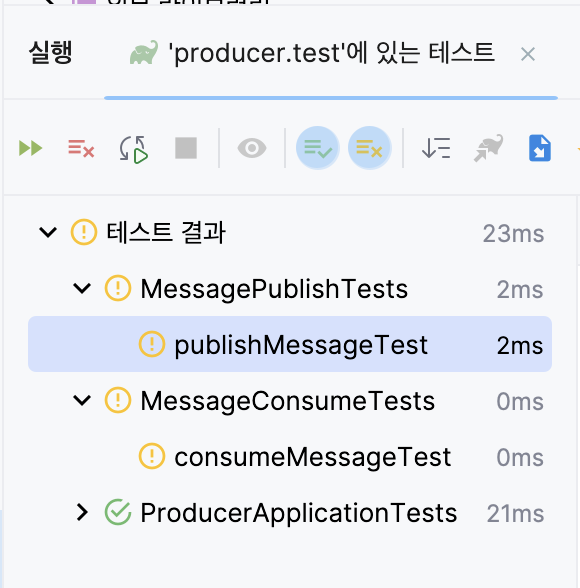
에러 메시지를 확인해 보니 InputDestination과 OutputDestination의 bean을 찾을 수 없다는 메시지가 등장한 것을 볼 수 있습니다.
... Unsatisfied dependency expressed through field 'outputDestination': No qualifying bean of type 'org.springframework.cloud.stream.binder.test.OutputDestination' available ...
... Unsatisfied dependency expressed through field 'inputDestination': No qualifying bean of type 'org.springframework.cloud.stream.binder.test.InputDestination' available ...
바인더를 두 개 도입하면서 테스트 환경에서 문제가 생겼던 것 같습니다.
여러 가지 해결 방법이 있을 수 있겠습니다만, Input/OutputDestination을 Bean으로 등록하는 곳은 spring-cloud-stream-test-binder의 TestChannelBinderConfiguration라는 점에 착안하여 해결책을 찾고자 합니다.
TestChannelBinderConfiguration
package org.springframework.cloud.stream.binder.test;

...

@Configuration
@ConditionalOnMissingBean({Binder.class})
@Import({BinderFactoryAutoConfiguration.class})
@EnableIntegration
public class TestChannelBinderConfiguration<T> {
	...
    @Bean
    public InputDestination sourceDestination() {
        return new InputDestination();
    }

    @Bean
    public OutputDestination targetDestination() {
        return new OutputDestination();
    }
	...
}
Test 클래스에 @Import하여 실행하면 context에서 Bean을 잘 찾는 것을 볼 수 있습니다.
MessageConsumeTests
package com.github.questcollector.producer;

...

@SpringBootTest
@Import(TestChannelBinderConfiguration.class)
@ExtendWith(MockitoExtension.class)
public class MessageConsumeTests {...}
MessagePublishTests
package com.github.questcollector.producer;

...

@SpringBootTest
@Import(TestChannelBinderConfiguration.class)
public class MessagePublishTests {...}
Receiver의 테스트 케이스도 마찬가지로 수정하면 잘 돌아가는 것을 확인할 수 있습니다.
ReceiverBindingTest
package com.github.questcollector.receiver;

...

@SpringBootTest
@Import(TestChannelBinderConfiguration.class)
@ExtendWith(MockitoExtension.class)
public class ReceiverBindingTest {...}
실행해보기
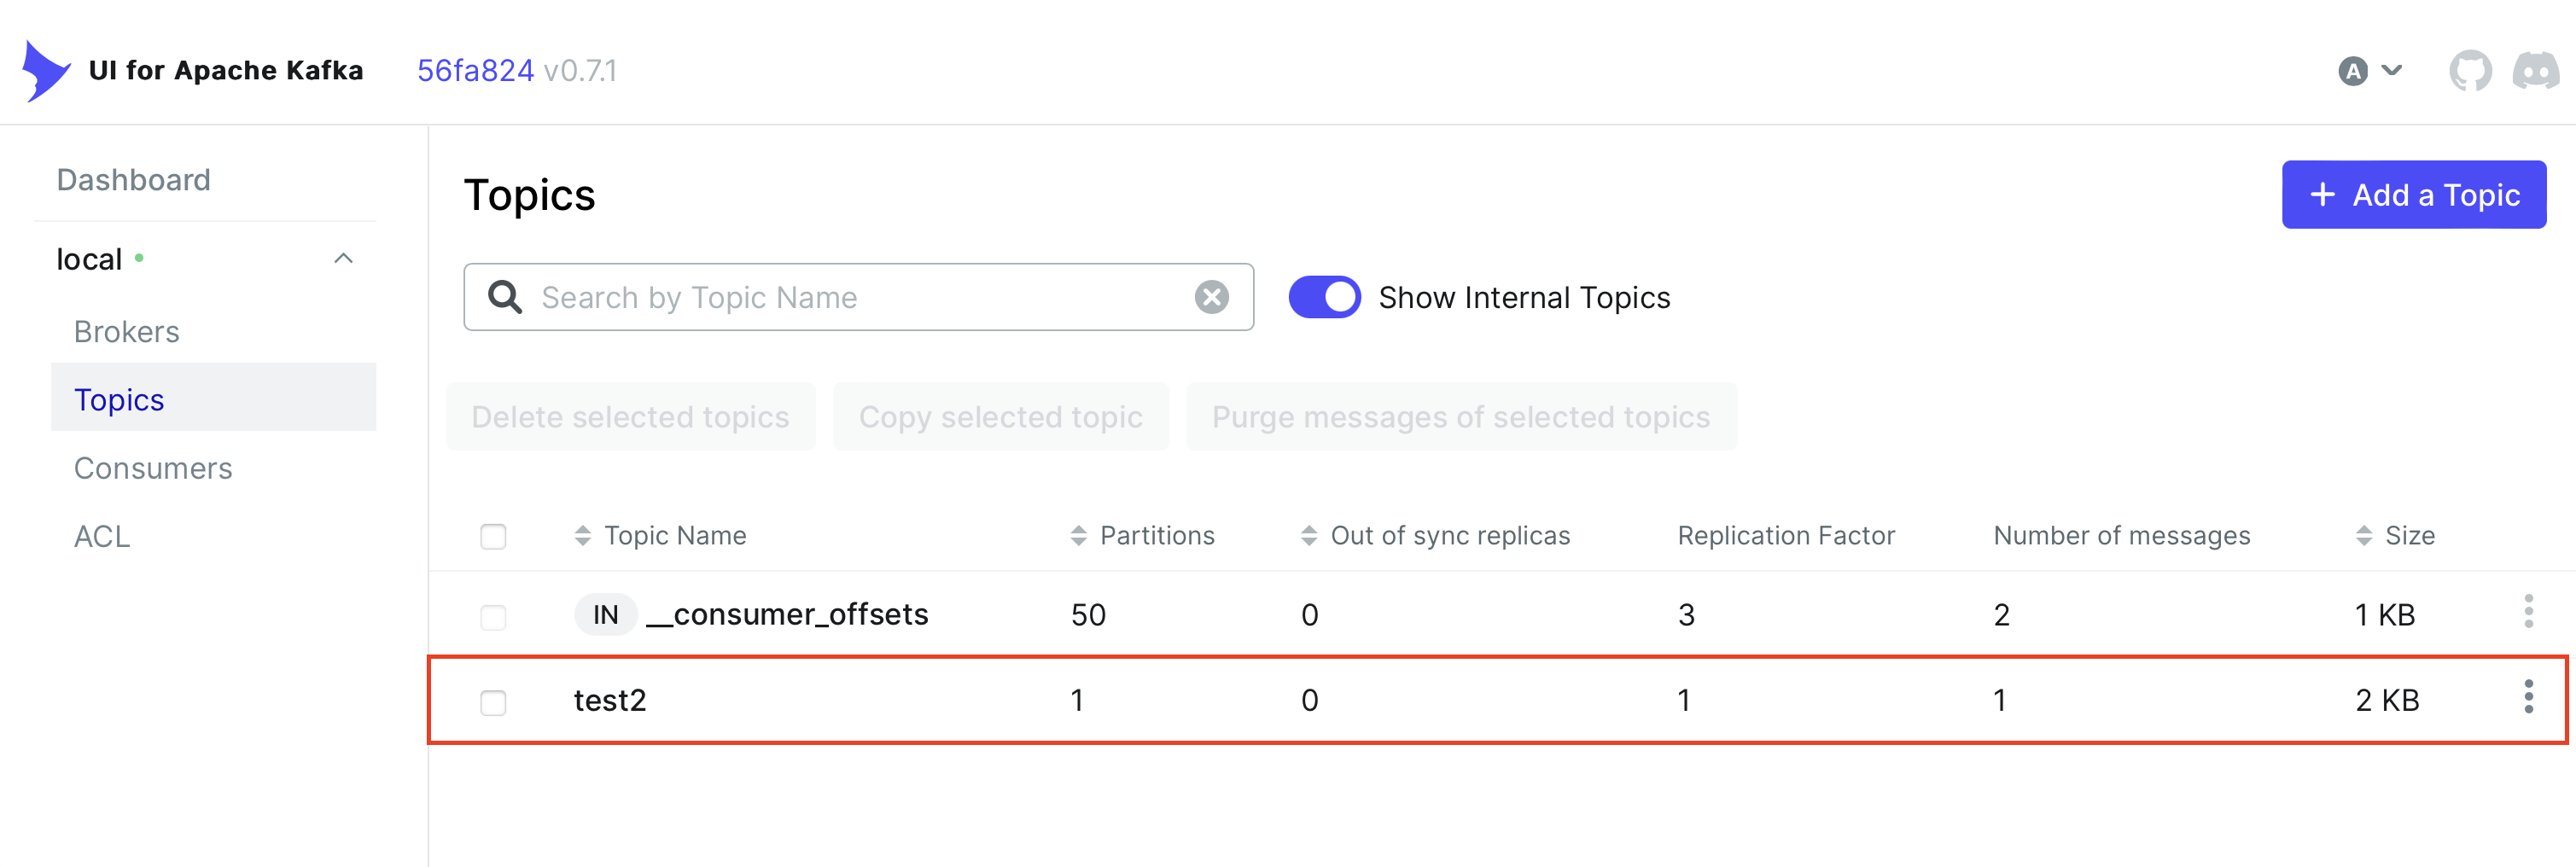
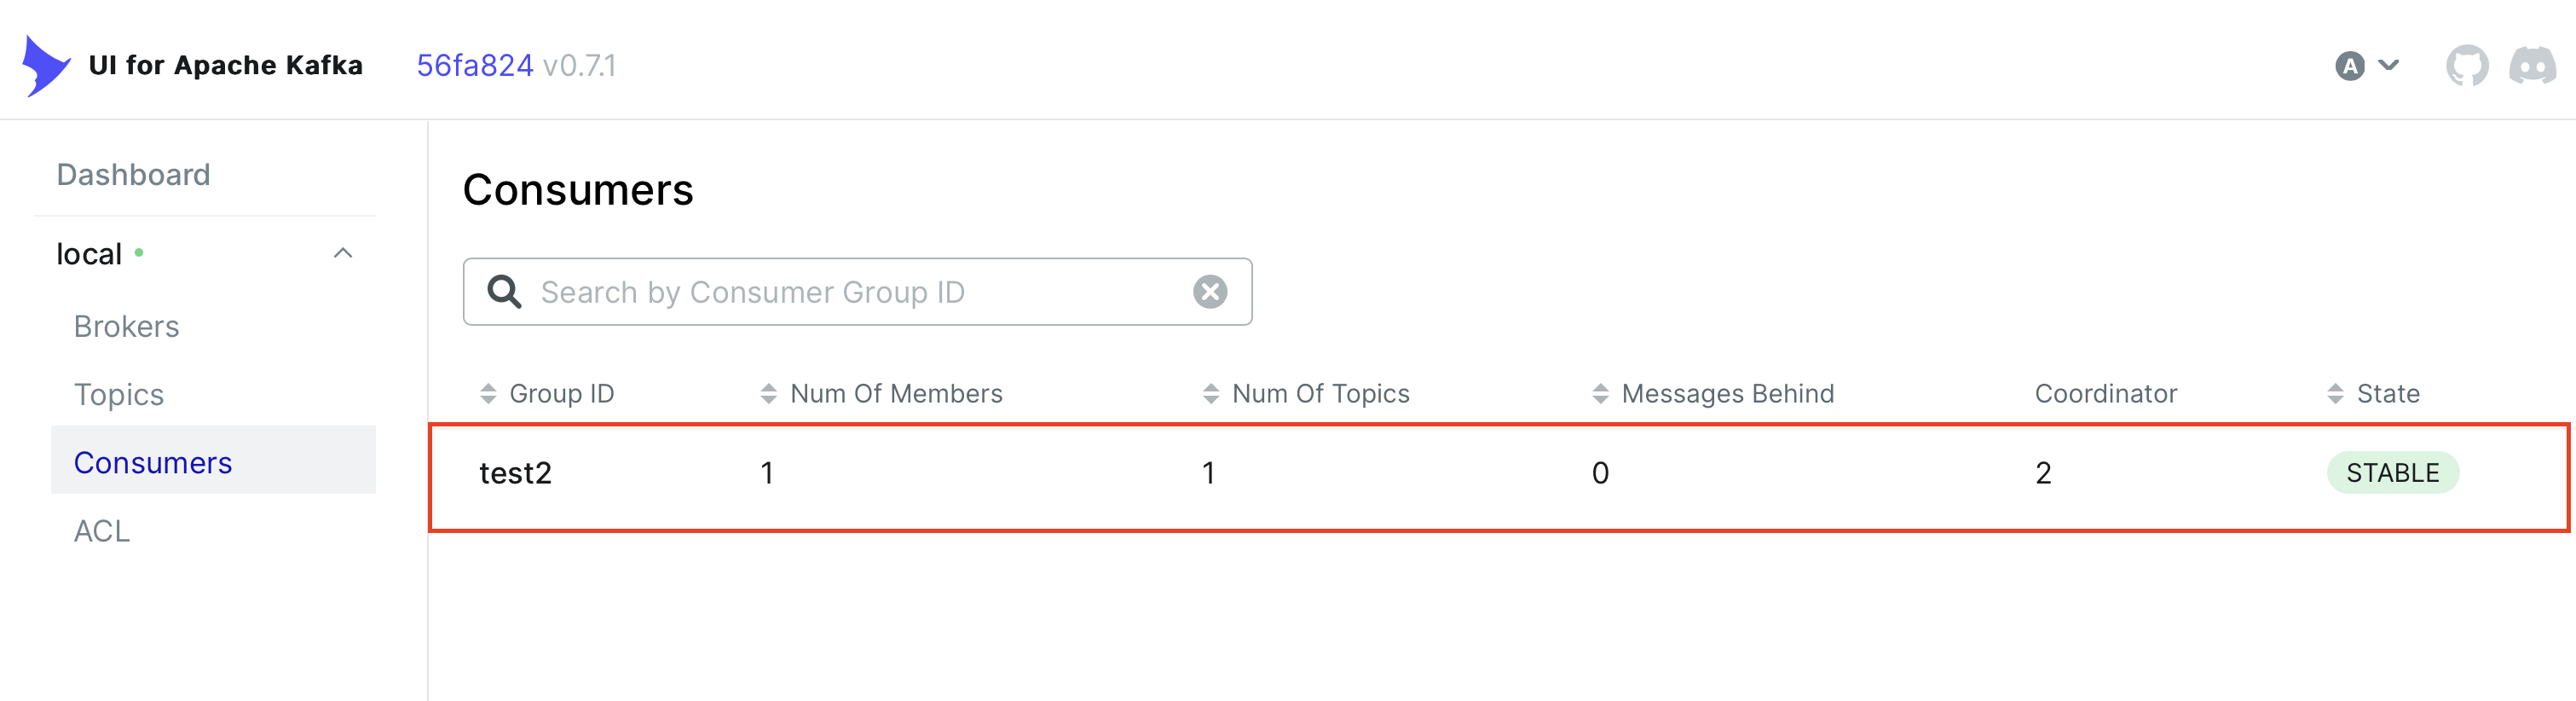
kafka-ui(localhost:9000)를 통해 확인해보면 topic과 consumer group이 생성된 것을 확인할 수 있습니다.
브라우저에서 localhost:18081에 접속하여 GET / API를 호출하면 다음과 같이 Producer와 Receiver의 로그를 확인할 수 있습니다.
Producer
...  INFO 9234 --- [io-18081-exec-1] c.g.q.producer.ProducerRestController    : published message to producerPublish binding
...  INFO 9234 --- [container-0-C-1] c.g.q.producer.ProducerMessageListener   : received message: MyMessage(id=6187594194052978558, content=Hello World2)
Receiver
...  INFO 8479 --- [  test1.test1-9] c.g.q.receiver.ReceiverMessageListener   : received message: MyMessage(id=6187594194052978558, content=Hello World)
...  INFO 8479 --- [  test1.test1-9] c.g.q.receiver.ReceiverMessageListener   : publish message to receiverPublish binding
간단한 data 클래스였기 때문에 특별히 변경할 점이 없었지만, 실제로 전환을 하는 경우 다양한 조치가 필요할 수 있습니다.
이를테면 시간과 관련된 데이터를 사용하는 경우 ObjectMapper에서 매핑을 하지 못하므로 적절한 ObjectMapper를 Bean으로 등록해 둬야 하는 경우가 있을 수 있습니다.
