문제
테스트하려는 객체가 여러 변수를 주입받고 있는 상황에서 어떤 객체는 Mocking하고, 어떤 객체는 원래 스프링 컨테이너가 주입해주는 객체를 활용하고 싶을 때는 어떻게 해야 할까요?
상황
테스트 대상
@Service
@RequiredArgsConstructor
public class ExchangeService {
    private final ExchangeRepository exchangeRepository;
    private final ExchangeRateClient exchangeRateClient;

    ...
}
테스트 대상인 ExchangeService는 ExchangeRepository와 ExchangeRateClient를 주입받아 사용하고 있습니다.
ExchangeRateClient는 외부 API를 활용하는 객체로 다른 곳에서 검증을 끝마쳤기 때문에 여기서는 Mock처리를 통해 테스트의 시간을 절약하고 싶습니다.
반면 ExchangeRepository는 별다른 장치 없이 기존에 사용하던 기능을 그대로 활용하고 싶습니다.
이럴 경우 어떻게 해야 할까요?
Mock객체를 주입하는 방법을 조사해 보면 @InjectMocks에 대한 내용이 많습니다. @InjectMocks은 @Mock어노테이션으로 선언한 객체를 주입시켜주는 어노테이션으로 다음과 같이 활용할 수 있습니다.
@ExtendWith(MockitoExtension.class)
class ExchangeServiceTest {
    @Mock
    ExchangeRateClient exchangeRateClient;

	@Mock
    ExchangeRepository exchangeRepository;

    @InjectMocks
    ExchangeService exchangeService;
}@InjectMocks은 @Mock으로 선언된 객체를 주입받아 사용할 수 있게 해 줍니다. 만약 우리가 ExchangeRateClient와 ExchangeRepository를 모두 Mocking해 사용할 거라면 위 코드처럼 작성하면 됩니다. 하지만 우리는 ExchangeRepository를 Mocking하길 원하지 않는 상황입니다.
@SpringBootTest
@ExtendWith(MockitoExtension.class)
class ExchangeServiceTest {
    @Mock
    ExchangeRateClient exchangeRateClient;

	@Autowired
    ExchangeRepository exchangeRepository;

    @InjectMocks
    ExchangeService exchangeService;
}
사실상 우리가 원하는 건 위 코드와 같은 상황일 겁니다. ExchangeRateClient는 Mocking처리하고, ExchangeRepository는 Spring Context에서 주입받고, 마지막으로 두 객체가 ExchangeService안으로 잘 들어가길 바라고 있습니다.
하지만 위 코드는 우리가 원하는 대로 동작하지 않습니다. ExchangeRepository가 Mock객체가 아니기 때문에 @InjectMocks이 인식하지 못하기 때문입니다.
- 기타)
@InjectMocks는 스프링 컨텍스트에서 빈을 찾지 않기 때문에@Mock이 아닌,@MockBean은 인식하지 못합니다.@MockBean은 원래 객체 대신 Mocking한 객체를 스프링 컨테이너에 넣어주는 어노테이션으로 주로@Autowired와 함께 사용합니다.
결론
@InjectMocks가 여러 이유로 원하는대로 작동하지 않았습니다.
그런데 우리가 꼭 어노테이션을 이용해 주입해야 할 이유는 없습니다. 우리가 원하는 객체를 직접 수동으로 주입해주면 됩니다.
최종 코드
@SpringBootTest
@ExtendWith(MockitoExtension.class)
class ExchangeServiceTest {
    @MockBean
    ExchangeRateClient exchangeRateClient;

    @Autowired
    ExchangeRepository exchangeRepository;

    ExchangeService exchangeService;

    @BeforeEach
    public void beforeEach(){
        exchangeService = new ExchangeService(exchangeRepository,exchangeRateClient);
    }
}ExchangeRateClient는 @MockBean으로 Mocking한 객체를 스프링 컨테이너에 넣었고, ExchangeRepository는 @Autowired로 스프링 컨테이너에 있는 객체를 그대로 주입받고 있습니다.
ExchangeService는 @BeforeEach를 통해 각 테스트가 시작되는 시점에 직접 객체를 생성합니다. 이 때 Mocking된 ExchangeRateClient와 Mocking되지 않은 ExchangeRepository를 직접 주입해 주고 있습니다.
추가
위에 작성한 BeforeEach에서 직접 객체를 생성하는 방식은 new키워드를 통해 직접 객체를 생성하는 방식으로 이는 결국 ApplicationContext에 등록된 빈을 활용하는 방식이 아닙니다. 그렇기 때문에 스프링 컨텍스트가 제공하는 기능은 물론 @Transactional과 같은 AOP의 적용 역시 받을 수 없습니다.
일반적으로 @Autowired로 주입받아 사용하는 객체는 ApplicationContext에 등록된 CGLIB 프록시 객체입니다
@SpringBootTest
@ExtendWith(MockitoExtension.class)
class ExchangeServiceTest {
    @MockBean
    ExchangeRateClient exchangeRateClient;

    @Autowired
    ExchangeRepository exchangeRepository;

    @Autowired
    ApplicationContext applicationContext;

    @Autowired
    ExchangeService exchangeService;

    @Test
    void func() {
        System.out.println(applicationContext.getBean("exchangeService").getClass());
        System.out.println(exchangeService.getClass());
    }

}
반면 new 키워드를 통해 생성한 객체는 ApplicationContext에 등록된 프록시 객체와 다릅니다
@SpringBootTest
@ExtendWith(MockitoExtension.class)
class ExchangeServiceTest {
    @MockBean
    ExchangeRateClient exchangeRateClient;

    @Autowired
    ExchangeRepository exchangeRepository;

    @Autowired
    ApplicationContext applicationContext;

    ExchangeService exchangeService;

    @BeforeEach
    public void beforeEach(){
        exchangeService = new ExchangeService(exchangeRepository,exchangeRateClient);
    }

    @Test
    void func() {
        System.out.println(applicationContext.getBean("exchangeService").getClass());
        System.out.println(exchangeService.getClass());
    }

}
특정 빈의 일부 메서드만 모킹하고 싶을 때 @Spy를 사용할 수 있습니다. Spy를 빈으로 ApplicationContext에 등록하는 @SpyBean을 이용하면 원하는 코드를 작성할 수 있습니다.
@SpringBootTest
@ExtendWith(MockitoExtension.class)
class MyServiceTest {
    @MockBean
    ExchangeRateClient exchangeRateClient;

    @SpyBean
    ExchangeRepository exchangeRepository;

    @Autowired
    ExchangeService myService;

}
기타
JpaRepository를 사용할 때 @Spy와 @SpyBean의 차이를 살펴봅시다.
테스트에 필요한 기본 코드는 다음과 같습니다.
ExchangeRepository
public interface ExchangeRepository extends JpaRepository<MyEntity, Long> {
}
ExchangeService
@Service
@RequiredArgsConstructor
public class ExchangeService {
    private final ExchangeRepository exchangeRepository;

    @Transactional
    public void func() {
        exchangeRepository.save(new MyEntity());
        System.out.println(exchangeRepository.count());
    }
}
아래 두 가지 방법으로 테스트코드를 실행해 봅시다.
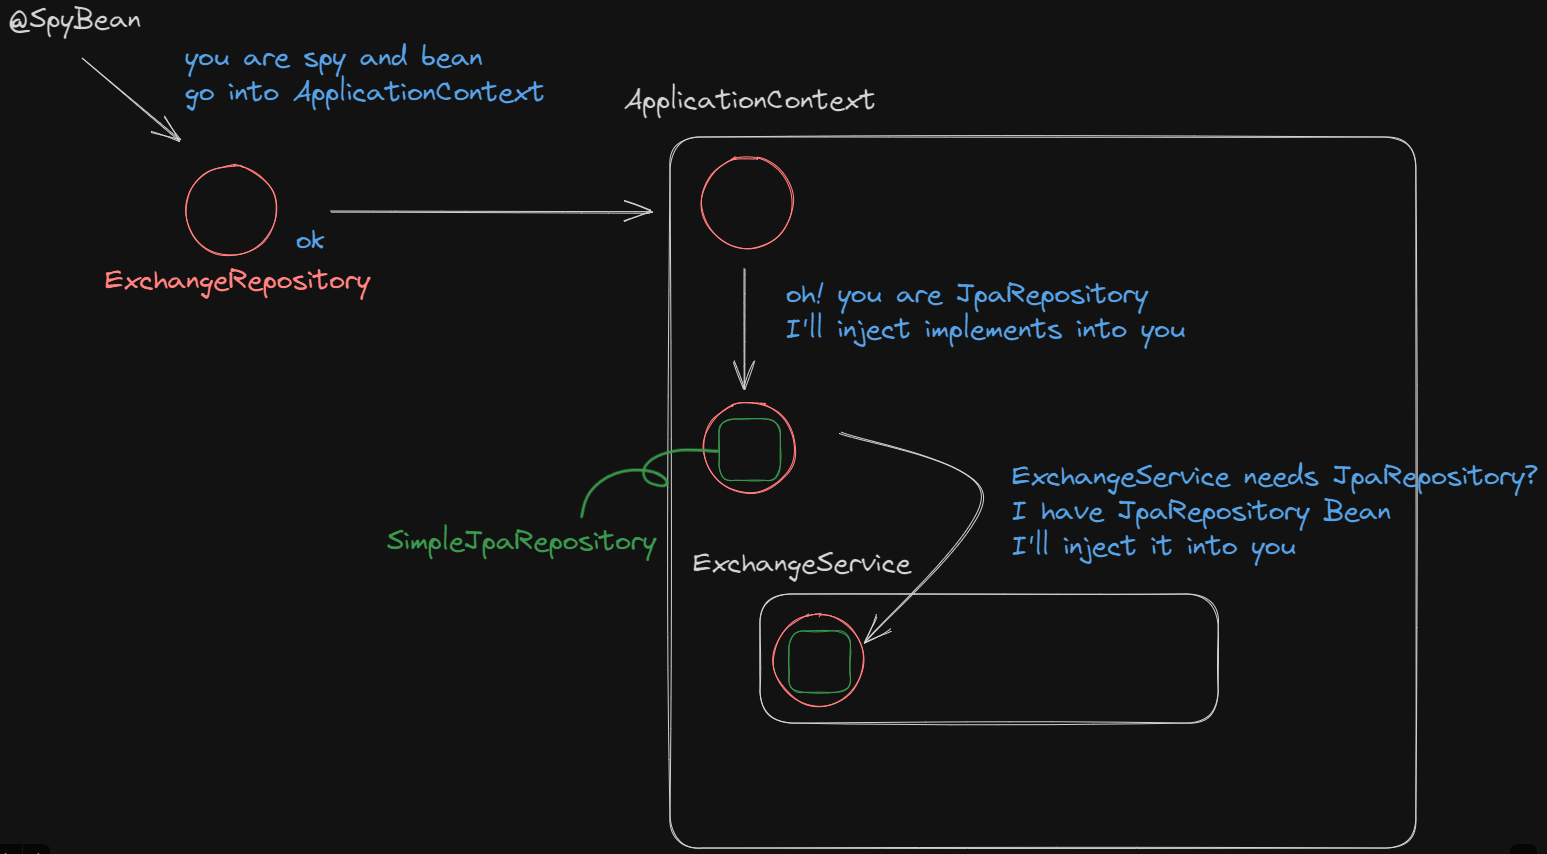
@SpyBean를 사용한 경우
@SpringBootTest
@ExtendWith(MockitoExtension.class)
class MyServiceTest {
@SpyBean
ExchangeRepository exchangeRepository;
@Autowired
ExchangeService exchangeService;
@Transactional
@Test
void func() {
exchangeService.func(); // 1
}
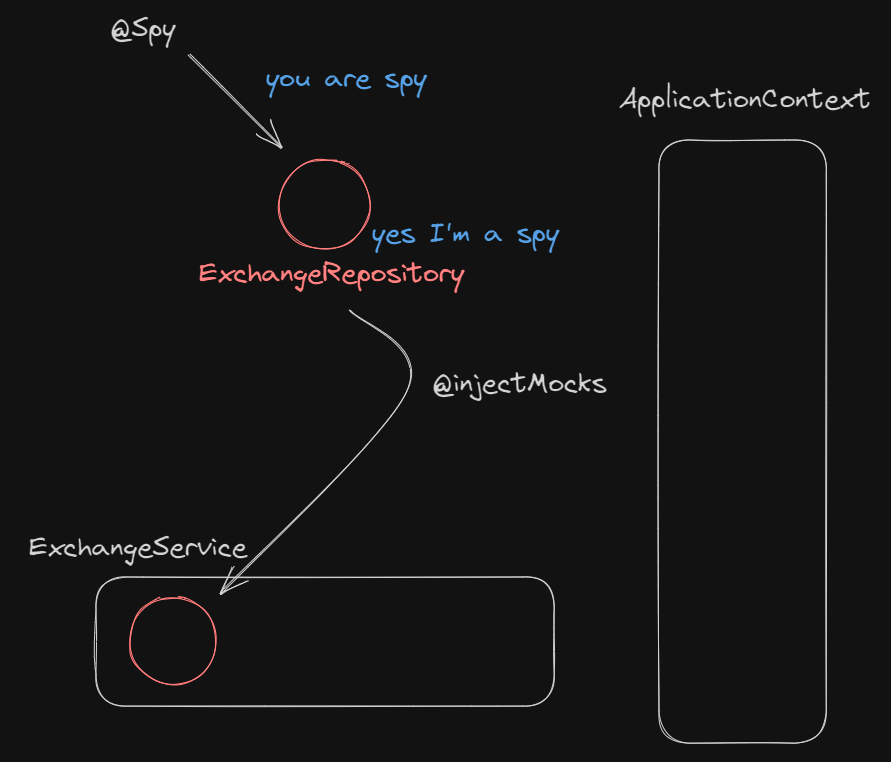
}@Spy를 사용한 경우
@SpringBootTest
@ExtendWith(MockitoExtension.class)
class MyServiceTest {

    @Spy
    ExchangeRepository exchangeRepository;

    @InjectMocks
    ExchangeService exchangeService;

    @Transactional
    @Test
    void func() {
        exchangeService.func(); // 0
    }

}
위 상황의 원인과 관련된 직접적인 내용은 찾지 못했고, 나름대로 생각해본 이유는 다음과 같습니다. (틀렸을 수도 있습니다!)
1. ExchangeRepository는 ApplicationContext로부터 그 구현체(SimpleJpaRepository)를 주입받아야 합니다.
2. ApplicationContext는 주입하는 객체와 주입받는 객체가 모두 Bean으로 등록되어 있어야 주입을 해줄 수 있습니다.
3. @Spy로 ExchangeRepository를 모킹했을 때 해당 객체는 ApplicationContext에 Bean으로 등록되지 않고 그 결과 구현체를 주입받지 못해 SimpleJpaRepository가 동작하지 않습니다.
4. 반면 @SpyBean으로 모킹했을 때 해당 객체는 ApplicationContext에 Bean으로 등록됩니다. ApplicationContext는 SimpleJpaRepository를 주입해 주고, 그 ExchangeRepository를 ExchangeService에도 주입해 정상적으로 동작합니다.

글 잘 읽었습니다. 테스트 코드 작성 중 코드를 따라서 쳐보고 학습하면서 알게된 내용을 공유하자면, 마지막처럼 Service 객체를 직접 생성하면, 흔히 Layered 아키텍처에서 많이 사용하는 서비스 클래스 위에 @Transactional 이 동작하지 않습니다. (Spring AOP로 프록시 객체가 만들어지지 않기 때문에) 인지하여 사용하는 것이 좋을 것 같습니다!