어노테이션에 대한 간단한 이해와 @Transactional

어노테이션
스프링 부트 프로젝트를 처음 접하면 어노테이션의 편리함에 감탄할 때가 많습니다. 메서드에 @Transactional어노테이션을 선언하기만 하면 트랜잭션 처리를 알아서 해준다는 사실은 매우 놀라웠습니다.
하지만 사실 어노테이션 그 자체로는 아무런 기능도 가지고 있지 않습니다. annotation이라는 단어의 뜻은 '주석'으로, 프로그래밍에서 주석은 컴파일러와 인터프리터에게 무시되는 정보로 프로그램에 영향을 주지 않습니다.
자바의 어노테이션 역시 특별한 정보를 작성해 둔 주석일 뿐 이를 처리하는 곳은 따로 있습니다. Aspect에서는 어노테이션 정보를 활용해 다양한 동작을 처리할 수 있습니다.
간단한 예제
Annotation은 메타정보일 뿐이고 구체적인 처리는 Aspect에서 진행된다는 점을 확인해 봅시다.
코드를 구현하기 위해 사용된 어노테이션들이 구체적으로 어떤 역할을 하는지에 대해서는 설명하지 않습니다.
예제1
'특정 메서드를 실행할 때 그 메서드가 언제 실행됐는지를 로그로 남기고 싶다'는 요구사항을 어노테이션과 Aspect로 구현해 보겠습니다.
어노테이션을 정의합니다
@Target(ElementType.METHOD)
@Retention(RetentionPolicy.RUNTIME)
public @interface MyAnnotation {
}
Aspect를 구현합니다
@Slf4j
@Aspect
@Component
public class MyAnnotationAspect {

    @Before("@annotation(com.example.aop.common.MyAnnotation)")
    public void before() {
        log.info("Method starts at time {}", System.currentTimeMillis());
    }

}
원하는 메서드에 어노테이션을 선언합니다
public class MyService {

    @MyAnnotation
    public String hello() {
        return "hello";
    }

}
실행 결과

예제2
'실행 시작시간과 종료시간을 함께 로그로 남기고 싶다'는 요구사항이 있다면 아래와 같이 구현할 수 있습니다.
Aspect를 추가합니다
@Slf4j
@Aspect
@Component
public class MyAnnotationAspect {

    @Before("@annotation(com.example.aop.common.MyAnnotation)")
    public void before() {
        log.info("Method starts at time {}", System.currentTimeMillis());
    }

    @After("@annotation(com.example.aop.common.MyAnnotation)")
    public void after() {
        log.info("Method ends at time {}", System.currentTimeMillis());
    }

}
실행 결과

예제3
'실행 시작시간과 종료시간을 함께 로그로 남기고 싶다'는 요구사항을 이렇게도 구현할 수 있습니다.
Aspect를 구현합니다
@Slf4j
@Aspect
@Component
public class MyAnnotationAspect {

    @Around("@annotation(com.example.aop.common.MyAnnotation)")
    public void around(ProceedingJoinPoint joinPoint) {
        String methodName = joinPoint.getSignature().getName();
        log.info("{} method starts at time {}", methodName, System.currentTimeMillis());
        try{
            joinPoint.proceed();
        }catch (Throwable e){}
        log.info("{} method ends at time {}", methodName, System.currentTimeMillis());
    }

}
joinPoint는 어노테이션이 선언된 메서드에 대한 정보를 가지고 있습니다.
- joinPoint.getSignature().getName()을 통해 메서드 이름을 가져왔습니다.
- joinPoint.proceed()를 통해 메서드를 실행했습니다.
실행 결과

AOP 용어 정리
여기서는 해당 용어에 대한 정확한 설명보다 간단한 설명에 중점을 두고 있습니다. 일부 원래의 뜻과 맞지 않는 내용이 있을 수 있습니다.
- Pointcut : Advice가 실행될 조건
- Advice : 실행될 로직
- Interceptor : Advice역할을 한다
- Advisor : Advice와 Pointcut을 합친 객체
- Aspect : Advisor객체를 생성한다
@Transactional의 동작에 대해
1. AnnotationAwareAspectJAutoProxyCreator
AnnotationAwareAspectJAutoProxyCreator는 프록시 객체를 생성하는 역할을 합니다.
AnnotationAwareAspectJAutoProxyCreator는 프록시 객체를 등록한다
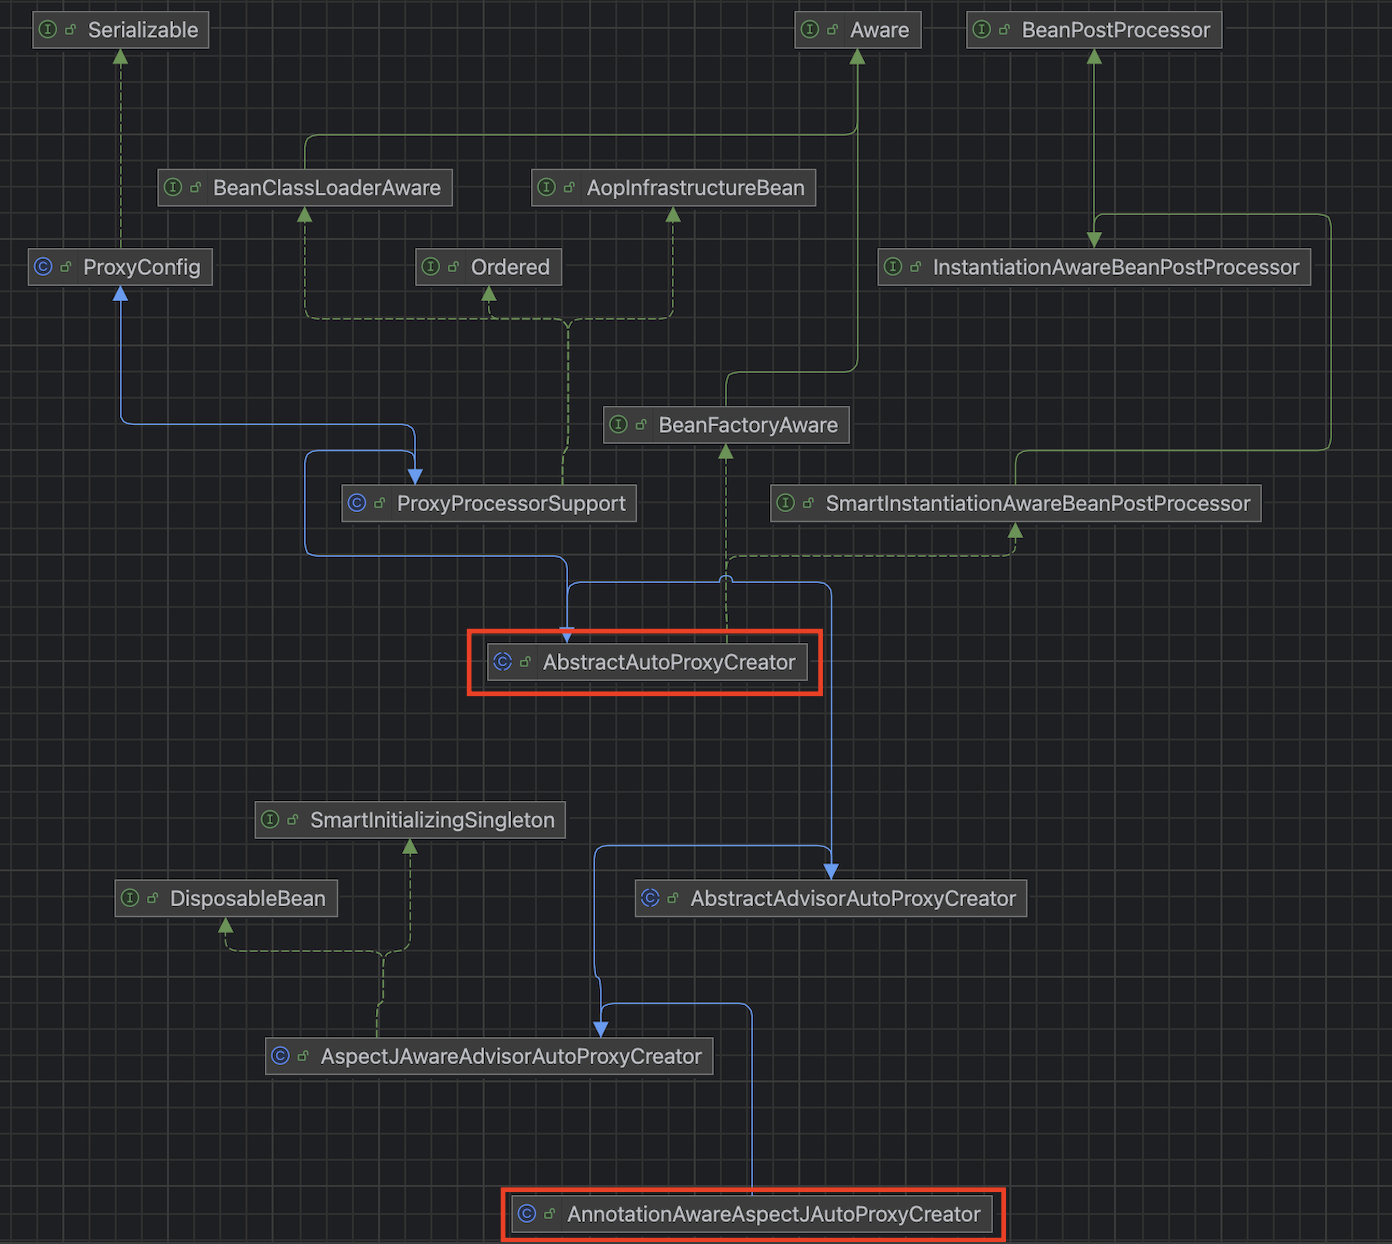
AnnotationAwareAspectJAutoProxyCreator은 AbstractAutoProxyCreator를 상속받고 있습니다.
AbstractAutoProxyCreator의 postProcessAfterInitialization메서드는 wrapIfNecessary메서드를 통해 필요 시 Bean을 프록시 객체로 감싸서 반환합니다.
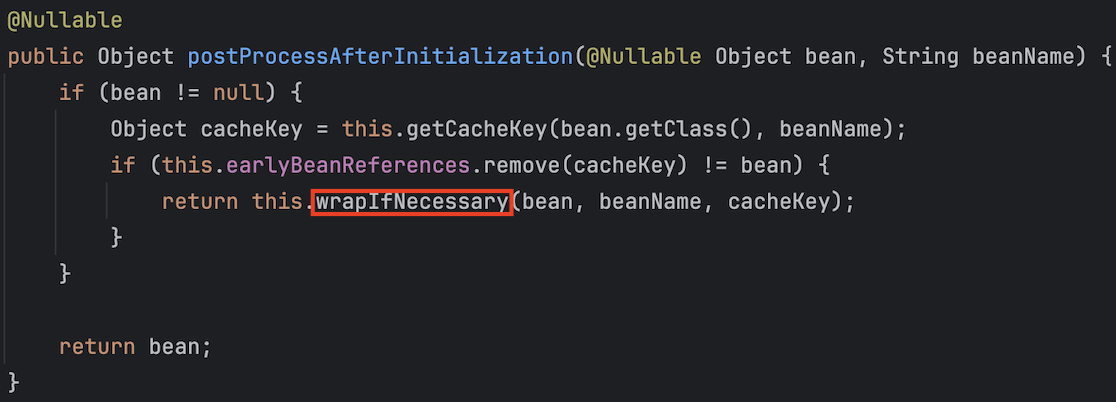
postProcessAfterInitialization메서드는 원본 객체가 초기화된 후 실행된다
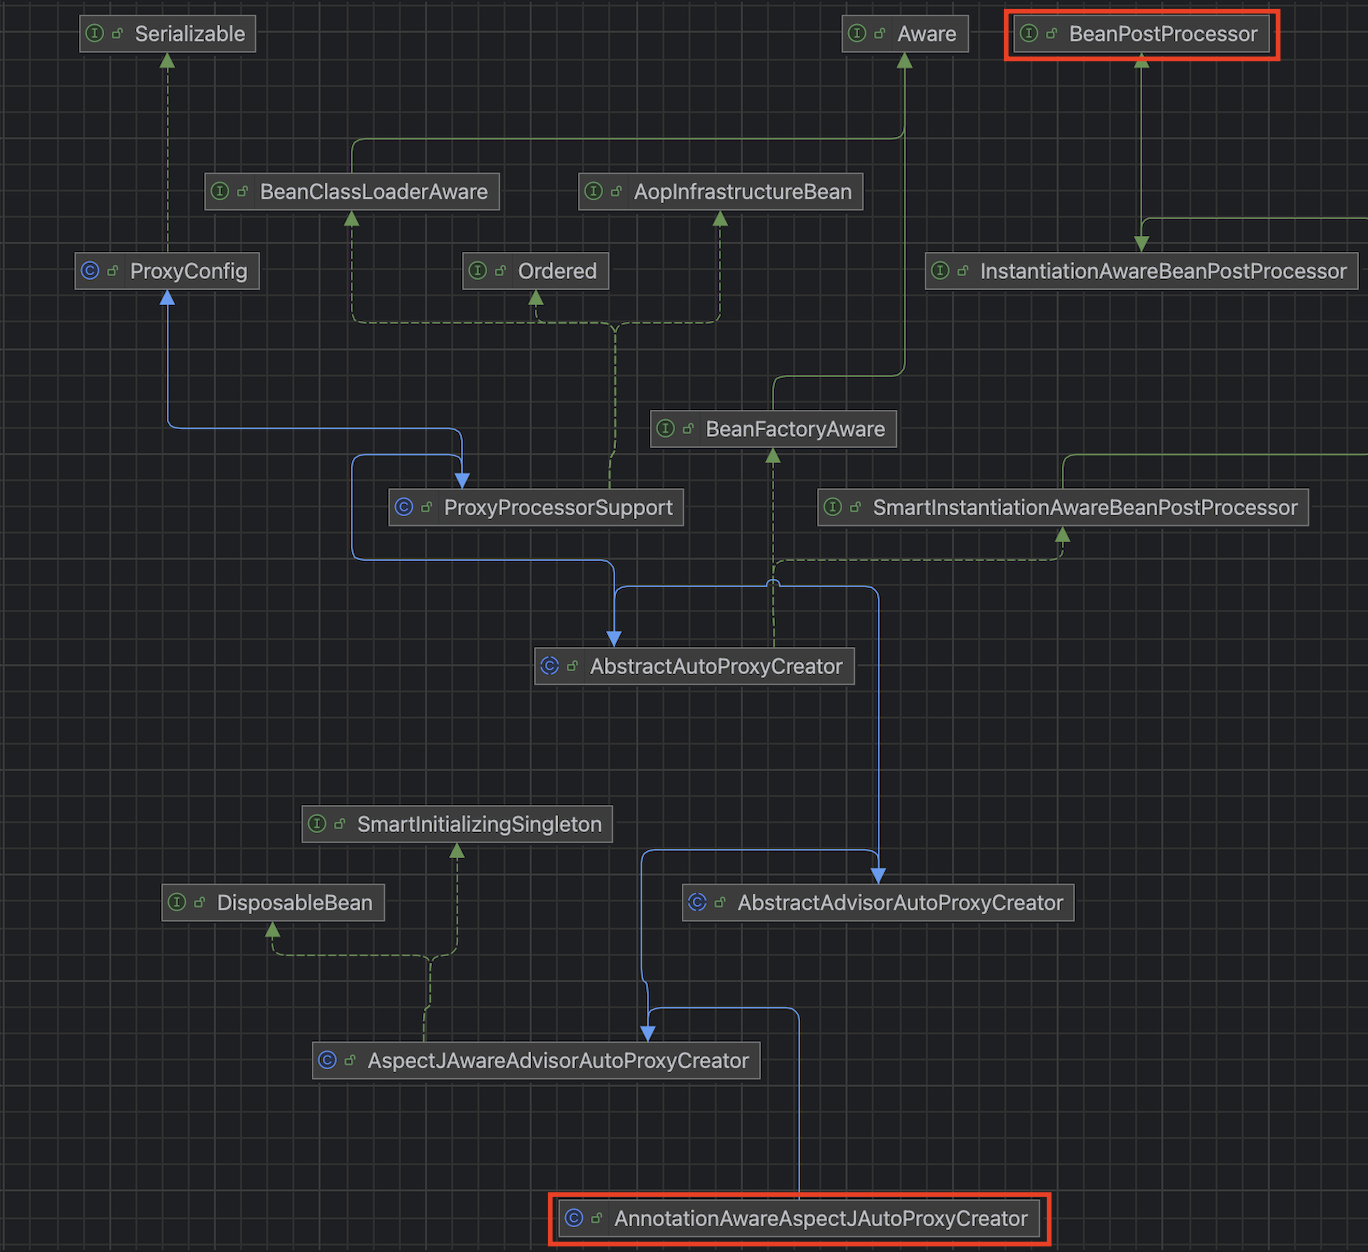
postProcessAfterInitialization메서드는 어떻게 호출될까요? postProcessAfterInitialization메서드는 BeanPostProcessor인터페이스에 정의되어 있는 메서드입니다.
BeanPostProcessor는 빈 후처리기라 부르며 객체 초기화 전/후에 실행할 동작을 정의합니다. postProcessAfterInitialization메서드 안에 있는 wrapIfNecessary메서드는 원본 객체가 초기화된 후 호출되어 프록시 객체를 등록합니다.
wrapIfNecessary메서드는 프록시를 생성할 때 Proxy에 Interceptor를 넣는다

createProxy메서드는 specificInterceptors를 인자로 받습니다.
@Transactional이 붙은 객체도 프록시로 등록됩니다. @Transactional이 붙은 객체와 관련된 프록시를 만들 때 주입되는 Interceptor중 하나로
TransactionInterceptor가 있습니다.
2. ProxyTransactionManagementConfiguration
ProxyTransactionManagementConfiguration은 BeanFactoryTransactionAttributeSourceAdvisor와 TransactionInterceptor를 Bean으로 등록하고 있습니다.
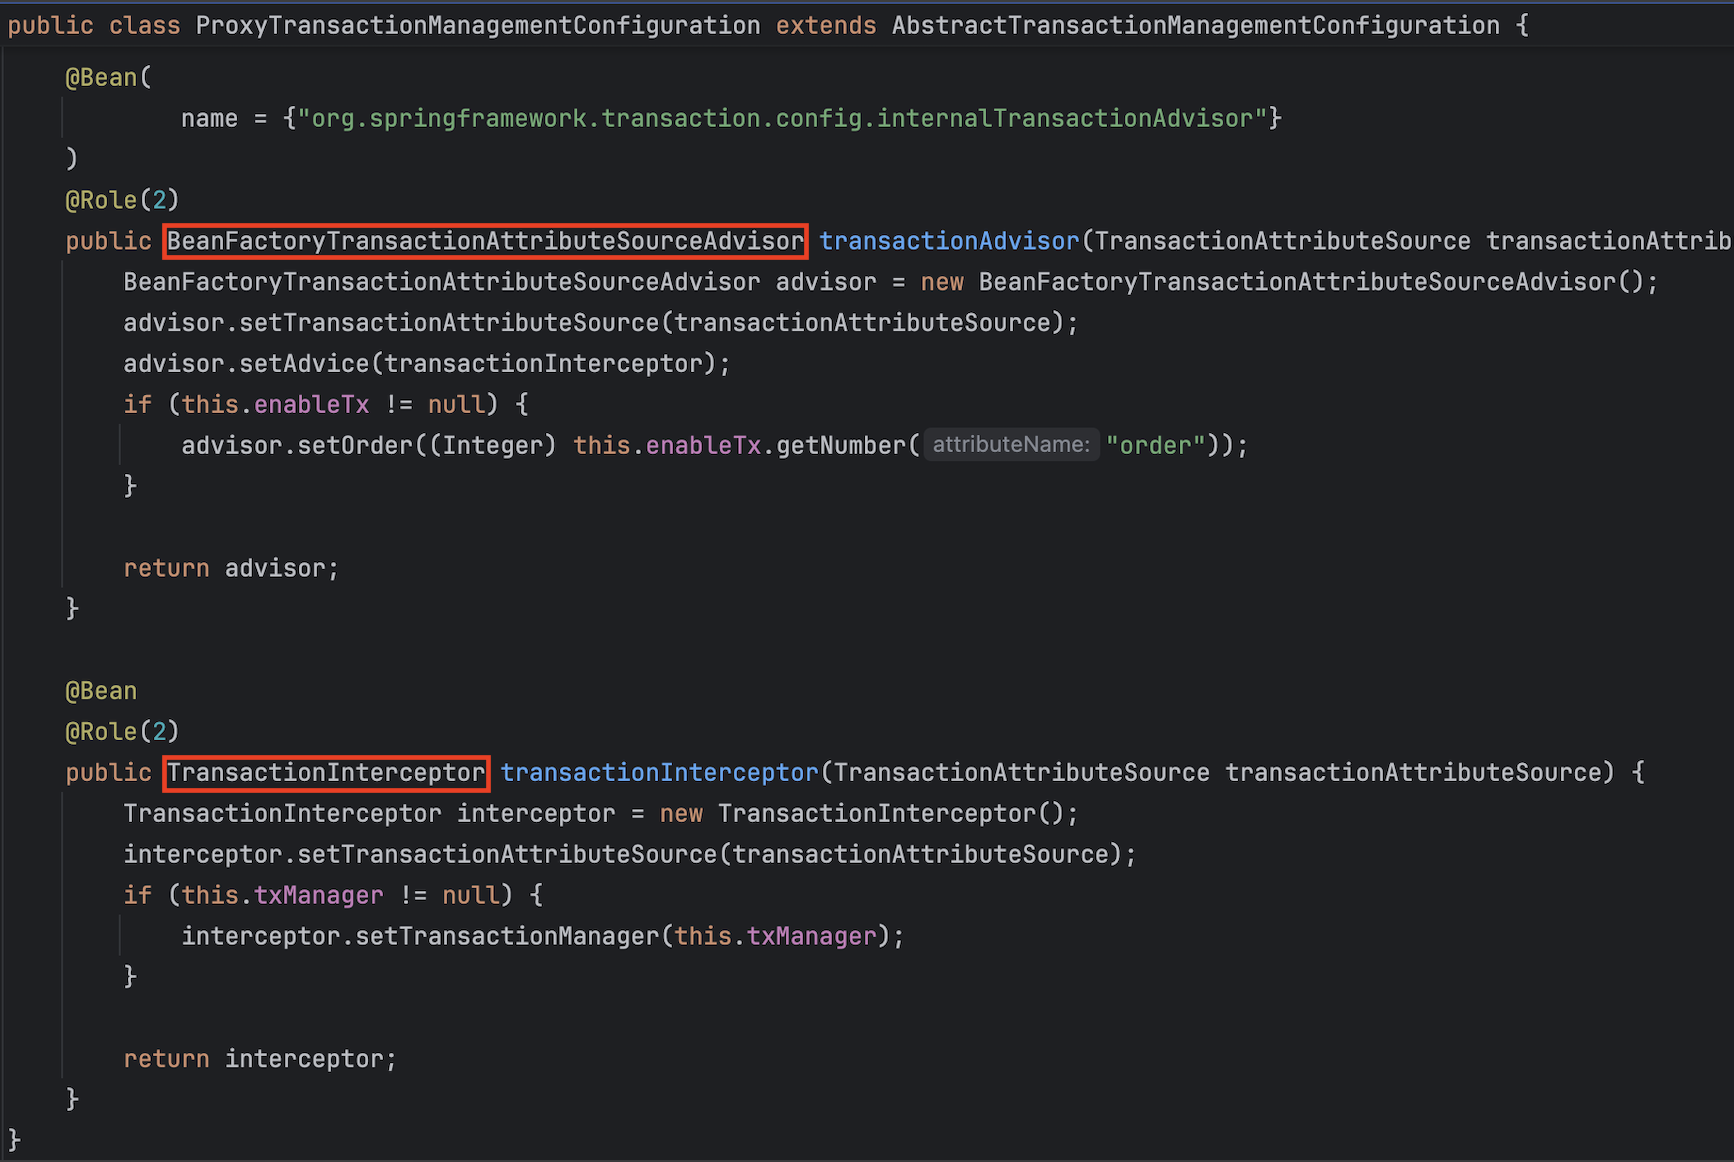
2-1. BeanFactoryTransactionAttributeSourceAdvisor
BeanFactoryTransactionAttributeSourceAdvisor는 TransactionAttributeSourcePointcut을 Pointcut으로, transactionInterceptor를 Advice로 가지는 Advisor입니다.
BeanFactoryTransactionAttributeSourceAdvisor는 트랜잭션을 적용할 대상 메서드를 선별합니다.
@Transactional이 붙은 객체가 프록시로 등록될 때 그 프록시 안에 TransactionInterceptor가 주입된다고 했습니다. 보다 구체적으로는 BeanFactoryTransactionAttributeSourceAdvisor에 의해 선별된 객체들이 AnnotationAwareAspectJAutoProxyCreator에 의해 등록될 때 TransactionInterceptor가 주입됩니다.
2-2. TransactionInterceptor
TransactionInterceptor는 invoke메서드를 통해 원본 메서드가 트랜잭션 안에서 실행될 수 있도록 합니다.

invokeWithinTransaction코드를 살펴보겠습니다. 여기서는 여러가지 조건(Reactive인 경우, Callback을 이용한 트랜잭션인 경우, Future인 경우)에 대한 로직은 제외하고 일반적인 경우의 트랜잭션 처리 로직에 대해 살펴보겠습니다.
protected Object invokeWithinTransaction(Method method, @Nullable Class<?> targetClass,
                                         final TransactionAspectSupport.InvocationCallback invocation) throws Throwable {

    // If the transaction attribute is null, the method is non-transactional.
    TransactionAttributeSource tas = getTransactionAttributeSource();
    final TransactionAttribute txAttr = (tas != null ? tas.getTransactionAttribute(method, targetClass) : null);
    final TransactionManager tm = determineTransactionManager(txAttr, targetClass);

    if (this.reactiveAdapterRegistry != null && tm instanceof ReactiveTransactionManager rtm) {
        // Reactive 트랜잭션 처리
    }

    PlatformTransactionManager ptm = asPlatformTransactionManager(tm);
    final String joinpointIdentification = methodIdentification(method, targetClass, txAttr);

    if (txAttr == null || !(ptm instanceof CallbackPreferringPlatformTransactionManager cpptm)) {
        // Standard transaction demarcation with getTransaction and commit/rollback calls.
        TransactionAspectSupport.TransactionInfo txInfo = createTransactionIfNecessary(ptm, txAttr, joinpointIdentification);

        Object retVal;
        try {
            // This is an around advice: Invoke the next interceptor in the chain.
            // This will normally result in a target object being invoked.
            retVal = invocation.proceedWithInvocation();
        }
        catch (Throwable ex) {
            // target invocation exception
            completeTransactionAfterThrowing(txInfo, ex);
            throw ex;
        }
        finally {
            cleanupTransactionInfo(txInfo);
        }

        if (retVal != null && txAttr != null) {
            // Future 또는 vavrTry에 대한 처리
        }

        commitTransactionAfterReturning(txInfo);
        return retVal;
    }

    else {
        // Callback을 이용한 트랜잭션 처리
    }
}
필요한 부분만 다시 살펴보겠습니다.
    TransactionAttributeSource tas = getTransactionAttributeSource();
    final TransactionAttribute txAttr = (tas != null ? tas.getTransactionAttribute(method, targetClass) : null);
    final TransactionManager tm = determineTransactionManager(txAttr, targetClass);

	PlatformTransactionManager ptm = asPlatformTransactionManager(tm);
final String joinpointIdentification = methodIdentification(method, targetClass, txAttr);- 트랜잭션 매니저를 생성합니다.
    TransactionAspectSupport.TransactionInfo txInfo = createTransactionIfNecessary(ptm, txAttr, joinpointIdentification);
    try {
        retVal = invocation.proceedWithInvocation();
    }
    catch (Throwable ex) {
        completeTransactionAfterThrowing(txInfo, ex);
        throw ex;
    }
    finally {
        cleanupTransactionInfo(txInfo);
    }

commitTransactionAfterReturning(txInfo);- createTransactionIfNecessary를 통해 필요할 경우 트랜잭션을 생성합니다.
- try문에서 원본 객체의 메서드를 실행합니다.
- 예외가 발생해 catch로 들어온 경우 completeTransactionAfterThrowing을 통해 상황에 따라 롤백을 수행합니다.
- completeTransactionAfterThrowing이 항상 롤백을 실행하는 건 아닙니다. transactionAttribute가 존재하며, 발생한 예외가 롤백 조건에 해당할 경우에만 롤백을 수행합니다.

- DefaultTransactionAttibute의 경우 기본적으로 RuntimeException 또는 Error의 경우 롤백하도록 설계되어 있습니다.

- completeTransactionAfterThrowing이 항상 롤백을 실행하는 건 아닙니다. transactionAttribute가 존재하며, 발생한 예외가 롤백 조건에 해당할 경우에만 롤백을 수행합니다.
-
finally문에서 cleanupTransactionInfo를 통해 스레드 로컬의 상태를 되돌립니다.

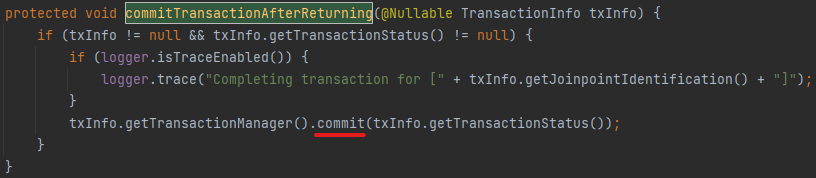
-
예외가 발생하지 않았을 경우 commitTransactionAfterReturning을 통해 커밋합니다.
@Transactional 정리
- AnnotationAwareAspectJAutoProxyCreator는 프록시 객체를 등록한다
- BeanFactoryTransactionAttributeSourceAdvisor에 의해 선별된 객체들은 AnnotationAwareAspectJAutoProxyCreator에 의해 프록시가 등록될 때 TransactionInterceptor가 주입된다
- TransactionInterceptor는 원본 메서드가 트랜잭션 안에서 실행될 수 있도록 한다
References