Haptic
모바일 사용 환경에서 진동을 통해 사용자에게 반응을 전달하는 것.
키보드 입력 시, 미세한 진동으로 누르는 느낌을 주는 것 등이 있다.
이번에는 우리 앱에서 회원가입이나 로그인 할 때 이메일 형식에 맞지 않았을 경우
이메일 형식이 아니라는 문구와 함께 햅틱 피드백 그리고 흔들리는 효과를 적용해 보기로 했다.
✨ 디자인 요구 사항
이번에는 Protopie라는 디자인 프로그램으로 받았는데, 피그마와 연동을 해서
실제 기기에서 진동까지도 확인할 수 있었다.
실제로 얼마 만큼 흔들려야 하는지 (좌로 몇 xp 이동해야되는지) 값을 알고 싶었지만
유료 결제를 해야지만 볼 수 있었기에 따로 스크린샷을 받아 값을 이동 값을 확인했다.
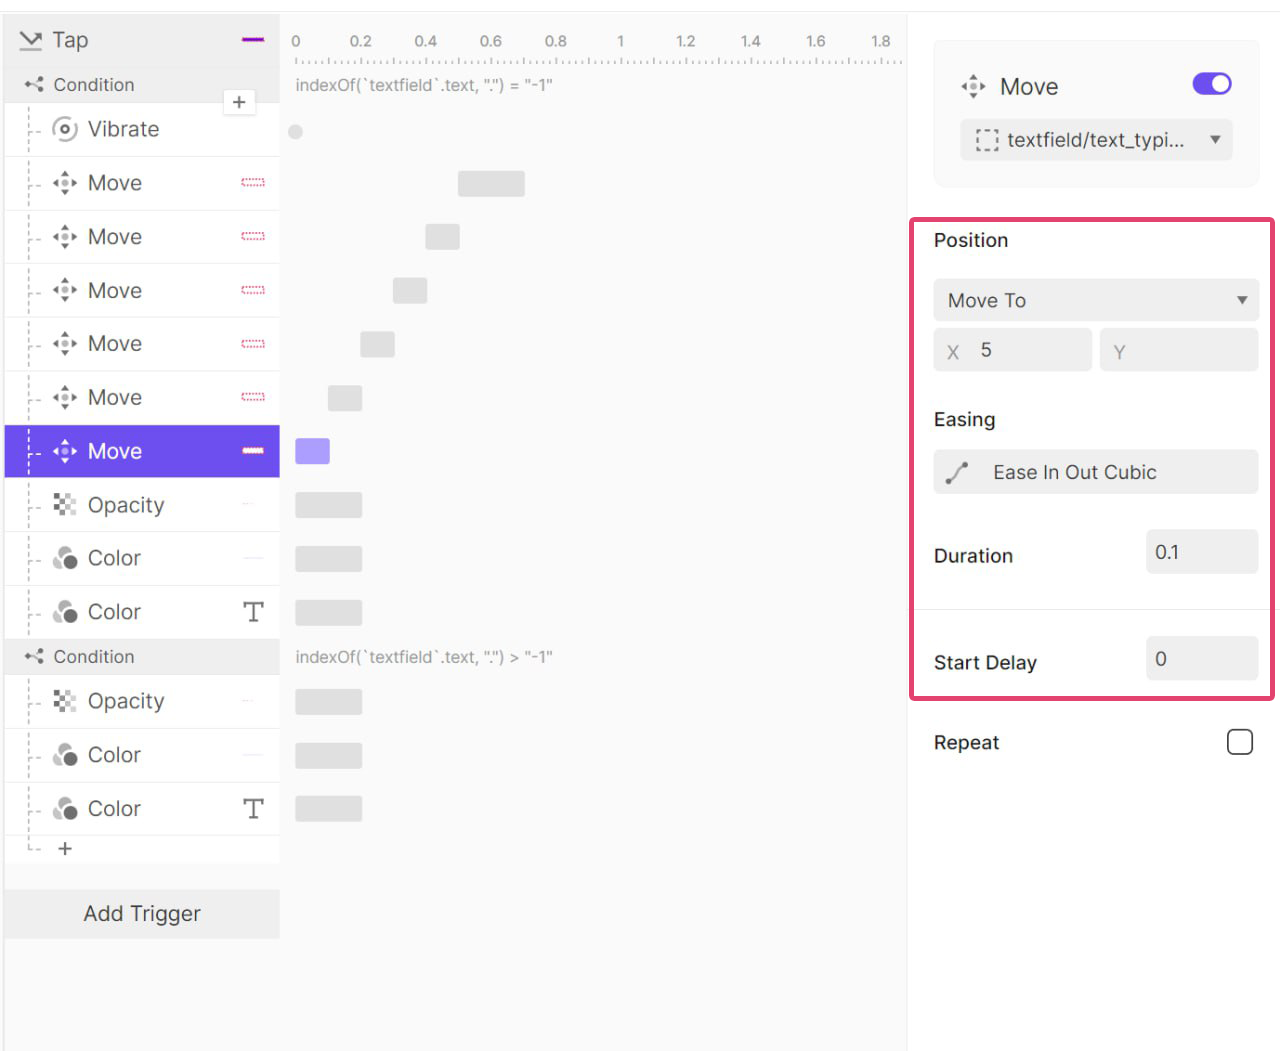
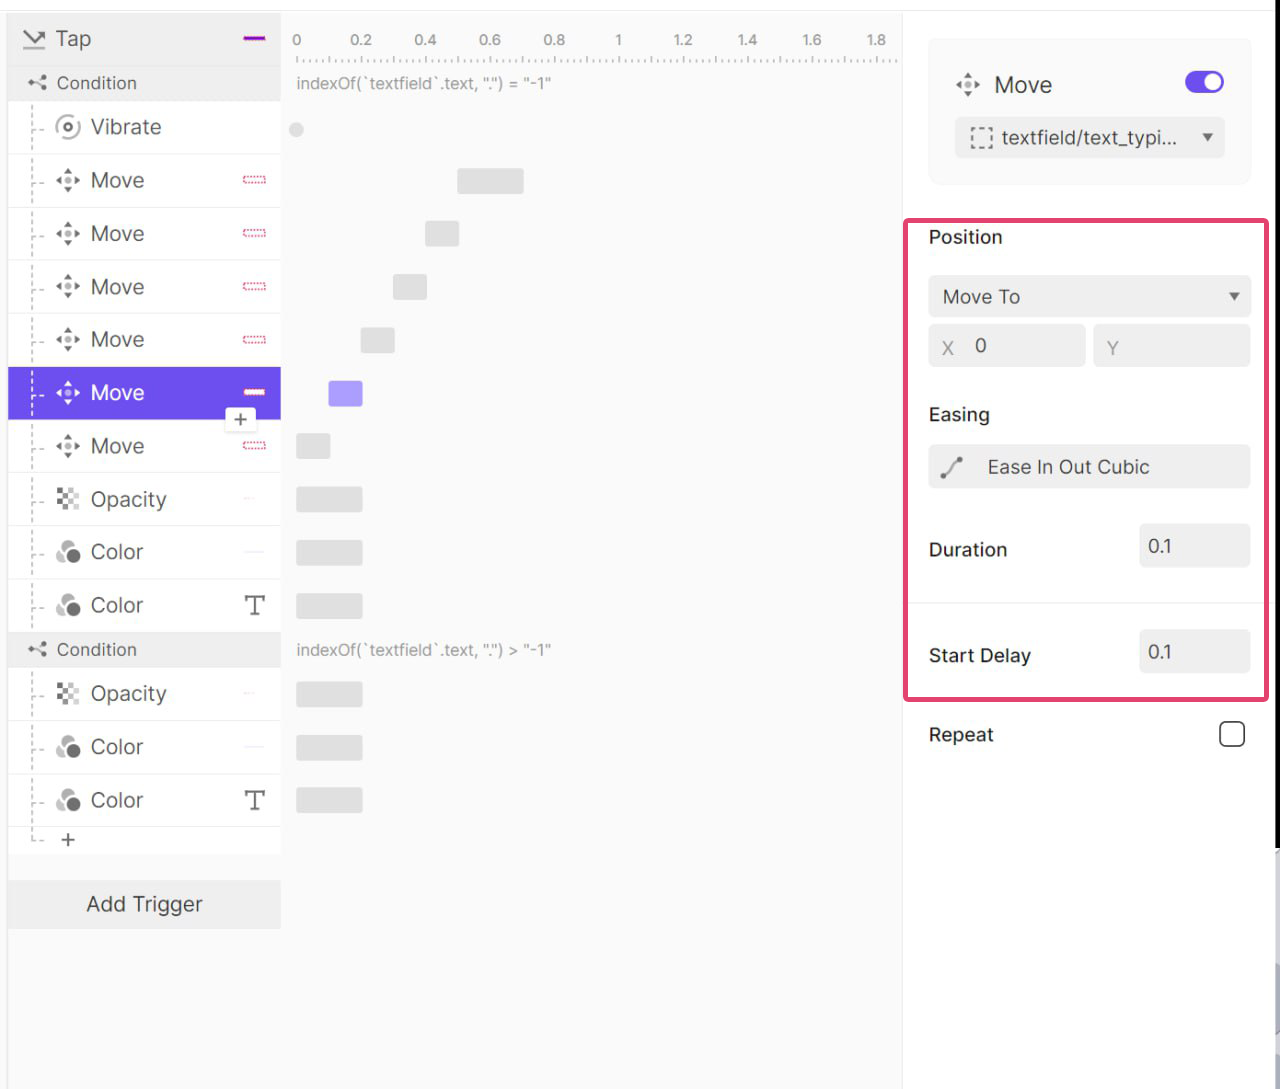
오른쪽으로 100ms 동안 5px 이동 후 원래 위치로 돌아온 뒤
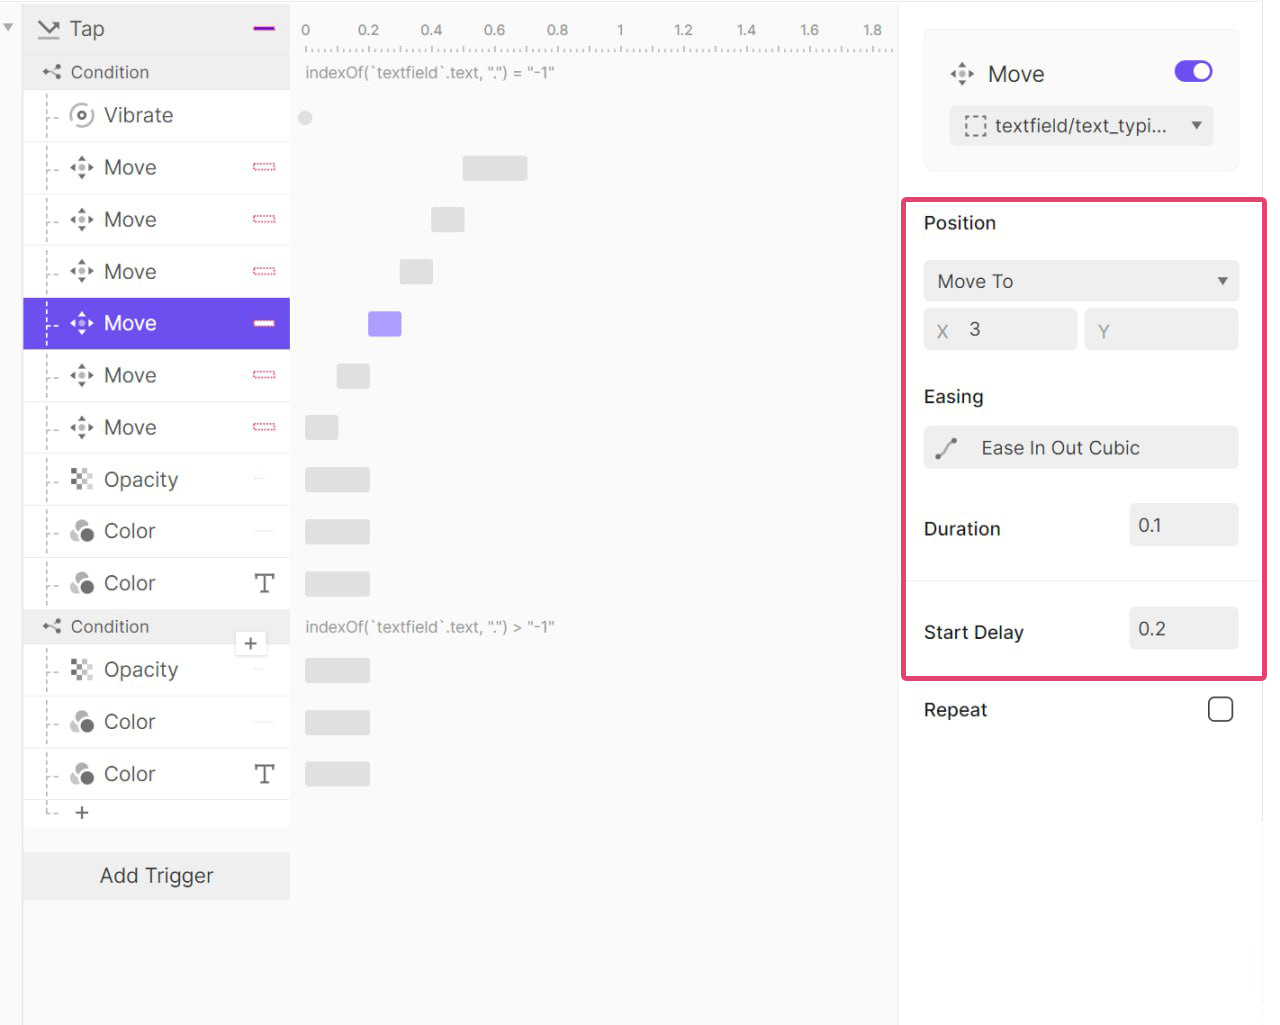
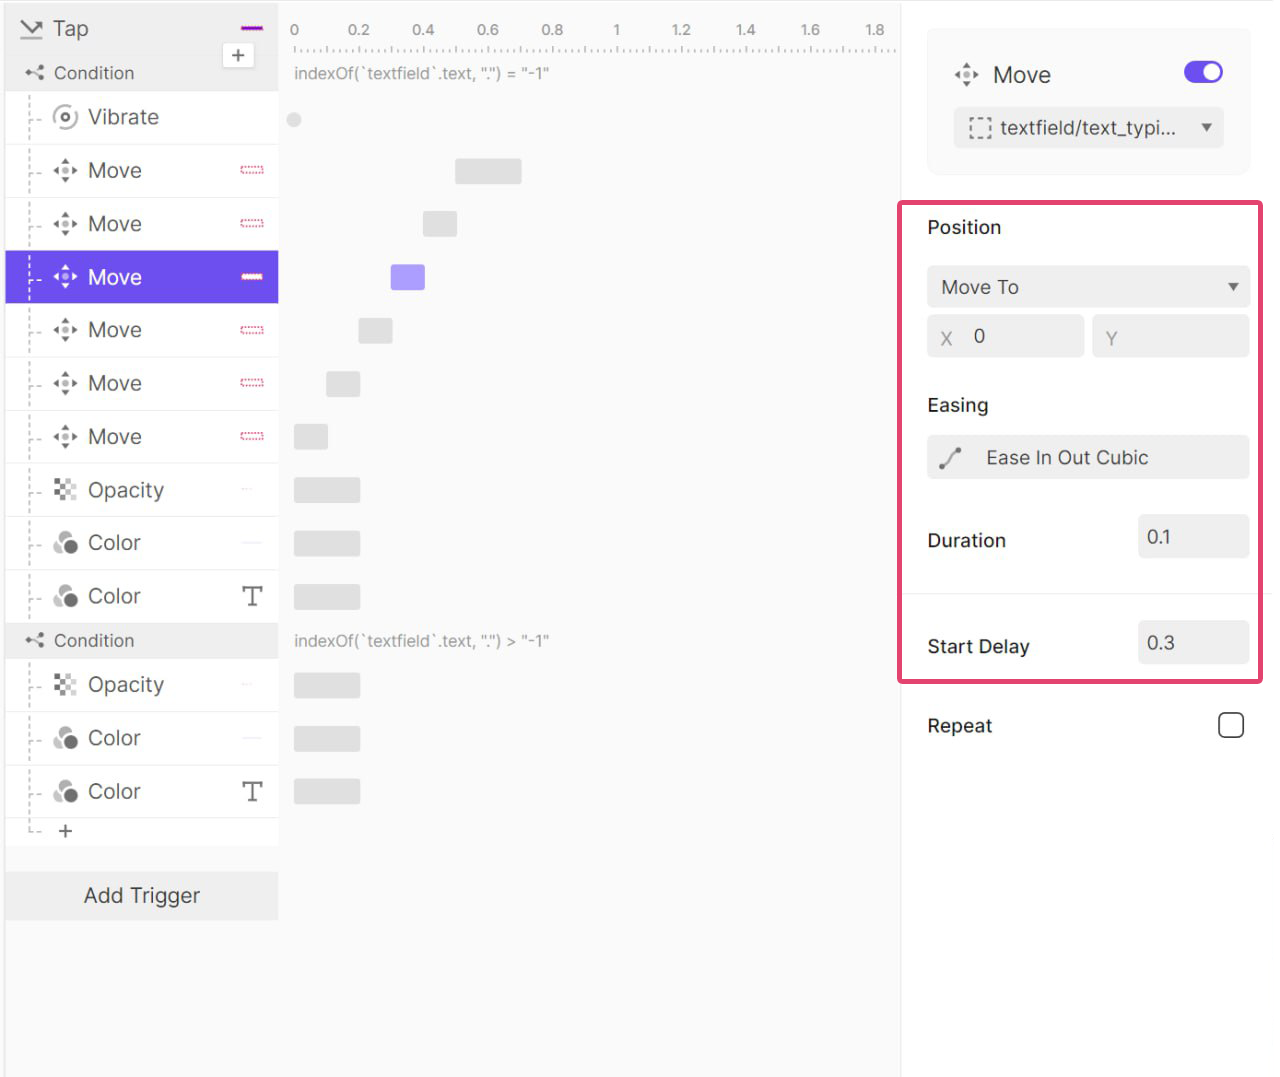
다시 오른쪽으로 100ms 동안 3px 이동 후 원래 위치로 돌아오고

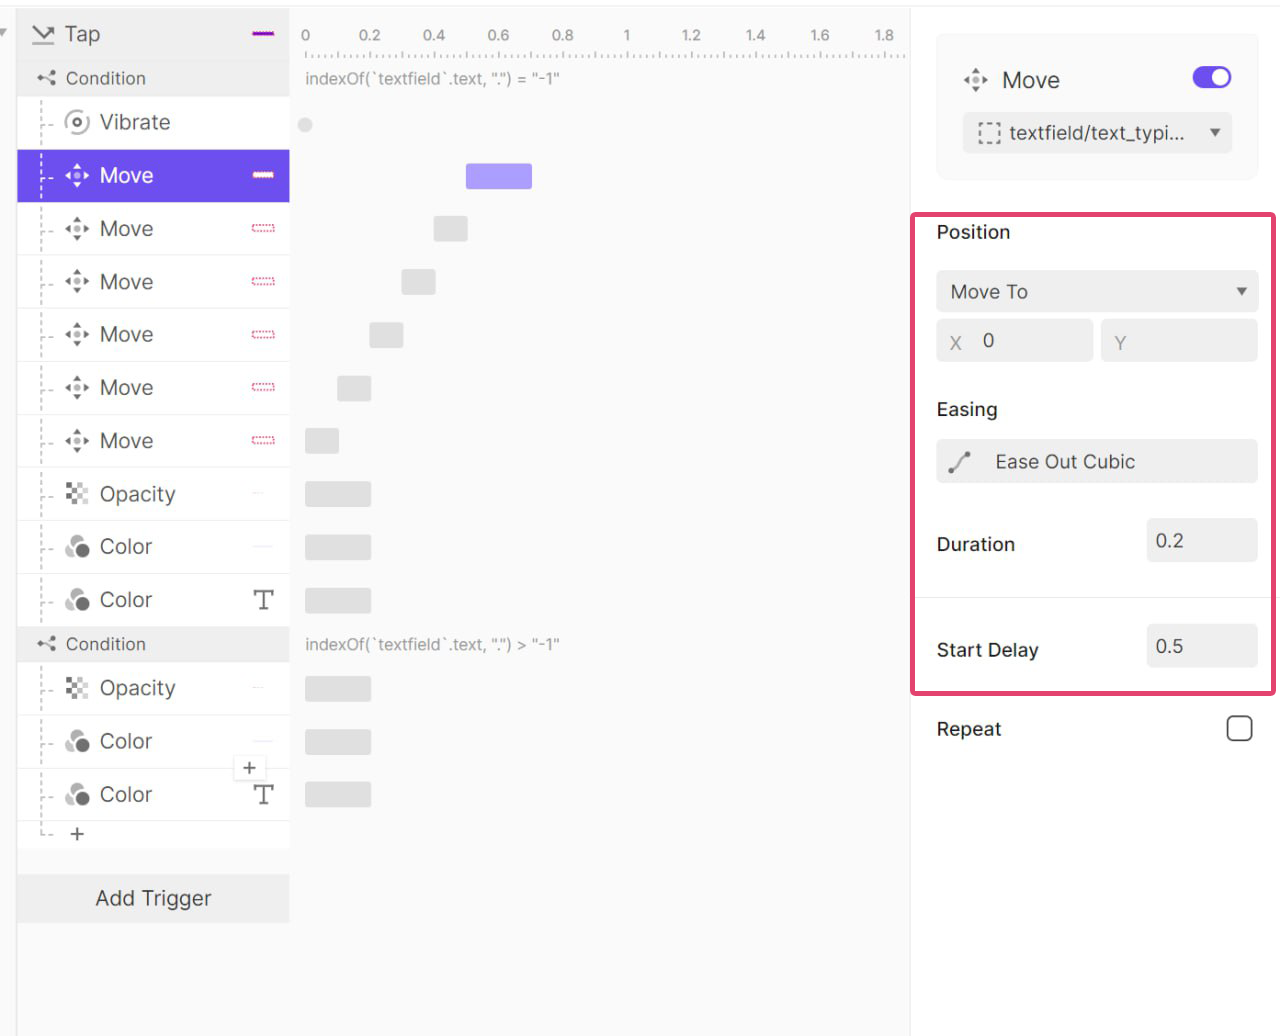
또 오른쪽으로 100ms 동안 1px 이동 후 원래 위치로 돌아오는 애니메이션이다.
✨ 생각하기
🤔 어떻게 해볼까? (1)
플러터에서 위젯을 이동시키려면 뭘 써야 할까?
가장 처음에 떠오른 것은 Positioned였다.
Positioned는 Stack 위젯 내부에서만 쓸 수 있는 위젯인데 top left bottom right 값을 줘서
Stack 내부에서 원하는 위치에 위젯을 배치시킬 수 있다.
마치 CSS에서는 display: absolute; 안에 있는 요소들처럼 말이다.
❌ 하지만 쓸 수 없었다...
우리 앱에서 회원가입 화면에 그대로 적용시키기에는 여러 문제가 있었다.
// ...
Expanded(
	child: SingleChildScrollView(
    	child: Column(
        	children: [
            	Padding( // 이메일 입력 칸
                	child: ...
                )
            ]
        )
    )
)
이런 구조로 되어 있었기 때문에 부모를 Stack으로 감싸고 Positioned에 top 등 위치 값을 주면
플러터에서는 Stack의 크기를 정확히 모른다는 에러가 발생했다.
수정하기 위해서는 아마도, 이 화면을 다시 만들어야겠다는 생각이 들었고
그렇기에는 시간이 너무 지체될 것 같아서 다른 방법을 떠올려 보려 했다.
🤔 어떻게 해볼까? (2)
Positioned를 쓸 수 있었다면 AnimatedPositioned를 활용해서
top 등, 위치 값에 변화를 줘서 애니메이션을 구현하려고 했었다.
다른 방법으로 애니메이션을 만드는 방법이 있을까? 👀
AnimatedBuilder를 써보면 되지 않을까? 🧐
이 위젯 내부에서 값을 변화를 줘서 이동시켜보자는 생각이 들었다.
그렇다면 위치를 이동시켜주는 위젯으로 뭘 쓰면 좋을까?
Transform이라는 위젯을 쓰면 우리가 원하는 애니메이션을 만들 수 있을 것 같았다.
Transform
자식 위젯을 회전, 크기 조정, 이동, 기울이기 등의 변형을 해주는 위젯
rotate→Transform.rotate(angle: pi / 4)(45도 회전)translate→Transform.translate(offset: Offset(5, 0))(x로 5만큼 이동)scale→Transform.scale(scale: 1.5)(1.5배 확대)skew→Transform.skewX(0.3)(x축으로 기울이기)
애니메이션으로 Offset 값만 변경시켜주면 될 것 같았다.
⭕ 정답입니다~
먼저 실제로 x 축으로 이동시킬 수 있는지 확인할 필요가 있었다.
AnimatedBuilder(
	animation: // ...animation,
    builder: (context, child) {
    	return Transform.translate(
        	offset: const Offset(20, 0),
            child: child,
        );
    },
    child: Column() // 이메일 입력 폼
)
위 코드와 같이 적용시켜 보니

내가 원하는 대로 x 축으로 20만큼 이동했다.
이제 Offset의 값을 애니메이션으로 위의 요구사항 대로 변경시켜주면 된다!
📱 구현하기
위젯도 이동시켰겠다, 어떻게 애니메이션을 만들어 보자.
먼저 든 생각은 아무리 간단한 애니메이션이라도 코드가 길어질 테니
분리시킬 필요가 있을 거라고 생각했다.
그래서 dart 언어의 mixin 클래스를 활용하기로 했다.
mixin 클래스에 애니메이션 로직을 만들고 사용한다면
실제 이메일 폼을 구현하는 코드에서는 간결해져서 보기 편해질 것이다.
mixin
다중 상속 없이 여러 클래스에서 재사용할 수 있는 코드 블록
클래스를상속받지 않고도 기능을 공유하여 사용할 수 있다.
mixin Bread {
	void buy() => print('우울해서 빵 샀어...');
}

class People with Bread {} // with 키워드로 Bread 적용

void main() {
	People().buy(); // 우울해서 빵 샀어...
}
⌨️ 애니메이션 작성
mixin JitterAnimation<T extends StatefulWidget> on State<T>, TickerProviderStateMixin<T> {
	// ...
}
먼저 위와 같이 mixin를 정의해 준다.
애니메이션 개수에 따라서 다른 프로바이더를 써야한다.
SingleTickerProviderMixin→ 애니메이션이 한 개일 경우 사용한다.TickerProviderStateMixin→ 애니메이션이 두 개 이상일 경우 사용한다.
그런 다음 AnimationController와 Animation을 정의해 주면 된다.
// ...
late AnimationController jitterAnimationController1;
late AnimationController jitterAnimationController2;
late AnimationController jitterAnimationController3;
late AnimationController jitterAnimationController4;
late AnimationController jitterAnimationController5;
late Animation<double> jitterAnimation1;
late Animation<double> jitterAnimation2;
late Animation<double> jitterAnimation3;
late Animation<double> jitterAnimation4;
late Animation<double> jitterAnimation5;
void iniState() {
super.initState();
jitterAnimationController1 = AnimationController(
vsync: this,
duration: const Duration(milliseconds: 100),
);
jitterAnimationController2 = AnimationController(
vsync: this,
duration: const Duration(milliseconds: 100),
);
jitterAnimationController3 = AnimationController(
vsync: this,
duration: const Duration(milliseconds: 100),
);
jitterAnimationController4 = AnimationController(
vsync: this,
duration: const Duration(milliseconds: 100),
);
jitterAnimationController5 = AnimationController(
vsync: this,
duration: const Duration(milliseconds: 100),
);
jitterAnimation1 = Tween<double>(begin: 0, end: 5).animate(
CurvedAnimation(
parent: jitterAnimationController1,
curve: const Cubic(0.65, 0, 0.35, 1),
),
);
jitterAnimation2 = Tween<double>(begin: 0, end: -5).animate(
CurvedAnimation(
parent: jitterAnimationController2,
curve: const Cubic(0.65, 0, 0.35, 1),
),
);
jitterAnimation3 = Tween<double>(begin: 0, end: 3).animate(
CurvedAnimation(
parent: jitterAnimationController3,
curve: const Cubic(0.65, 0, 0.35, 1),
),
);
jitterAnimation4 = Tween<double>(begin: 0, end: -3).animate(
CurvedAnimation(
parent: jitterAnimationController4,
curve: const Cubic(0.65, 0, 0.35, 1),
),
);
jitterAnimation5 = Tween<double>(begin: 0, end: 1).animate(
CurvedAnimation(
parent: jitterAnimationController5,
curve: const Cubic(0.65, 0, 0.35, 1),
),
);
}
// 컨트롤러를 해제시켜서, 메모리 관리.
void dispose() {
jitterAnimationController1.dispose();
jitterAnimationController2.dispose();
jitterAnimationController3.dispose();
jitterAnimationController4.dispose();
jitterAnimationController5.dispose();
super.dispose();
}애니메이션을 차례대로 진행시키기 위해서 저번에도 활용했었던
컨트롤러에 리스너를 추가해서 차례대로 실행시키기로 했다.
jitterAnimationController1.addStatusListener((status) async {
      if (status == AnimationStatus.completed) {
        jitterAnimationController2.forward();
      }
});

// ... 4번까지 같음

    jitterAnimationController5.addStatusListener((status) async {
      if (status == AnimationStatus.completed) {
        jitterAnimationController5.reverse(); // 1에서 0으로 되돌아가기
        jitterAnimationController1.reset(); // 초기 상태로 되돌리기
        jitterAnimationController2.reset();
        jitterAnimationController3.reset();
        jitterAnimationController4.reset();
      }
    });
  }
마지막으로 이 애니메이션을 실행시켜줄 트리거를 만들어준다.
void doJitter() {
	jitterAnimationConroller1.forward();
}
⌨️ 위젯에 적용시키기
mixin으로 정의된 것을 쓰고 싶다면 with 키워드로 상속받듯이 작성해주면 된다.
// ...
class _JoinEmailScreenState extends ConsumerState<JoinEmailScreen>
    with TickerProviderStateMixin, JitterAnimation {
// ...
AnimatedBuilder(
	animation: Listenable.merge([ // 여러 Listenable 객체를 하나로 합쳐서 한 번게 감지할 수 있게 하는 기능
    	jitterAnimation1,
        jitterAnimation2,
        jitterAnimation3,
        jitterAnimation4,
        jitterAnimation5,
    ]),
    builder: (context, child) {
    // 모든 애니메이션의 value 값을 더함
    final offsetX = jitterAnimation1.value +
                    jitterAnimation2.value +
                    jitterAnimation3.value +
                    jitterAnimation4.value +
                    jitterAnimation5.value;
    	return Transform.translate(
        	// 더해진 값들을 offset으로 전달
        	offset: const Offset(offsetX, 0),
            child: child,
        );
    },
    child: Column() // 이메일 입력 폼
)
이런 다음 이메일 형식에 맞지 않을 때마다 이 애니메이션을 실행시켜주면 된다.
  void nextButtonClick() {
    if (isAllFieldsValid()) {
      context.pushNamed(JoinCheckScreen.routeName);
      } else {
         doJitter();
      }
    }
  }
🥳 결과
🫨 햅틱 효과도 넣자
플러터에서 기본적으로 제공하는 HapticFeedBack이라는 클래스가 있어서
이걸 쓴다면 간단하게 햅틱 효과를 적용시킬 수 있다.
void doJitter() {
	// ...
    HapticFeedBack.HeavyImpact();
}
HapticFeedback 주요 메서드
| 메서드 | 설명 |
|---|---|
| lightImpact() | 가벼운 진동 (짧고 부드러움) |
| mediumImpact() | 중간 강도의 진동 (조금 더 강함) |
| heavyImpact() | 강한 진동 (뚜렷한 느낌) |
| selectionClick() | 짧고 가벼운 클릭 느낌 (UI 요소 선택 시 사용) |
| vibrate() | OS 기본 진동 |
자세한 진동 요구 사항은 없었기에 기본 제공하는 걸 썼지만
더 길게 진동이 되어야한다든지 등 다른 요구 사항이 있다면
어떻게 구현해야할지는... 그때 가서 생각해 보기로
🔨 살짝 개선시키기
코드를 다시 살펴보니,
어차피 같은 시간으로 x로 이동하고 되돌아오는데 각각 컨트롤러, 애니메이션을 만들어야 할까? 🤔
이런 생각이 들었고 줄여도 되겠다, 싶었다.
그래서 1번 애니메이션을 진행시킨 다음 reverse()로 초기 상태로 돌아가고
돌아가는 시간을 기다리기 위해서 Future.delay()를 썼다.
또 애니메이션이 진행 중일 때 버튼을 여러 번 누르면 애니메이션이 중첩되어서 실행될 것 같아서
isAnimation이라는 플래그를 추가해서 애니메이션이 진행 중일 때는
중첩되지 않도록 추가했다.
  late AnimationController jitterAnimationController1;
  late AnimationController jitterAnimationController2;
  late AnimationController jitterAnimationController3;

  late Animation<double> jitterAnimation1;
  late Animation<double> jitterAnimation2;
  late Animation<double> jitterAnimation3;

  bool isAnimation = false; // 애니메이션 진행 중인지 확인하기 위해
jitterAnimationController1 = AnimationController(
vsync: this,
duration: const Duration(milliseconds: 100),
);
jitterAnimationController2 = AnimationController(
vsync: this,
duration: const Duration(milliseconds: 100),
);
jitterAnimationController3 = AnimationController(
vsync: this,
duration: const Duration(milliseconds: 100),
);
jitterAnimation1 = Tween<double>(begin: 0, end: 5).animate(
CurvedAnimation(
parent: jitterAnimationController1,
curve: const Cubic(0.65, 0, 0.35, 1),
),
);
jitterAnimation2 = Tween<double>(begin: 0, end: 3).animate(
CurvedAnimation(
parent: jitterAnimationController2,
curve: const Cubic(0.65, 0, 0.35, 1),
),
);
jitterAnimation3 = Tween<double>(begin: 0, end: 1).animate(
CurvedAnimation(
parent: jitterAnimationController3,
curve: const Cubic(0.65, 0, 0.35, 1),
),
);jitterAnimationController1.addStatusListener((status) async {
if (status == AnimationStatus.completed) {
jitterAnimationController1.reverse();
await Future.delay(const Duration(milleSecond: 100));
jitterAnimationController2.forward();
}
});
// ... 2번까지 같음
jitterAnimationController3.addStatusListener((status) async {
if (status == AnimationStatus.completed) {
jitterAnimationController3.reverse(); // 1에서 0으로 되돌아가기
// reverse()로 초기 상태로 돌아갔기 때문에 reset()은 쓰지 않아도 됨.
isAnimation = false;
}
});
}void doJitter() {
if(isAnimation) return;
isAnimation = true;
jitterAnimationController1.forward();
}