🚩크롭앱
3.2 Searching For Elements
getElementById
getElementById("title")
<body>
    <h1 class="hello" id="title">Grab me!</h1>
</body>

이면

const title = document.getElementById("title");
console.log(title.innerText); // Grab me!
querySelector
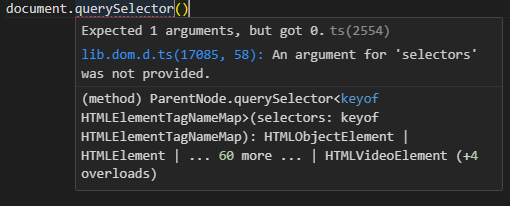
querySelector(".hello h1")
<body>
    <h1 class="hello" id="title">Grab me!</h1>
</body>

이면

const title = document.querySelector("h1");
console.log(title.innerHTML); // Grab me!document.getElementById("title")랑
querySelector(".hello h1")같음!!
번외1
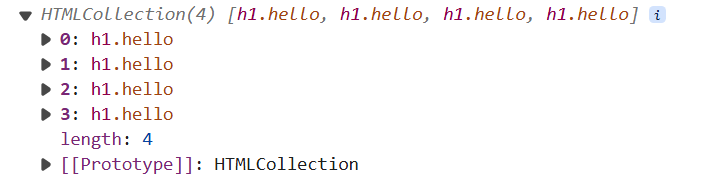
getElementsByClassName
<body>
    <h1 class="hello" >Grab me!</h1>
    <h1 class="hello" >Grab me!</h1>
    <h1 class="hello" >Grab me!</h1>
    <h1 class="hello" >Grab me!</h1>
</body>

const hellos = document.getElementsByClassName("hello");

console.log(hellos); // 콘솔1
console.log(hellos.innerText); // 콘솔2
console.log(hellos[0].innerText); // 콘솔3
결과1
결과2

-> hellos 가 배열(array)라서 불가능
결과3

-> 배열이라 [인덱스값] 형식으로 innerText 가져올 수 있음
getElementsByTagName
<body>
    <div class="hello">
        <h1>Grab me!</h1>
    </div>
</body>

이면
const title  = document.getElementsByTagName("h1");
console.log(title); // HTMLCollection [h1]
querySelector(".hello h1")
<body>
    <div class="hello">
        <h1>Grab me!</h1>
    </div>
</body>

이면
const title  = document.querySelector(".hello h1");
console.log(title); // <h1>Grab me!</h1>
결론
<body>
    <div class="hello">
        <h1>Grab me!</h1>
    </div>
</body>


const title = document.querySelector("#hello");
const title = document.getElementById("hello");
두 코드는 같다.
번외2 : getElementById VS querySelector
-
getElementById("title"):id="title"로 지정된 요소를 선택합니다.- 이 경우, 오직 id로만 선택할 수 있으며, HTML 문서에서
id는 고유하므로 하나의 요소만 반환됩니다.
const title = document.getElementById("title"); console.log(title.innerText); // Grab me! -
querySelector(".hello h1"):.hello클래스 안에 있는h1태그를 선택합니다.querySelector는 CSS 선택자를 사용하며, 첫 번째로 일치하는 요소 하나를 반환합니다..hello는 클래스 선택자이며,h1은 태그 선택자입니다. 이 조합으로 특정 요소를 선택할 수 있습니다.
const title = document.querySelector(".hello h1");
console.log(title.innerHTML); // Grab me!
차이점
getElementById는 요소의id를 기준으로 선택하고,querySelector는 CSS 선택자를 사용하여 보다 유연하게 선택할 수 있습니다.getElementById는id하나만 사용하므로 빠르고 간결합니다.querySelector는 class, id, 태그 등 다양한 조합으로 선택할 수 있어 더 유연하지만, 그만큼 약간 더 복잡할 수 있습니다.
따라서 두 코드는 선택하려는 대상이 같지만, 선택 방식과 상황에 따라 어떤 메서드를 사용할지 결정하게 됩니다.
번외 3 css 선택자
1. 기본 선택자
(1) 태그 선택자
- 특정 HTML 태그에 스타일을 적용할 때 사용합니다.
- 모든 해당 태그에 일괄적으로 스타일이 적용됩니다.
예시:
h1 {
  color: blue;
}<h1>제목 1</h1> <!-- 파란색으로 적용 -->
<h1>제목 2</h1> <!-- 파란색으로 적용 -->(2) 클래스 선택자
class속성을 가진 요소를 선택합니다.- 같은 클래스를 여러 요소에 적용할 수 있습니다.
- 클래스 앞에는
.을 붙입니다.
예시:
.red-text {
  color: red;
}<p class="red-text">이 문장은 빨간색입니다.</p>
<p class="red-text">이 문장도 빨간색입니다.</p>(3) 아이디 선택자
id속성을 가진 요소를 선택합니다.- HTML에서 각
id는 고유해야 하므로 한 요소에만 적용됩니다. - 아이디 앞에는
#을 붙입니다.
예시:
#main-title {
  font-size: 24px;
}<h1 id="main-title">주제</h1> <!-- 폰트 크기 24px로 적용 -->2. 결합 선택자
(1) 자손 선택자
- 특정 요소의 모든 하위 요소에 스타일을 적용합니다.
- 부모 요소와 자식 요소 사이에 공백을 넣습니다.
예시:
div p {
  color: green;
}<div>
<p>이 문장은 초록색입니다.</p>
<span>이 문장은 영향받지 않습니다.</span>
</div>(2) 자식 선택자
- 바로 다음 단계의 자식 요소에만 스타일을 적용합니다.
- 부모와 자식 사이에
>를 사용합니다.
예시:
div > p {
  font-weight: bold;
}<div>
<p>이 문장은 굵게 적용됩니다.</p>
<div>
<p>이 문장은 영향을 받지 않습니다.</p>
</div>
</div>(3) 형제 선택자
- 특정 요소의 형제 요소 중 바로 뒤에 오는 요소에 스타일을 적용합니다.
- 선택자 사이에
+를 사용합니다.
예시:
h1 + p {
  color: purple;
}<h1>제목</h1>
<p>이 문장은 보라색입니다.</p>
<p>이 문장은 영향받지 않습니다.</p>(4) 일반 형제 선택자
- 형제 관계에 있는 모든 요소에 스타일을 적용합니다.
- 선택자 사이에
~를 사용합니다.
예시:
h1 ~ p {
  font-size: 18px;
}<h1>제목</h1>
<p>이 문장은 18px입니다.</p>
<p>이 문장도 18px입니다.</p>3. 속성 선택자
(1) [속성 선택자]
- 특정 속성을 가진 요소에 스타일을 적용합니다.
예시:
a[href] {
  color: orange;
}<a href="example.com">링크</a> <!-- 주황색으로 적용 -->
<a>링크 없음</a> <!-- 영향받지 않음 -->(2) [속성^=값] (시작 문자)
- 특정 속성이 주어진 값으로 시작하는 요소를 선택합니다.
예시:
a[href^="https"] {
  color: green;
}<a href="https://example.com">보안 링크</a> <!-- 초록색으로 적용 -->
<a href="http://example.com">비보안 링크</a> <!-- 영향받지 않음 -->(3) [속성$=값] (끝 문자)
- 특정 속성이 주어진 값으로 끝나는 요소를 선택합니다.
예시:
img[src$=".jpg"] {
  border: 2px solid black;
}<img src="image.jpg"> <!-- 테두리 적용 -->
<img src="image.png"> <!-- 영향받지 않음 -->(4) [속성*=값] (포함 문자)
- 특정 속성이 주어진 값을 포함하는 요소를 선택합니다.
예시:
a[href*="blog"] {
  color: pink;
}<a href="https://myblog.com">블로그 링크</a> <!-- 분홍색으로 적용 -->
<a href="https://example.com">다른 링크</a> <!-- 영향받지 않음 -->4. 의사 클래스 및 의사 요소
(1) :hover
- 사용자가 요소 위에 마우스를 올릴 때 스타일을 적용합니다.
예시:
a:hover {
  color: red;
}<a href="#">링크</a> <!-- 마우스 오버 시 빨간색으로 변함 -->(2) :first-child
- 부모 요소의 첫 번째 자식 요소에 스타일을 적용합니다.
예시:
li:first-child {
  font-weight: bold;
}<ul>
<li>첫 번째 항목</li> <!-- 굵게 적용 -->
<li>두 번째 항목</li>
</ul>(3) :nth-child(n)
- n번째 자식 요소에 스타일을 적용합니다. n은 숫자 또는 수식을 사용할 수 있습니다.
예시:
li:nth-child(2) {
  color: blue;
}<ul>
<li>첫 번째 항목</li>
<li>두 번째 항목</li> <!-- 파란색으로 적용 -->
</ul>5. 의사 요소
(1) ::before
- 요소의 내용 앞에 가상 요소를 삽입합니다.
예시:
p::before {
  content: "Note: ";
  font-weight: bold;
}<p>이 문장은 메모입니다.</p>
<!-- Note: 이 문장은 메모입니다. -->(2) ::after
- 요소의 내용 뒤에 가상 요소를 삽입합니다.
예시:
p::after {
  content: " 끝.";
}<p>이 문장은</p>
<!-- 이 문장은 끝. -->6. 그룹화 및 결합
(1) 그룹화
- 여러 요소를 한꺼번에 스타일 적용할 때 사용합니다.
- 선택자들을 쉼표로 구분합니다.
예시:
h1, h2, h3 {
  color: red;
}<h1>제목 1</h1> <!-- 빨간색 적용 -->
<h2>제목 2</h2> <!-- 빨간색 적용 -->
<h3>제목 3</h3> <!-- 빨간색 적용 -->(2) 결합
- 특정 조건을 만족하는 요소들에 스타일을 적용할 때 사용합니다.
예시:
input[type="text"] {
  background-color: lightgray;
}<input type="text" /> <!-- 배경 회색 적용 -->
<input type="password" /> <!-- 영향받지 않음 -->3.3 Events
dir 정보 이용하기
<body>
    <div class="hello">
        <h1>Grab me!</h1>
    </div>
</body>

이면
const title  = document.querySelector(".hello h1");
console.dir(title);
title.style.color = "red";
-> dir를 이용해서 style.color값을 확인하고 바꿔주기
eventListener 추가하기
<body>
    <div class="hello">
        <h1>Grab me!</h1>
    </div>
</body>

이면
const title  = document.querySelector(".hello h1");

function handleTitleClick(){
    console.log("title was Clicked");
}
title.addEventListener("click", handleTitleClick);
결과 
<body>
<div class="hello">
<h1>Grab me!</h1>
</div>
</body>
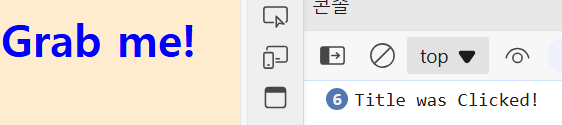
이면
const title = document.querySelector(".hello h1");
function handleTitleClick(){
title.style.color = "blue";
console.log("Title was Clicked!");
}
title.addEventListener("click", handleTitleClick);결과
3.4 Events part Two
addEventListener로 여러가지 만들어보기
<body>
    <div class="hello">
        <h1>Grab me!</h1>
    </div>
</body>

이면
const title  = document.querySelector(".hello h1");

console.dir(title); // dir를 통해서 onmouseenter등을 알아낸다.

function handleTitleClick(){
    title.style.color = "blue";
    // console.log("Title was Clicked!");
}

function handleMouseEnter(){
    title.innerText = "Mouse is here";
}

function handleMouseLeave(){
    title.innerText = "Mouse is gone";
}

title.addEventListener("click", handleTitleClick);
title.addEventListener("mouseenter", handleMouseEnter);
title.addEventListener("mouseleave", handleMouseLeave);
3.5 More Events
addEventListener 다른방식으로 쓰기
title.addEventListener("click", handleTitleClick);
===
title.onclick = handleTitleClick;
addEventListener의 다양한 종류
const title  = document.querySelector(".hello h1");

console.dir(title);

function handleTitleClick(){
    title.style.color = "blue";
    // console.log("Title was Clicked!");
}

function handleMouseEnter(){
    title.innerText = "Mouse is here";
}

function handleMouseLeave(){
    title.innerText = "Mouse is gone";
}

// title.addEventListener("click", handleTitleClick);
title.onclick = handleTitleClick;

// title.addEventListener("mouseenter", handleMouseEnter);
title.onmouseenter = handleMouseEnter;

// title.addEventListener("mouseleave", handleMouseLeave);
title.onmouseleave = handleMouseLeave;


function handleWindowResize(){
    document.body.style.backgroundColor = "tomato";
}
window.addEventListener("resize", handleWindowResize);


function handleWindowCopy(){
    alert("copier!");
}
window.addEventListener("copy", handleWindowCopy);

function handleWindowOffline(){
    alert("S!O!S!");
}
window.addEventListener("offline", handleWindowOffline);

function handleWindowOnline(){
    alert("ALL GOOD");
}
window.addEventListener("online", handleWindowOnline);
3.6 CSS in Javascript
const 로 정의
const h1  = document.querySelector(".hello h1");

console.dir(h1);

function handleTitleClick(){
    const currentColor =  h1.style.color;
    if(currentColor === "blue"){
        currentColor = "red";
    } else {
        currentColor = "blue";
    }
}

h1.onclick = handleTitleClick;
// Uncaught TypeError: Assignment to constant variable. at HTMLHeadingElement.handleTitleClick (app.js:10:22) handleTitleClick
Error
const 는 변하면 안되는 것!
const h1  = document.querySelector(".hello h1");

console.dir(h1);

function handleTitleClick(){
    const currentColor =  h1.style.color;
    let newColor;
    if(h1.style.color === "blue"){
        h1.style.color = "red";
    } else {
        h1.style.color = "blue";
    }
}

h1.onclick = handleTitleClick;
const currentColor = h1.style.color; let newColor; 로 수정해주기
최종완성본
const h1  = document.querySelector(".hello h1");

console.dir(h1);

function handleTitleClick(){
    const currentColor =  h1.style.color;
    let newColor;
    if(currentColor === "blue"){
        newColor = "red";
    } else {
        newColor = "blue";
    }
    h1.style.color = newColor; // ** 이거 안해주면 색 안바뀜!! **
}

h1.onclick = handleTitleClick;
h1.style.color = newColor;
if else 구문안에서만 변화된 컬러 newColor가 설정되기 때문에
if else를 통해서 최종으로 확정된 newColor를 외부구문에서도 설정해줘야 실제 색이 설정된다.
🚩타입스크립트
4.2 Interface
type > interface로 바꿔보기1
type >> 좀 더 활용할 수 있는게 많다.(다양한목적)
type Player = {
    nickname: string,
    team: Team,
    health: Health
}
interface > 오브젝트의 모양을 타입스크립트에게 설명해 주기 위해서만 사용되는 키워드
interface Player {
    nickname: string,
    team: Team,
    health: Health
}
type > interface로 바꿔보기2
// interface version
interface User {
    name: string
}

interface Player extends User {
}

const nico: Player = {
    name: "nico"
}

// ----------------------------
// type version
type User = {
    name: string
}

type Player = User & {
}

const nico: Player = {
    name: "nico"
}
type > interface로 바꿔보기3
interface > type보다 더 나은 합체능력
interface User {
    name: string
}

interface User {
    lastName: string
}

interface User {
    health: number
}

const nico: User = {
    name: "nico",
    lastName: "oh",
    health: 100
}
type >> Error : Duplicate identifier 'User' : 중복사용❌
type User = {
    name: string
}

type User = { // Duplicate identifier 'User'
    lastName: string
}
4.3 Interfaces part Two
추상클래스
- 추상클래스는 이걸 상속 받는 다른 클래스가 가질 프로퍼티와 메소드를 지정하도록 해줌
- 만약 User 클래스를 상속한다면 sayHi와 fullName을 구현해야하고,
firstName과 lastName을 갖게 될 것이다.- 상속받는 클래스가 어떻게 동작해야할 지 알려주기 위해서 추상클래스 사용
- 추상클래스 사용하는 이유 : 다른 클래스들이 표준화된 모양 & 표준화된 프로퍼트와 메소드를 갖도록 해주는 청사진을 만들기 위해 사용
protected 추상클래스로부터 상속받은 클래스들이 프로퍼티에 접근하도록 해줌
private > protected > public
abstract class User {
    constructor(
        protected firstName : string,
        protected lastName : string
    ) {}
    abstract sayHi(name:string):string
    abstract fullName():string
}

// 추상클래스는 (아래와 같은)인스턴스 만드는 것을 허용하지 않음
// new User() // Cannot create an instance of an abstract class

class Player extends User {
    fullName(){
        return `${this.firstName} ${this.lastName}`
    }
    sayHi(name: string){
        return `Hello ${name}. My name is ${this.fullName()}`
    }
}
추상클래스의 모습 in typescript VS javascript
typescript
abstract class User {
    constructor(
        protected firstName : string,
        protected lastName : string
    ) {}
    abstract sayHi(name:string):string
    abstract fullName():string
}
javascript
class User {
  constructor(firstName, lastName){
    this.firstName = firstName,
    this.lastName = lastName
  }
}
추상클래스와 VS 인터페이스를 사용할 때의 차이점
- 추상클래스를 사용할 때는 클래스들이 자바스크립트에서 보인다.
- 인터페이스는 컴파일 하면 JS로 바뀌지 않고 사라짐
(같은코드) 추상클래스
abstract class User {
    constructor(
        protected firstName : string,
        protected lastName : string
    ) {}
    abstract sayHi(name:string):string
    abstract fullName():string
}

class Player extends User {
    fullName(){
        return `${this.firstName} ${this.lastName}`
    }
    sayHi(name: string){
        return `Hello ${name}. My name is ${this.fullName()}`
    }
}
(같은코드) 인터페이스
// 아래 interface 코드는 `자바스크립트`에서 보여지지 않는다.
interface User {
    firstName : string,
    lastName : string,
    sayHi(name:string):string
    fullName():string
}

// implements : extends를 쓸때보다 코드가 더 가벼워진다.
// User interface 추적불가 : 인터페이스는 타입스크립트에서만 존재하고 자바스크립트에는 존재하지 않는다.
// interface를 상속할 때에는 프로퍼티를 `private | protected`으로 만들지 못한다. > public 으로만 가능
// interface : 클래스의 모양을 알려준다는 점에서 유용하다.& 자바스킙트로 컴파일 되지 않는다.


class Player implements User {
    constructor(
        public firstName : string,
        public lastName  : string,
    ){}
    fullName(){
        return `${this.firstName} ${this.lastName}`
    }
    sayHi(name: string){
        return `Hello ${name}. My name is ${this.fullName()}`
    }

}
4.4 Recap 추상클래스 VS 인터페이스
인터페이스 설명
- 인터페이스를 사용해서 클래스의 특정 메소드나 프로퍼티를 상속하도록 강제하는 방법 즉, 인터페이스는 내가 원하는 메소드와 프로퍼티를 클래스가 가지도록 강제 할 수 있게 해준다.
- 인터페이스는 자바스크립트로 컴파일 되지 않는다.
- 추상클래스와 비슷한 보호를 제공하지만, 인터페이스는 자바스크립트 파일에서 보이지 않는다.
추상클래스 설명
- 추상클래스를 쓰면 자바스크립트에서 일반적인 클래스로 바뀐다. 즉, 파일 크기가 좀 더 커지고, 추가 클래스가 만들어진다는 것을 의미한다.
- 만약 추상클래스를 다른 클래스들이 특정 모양을 따르도록 하기 위한 용도로 쓴다면 같은 역할을 하는 인터페이스는 쓰는 것이 더 유용하다!
ex)class Player extends User>(대신)>class Player implements User로 써줘야한다.
사용방법들
type 방법1
: 타입스크립트에게 오브젝트의 모양을 알려줄 때 사용
type Player = {
}
type 방법2
type alias를 만드는 방법
type Player = numbertype 방법3
타입을 특정된 값으로 만들어 사용하는 방법
type Player = "1" | "2"type 기본 사용방법
type PlayerA = {
    name : string
}
const playerA : PlayerA = {
    name: "nico",
}
interface 사용방법
interface PlayerB {
    name: string
}
const playerB : PlayerB = {
    name: "nico",
}
type 과 interface 둘의 사용 목적과 결과는 동일 but 할 수 있는 것들이 다름
1. 상속하는 방법
type이 상속하는 방법
type PlayerA = {
    name: string
}
type PlayerAA = PlayerA & {
    lastName: string
}
const playerA : PlayerAA = {
    name: "nico",
    lastName: "oh"
}
interface이 상속하는 방법 : 객체지향 프로그래밍의 컨셉과 유사함
interface PlayerB {
    name: string
}
interface PlayerBB extends PlayerB {
    lastName: string
}
const playerB : PlayerBB = {
    name: "nico",
    lastName: "oh"
}
2. property를 추가할때
type에 property 추가하는 방법
type PlayerA = {
    name: string
}
type PlayerAA = PlayerA & {
    lastName: string
}
type playerAA = { // 이렇게 추가 불가능 : PlayerAA가 이미 정의 되어있어서 중복불가능 X, 아래 const playerA에 health 입력하면 에러남
    health: number
}
const playerA : PlayerAA = {
    name: "nico",
    lastName: "oh",
    health: 10 // Object literal may only specify known properties, and 'health' does not exist in type 'PlayerAA'
}
interface에 property 추가하는 방법
interface PlayerB {
    name: string
}
interface PlayerBB extends PlayerB {
    lastName: string
}
interface PlayerBB { // 추가해도 문제없음 && `extends`를 생략해도됨(위코드도 동일 적용)
    health: number
}
// const playerB : PlayerBB = {
//     name: "nico",
//     lastName: "oh",
//     health: 100
// }

const playerB : PlayerBB = {
    name: "nico",
    lastName: "oh",
    health: 100
}
만약 > 둘다 extends 없앤다면 아래와 같이 사용해도 무방
즉, 같은 PlayerB로 다른 프로퍼티 계속 중복 추가 가능interface PlayerB { name: string } interface PlayerB { lastName: string } interface PlayerB { health: number } const playerB : PlayerB = { name: "nico", lastName: "oh", health: 100 }
3. 추상클래스로 대체하기 (type과 interface 둘다 같은 방식으로 대체)
type > 추상클래스로 대체
type PlayerA = {
    firstName: string
}
class User1 implements PlayerA {
    constructor (
        public firstName: string
    ) {}
}
interface > 추상클래스로 대체
interface PlayerB {
    firstName: string
}
class User2 implements PlayerB {
    constructor (
        public firstName: string
    ) {}
}
공식문서 : 타입과 인터페이스 비교
1. interface 인터페이스 코드
interface Animal {
  name: string;
}

interface Bear extends Animal {
  honey: boolean;
}

const bear = getBear();
bear.name;
bear.honey;
설명:
interface Animal:Animal이라는 인터페이스를 정의합니다. 이 인터페이스는 하나의 속성name을 가지고 있으며, 그 타입은string입니다.interface Bear extends Animal:Bear라는 인터페이스는Animal인터페이스를 상속합니다. 즉,Bear는Animal이 가진 모든 속성을 가집니다.extends키워드를 사용하여 상속하고, 추가적으로honey라는boolean타입의 속성을 추가했습니다.const bear = getBear():bear라는 변수를 선언하고,getBear()라는 함수 호출을 통해bear객체를 가져옵니다. 이 함수는Bear타입의 객체를 반환할 것으로 예상됩니다.bear.name:bear는Animal을 상속받기 때문에name속성을 가지고 있습니다.bear.honey:bear는Bear에서 추가된honey속성도 가지고 있습니다.
요약:
- interface는 TypeScript에서 객체의 구조를 정의하는 방법입니다.
- 상속을 통해 기존 구조를 확장할 수 있습니다.
Bear는Animal의 모든 속성을 상속받으며, 추가로honey속성을 가집니다.
2. type 타입 코드
type Animal = {
  name: string;
}

type Bear = Animal & {
  honey: boolean;
}

const bear = getBear();
bear.name;
bear.honey;
설명:
type Animal = { name: string }:Animal이라는 타입을 정의합니다.Animal타입은name이라는string타입의 속성을 가집니다. 여기서는interface가 아닌 type으로 구조를 정의한 것입니다.type Bear = Animal & { honey: boolean }:Bear라는 타입은Animal타입과 결합합니다. 여기서는&연산자를 사용하여 교차 타입을 만듭니다. 이 교차 타입은Animal타입의 모든 속성에 추가로honey라는boolean속성을 포함합니다.const bear = getBear():bear객체를 선언하고,getBear()함수가Bear타입의 객체를 반환할 것으로 예상됩니다.bear.name:bear는Animal의 속성인name을 가집니다.bear.honey:bear는Bear에서 정의한honey속성을 가집니다.
요약:
- type은 TypeScript에서 객체, 유니언 타입, 튜플 등을 정의할 수 있는 방식입니다.
&연산자를 사용하여 타입을 확장하는 교차 타입을 구현할 수 있습니다.Bear는Animal타입과honey속성을 모두 포함하는 구조를 가집니다.
인터페이스와 타입의 차이점
- 확장 방법:
interface는extends를 사용하여 상속을 하고,type은&(교차 타입)을 사용하여 확장합니다. - 유연성:
type은 단순히 객체의 구조뿐만 아니라 유니언, 교차 타입, 튜플 등의 복잡한 타입을 정의하는 데 더 유연합니다. 반면,interface는 주로 객체의 형태를 정의하는 데 집중합니다. - 중복 선언:
interface는 같은 이름으로 여러 번 선언할 수 있으며, 그것들이 자동으로 병합됩니다. 그러나type은 중복 선언이 불가능합니다.
언제 interface를 사용할까?
- 객체의 구조만을 정의하고 상속을 통해 구조를 확장해야 할 때 적합합니다.
언제 type을 사용할까?
- 객체의 구조뿐만 아니라 유니언 타입, 튜플, 또는 교차 타입 등의 복잡한 타입을 정의해야 할 때 적합합니다.
결론
interface와 type은 대부분의 상황에서 서로 교체 가능하지만, 프로젝트의 요구 사항에 따라 적절한 선택을 해야 합니다. 기본적인 객체 구조를 정의하고 상속이 필요한 경우 interface를, 보다 복잡한 타입 구성을 필요로 하는 경우에는 type을 사용하는 것이 일반적입니다.
4.5 Polymorphism
- 다향성 : 다른 모양의 코드를 가질 수 있게 해 줌 -> 제네릭 사용
- 제네릭 : placeholder 타입을 쓸 수 있도록 해줌
- 때가 되면 타입스크립트가 placeholder 타입을 concrete 타입으로 바꿔줌
- 코드를 예쁘게 해준다.
- 같은 코드를 다른 타입에 대해서 쓸 수 있도록 해준다.
다형성(polymorphism) 개념
다형성이란 객체 지향 프로그래밍의 중요한 특징 중 하나로, 같은 인터페이스나 상위 클래스에서 파생된 여러 다른 형태의 객체들이 다른 방식으로 동작할 수 있는 능력을 말합니다.
예시:
- 여러 클래스가 같은 메서드 이름을 가지지만, 각 클래스에서 그 메서드가 다르게 동작할 수 있습니다. 예를 들어,
Animal클래스에서speak()메서드를 정의하면,Dog클래스에서는멍멍하고,Cat클래스에서는야옹하는 식으로 같은 이름의 메서드가 각기 다르게 동작하는 것이 다형성입니다.
이 개념은 코드 재사용성을 높이고, 유지보수를 쉽게 하며, 객체지향 프로그래밍의 유연성을 극대화하는 데 사용됩니다.
코드 설명
interface SStorage<T> {
    [key:string]: T
}
설명:
SStorage<T>는 제네릭 인터페이스입니다. 이 인터페이스는[key: string]구문을 통해 동적 키 값 쌍을 표현합니다. 즉, 이 인터페이스를 사용하면 문자열 키에 어떤 타입의 값이든 저장할 수 있는 객체 구조를 정의하게 됩니다.<T>는 제네릭을 나타내며, 이 인터페이스를 사용할 때 타입을 매개변수로 전달할 수 있습니다. 예를 들어,SStorage<string>는 키가 문자열이고, 값도 문자열인 저장소를 의미합니다.
class LocalStorage<T> {
    private storage: SStorage<T> = {}

    set(key: string, value: T) {
        this.storage[key] = value;
    }

    remove(key: string) {
        delete this.storage[key];
    }

    get(key: string): T {
        return this.storage[key];
    }

    clear() {
        this.storage = {};
    }
}
설명:
LocalStorage<T>는 제네릭 클래스입니다.T는 타입을 나타내며, 이 클래스가 어떤 타입의 데이터를 저장할지 정의할 수 있습니다.
-
private storage: SStorage<T>:storage는SStorage<T>타입의 객체로, 초기값은 빈 객체입니다. 제네릭 인터페이스인SStorage<T>를 통해 이 객체는 키가 문자열이고 값은T타입인 데이터를 저장합니다.
-
set(key: string, value: T):- 이 메서드는
key와value를 받아서,storage에 저장합니다. - 예를 들어,
stringsStorage.set("hello", "how are you")는hello라는 키에"how are you"라는 값을 저장합니다.
- 이 메서드는
-
remove(key: string):- 이 메서드는
key를 받아서, 해당 키를 가진 데이터를 삭제합니다.
- 이 메서드는
-
get(key: string): T:- 이 메서드는
key를 받아서 해당 키에 저장된 값을 반환합니다. 반환되는 값의 타입은T입니다. - 예를 들어,
stringsStorage.get("hello")는"how are you"를 반환할 것입니다.
- 이 메서드는
-
clear():- 이 메서드는 저장된 모든 데이터를 초기화(빈 객체로 변경)합니다.
const stringsStorage = new LocalStorage<string>();설명:
stringsStorage는 문자열 타입으로 데이터를 저장하는LocalStorage인스턴스입니다. 즉, 이 인스턴스에서는T가string으로 지정되었기 때문에, 오직 문자열만 저장할 수 있습니다.
stringsStorage.get("key");
stringsStorage.set("hello", "how are you");
설명:
stringsStorage.get("key"):key라는 키에 해당하는 값을 가져옵니다. 아직 이 키로 저장된 값이 없으므로undefined를 반환할 것입니다.stringsStorage.set("hello", "how are you"):hello라는 키에"how are you"라는 값을 저장합니다.
const booleansStorage = new LocalStorage<boolean>();설명:
booleansStorage는 불리언 타입으로 데이터를 저장하는LocalStorage인스턴스입니다. 여기서T는boolean으로 설정되어 있습니다.
booleansStorage.get("key");
booleansStorage.set("key", true);
설명:
booleansStorage.get("key"):key라는 키에 해당하는 불리언 값을 가져옵니다. 아직 값이 없기 때문에undefined를 반환할 것입니다.booleansStorage.set("key", true):key라는 키에true라는 불리언 값을 저장합니다.
제네릭과 다형성의 관계
이 코드에서 다형성이 중요한 이유는 제네릭을 사용함으로써 다양한 타입에 대해 동일한 로직을 사용할 수 있기 때문입니다. 여기서 다형성은 제네릭을 통해 구현되었고, LocalStorage 클래스는 특정 타입(T)을 요구하지만, 그 타입은 사용하는 시점에서 자유롭게 결정할 수 있습니다.
stringsStorage는string타입만을 처리하고,booleansStorage는boolean타입만을 처리합니다.
따라서, 하나의 클래스가 다양한 타입에 대해 동작하는 것이 다형성의 한 예라고 할 수 있습니다.
요약:
- 다형성은 객체가 같은 인터페이스나 상위 클래스에 대해 다른 동작을 할 수 있게 하는 것을 의미합니다.
- 제네릭 클래스인
LocalStorage<T>는 이 다형성을 실현하는 방식 중 하나로, 여러 타입에 대해 동일한 동작을 적용하면서도 타입 안정성을 제공합니다. - 이 코드에서는
LocalStorage클래스가string이나boolean등 다양한 타입에 대해 동일한 메서드를 사용할 수 있게 다형성을 실현하고 있습니다.
부가설명
다형성을 좀 더 쉽게 이해할 수 있는 예시로, 동물(Animal)과 그 하위 클래스(고양이와 개)를 사용하는 간단한 예제를 소개하겠습니다.
예시: 동물과 하위 클래스들
// 부모 클래스: Animal
class Animal {
    constructor(public name: string) {}

    makeSound() {
        console.log("동물이 소리를 냅니다.");
    }
}

// 자식 클래스: Dog
class Dog extends Animal {
    makeSound() {
        console.log("멍멍!");
    }
}

// 자식 클래스: Cat
class Cat extends Animal {
    makeSound() {
        console.log("야옹!");
    }
}

// Animal 타입의 배열로 여러 동물을 관리할 수 있음
const animals: Animal[] = [new Dog("바둑이"), new Cat("나비")];

// 다형성을 활용하여 같은 메서드를 호출해도 각 객체는 자기만의 방식으로 동작함
animals.forEach((animal) => {
    console.log(animal.name);
    animal.makeSound(); // 각각의 객체에 맞는 소리를 냄
});
코드 설명:
-
class Animal:Animal은 기본적인 동물 클래스로, 모든 동물이 가질name속성을 포함합니다.makeSound()메서드는 기본적으로 "동물이 소리를 냅니다."라고 출력합니다. 이 메서드는 하위 클래스에서 재정의할 수 있습니다.
-
class Dog extends Animal:Dog클래스는Animal클래스를 상속받습니다.makeSound()메서드를 재정의(오버라이드)하여 "멍멍!" 소리를 내도록 합니다.
-
class Cat extends Animal:Cat클래스도Animal클래스를 상속받고,makeSound()메서드를 재정의하여 "야옹!" 소리를 내도록 합니다.
-
다형성의 예시:
const animals: Animal[]은Animal클래스 타입의 배열로, 배열 안에Dog와Cat객체를 함께 저장할 수 있습니다.- 다형성의 핵심은, 부모 클래스(Animal) 타입으로 정의된 배열에서 각 객체(
Dog와Cat)가 자신의makeSound()메서드를 실행한다는 점입니다. animals.forEach()를 통해 배열에 있는 각 객체의makeSound()메서드를 호출할 때, 각 객체는 자신의 방식으로 소리를 냅니다.Dog객체는 "멍멍!",Cat객체는 "야옹!" 소리를 냅니다.
출력 결과:
바둑이
멍멍!
나비
야옹!
다형성의 핵심:
- 동일한 메서드 이름:
Animal이라는 부모 클래스에서makeSound()메서드를 정의했으며, 이를Dog와Cat클래스에서 각자 다르게 재정의했습니다. - 같은 타입으로 여러 객체를 처리:
Animal배열에Dog와Cat객체를 모두 넣을 수 있습니다. 이때 각 객체는 같은makeSound()메서드를 호출하지만, 자신에게 맞는 동작을 수행합니다.
왜 다형성이 중요한가?
- 코드 재사용성: 부모 클래스를 통해 기본적인 기능을 정의하고, 하위 클래스들이 그 기능을 재정의하여 자신의 방식으로 동작하게 할 수 있습니다.
- 유연성: 동일한 인터페이스나 부모 클래스를 상속받는 객체들을 같은 방식으로 처리할 수 있어 코드를 단순하게 유지하면서도 확장 가능합니다.
이 예제는 다형성을 이해하기 쉽게 도와주는 기본적인 구조를 보여줍니다. Animal이라는 부모 클래스를 기준으로, 고양이와 개 같은 자식 클래스들이 각자 다른 방식으로 행동하지만, 부모 클래스 타입으로 관리할 수 있다는 점이 다형성의 핵심입니다.
5.2 Lib Configuration
{
    "include": [ // JVS로 컴파일하고 싶은 디렉토리 추가
        "src"
    ],
    "compilerOptions": {
        "outDir": "build", // JVS 파일이 생성될 디렉토리 지정
        "target": "es6", // 어떤 버전의 JVS로 TS를 컴파일 하고 싶은지 설정
        "lib": ["ES6", "DOM"], // 합쳐진 라이브러리의 정의 파일을 특정해주는 역할 // ex) ["ES6", "DOM"] : es6를 지원하는 서버와, dom 즉 브라우저 환경에서 코드를 실행시킬거다 라는뜻

    }

}
"lib": ["ES6", "DOM"]
DOM으로 설정함으로써 아래와 같이 사용방법 및 정의를 볼 수 있다.