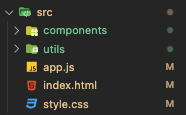
폴더 구조
-
상위 파일
app.js:App컴포넌트를 호출 -
컴포넌트 :
App,Button,Flex,Form,Input,Meals,ResultHeading,SingleMeal -
유틸 :
api.jsicon.js
상위 파일
index.html
<!DOCTYPE html>
<html lang="en">
  <head>
    <meta charset="UTF-8" />
    <meta http-equiv="X-UA-Compatible" content="IE=edge" />
    <meta name="viewport" content="width=device-width, initial-scale=1.0" />
    <title>MEAL FINDER</title>
    <link rel="stylesheet" href="style.css" />

    <link
      rel="stylesheet"
      href="https://cdnjs.cloudflare.com/ajax/libs/font-awesome/5.15.3/css/all.min.css"
      integrity="sha512-iBBXm8fW90+nuLcSKlbmrPcLa0OT92xO1BIsZ+ywDWZCvqsWgccV3gFoRBv0z+8dLJgyAHIhR35VZc2oM/gI1w=="
      crossorigin="anonymous"
    />
    <script type="module" src="./app.js"></script>
  </head>
  <body>
    <div class="container">
      <h1>Meal Finder</h1>
    </div>
    <!-- <script src="/dist/main.js"></script> -->
  </body>
</html>
app.js
import App from "./components/App.js";

new App(document.querySelector(".container"));
app.js는 최상위 자바스크립트 파일임. 이 파일을 기준으로 필요한 자바스크립트 파일들을 로드함.
App컴포넌트
- 모든 하위 컴포넌트의 이벤트 처리는
App컴포넌트에서 관리한다.
import { fetcher, SEARCH_KEY } from "../utils/api.js";
import Flex from "./Flex.js";
import Meals from "./Meals.js";
import ResultHeading from "./ResultHeading.js";
import SingleMeal from "./SingleMeal.js";

export default function App($app) {
  // 초기 어플리케이션 상태
  this.state = {
    meals: [],
    currentFoodKeyword: "",
    singleFood: null,
  };

  // Flex 컴포넌트 호출
  new Flex({
    $app,
    initialState: {},
    onSubmit: async (e) => {
      e.preventDefault();
      console.log(e.target);

      const {
        target: {
          firstChild: { value: food },
        },
      } = e;
      const newMeals = await fetcher(SEARCH_KEY, food);
      this.setState({
        ...this.state,
        meals: newMeals.meals,
        currentFoodKeyword: food,
      });

      e.target.firstChild.value = "";
      //   비동기요청 하고 셋스테이트
    },
    onRandomButtonHandler: () => {},
  });


  // ResultHeading 컴포넌트 호출
  const resultHeading = new ResultHeading({
    $app,
    initialState: { currentFoodKeyword: this.state.currentFoodKeyword },
  });
  const meals = new Meals({
    $app,
    initialState: { meals: this.state.meals },
    onClick: (e) => {
      // 사진 누를때 텍스트나 이상한 곳누르면 실행되는 이슈
      const singleFoodId = e.target.getAttribute("data-mealid");
      const singleFood = this.state.meals.find(
        (meal) => meal.idMeal === singleFoodId
      );
      this.setState({
        ...this.state,
        singleFood: singleFood,
      });
    },
  });


  //SingleMeal 컴포넌트
  const singleMeal = new SingleMeal({
    $app,
    initialState: { singleFood: this.state.singleFood },
  });


  //App setState 함수 상태 변화하면 여기서 각 컴포넌트의 setState함수를 호출한다.
  this.setState = (nextState) => {
    const prevState = this.state;
    this.state = nextState;

    meals.setState({ meals: nextState.meals });
    resultHeading.setState({
      currentFoodKeyword: nextState.currentFoodKeyword,
    });
    singleMeal.setState({
      singleFood: nextState.singleFood,
    });
  };
}
Flex 컴포넌트
다음과 같은 dom구조를 자바스크립트로 구현
<div class="flex">
  <form class="flex" id="submit">
    <input type="text" id="search" placeholder="Search for meals or keywords">
    <button class="search-btn" type="submit">
      <i class="fas fa-search"></i>
    </button>
  </form>
  <button class="random-btn" id="random">
    <i class="fas fa-random"></i>
  </button>
</div>Flex컴포넌트는 Form컴포넌트와 Button컴포넌트를 필요로 한다. 다음은 Flex컴포넌트 코드이다.
import { randomIcon, searchIcon } from "../utils/icon.js";
import Button from "./Button.js";
import Form from "./Form.js";

export default function ({
  $app,
  initialState,
  onSubmit,
  onRandomButtonHandler,
}) {
  this.$target = document.createElement("div");
  this.$target.setAttribute("class", "flex");
  $app.appendChild(this.$target);
  // 서치버튼 데이터
  const formButtonData = {
    icon: searchIcon,
    onClick: null,
    className: "search-btn",
    type: "submit",
    id: null,
  };
  // 랜덤버튼 데이터
  const randomButtonData = {
    icon: randomIcon,
    onClick: onRandomButtonHandler,
    className: "random-btn",
    type: null,
    id: "random",
  };
  // 폼
  new Form({
    //this.$target은 flex 영역임 여기다가 붙여야댐.

    $app: this.$target,
    initialState,
    onSubmit,
    buttonData: formButtonData,
  });
  // 랜덤버튼
  new Button({
    //this.$target은 flex 영역임 여기다가 붙여야댐.
    $app: this.$target,
    initialState,
    buttonData: randomButtonData,
  });
}
Form 컴포넌트
Flex컴포넌트의 하위 컴포넌트이다.
<form class="flex" id="submit">
    <input type="text" id="search" placeholder="Search for meals or keywords">
    <button class="search-btn" type="submit">
      <i class="fas fa-search"></i>
    </button>
  </form>
import Input from "./Input.js";
import Button from "./Button.js";
export default function Form({ $app, initialState, onSubmit, buttonData }) {
this.$target = document.createElement("form");
this.$target.setAttribute("class", "flex");
this.$target.setAttribute("id", "submit");
// input
new Input({
$app: this.$target,
initialState: initialState,
});
// 서치버튼
new Button({
$app: this.$target,
initialState: initialState,
buttonData,
});
this.$target.addEventListener("submit", onSubmit);
$app.appendChild(this.$target);
}
Form컴포넌트는 Input,Button 컴포넌트 두 개의 컴포넌트를 갖는다.
this.$target.addEventListener("submit", onSubmit);다음과 같이 제출 이벤트를 달아준다.
Button 컴포넌트
랜덤 기능을 수행하는 버튼과 검색 기능을 수행하는 버튼을 만들기위한 (확장성있게)
export default function Button({
  $app,
  initialState,
  buttonData: { className, type, id, onClick, icon },
}) {
  this.$target = document.createElement("button");
  if (className) this.$target.setAttribute("class", className);
  if (type) this.$target.setAttribute("type", type);
  if (id) this.$target.setAttribute("id", id);
  if (onClick) this.$target.addEventListener("click", onClick);
  if (icon) this.$target.innerHTML = icon;

  $app.appendChild(this.$target);
}
Meals 컴포넌트
다음 DOM구조를 구현하는 컴포넌트
<div id="meals" class="meals"><div class="meal">
      <img src="https://www.themealdb.com/images/media/meals/vussxq1511882648.jpg" alt="Steak Diane">
      <div class="meal-info" data-mealid="52935">
        <h3>Steak Diane</h3>
      </div>
    </div><div class="meal">
      <img src="https://www.themealdb.com/images/media/meals/qysyss1511558054.jpg" alt="Steak and Kidney Pie">
      <div class="meal-info" data-mealid="52881">
        <h3>Steak and Kidney Pie</h3>
      </div>
    </div></div>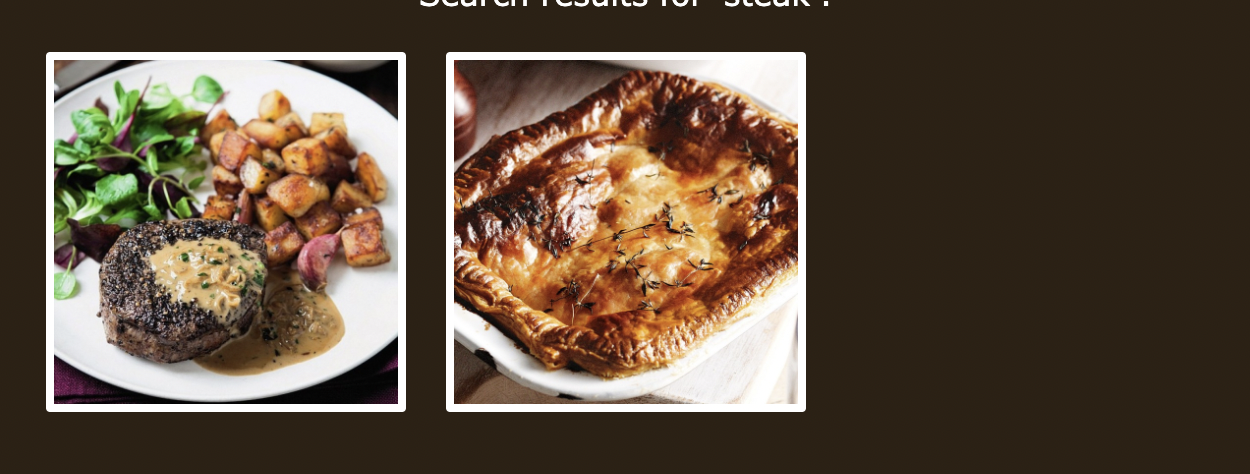
- meals라는 상태값을 갖는다.
export default function Meals({ $app, initialState, onClick }) {
  this.$target = document.createElement("div");

  this.$target.setAttribute("id", "meals");
  this.$target.setAttribute("class", "meals");
  $app.appendChild(this.$target);
  this.$target.addEventListener("click", onClick);
  this.setState = (nextState) => {
    this.state = nextState;
    this.render();
  };
  this.render = () => {
    //   스테이트에 있는 비동기 데이터(음식들) div-img 태그들로 다 만들어서 타겟에 innerHTML
    if (this.state.meals !== null) {
      // 받아온 데이터가 널이 아니라면 렌더 진행 아니면 이전 상태 그대로임
      const mealsTemplate = this.state.meals
        .map(
          (meal) =>
            `<div class="meal">
      <img src="${meal.strMealThumb}" alt="${meal.strMeal}">
      <div class="meal-info" data-mealid="${meal.idMeal}">
        <h3>${meal.strMeal}</h3>
      </div>
    </div>`
        )
        .join("");

      this.$target.innerHTML = mealsTemplate;
    }
  };
}
-
setState()에 의해meals스테이트가 변하면
-
this.render()를 수행하고
-
meals값을 순회하며li태그로 만든다.
-
- 이를
meals의 자식으로 넣음
- 이를
SingleMeal 컴포넌트
Meal의 상세 화면이다.
다음 돔구조와 사진을 구현하기위한컴포넌트이다.
<div id="single-meal"> <div class="single-meal">
    <h1>Steak and Kidney Pie</h1>
    <img src="https://www.themealdb.com/images/media/meals/qysyss1511558054.jpg" alt="Steak Diane">
    <div class="single-meal-info">
      <p>Beef</p>
      <p>British</p>
    </div>
    <div class="main">
      <p>Preheat the oven to 220C/425F/Gas 7
Heat the vegetable oil in a large frying pan, and brown the beef all over. (You may need to do this in batches.) Set aside, then brown the kidneys on both sides in the same pan. Add the onions and cook for 3-4 minutes.
Return the beef to the pan, sprinkle flour over and coat the meat and onions
Add the stock to the pan, stir well and bring to the boil.
Turn the heat down and simmer for 1½ hours without a lid. If the liquid evaporates too much, add more stock.
Remove from the heat. Add salt, pepper and Worcestershire sauce and allow to cool completely. Place the cooked meat mixture into a pie dish.
Roll out the pastry to 5mm/¼in thick and 5cm/2in larger than the dish you are using.
Using a rolling pin, lift the pastry and place it over the top of the pie dish. Trim and crimp the edges with your fingers and thumb.
Brush the surface with the beaten egg mixture and bake for 30-40 minutes until golden-brown and puffed.
Serve with creamy mash and steamed vegetables to soak up the gravy.</p>
      <h2>Ingredients</h2>
      <ul>
      <li>Puff Pastry</li><li>Egg White</li><li>Egg Yolks</li><li>Vegetable Oil</li><li>Beef</li><li>Lamb Kidney</li><li>Onions</li><li>Plain Flour</li><li>Beef Stock</li><li>Salt</li><li>Pepper</li><li>Worcestershire Sauce</li>
      </ul>
    </div>
  </div></div>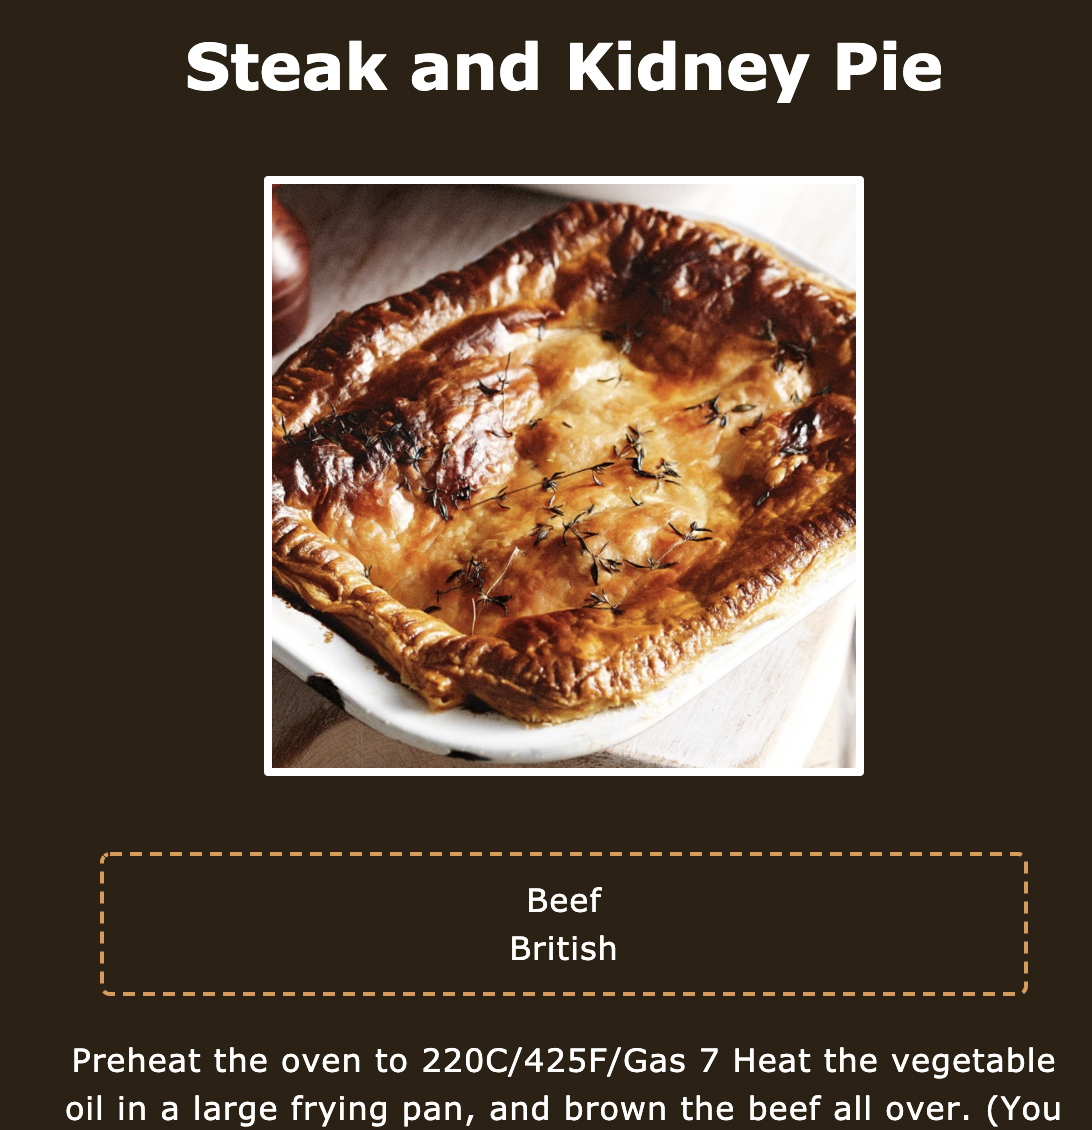
다음은 구현내용이다.
export default function ({ $app, initialState }) {
  this.$target = document.createElement("div");
  this.$target.setAttribute("id", "single-meal");
  $app.appendChild(this.$target);
  this.setState = (nextState) => {
    this.state = nextState;
    if (nextState.singleFood !== null) this.render();
  };
  this.render = () => {

	// meal id로 찾은 음식 데이터
    const targetSingleFood = this.state.singleFood;

    // meal 데이터의 재료들을 순회하며 li로 만들어준다.
    let singleFoodUlTemplate = "";
    for (let check = 1; check < 21; check++) {
      if (targetSingleFood[`strIngredient${check}`]) {
        singleFoodUlTemplate += `<li>${
          targetSingleFood[`strIngredient${check}`]
        }</li>`;
      }
    }

    // 다음 구조로 데이터를 집어넣는다.
    this.$target.innerHTML = ` <div class="single-meal">
    <h1>${targetSingleFood.strMeal}</h1>
    <img src="${targetSingleFood.strMealThumb}" alt="Steak Diane">
    <div class="single-meal-info">
      <p>${targetSingleFood.strCategory}</p>
      <p>${targetSingleFood.strArea}</p>
    </div>
    <div class="main">
      <p>${targetSingleFood.strInstructions}</p>
      <h2>Ingredients</h2>
      <ul>
      ${singleFoodUlTemplate}
      </ul>
    </div>
  </div>`;
  };
}
남은 구현
-
데이터 캐싱하기
내 상태가 변한것도아닌데 재 렌더링 되는 구조 바꾸어야함. -
추가기능 구현하기
-
이벤트 버블링
현재 음식 사진을 누르면 상세 화면이 렌더링 되도록 구현함. 근데 이벤트를 상위 컴포넌트에 달다보니 하위 컴포넌트를 타겟으로 하여 클릭하는 경우 렌더링되지않음. -
웹 팩
느낀점
- 자바스크립트 모듈화하기
웹 팩말고 다음과 같이 모듈화하는 경우
<script type="module" src="./app.js"></script>import시 파일의 확장자까지 입력해줘어야함. (다음처럼)
import App from "./components/App.js";Reference

Frontend Ninja