◇ 영상 파일 불러오기 ◇
cv.imread(filename, flags = None) -> retval- filename 불러올 영상 파일 이름(문자열)
- 영상 파일 불러오기 옵션 플래스

- retval : 불러온 영상 데이터 (numpy.ndarray)
◇ 영상 파일 저장하기
cv2.imwrite(filename, imgm params = None) -> retval- filename : 저장할 영상 파일 이름 (문자열)
- img : 저장할 영상 데이터 (numpay.ndarry)
- params : 파일 저장 옵션 지정 ( 속성 & 값의 정수 쌍)
- cv2.IMWRITE_JPEG_QUALITY,90 : JPG 파일 압축률을 90%로 지정
- retval : 정상적으로 저장하면 True , 실패하면 False.
◇ 새창 띄우기 ◇
cv2.nameWindow(winname, flags = None) -> None- winname : 창 고유이름(문자열)
- flags : 창 속성 지정 플래그

◇ 창 닫기 ◇
cv2.destroyWindow winname() -> None
cv2.destroyAllWindows() -> None- winname: 닫고자하는창이름
참고사항
- cv2.destroyWindow() 함수는 지정한 창하나만 닫고, cv2.destroyAllWindows() 함수는 열려있는 모든 창을 닫음.
- 일반적인 경우 프로그램 종료시 운영체제에 의해 열려있는 모든창이 자동으로 닫힘
◇ 창 위치 이동 ◇
cv2.moveWindow winname , x , y ) --> None- winname: 창이름
- x, y: 이동할위치좌표
◇ 창 크기 변경 ◇
cv2.resizeWindow winname , width , height ) --> None- winname: 창이름
- width:변경할창의가로크기
- height: 변경할창의세로크기
참고사항
- 창생성시cv2.WINDOW_NORMAL 속성으로 생성되어야 동작
- 영상출력부분의크기만을고려함(제목표시줄, 창경계는고려되지않음)
◇ 영상출력하기 ◇
cv2.imshow(winname , mat) --> None- winname:영상을출력할대상창이름
- mat:출력할영상데이터(numpy.ndarray)
참고사항
- uint16, int32 자료형행렬의경우, 행렬원소값을255로나눠서출력
- float32, float64 자료형행렬의경우, 행렬원소값에255를곱해서출력
- 만약 winname에 해당하는 창이없으면 창을 새로만들어서 영상을 출력함
- Windows 운영체제에서는Ctrl + C (복사), Ctrl + S (저장) 지원
- 실제로는 cv2.waitKey() 함수를호출해야화면에영상이나타남
◇ 키보드 입력 대기 ◇
cv2.waitKey(delay = None) --> retval◇ 이미지 읽기 ◇
# 컬러로 읽기
img_color = cv2.imread(img_path, cv2.IMREAD_COLOR)

#흑백 이미지로 읽기
img_gray = cv2.imread(img_path, cv2.IMREAD_GRAYSCALE)
cv2.imread(filename, flag)
인자
- fileName : 문자열 타입의 파일 경로
- flag : 이미지를 읽을 때 사용할 옵션
◇ 읽은 이미지 차원 확인하기 ◇
#컬러 이미지 행렬 차원 확인하기
print(type(img_color), img_color.shape)

#흑백 이미지 행렬 차원 확인하기
print(type(img_gray), img_gray.shape)- OpenCV는 numpy를 이용하여 행렬의 형채로 이미지를 표현
- 그래서 shape을 확인하면 이미지가 컬러인지, 흑백인지 확인가능
- type(), print()를 이용해 결과 확인
◇ 흑백으로 변환된 이미지 저장하기 ◇
if cv2.imwrite(save_path, img_gray):
	print("image save done")
else
	print("image save failed")
cv2.imwrite(filename, image)
인자
fileName:문자열 타입의 파일경로
image:numpy.ndarray 타입 이미지
반환값 : 이미지 저장 실패 여부가 bool 타입으로 반환
◇ 흑백 이미지 컬러 변환하기 ◇
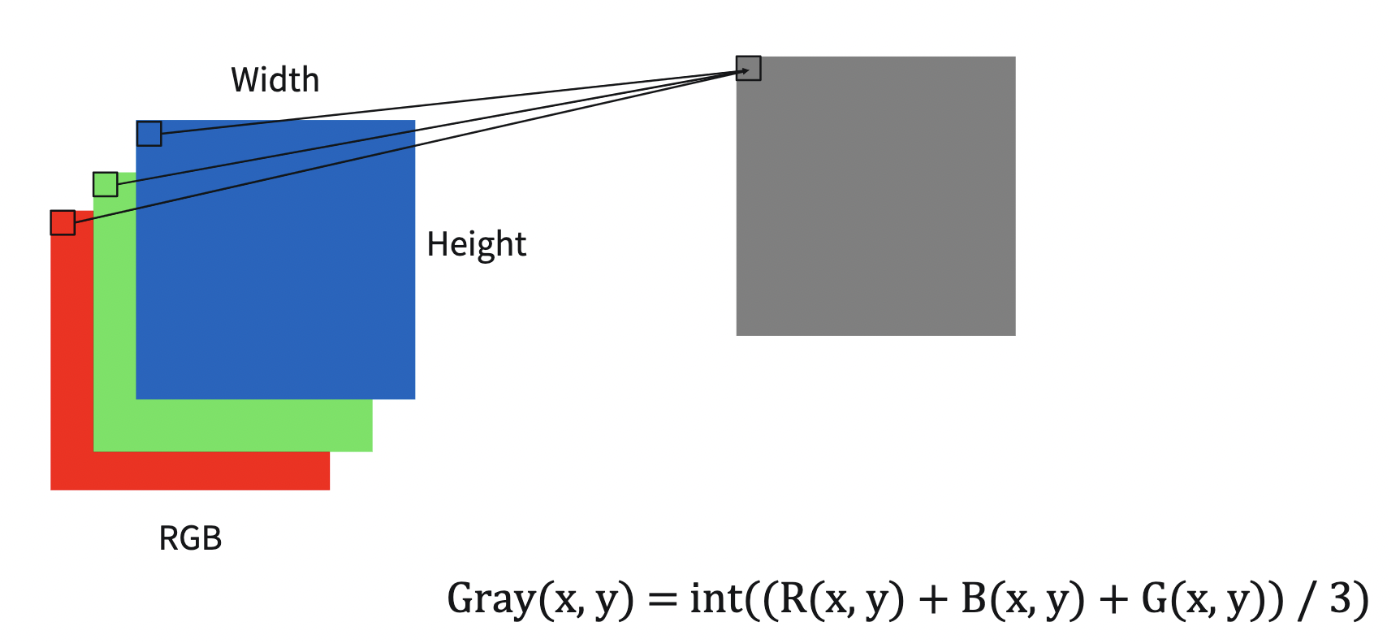
# 흑백 이미지를 다시 컬러 이미지로 바꾸기
img_gray_to_color = cv2.cvColor(img_gray, cv2.COLOR_GRAY2BGR)

# 흑백 이미지 컬로 변환 후 행렬 차원 확인하기
print("흑백 이미지를 다시 컬러로 변환 : ", type(img_gray_to_color),img_gray_to_color.shape)
cv2.cvtColor(image,option)
인자
image : numpy.ndarray 타입 이미지
option : 이미지를 읽을 떄 사용할 옵션
반환값 : 이미지를 제대로 읽으면 numpy.ndarray 타입의 이미지가, 그렇지 못할 경우 None을 반환
◇ 이미지를 지정된 사이즈로 크기 조정하기 ◇
#이미지 리사이징 하기
img_resized = cv2.resize(img_color,(512,512))
print("이미지를 512 x 512로 크기 변환 :", type(img_resized), img_resized.shape)
cv2.resize(image, dsize)
인자
image : numpy, ndarray 타입 이미지
dsize : 목적 이미지 크기 , 튜플 형태로 (가로 세로) 로 지정
반환값 : 이미지를 제대로 읽으면 numpy.ndarray 타입의 이미지가 그렇지 못할 경우 None을 반환
◇ 이미지를 크롭하여 일미지 일부만 남기기 ◇
img_croped = img_color[0:img_color.shape[0] //2, :]
print("이미지를 횡으로 크롭하기: ", type(img_croped), img_croped.shape)
크롭 = 2차원 배열을 슬라이싱 하는 것
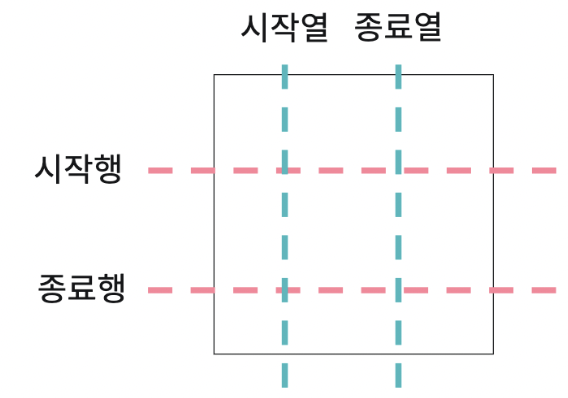
OpenCV는 이미지를 행렬로 다루므로
numpy의 슬라이싱 기능을 그대로 쓸 수 있음
image_cropped = [시작행:종료행, 시작열:가로열]

DA/DA/AE