
소개
개발자들은 리덕스를 사용하면서 몇 가지 이유에서 많은 피로감과 불편함을 느끼었습니다.
"Redux 저장소 구성이 너무 복잡하다"
"Redux에서 유용한 작업을 수행하려면 많은 패키지들을 추가해야 한다"
"Redux는 너무 많은 상용구 코드들이 필요하다"
리덕스 툴킷(RTK)은 위의 문제점들을 보완하고 보다 쉽게 접근하고 사용할 수 있도록
리덕스의 창시자 Dan Abramov와 그의 팀이 내놓은 리덕스를 위한 도구 모음입니다.
이제 TypeScript+Next.js 프로젝트에 RTK를 적용하여 카운터를 구현하면서
몇 가지 주요 API를 이용한 사용법을 알아보겠습니다.
1. configureStore()로 스토어 작성
configureStore는 redux 코어 표준 함수인 createStore를 추상화한 것으로 더 나은 개발 경험을 위해 저장소 설정에 좋은 기본값을 추가한 함수이다.
configureStore Options
-
reducer : 리듀서를 받는다. 단일 함수인 경우 저장소의 루트 리듀서로 바로 사용할 수 있으며, 슬라이스 리듀서로 구성된 객체인 경우 자동으로 내부에서 conbineReducers함수로 병합하여 루트 리듀서를 생성한다.
-
middleware : 미들웨어를 담는 배열을 받는다. 아무것도 지정하지 않으면
getDefaultMiddleware()를 호출한다
/* getDefaultMiddleware() 반환 값 */

// development
return [ immutableStateInvariant, serializableStateInvariant, thunk ]

// production
return [ thunk ]- devTools : boolean값으로 참일 경우 Redux DevTools browser extension를 지원한다.
지원 브라우저 - Chrome, Edge and Firefox - preloadedState : 스토어에 전달할 초기값을 설정한다.
코드 및 설명
/* store/index.ts */

import {
  configureStore,
  getDefaultMiddleware,
  ThunkAction,
  Action} from '@reduxjs/toolkit';
import { createWrapper } from 'next-redux-wrapper';
import {useDispatch} from 'react-redux';
import rootReducer from './reducer';

const isDev = process.env.NODE_ENV === 'development';
const makeStore = () => {
  const middleware = getDefaultMiddleware();
  const store = configureStore({
    reducer: rootReducer,
    middleware,
    /* custom middleware: (getDefaultMiddleware) => getDefaultMiddleware().concat(사용자 정의)  */
    devTools: isDev,
  })
  return store;
}

const wrapper = createWrapper(makeStore);

/*
	아래는 wrapper로 스토어를 생성하고 클라이언트에서 사용할 typeScript용
	dispatch와 state 및 asynchronous dispatch의 타입 작성 코드이다.
*/
type AppStore = ReturnType<typeof makeStore>;
type AppDispatch = AppStore['dispatch'];
export type RootState = ReturnType<AppStore['getState']>;
export const useAppDispatch = () => useDispatch<AppDispatch>();
export type AppThunk<ReturnType = void> = ThunkAction<
 ReturnType,
 RootState,
 unknown,
 Action
>;

export default wrapper;
next-redux-wrapper는 무엇인가요?
Next Js에서 Static Site Generator나 Server Side Rendering을 할 때 서버측 리덕스 스토어가 따로 필요하기 때문에 이를 클라이언트 리덕스 스토어와 합치어 같은 상태를 유지하게 해줘야 하며 자주 사용되는 getInitialProps나 getServerSideProps를 진행하기 위해 스토어에 접근할 수 있어야 합니다.
이를 수행하기 위한 과정은 꽤나 복잡한데 이를 간단히 해주는 라이브러리이다.
위의 코드에서처럼 생성된 저장소는 콜백으로 createWrapper의 인자로 넘기어 wrapper를 생성합니다. 생성된 wrapper는 앞으로 프로젝트를 진행하면서 여러 용도에서 쓰입니다.
2. 리듀서 병합과 HYDRATE
코드 및 설명
/* store/reducer.ts */

import {combineReducers} from 'redux';
import { HYDRATE } from 'next-redux-wrapper';
import counterSlice from '../features/countSlice.ts';

const combinedReducer = combineReducers({
  counter: counterSlice,
});

const rootReducer: typeof combinedReducer = (state, action) => {
  if (action.type === HYDRATE) {
    const nextState = {
      ...state,
      ...action.payload
    }
    return nextState;
  } else {
    return combinedReducer(state, action)
  }
}
export default rootReducer;
rootReducer를 정의하는 구간이다. 먼저 리듀서가 여러개 일 경우 Redux 코어 라이브러리에서 제공하는 함수인 combineReducers로 합쳐준다. 다음으로 next-redux-wrapper의 공식문서에서 알려주는 데로 HYDRATE를 사용하여 코드를 작성한다.
- HYDRATE : 서버 상태와 클라이언트 상태를 적절하게 병합해주는 역할을 한다.
3. createSlice로 리듀서 생성
createSlice는 초기 상태, 리듀서 함수를 정의하는 객체, "슬라이스 이름"을 받아 자동으로 리듀서와 상응하는 액션 생성자, 액션 타입을 생성해주는 함수이다.
createSlice Options
-
initialState : 초기 상태값을 받는다.
-
name : 슬라이스의 이름을 정의한다. 생성된 액션 타입 상수들은 prefix로 정의한 이름을 쓴다.
-
reducers : 함수 및 객체를 받는다.
/* 함수 -> 일반적인 경우 */
 reducers: {
    increment(state){
      state.val += 1;
    }
 }

/* 객체 -> 리듀서 실행 전에 액션의 페이로드 값을 따로 정의해야할 경우 */
reducers: {
    increment: {
    	reducer: (state, action: PayloadAction) => {
        	state.val += 1;
        },
        prepare: (val: number) => {
        	const id = getId();
          	return {payload: {id, val}};
        }
}- extraReducers : createSlice가 생성한 액션 외에 다른 액션에도 응답할 수 있도록 하는 용도로 쓰인다. 주로 createAsyncThunk로 생성된 비동기 액션을 정의한다.
코드 및 설명
/* fetures/counterSlice.ts */

import { createSlice } from "@reduxjs/toolkit";

interface CountState{
  val: number
}

const initialState: CountState = {
  val: 0
};

export const countSlice = createSlice({
  name: 'count',
  initialState,
  reducers: {
    increment(state){
      state.val += 1;
    },
    decrement(state){
      state.val -= 1;
    }
  },
  extraReducers: (builder) => {}
});

export const { increment, decrement } = countSlice.actions;
export default countSlice.reducer;createSlice에서 리듀서를 생성할 때 사용되는 RTK의 createReduer API에는 내부적으로 Immer라이브러리를 사용하여 자동으로 불변성을 유지해줍니다.
export하는 increment, decrement 액션들은 클라이언트에서 dispatch할 때 사용됩니다.
4. 화면 구축 및 테스트
리덕스 연동
/* pages/_app.tsx */

import type { AppProps } from 'next/app'
import wrapper  from '../store'

function MyApp({ Component, pageProps }: AppProps) {
  return <Component {...pageProps} />
}

export default wrapper.withRedux(MyApp);
Provider로 감싸주던 기존의 방식과는 다르게 next-redux_wrapper에서는 루트 부분을 wrapper로 감싸준다. 이러면 클라이언트에서 리덕스를 사용할 준비가 끝났다.
카운터 UI 구축
import { useCallback } from 'react'
import type { NextPage } from 'next'
import { useSelector } from 'react-redux' // 스토어에서 state를 불러오기 위한 hook
import { RootState } from '../store' // 스토어에 저장된 state의 type
import { useAppDispatch } from '../store' //스토어 생성단계에서 export한 커스텀 dispatch hook
import {increment, decrement} from '../slices/count';

const Home: NextPage = () => {
  const dispatch = useAppDispatch();
  const {val} = useSelector((state:RootState) => state.count);

  const onIncrement = useCallback(()=>dispatch(increment()),[])
  const onDecrement = useCallback(()=>dispatch(decrement()),[])

  return (
    <div className={styles.container}>
      <main className={styles.main}>
         <div className={styles.box}>
              <span>{val}</span>
              <div className={styles.btnBox}>
                  <button onClick={onIncrement}>+</button>
                  <button onClick={onDecrement}>-</button>
              </div>
         </div>
      </main>
    </div>
  )
}

export default Home
increment와 decrement는 단순히 dispatch를 수행하는 함수이지만 useCallback으로 감싸준 이유는 불필요한 렌더링을 방지하기 위해서인데 컴포넌트에 속성으로 들어가는 함수는 useCallback으로 감싸주는것이 좋다.
테스트 결과 화면
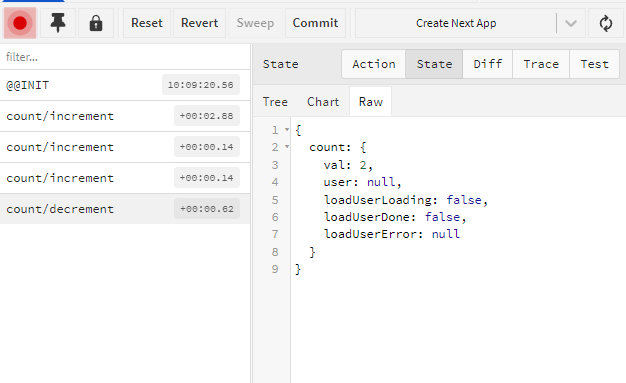

useAppSelector를 놔두고 useSelector 훅을 사용하시는 이유를 알 수 있을까요?