아이템 17. 핵심 정리 - 불변 클래스

한번 만들어지면 그 상태가 바뀌지 않아야 한다.
package me.whiteship.chapter04.item17.part1;

public class PhoneNumber {

    private final short areaCode, prefix, lineNum;

    public PhoneNumber(short areaCode, short prefix, short lineNum) {
        this.areaCode = areaCode;
        this.prefix = prefix;
        this.lineNum = lineNum;
    }

    public short getAreaCode() {
        return areaCode;
    }

    public short getPrefix() {
        return prefix;
    }

    public short getLineNum() {
        return lineNum;
    }


}
package me.whiteship.chapter04.item17.part1;

public class MyPhoneNumber extends PhoneNumber{

    public MyPhoneNumber(short areaCode, short prefix, short lineNum) {
        super(areaCode, prefix, lineNum);
    }

    private String name;

    public String getName() {
        return name;
    }

    public void setName(String name) {
        this.name = name;
    }

}
상속하면 다른게 추가가 되는데 바뀔 수 있는 객체가 되었다.
불변 클래스를 상속받으면서 불변 클래스가 아니게 객체의 상태를 바뀌도록 되었기 때문에 이상한 클래스가 만들어지는 것을 방지할 수 있다.
package me.whiteship.chapter04.item17.part1;

public final class PhoneNumber {

    public final short a, b, c;

    public PhoneNumber(short areaCode, short prefix, short lineNum) {
        this.a = areaCode;
        this.b = prefix;
        this.c = lineNum;
    }

    public short getAreaCode() {
        return a;
    }

    public short getPrefix() {
        return b;
    }

    public short getLineNum() {
        return c;
    }


}
final 키워드를 적어서 방지가능하다.
모든 필드를 private으로 선언해야 한다. private이 아니면 final이라도 바꿀수는 없지만 참조하는 것을 바라지는 않는다.
자신 이외의 내부 기반 컴포넌트에 접근할 수 없도록 한다.
package me.whiteship.chapter04.item17.part1;

public final class Person {

    private final Address address;

    public Person(Address address) {
        this.address = address;
    }

    public Address getAddress() {
        return address;
    }

    public static void main(String[] args) {
        Address seattle = new Address();
        seattle.setCity("Seattle");

        Person person = new Person(seattle);

        Address redmond = person.getAddress();
        redmond.setCity("Redmond");

        System.out.println(person.address.getCity());
    }
}
package me.whiteship.chapter04.item17.part1;

public class Address {

    private String zipCode;

    private String street;

    private String city;

    public String getZipCode() {
        return zipCode;
    }

    public void setZipCode(String zipCode) {
        this.zipCode = zipCode;
    }

    public String getStreet() {
        return street;
    }

    public void setStreet(String street) {
        this.street = street;
    }

    public String getCity() {
        return city;
    }

    public void setCity(String city) {
        this.city = city;
    }
}
Person이 불변이더라도 address가 얼마든지 변경이 될 수 있다.
package me.whiteship.chapter04.item17.part1;

public final class Person {

    private final Address address;

    public Person(Address address) {
        this.address = address;
    }

    public Address getAddress() {
        Address copyOfAddress = new Address();
        copyOfAddress.setStreet(address.getStreet());
        copyOfAddress.setZipCode(address.getZipCode());
        copyOfAddress.setCity(address.getCity());
        return copyOfAddress;
    }

    public static void main(String[] args) {
        Address seattle = new Address();
        seattle.setCity("Seattle");

        Person person = new Person(seattle);

        Address redmond = person.getAddress();
        redmond.setCity("Redmond");

        System.out.println(person.address.getCity());
    }
}
방어적 복사를 해서 준다.
방어적 복사와 비슷하게 새로운 객체를 만들어서 return을 하면 된다.
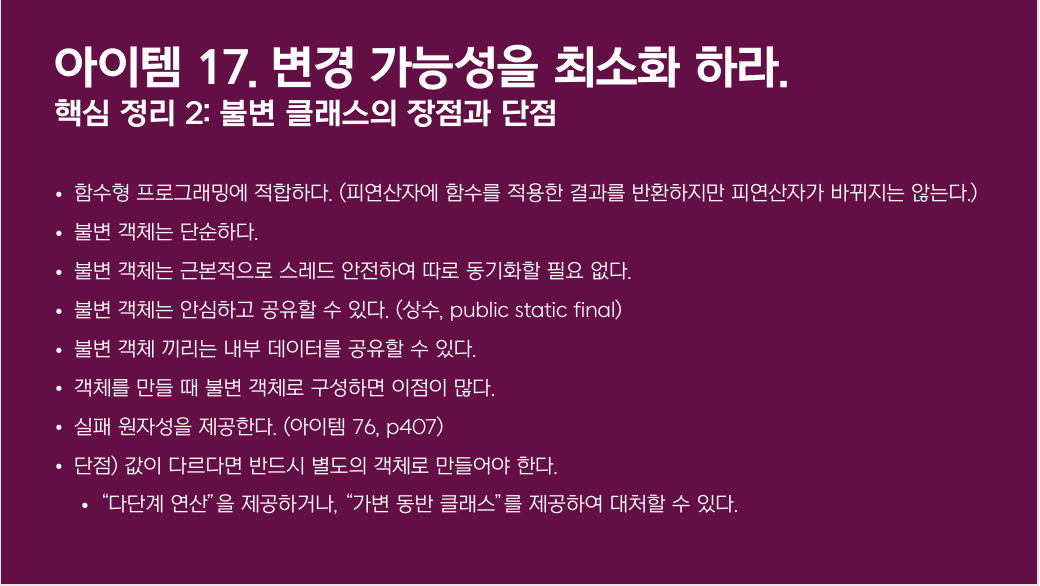
아이템 17. 핵심 정리 - 불변 클래스의 장점과 단점
package me.whiteship.chapter04.item17.part2;

// 코드 17-1 불변 복소수 클래스 (106-107쪽)
public final class Complex {
    private final double re;
    private final double im;

    public static final Complex ZERO = new Complex(0, 0);
    public static final Complex ONE  = new Complex(1, 0);
    public static final Complex I    = new Complex(0, 1);

    public Complex(double re, double im) {
        this.re = re;
        this.im = im;
    }

    public double realPart()      { return re; }
    public double imaginaryPart() { return im; }

    public Complex plus(Complex c) {
        return new Complex(re + c.re, im + c.im);
    }

    // 코드 17-2 정적 팩터리(private 생성자와 함께 사용해야 한다.) (110-111쪽)
    public static Complex valueOf(double re, double im) {
        return new Complex(re, im);
    }

    public Complex minus(Complex c) {
        return new Complex(re - c.re, im - c.im);
    }

    public Complex times(Complex c) {
        return new Complex(re * c.re - im * c.im,
                re * c.im + im * c.re);
    }

    public Complex dividedBy(Complex c) {
        double tmp = c.re * c.re + c.im * c.im;
        return new Complex((re * c.re + im * c.im) / tmp,
                (im * c.re - re * c.im) / tmp);
    }

    @Override public boolean equals(Object o) {
        if (o == this)
            return true;
        if (!(o instanceof Complex))
            return false;
        Complex c = (Complex) o;

        // == 대신 compare를 사용하는 이유는 63쪽을 확인하라.
        return Double.compare(c.re, re) == 0
                && Double.compare(c.im, im) == 0;
    }
    @Override public int hashCode() {
        return 31 * Double.hashCode(re) + Double.hashCode(im);
    }

    @Override public String toString() {
        return "(" + re + " + " + im + "i)";
    }
}
다 새로운 인스턴스를 만들어서 return해준다.
package me.whiteship.chapter04.item17.part2;

import java.awt.*;
import java.math.BigInteger;
import java.util.HashSet;
import java.util.Set;

public class BigIntExample {

    public static void main(String[] args) {
        BigInteger ten = BigInteger.TEN;
        BigInteger minusTen = ten.negate();

        final Set<Point> points = new HashSet<>();
        Point firstPoint = new Point(1, 2);
        points.add(firstPoint);

    }
}
다른 불변객체인 경우 현재 객체 10을 -로 바꿔서 할 수 있기 때문에 공유 가능하다.
Set은 그 컬렉션을 구성하고 있는 요소들이 같아야 된다.
package me.whiteship.chapter04.item17.part2;

import java.awt.*;
import java.math.BigInteger;
import java.util.HashSet;
import java.util.Set;

public class BigIntExample {

    public static void main(String[] args) {
        BigInteger ten = BigInteger.TEN;
        BigInteger minusTen = ten.negate();

        final Set<Point> points = new HashSet<>();
        Point firstPoint = new Point(1, 2);
        points.add(firstPoint);

        firstPoint.x = 10;

    }
}
final로 해도 그 안에 내부 레퍼런스들이 바꿀 수가 없다. 넣는 객체도 불변하게 만들어야 한다.
plus, minus, tims를 모아서 하나로 만들어서 다단계 연산을 만드는 방법이 있다.
package me.whiteship.chapter04.item17.part2;

public class StringExample {

    public static void main(String[] args) {
        String name = "whiteship";

        StringBuilder nameBuilder = new StringBuilder(name);
        nameBuilder.append("keesun");
    }
}
기존 빌더에 추가하는 식으로 만들 수 있다.
새로 추가해야 하는 경우, 값이 변경이 되는 경우 등등 가변동반클래스를 만들 수 있다.
아이템 17. 핵심 정리 - 불변 클래스 만들 때 고려할 것
package me.whiteship.chapter04.item17.part2;

// 코드 17-1 불변 복소수 클래스 (106-107쪽)
public final class Complex {
    private final double re;
    private final double im;

    public static final Complex ZERO = new Complex(0, 0);
    public static final Complex ONE  = new Complex(1, 0);
    public static final Complex I    = new Complex(0, 1);

    private Complex(double re, double im) {
        this.re = re;
        this.im = im;
    }

    public double realPart()      { return re; }
    public double imaginaryPart() { return im; }

    public Complex plus(Complex c) {
        return new Complex(re + c.re, im + c.im);
    }

    // 코드 17-2 정적 팩터리(private 생성자와 함께 사용해야 한다.) (110-111쪽)
    public static Complex valueOf(double re, double im) {
        return new Complex(re, im);
    }

    public Complex minus(Complex c) {
        return new Complex(re - c.re, im - c.im);
    }

    public Complex times(Complex c) {
        return new Complex(re * c.re - im * c.im,
                re * c.im + im * c.re);
    }

    public Complex dividedBy(Complex c) {
        double tmp = c.re * c.re + c.im * c.im;
        return new Complex((re * c.re + im * c.im) / tmp,
                (im * c.re - re * c.im) / tmp);
    }

    @Override public boolean equals(Object o) {
        if (o == this)
            return true;
        if (!(o instanceof Complex))
            return false;
        Complex c = (Complex) o;

        // == 대신 compare를 사용하는 이유는 63쪽을 확인하라.
        return Double.compare(c.re, re) == 0
                && Double.compare(c.im, im) == 0;
    }
    @Override public int hashCode() {
        return 31 * Double.hashCode(re) + Double.hashCode(im);
    }

    @Override public String toString() {
        return "(" + re + " + " + im + "i)";
    }
}
class에 final을 넣는다.
생성자를 private으로 만든다.(내부 패키지에서만 사용하는 경우) 혹은 package-private로 만든다.
package me.whiteship.chapter04.item17.part3;

public class MyComplex extends Complex {
    MyComplex(double re, double im){
        super(re, im);
    }
}
혹은 내부 클래스로 가져온다.
private static class MyComplex extends Complex {
        private MyComplex(double re, double im) {
            super(re, im);
        }
    }
정적 팩터리를 사용가능하다.
    // 코드 17-2 정적 팩터리(private 생성자와 함께 사용해야 한다.) (110-111쪽)
    public static Complex valueOf(double re, double im) {
        return new Complex(re, im);
    }
// 코드 17-2 정적 팩터리(private 생성자와 함께 사용해야 한다.) (110-111쪽)
public static Complex valueOf(double re, double im) {
return new MyComplex(re, im);
}
- Complex 대신에 MyComplex로 바꿔서 사용가능하다.
- 정적 팩터리를 캐싱할 수 있다. 성능 개선가능하다.
package me.whiteship.chapter04.item17.part3;

public class ComplexExample {

    public static void main(String[] args) {
        Complex complex = Complex.valueOf(1, 0.222);
    }
}
BigIntegerUtils
package me.whiteship.chapter04.item17.part3;

import java.math.BigInteger;

public class BigIntegerUtils {

    public static BigInteger safeInstance(BigInteger val) {
        return val.getClass() == BigInteger.class ? val : new BigInteger(val.toByteArray());
    }
}
만약에 상속을 허용했다. 상속이 되는 클래스는 BigInteger 클래스이다.
이 불변을 의도한 클래스이지만 BigInteger인데 public 생성자를 가지고 있어서 상속이 가능하다.
타입이 BigInteger이 아닌 상속된 타입인 경우 BigInteger로 바꿔서 쓰겠다 라고 방어적으로 사용가능하다.
package me.whiteship.chapter04.item17.part3;

import java.util.HashMap;
import java.util.Map;

// equals를 재정의하면 hashCode로 재정의해야 함을 보여준다. (70-71쪽)
public final class PhoneNumber {
    private final short areaCode, prefix, lineNum;

    public PhoneNumber(int areaCode, int prefix, int lineNum) {
        this.areaCode = rangeCheck(areaCode, 999, "area code");
        this.prefix   = rangeCheck(prefix,   999, "prefix");
        this.lineNum  = rangeCheck(lineNum, 9999, "line num");
    }

    private static short rangeCheck(int val, int max, String arg) {
        if (val < 0 || val > max)
            throw new IllegalArgumentException(arg + ": " + val);
        return (short) val;
    }

    @Override public boolean equals(Object o) {
        if (o == this)
            return true;
        if (!(o instanceof PhoneNumber))
            return false;
        PhoneNumber pn = (PhoneNumber)o;
        return pn.lineNum == lineNum && pn.prefix == prefix
                && pn.areaCode == areaCode;
    }

    // 해시코드를 지연 초기화하는 hashCode 메서드 - 스레드 안정성까지 고려해야 한다. (71쪽)
    private volatile int hashCode; // 자동으로 0으로 초기화된다.

    @Override public int hashCode() {
        if (this.hashCode != 0) {
            return hashCode;
        }

        synchronized (this) {
            int result = hashCode;
            if (result == 0) {
                result = Short.hashCode(areaCode);
                result = 31 * result + Short.hashCode(prefix);
                result = 31 * result + Short.hashCode(lineNum);
                this.hashCode = result;
            }
            return result;
        }
    }

    public static void main(String[] args) {
        Map<PhoneNumber, String> m = new HashMap<>();
        m.put(new PhoneNumber(707, 867, 5309), "제니");
        System.out.println(m.get(new PhoneNumber(707, 867, 5309)));
    }
}
외부에 공개되는 필드는 final로 하는게 좋다. 외부에 공개되어 있지 않은 이런 값들 같은 경우에는 계산이 또 하는데 오래 걸리고 비용이 많이 드는 그런 값들인 경우에는 이렇게 private한 non-final field에 값을 저장해 놓고 재사용할 수 있다.
아이템 17. 완벽 공략 요약

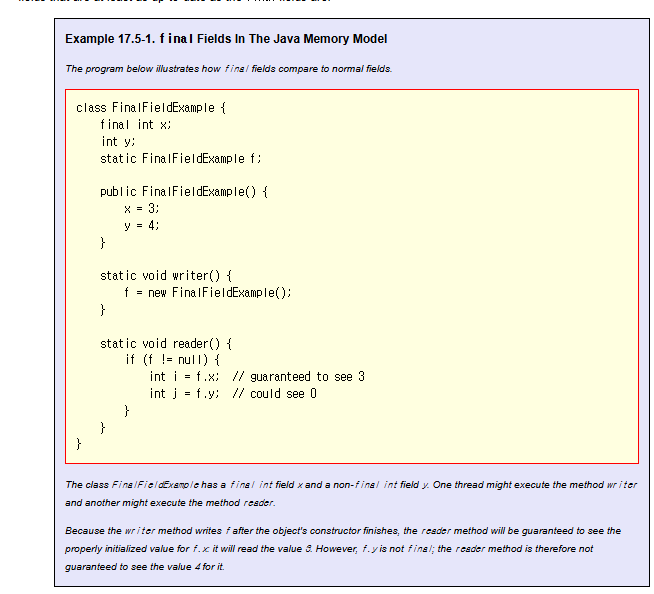
아이템 17. 완벽 공략 - final과 자바 메모리 모델(JMM)

final을 사용하면 안전하게 초기화할 수 있다.
JMM에서 파이널을 어떻게 정의하는지 알아야 한다.
생성자 안에서 x, y 를 1,2로 정의할 때 이렇게 실행해도 되고 저렇게 실행해도 된다.
실행 순서는 메모리 모델이 허용하는 안에서 정하는 것이다.
메모리 모델이 허용하는 규칙 내에서 프로그램 실행 순서를 바꿀 수도 있다.
package me.whiteship.chapter04.item17.memorymodel;

public class Whiteship {

    private int x;

    private int y;

    public Whiteship() {
        this.x = 1;
        this.y = 2;
    }

    public static void main(String[] args) {
        // Object w = new Whiteship()
        // whiteship = w
        // w.x = 1
        // w.y = 2

        Whiteship whiteship = new Whiteship();
    }


}
x와 y를 다른 스레드에서 같이 사용한다고 보면 인스턴스의 값들이 생성되기도 전에 참조하는 경우가 생길 수 도 있다.
실행 순서가 어떻게 바뀌냐에 따라서 달라진다. 발생할 수도 있다.
final을 쓰면 instance에 해당하는 field가 초기화하는 이후에만 쓸 수가 있다.
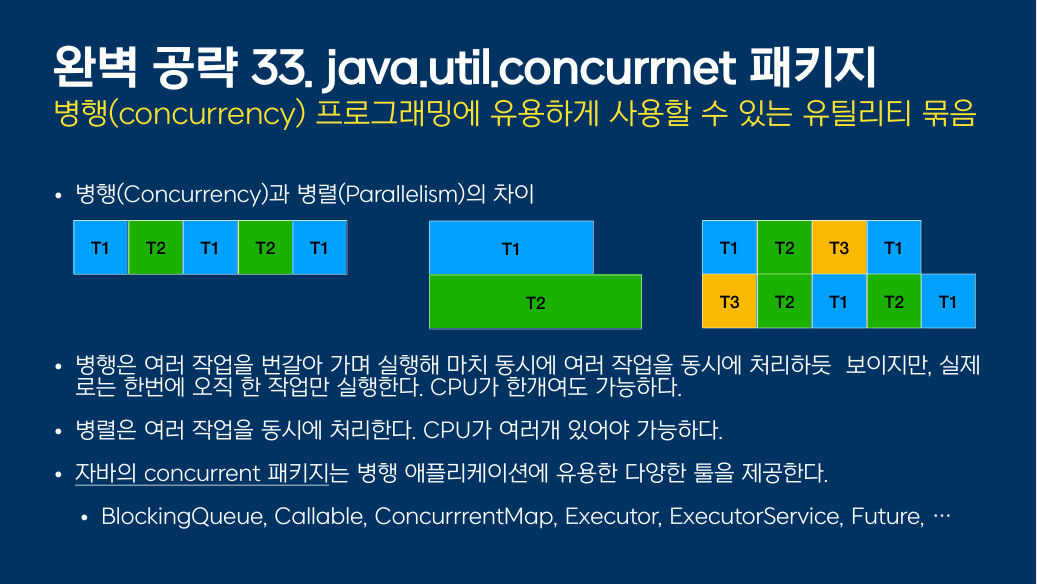
아이템 17. 완벽 공략 - CountDownLatch

package me.whiteship.chapter04.item17.concurrent;

import java.util.concurrent.CountDownLatch;

public class ConcurrentExample {
    public static void main(String[] args) throws InterruptedException {
        int N = 10;
        CountDownLatch startSignal = new CountDownLatch(1);
        CountDownLatch doneSignal = new CountDownLatch(N);

        for (int i = 0; i < N; ++i) // create and start threads
            new Thread(new Worker(startSignal, doneSignal)).start();

        ready();            // don't let run yet
        startSignal.countDown();      // let all threads proceed
        doneSignal.await();           // wait for all to finish
        done();
    }

    private static void ready() {
        System.out.println("준비~~~");
    }

    private static void done() {
        System.out.println("끝!");
    }

    private static class Worker implements Runnable {

        private final CountDownLatch startSignal;
        private final CountDownLatch doneSignal;

        public Worker(CountDownLatch startSignal, CountDownLatch doneSignal) {
            this.startSignal = startSignal;
            this.doneSignal = doneSignal;
        }

        public void run() {
            try {
                startSignal.await();
                doWork();
                doneSignal.countDown();
            } catch (InterruptedException ex) {} // return;
        }

        void doWork() {
            System.out.println("working thread: " + Thread.currentThread().getName());
        }
    }
}
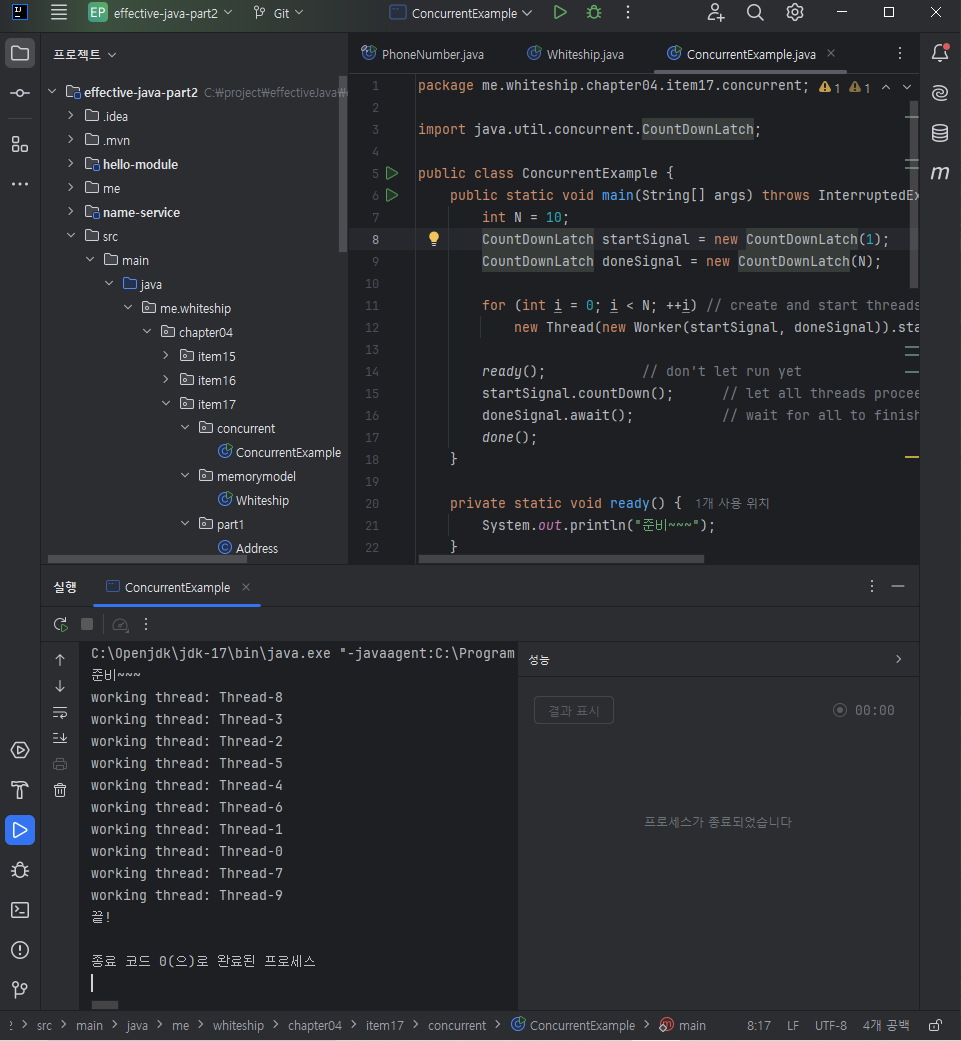
한번 사용하면 끝이다.
