Spring Security
프로젝트를 진행하는데 인증(Authentication)과 인가(Authorization)에 대한 처리 설정해야했다.
스프링 시큐리티라는 프레임워크를 알게되었고 자연스레 이에대한 공부를 할 수 있었다.
스프링 시큐리티는 "인증"과 "인가" 등의 애플리케이션 보안을 담당하는 스프링 하위 프레임워크이다.
스피링 시큐리티는 Filter의 흐름에 따라 "인증"과 "인가"를 처리하고있다.
개발자는 스프링시큐리티를 사용해서 보안관련 로직을 편하게 사용할 수 있는 장점이 있다.
인증, 인가
인증(Authentication): 'A'라고 주장하는 주체(user, subject, principal)가 'A'가 맞는지 확인하는 절차- Authentication : 인증 과정에 사용되는 핵심 객체
- ID/PASSWORD, JWT, OAuth 등 여러 방식으로 인증에 필요한 값이 전달되는데 이것을 하나의 인터페이스로 받아 수행하도록 추상화 하는 역할의 인터페이스다.
인가(Authorization): 인증된 사용자가 요청한 자원에 접근 가능한지를 결정하는 절차- 먼저 인증을 해야 인가를 할 수 있다.
Spring Security에서는 이러한 인증과 인가를 위해 Principal을 아이디로, Credential을 비밀번호로 사용하는 Credential 기반의 인증 방식을 사용한다.
Spring Security 적용방법은 아래에 있으니 이론부터 확인해보자
바로 적용을 하고싶다면 목록의Spring Security 적용을 확인하면 된다.
Security Filter
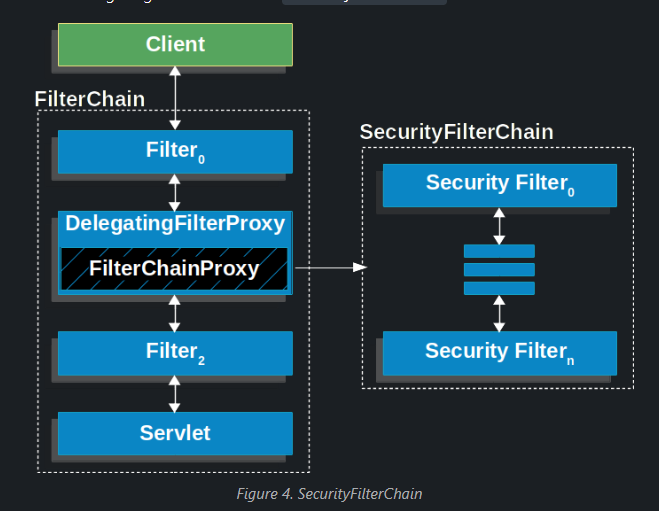
아래 사진은 SpringSecurity 문서에서 가져왔다.
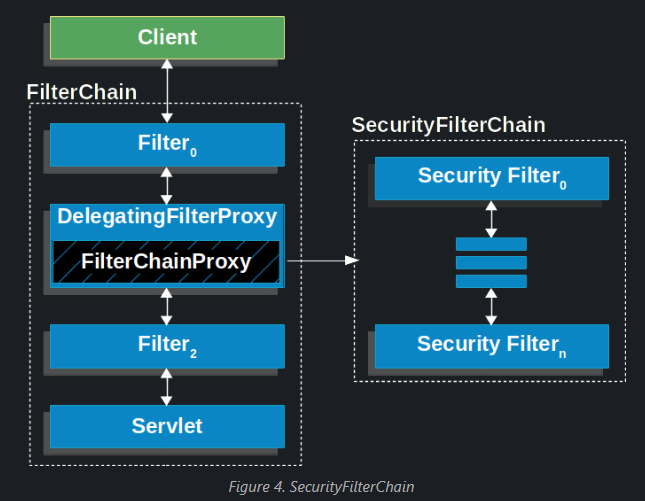
우선 클리이언트의 Request가 오면 Filter chain을 거쳐 servlet(DispatcherServlet)에 도착한다.
이때 Spring Security는 메인 Filter Chain에 DelegatingFilterProxy 라는 필터를 만든다. (DispatcherServlet에 도착하기 전 상태)
조금 더 정확히는 SecurityFilterAutoConfiguration에서 DelegatingFilterProxyRegistrationBean을 만들고 여기서 DelegtingFilterProxy라는 filter를 만들어준다.
DelegatingFiterProxy의 내부에 FilterChainProxy라는 위임대상을 가지고 있다.
FilterChainProxy는 SpringSecurity에서 제공되는 특수 필터로 SpringSecurityFilterChain이라는 이름을 가진 Bean을 호출하여 SecurityFilter의 역할을 수행한다.
위 내용을 정리하면 아래와 같다.
사진과 같이 보며 이해하면 좋을 것이다.
Clinet -> FilterChain -> DelegatingFilterProxy (위임처리) -> FilterChainProxy -> Security Filter
이렇게 Spring Security가 적용되는 과정을 알아보았다.
이제 SecurityFilterChain가 어떻게 동작하는이 알아보자.
SecurityFilterChain
SpringSecurityFilterChain은 List의 형태로 구성되어있다.
이 리스트를 AuthenticationFilter라고 부른다.
WebAsyncManagerIntegrationFilter- SpringMVC Async Hanlder 를 지원하기 위한 필터이다.
- SpringSecurityContextHolder는 ThreadLocal기반(하나의 쓰레드에서 SecurityContext 공유하는 방식)으로 동작하는데, 비동기(Async)와 관련된 기능을 쓸 때에도 SecurityContext를 사용할 수 있도록 만들어주는 필터
SecurityContextPersistenceFilter- SecurityContext가 없으면 만들어주는 필터
- SecurityContext는 Authentication 객체를 보관하는 보관 인터페이스다. (구현체를 만들어 사용)
HeaderWriterFilter- 응답(Response)에 Security와 관련된 헤더 값을 설정해주는 필터
CsrfFilter- 허가된 사이트나 클라이언트의 요청인지 검사하는 역할을 한다.
LogoutFilter- Request가 로그아웃하겠다고 하는것인지 체크한다.
- DefaultLogoutPageGeneratingFilter가 로그아웃 기본 페이지를 생성함
UsernamePasswordAuthenticationFilter- username / password 로 로그인을 하려고 하는지 체크하여 승인이 되면 Authentication을 부여하고 이동 할 페이지로 이동한다.
- AuthenticationManager를 통한 인증 실행
- 성공하면, Authentication 객체를 SecurityContext에 저장 후 AuthenticationSuccessHandler 실행
- 실패하면 AuthenticationFailureHandler 실행
ConcurrentSessionFilter- 동시 접속을 허용할지 체크한다.
BearerTokenAuthenticationFilter- Authorization 해더에 Basic 토큰을 인증해주는 역할을 한다.
RequestCacheAwareFilter- 인증 후, 원래 Request 정보로 재구성하는 필터
- request한 내용을 다음에 필요할 수 있어서 Cache에 담아주는 역할을 한다. 다음 Request가 오면 이전의 Cache값을 줄 수 있다.
SecurityContextHolderAwareRequestFilter- 보안 관련 Servlet 3 스펙을 지원하기 위한 필터라고 한다.
RememberMeAuthenticationFilter- 아직 Authentication 인증이 안된 경우라면 RememberMe 쿠키를 검사해서 인증 처리해준다.
AnonymousAuthenticationFilter- 앞선 필터를 통해 인증이 아직도 안되었으면 해당 유저는 익명 사용자라고 Authentication을 정해주는 역할을 한다. (Authentication이 Null인 것을 방지, Authentication 객체를 새로 생성함(AnonymousAuthenticationToken))
SessionManagementFilter- 세션 변조 공격 방지 (SessionId를 계속 다르게 변경해서 클라이언트에 내려준다)
- 유효하지 않은 세션으로 접근했을 때 URL 핸들링
- 하나의 세션 아이디로 접속하는 최대 세션 수(동시 접속) 설정
- 세션 생성 전략 설정
ExceptionTranslationFilter-> 예외처리에서 사용할 예정이다.- 해당필터 이후에 필터 처리 과정에서 인증 예외(AuthenticationException) 또는 인가 예외(AccessDeniedException)가 발생한 경우, 해당 예외를 캐치하여 처리
FilterSecurityInterceptor- 사용자가 요청한 request의 결과를 리턴해도 되는 인가(Authorization)가 있는지를 체크한다. 해당 필터에서 권한이 없다는 결과가 나온다면 위의 ExcpetionTranslationFilter필터에서 Exception을 처리해준다.
- 인가(Authorization)를 결정하는 AccessDecisionManager에게 접근 권한이 있는지 확인
AuthenticationFilter 필터의 인증방식
여러 필터를 거치면서 앞 선 어떠한 필터에서 인증이 완료되면 해당 요청(Request)은 "인증된 요청"이 되는 것이다.
모든 필터를 거쳤는데 전부 다 인증에 실패하면 어떻게 될까? "인증되지 않은 요청"이 되는 것뿐이다.
그러면 인증이 안 됐으니까 해당 요청이 접근 권한이 없으므로 그에 따른 처리를 해주면 된다. 예를 들어 회원가입 페이지로 :redirect 하거나 Http Error Code : 403에 대한 처리 등을 하면 된다.
Filter Chain 확인하는 방법
WebSecurityConfigurerAdapter을 상속받아 Filter Chain을 만드는 Class위에
@EnableWebSecurity(debug = true)어노테이션을 붙여주면 현재 실행되는 Security Fiter들을 확인할 수 있다.
아래 사진과 같이 나온다.
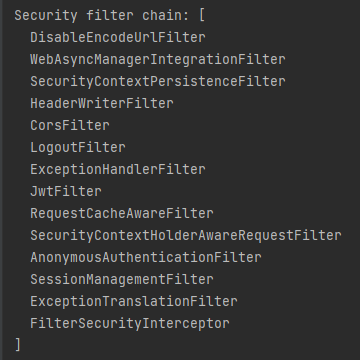
아이디, 패스워드를 이용한 인증담당 필터
여기서 중요한것은 UsernamePasswordAuthenticationFilter 라는 필터이다.
이 필터가 아이디, 패스워드를 이용한 인증을 담당 하는 필터다.
이제 UsernamePasswordAuthenticationFilter가 어떻게 작동하는지 알아보자.
UsernamePasswordAuthenticationFilter 클래스 내의 attemptAuthentication(request, response) 메서드이다.
@Override
	public Authentication attemptAuthentication(HttpServletRequest request, HttpServletResponse response)
			throws AuthenticationException {
		if (this.postOnly && !request.getMethod().equals("POST")) {
			throw new AuthenticationServiceException("Authentication method not supported: " + request.getMethod());
		}
		String username = obtainUsername(request);
		username = (username != null) ? username.trim() : "";
		String password = obtainPassword(request);
		password = (password != null) ? password : "";
		UsernamePasswordAuthenticationToken authRequest = UsernamePasswordAuthenticationToken.unauthenticated(username,
				password);
		// Allow subclasses to set the "details" property
		setDetails(request, authRequest);
		return this.getAuthenticationManager().authenticate(authRequest);
	}
우선 Request로 넘어온 username,password를 통해 UsernamePasswordAuthenticationToken(Authentication)을 생성한다.
그 다음에 참조하고 있던 AuthenticationManager(구현체인 ProviderManager) 에게 인증을 진행하도록 위임한다.
UsernamePasswordAuthenticationToken 은 Authentication 인터페이스의 구현체다.
참고로 Authentication(Interface)을 구현한 구현체여야만 AuthenticationManager에서 인증 과정을 수행할 수 있다.
UsernamePasswordAuthenticationToken은 userName을 principal로 Password를 credentials로 받는다.
public static UsernamePasswordAuthenticationToken unauthenticated(Object principal, Object credentials) {
		return new UsernamePasswordAuthenticationToken(principal, credentials);
	}
이제 AuthenticationManager가 인증을 해주는 데까지 왔다.
이제 AuthenticationManager가 무엇인지를 먼저 알아보고 동작을 살펴볼 것이다.
인증 처리과정
UsernamePasswordAuthenticationFilter -> UsernamePasswordAuthenticationToken(Authentication) -> AuthenticationManager(Interface) -> ProviderManager(Class) -> AuthenticationProvider(Interface)
-
AuthenticationManager(Interface)- 객체를 받아 인증하고 인증되었다면 인증된
Authentication객체를 돌려주는 메서드를 구현하도록 하는 인터페이스다. (isAuthenticated(boolean)값을 TRUE로 바꿔준다.)
- 객체를 받아 인증하고 인증되었다면 인증된
-
ProviderManager(Class)- AuthenticationManager의 구현체로 스프링에서 인증을 담당하는 클래스
- 멤버 변수로 가지고 있는AuthenticationProvider들을에게 인증을 위임처리 후 결과를AuthenticationManager에게 return
- AuthenticationManager의 구현체로 스프링에서 인증을 담당하는 클래스
-
AuthenticationProvider (Interface)- UsernamePasswordAuthenticationToken이 인증이 가능한지 확인 후
ProviderManager에게 전달
- UsernamePasswordAuthenticationToken이 인증이 가능한지 확인 후
Authentication 인터페이스를 구현한 구현체 클래스(ex. UsernamePasswordAuthenticationToken)의 객체가 SecurityContext에 들어가고 SecurityContextHolder에 저장이 된다.
- 자료 출처 SecurityContext, SecurityContextHolder, 이미지자료
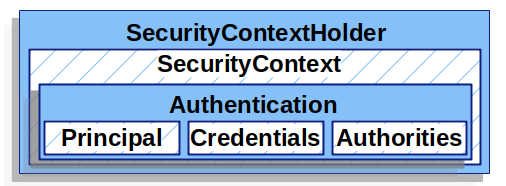
시큐리티를 사용하는 이유 중 하나는 인증된 사용자 정보를 확인하는 것 일 것이고, 인증된 사용자의 정보는SecurityContextHolder를 통해 확인이 가능하다.
Spring Security 적용
자 이제 이론적인부분을 봤으니 Spring Security를 적용해보자.
Security dependency를 추가해주자.
- Test와 jwt토큰을 사용하기위한 dependency도 넣어주었다.
dependencies {
    implementation 'org.springframework.boot:spring-boot-starter-security'
    testImplementation 'org.springframework.security:spring-security-test'
    implementation 'io.jsonwebtoken:jjwt:0.9.1'
}
스프링부트에서는 @EnableAutoConfiguration을통해 SecurityFilterAutoConfiguration클래스를 로드하고 디폴트로 이름이 "springSecurityFilterChain" 빈을 등록해준다.
그리고 @Bean SecurityFilterChain을 등록하면 적용이 된다.
@RequiredArgsConstructor
@EnableWebSecurity(debug = true) // request가 올 떄마다 어떤 filter를 사용하고 있는지 출력을 해준다.
public class SecurityConfig {

    private final UserService userService;

    @Value("${jwt.secret}")
    private String secretKey;

    @Bean
    public SecurityFilterChain securityFilterChain(HttpSecurity httpSecurity) throws Exception {
        return httpSecurity
                .httpBasic().disable()
                .csrf().disable()
                .cors().and()
                .authorizeRequests()
                .antMatchers("/api/v1/users/join", "/api/v1/users/login").permitAll() // join, login은 언제나 가능
                .antMatchers(HttpMethod.POST, "/api/v1/posts/**").authenticated()
                .antMatchers(HttpMethod.POST, "/api/v1/users/{id}/role/change").access("hasRole('ROLE_ADMIN')")
                .antMatchers(HttpMethod.PUT, "/api/**").authenticated()
                .antMatchers(HttpMethod.DELETE, "/api/**").authenticated()
                .antMatchers(HttpMethod.GET, "/api/v1/posts/my").authenticated()
                .and()
                .exceptionHandling()// 예외처리기능 작동
                .authenticationEntryPoint(new CustomAuthenticationEntryPointHandler()) // 인증처리 실패시 처리
                .accessDeniedHandler(new CustomAccessDeniedHandler())// 인가처리 실패시 처리
                .and()
                .sessionManagement()
                .sessionCreationPolicy(SessionCreationPolicy.STATELESS) // STATELESS = jwt사용하는 경우 씀 : 매번 토큰을 사용하는 개념?
                .and()
                .addFilterBefore(new JwtFilter(userService, secretKey), UsernamePasswordAuthenticationFilter.class) //UserNamePasswordAuthenticationFilter적용하기 전에 JWTTokenFilter를 적용 하라는 뜻 입니다.
                .addFilterBefore(new ExceptionHandlerFilter(), JwtFilter.class)
                .build();
    }
}
Filter Chain이 적용되는 URL설정
HttpSecurity를 이용해 스프링 시큐리티 관련 설정을 한다.
현재는 permitAll(), hasRole(), authenticated() 만 사용해서 권한 설정을 해주고 있는데 권한 설정 관련 메소드들은 다음과 같다.
authenticated(): 인증된 사용자의 접근을 허용permitAll(): 모든 사용자 허용denyAll(): 모든 사용자 거부hasRole(Role): Role 에 해당하는 사용자만 허용hasAnyRole(Roles...): Role 중 하나라도 해당하면 허용hasIpAddress: 해당 IP 를 가지고 있는 사용자인 경우 허용
이제 시큐리티 적용이 된것을 확인할 수 있다.
그런데 위의 코드에는 JWT의 내용도 들어있는것을 확인 할 수 있다.
다음에는 JWT를 Security Filter에 적용하는 방법을 알아보자.
참고자료

제가 쓰고 있는 시큐리티 적용은 극히 일부만 적용되어 있는 것 같습니다..
좀 더 깊이 공부하여 여러 시도를 해봐야겠습니다 !
정리를 잘 해주셔서 많은 도움을 받고 갑니다 ^_^