useScroll
스크롤의 움직임에 따라 반응하는 훅이다. window.scrollY와 window.scrollX를 console.log로 찍어보면 스크롤의 위치에 따라 각각의 값을 반환한다. 그 값들을 state에 넣는다. 여기서는 가로축(x) 스크롤이 없으므로 세로축(y)을 기준으로 Hello, World의 색이 변한다. 확인을 위해 영역의 높이를 1000vh로 늘리고, <h1> 태그의 position을 fixed로 설정해두었다.
vh(vertical height)와vw(vertical width)는 높이값과 너비값의 1/100px을 의미한다. 전체 높이가 800px라면 1vh 8px를 의미한다. 1000vh는 8px * 1000 = 8000px가 된다.
해당 컴포넌트가 Unmount되면 scroll 이벤트가 제거되도록 clean-up function도 작성했다.
useFullscreen
const useFullscreen = (callback) => {
  const element = useRef();
  const runCb = (isFull) => {
    if (callback && typeof callback === "function") {
      callback(isFull);
    }
  };
  const triggerFull = () => {
    if (element.current) {
      if (element.current.requestFullscreen) {
        element.current.requestFullscreen();
      } else if (element.current.mozRequestFullScreen) {
        // 파이어폭스
        element.current.mozRequestFullScreen();
      } else if (element.current.webkitRequestFullscreen) {
        // 사파리
        element.current.webkitRequestFullscreen();
      } else if (element.current.msRequestFullscreen) {
        // IE11
        element.current.msRequestFullscreen();
      }
      runCb(true);
    }
  };
  const exitFull = () => {
    document.exitFullscreen();
    if (document.exitFullscreen) {
      document.exitFullscreen();
    } else if (document.mozCancelFullScreen) {
      // 파이어폭스
      document.mozCancelFullScreen();
    } else if (document.webkitExitFullscreen) {
      // 사파리
      document.webkitExitFullscreen();
    } else if (document.msExitFullscreen) {
      // IE11
      document.msExitFullscreen();
    }
    runCb(false);
  };
  return { element, triggerFull, exitFull };
};
이미지를 fullscreen으로 만들었다가 다시 빠져나오는 훅이다. useRef(요소 획득 hook)으로 획득한 요소를 버튼에 따라 전체화면 활성, 비활성을 실행한다. useFullscreen은 callback 함수를 인자로 받고, 다시 내부에서 runCb가 callback을 판단해 참이라면 isFull을 인자로 넘겨준다. isFull은 triggerFull이라면 true, exitFull이라면 false가 된다. 많은 조건문은 주석에서 알 수 있듯, 브라우저마다 다른 환경을 고려한 코드다.
const UseFullscreen = () => {
  const onFulls = (isFull) => {
    console.log(isFull ? "We are Full" : "We are Small");
  };
  const { element, triggerFull, exitFull } = useFullscreen(onFulls);
  return (
    <div>
      <div ref={element}>
        <img
          alt="react"
          src="https://upload.wikimedia.org/wikipedia/commons/thumb/a/a7/React-icon.svg/200px-React-icon.svg.png"
          width="200px"
        />
        <button onClick={exitFull}>Exit Fullscreen</button>
      </div>
      <button onClick={triggerFull}>Make Fullscreen</button>
    </div>
  );
};
브라우저에 노출되는 부분으로, runCb가 넘겨준 isFull이 onFulls에서 동작한다.
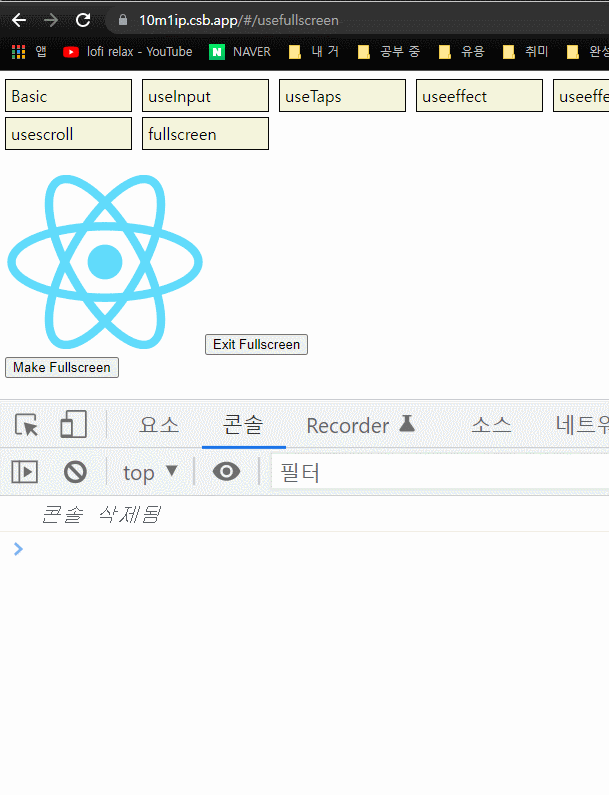
전체 화면 활성 여부에 따라 콘솔 반응이 다른 것을 확인할 수 있다. codesandbox 에디터로 추가했으면 좋으련만, iframe의 문제로 codesandbox에서는 fullscreen이 실행되지 않았다. 대신 남긴 링크에서 확인할 수 있다.
Fullscreen test
useNotification
알림을 울려주는 훅. 버튼을 누르면 알림창에 지정한 멘션을 날린다. Notification API를 통해 알림 설정과 내용을 전할 수 있다. MDN의 Notification 문서를 보면, 먼저 정적 메서드를 호출해 알림 권한을 확인할 수 있다.
const permission = Notification.permission;권한 표현에는 3가지가 있다.
| 상태 | 설명 | |
|---|---|---|
| 1 | granted | 사용자가 의도하여 어플리케이션이 알림을 보낼 수 있도록 허가. |
| 2 | denied | 사용자가 의도하여 어플리케이션이 알림을 보내는 것을 거부. |
| 3 | default | 사용자의 결정은 알 수 없으나, 어플리케이션 기본적으로 denied 와 같이 동작할 것 입니다. |
1번의 여부를 통해 권한 설정이 되어 있지 않으면 Notification.requestPermission() 객체를 생성해 권한을 요청하고, 허용하면 permission을 granted로 바꾼 후 알림을 실행한다. 이미 허용 상태라면 곧바로 알림을 날린다. Notification 객체는 여러 프로퍼티를 가지고 있는데, 해당 코드에서는 알림의 제목인 title을 기본 인자로, 나머지는 옵션 인자로 받는다. 아래는 프로퍼티의 종류.
| 프로퍼티 | 설명 |
|---|---|
| Notification.actions | 알림의 액션 배열 |
| Notification.badge | 알림 여유 공간이 없을 때 표시하는 이미지 URL |
| Notification.body | 알림의 본문 |
| Notification.data | 알림 데이타의 구조화된 복사본 |
| Notification.dir | 알림 글의 방향 |
| Notification.lang | 알림의 언어 코드 |
| Notification.tag | 알림의 ID |
| Notification.icon | 알림의 아이콘 URL |
| Notification.image | 알림의 일부분 이미지의 URL |
| Notification.requireInteraction | 사용자가 클릭까지 유지 여부 Boolean |
| Notification.silent | 알림이 조용해야 하는지 여부 |
| Notification.timestamp | 알림이 생성되었거나 적용 가능한(과거, 현재, 미래) 시간 |
| Notification.title | 알림의 제목 |
| Notification.vibrate | 진동 패턴 |
useAxios
비동기 통신으로 API를 로드하는 훅으로, 먼저 axios를 알아야 한다.
axios는 Node.js와 브라우저를 위한 Promise API를 활용하는 HTTP 통신 라이브러리입니다.
비동기로 HTTP 통신을 할 수 있으며 return을 promise 객체로 해주기 때문에 response 데이터를 다루기 쉽습니다.출처: https://cocoon1787.tistory.com/756
axios를 처음 접한 나에게는 어려운 코드였다. 그러니 차근차근 풀어나가 보자. 주석으로 정리한다.
// aixos의 기본 객체를 import
import defaultAxios from "axios";
import { useEffect, useState } from "react";

// opts는 필수 인자, defaultAxios는 기본 인자
const useAxios = (opts, axiosInstance = defaultAxios) => {
  const [state, setState] = useState({
    // loading: true는 url 호출 중
    loading: true,
    // error 내용, data 내용 담을 오브젝트 선언
    error: null,
    data: null
  });

  // opts에 url이 없으면 동작 안 함.
  if (!opts.url) {
    return;
  }

  // axios 재호출을 위한 변수
  const [trigger, setTrigger] = useState(0);

  // axios 재호출하면 state 재설정 및 trigger 변경
  const refetch = () => {
    setState({
      ...state,
      loading: true
    });
    setTrigger(Date.now());
  };

  useEffect(() => {
    // axios 객체가 url을 받은 후
    axiosInstance(opts)
    // state 변경
      .then((data) => {
        setState({
          ...state,
          // loading: false면 axios 호출 완료
          loading: false,
          // axios가 받은 url의 data 담음
          data
        });
      })
      .catch((error) => {
      // error가 발생하면 data는 null, error 담음
        setState({
          ...state,
          loading: false,
          error
        });
      });
    // 해당 useEffect는 trigger 변경 시 re-rendering
  }, [trigger]);
  // state 모든 프로퍼티와 refetch() 반환
  return { ...state, refetch };
};
생성한 useAxios( ) 사용
import React from "react";
import useAxios from "./useAxios";

const UseAxios = () => {
  const { loading, data, error, refetch } = useAxios({
    url: "https://jsonplaceholder.typicode.com/todos/1"
  });
  return (
    <div>
      <h1>{data && data.status}</h1>
      <h2>{loading && "Loading"}</h2>
      <button onClick={refetch}>Refetch</button>
    </div>
  );
};useAxios의 리턴인 ...state는 {lodaing, data, error}와 {refetch}를 가지고 있으므로, test용 json url을 넣으면 해당 json의 정보를 받아 사용할 수 있게 된다.
정상적으로 데이터를 받으면 200이 화면에 나오고 loading이 사라진다. 버튼을 누르면 다시 API를 호출한다.
이것으로 <노마드 코더> 실전형 리액트 hooks 정리 끝.
참고
<노마드 코더> 실전형 리액트 hooks: https://nomadcoders.co/react-hooks-introduction/lobby
vh& vw 설명 블로그: https://webclub.tistory.com/356
Axios 설명 블로그: https://cocoon1787.tistory.com/756
Test 용 json 제공 사이트 JSONPlaceholder: https://jsonplaceholder.typicode.com/
MDN Notification document: https://developer.mozilla.org/ko/docs/Web/API/notification