다운로드
사실 최근 범용적으로 쓰이는 IDE는 인텔리제이입니다. 하지만, 인텔리제이에서 톰캣을 사용할 시에는 무료 버전은 사용이 불가능하므로 경우에 따라 특히 교육용으로 이클립스 기반의 Spring Tool Suite(STS)를 사용하는 경우도 존재합니다.
STS의 경우 현 시점 4까지 있는데, STS4의 경우 Spring Boot를 지원하고 있습니다. 이 포스팅에서는 Spring Boot가 아닌 Spring만을 다루는 이전 버전에 대해서 다루고 있습니다.
다운로드 경로
java jdk 1.8버전 : https://jdk.java.net/java-se-ri/8-MR5
STS3 : https://github.com/spring-attic/toolsuite-distribution/wiki/Spring-Tool-Suite-3
Tomcat : https://tomcat.apache.org/download-80.cgi
주의할 것은 jdk 8을 받는 경우 Tomcat 8.5를 받는 것을 권장하며, 10이상을 받지 않는 것이 중요합니다. 버전별 지원하는 것이 다르기 때문에 참고하기 바랍니다.
이클립스에서 Tomcat & 인코딩 설정은 아래 URL을 참고하면 됩니다.
https://velog.io/@red-sprout/JSPServlet-%EC%9D%B4%ED%81%B4%EB%A6%BD%EC%8A%A4-%EC%84%B8%ED%8C%85Tomcat-8
STS
인코딩, Tomcat 설정을 완료하였으면, 기존에 있는 서버 폴더는 삭제해줍니다.
Spring MVC Project Template
Spring MVC Project Template은 Spring MVC 애플리케이션을 빠르게 시작할 수 있도록
프로젝트 구조와 설정을 제공하는 템플릿으로, 전체적인 프로젝트 구조와 Spring MVC 프로젝트에 사용되는 필수적인 '라이브러리 의존성', 'web.xml', 'Spring 설정 파일' 등으로 구성되어 있습니다.
이와 같은 것들이 최근에는 Spring Boot로 대체되는 추세입니다. 다만, 학습의 목적으로 설정을 하나하나 잡아가보도록 하겠습니다.
Maven project 생성
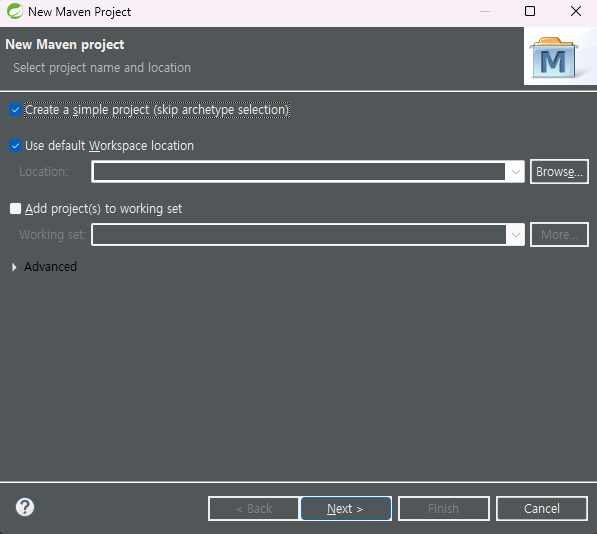
우선 아래와 같이 Maven project를 만들어줍니다.

Create a simple project를 생성하고
Group Id, Artifact Id, Packing을 아래와 같이 설정합니다.
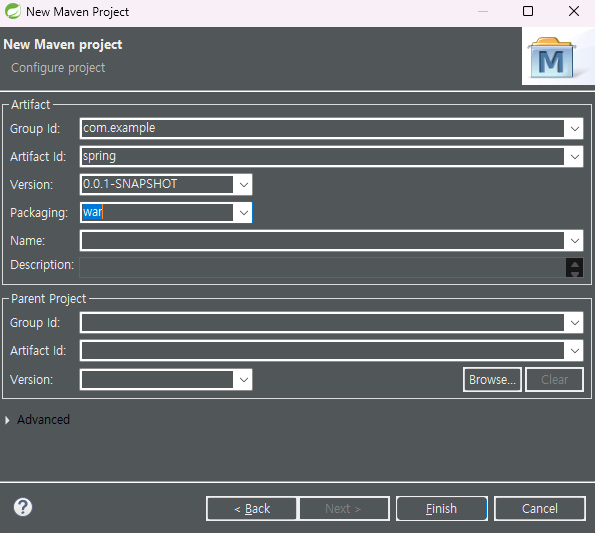
Artifact Id는 후에 배포할 때 jar 또는 war 형태로 배포하게 될건데, 이것의 파일명이 바로 Artifact Id가 되고, 그냥 쉽게 생각하면 프로젝트명이 됩니다.
Group Id는 추가적인 프로젝트 식별자라 생각하면 됩니다. 패키지랑 네이밍이 거의 비슷합니다.
Packing은 jar, war 등 여러 종류가 있습니다. 뭔가 알파벳에서 알 수 있듯 jar는 Java 기준으로 독립적인 애플리케이션을 만들때 사용하고, war는 WEB 환경에서 실행될 JSP 등과 같은 애플리케이션에 포커스를 두고 있습니다.
Maven 설정 파일 세팅
처음 눈에 띄는 파일은 pom.xml일 겁니다. 이 파일에 다음과 같은 설정을 추가합니다.
<?xml version="1.0" encoding="UTF-8"?>
<project xmlns="http://maven.apache.org/POM/4.0.0" xmlns:xsi="http://www.w3.org/2001/XMLSchema-instance"
	xsi:schemaLocation="http://maven.apache.org/POM/4.0.0 https://maven.apache.org/maven-v4_0_0.xsd">
	<modelVersion>4.0.0</modelVersion>
	<groupId>com.example</groupId>
	<artifactId>spring</artifactId>
	<name>springProject</name>
	<packaging>war</packaging>
	<version>1.0.0-BUILD-SNAPSHOT</version>

	<properties>
		<java-version>1.8</java-version>
		<org.springframework-version>5.3.14</org.springframework-version>
		<org.aspectj-version>1.6.10</org.aspectj-version>
		<org.slf4j-version>1.6.6</org.slf4j-version>
	</properties>


	<dependencies>
		<dependency>
			<groupId>org.springframework</groupId>
			<artifactId>spring-context</artifactId>
			<version>${org.springframework-version}</version>
			<exclusions>
				<!-- Exclude Commons Logging in favor of SLF4j -->
				<exclusion>
					<groupId>commons-logging</groupId>
					<artifactId>commons-logging</artifactId>
				 </exclusion>
			</exclusions>
		</dependency>
		<dependency>
			<groupId>org.springframework</groupId>
			<artifactId>spring-webmvc</artifactId>
			<version>${org.springframework-version}</version>
		</dependency>

		<!-- AspectJ -->
		<dependency>
			<groupId>org.aspectj</groupId>
			<artifactId>aspectjrt</artifactId>
			<version>${org.aspectj-version}</version>
		</dependency>

		<!-- Logging -->
		<dependency>
			<groupId>org.slf4j</groupId>
			<artifactId>slf4j-api</artifactId>
			<version>${org.slf4j-version}</version>
		</dependency>
		<dependency>
			<groupId>org.slf4j</groupId>
			<artifactId>jcl-over-slf4j</artifactId>
			<version>${org.slf4j-version}</version>
			<scope>runtime</scope>
		</dependency>
		<dependency>
			<groupId>org.slf4j</groupId>
			<artifactId>slf4j-log4j12</artifactId>
			<version>${org.slf4j-version}</version>
			<scope>runtime</scope>
		</dependency>
		<dependency>
			<groupId>log4j</groupId>
			<artifactId>log4j</artifactId>
			<version>1.2.15</version>
			<exclusions>
				<exclusion>
					<groupId>javax.mail</groupId>
					<artifactId>mail</artifactId>
				</exclusion>
				<exclusion>
					<groupId>javax.jms</groupId>
					<artifactId>jms</artifactId>
				</exclusion>
				<exclusion>
					<groupId>com.sun.jdmk</groupId>
					<artifactId>jmxtools</artifactId>
				</exclusion>
				<exclusion>
					<groupId>com.sun.jmx</groupId>
					<artifactId>jmxri</artifactId>
				</exclusion>
			</exclusions>
			<scope>runtime</scope>
		</dependency>

		<!-- @Inject -->
		<dependency>
			<groupId>javax.inject</groupId>
			<artifactId>javax.inject</artifactId>
			<version>1</version>
		</dependency>

		<!-- Servlet -->
		<dependency>
			<groupId>javax.servlet</groupId>
			<artifactId>servlet-api</artifactId>
			<version>2.5</version>
			<scope>provided</scope>
		</dependency>
		<dependency>
			<groupId>javax.servlet.jsp</groupId>
			<artifactId>jsp-api</artifactId>
			<version>2.1</version>
			<scope>provided</scope>
		</dependency>
		<dependency>
			<groupId>javax.servlet</groupId>
			<artifactId>jstl</artifactId>
			<version>1.2</version>
		</dependency>

		<!-- Test -->
		<dependency>
			<groupId>junit</groupId>
			<artifactId>junit</artifactId>
			<version>4.7</version>
			<scope>test</scope>
		</dependency>

	</dependencies>


    <build>
        <plugins>
            <plugin>
                <artifactId>maven-eclipse-plugin</artifactId>
                <version>2.9</version>
                <configuration>
                    <additionalProjectnatures>
                        <projectnature>org.springframework.ide.eclipse.core.springnature</projectnature>
                    </additionalProjectnatures>
                    <additionalBuildcommands>
                        <buildcommand>org.springframework.ide.eclipse.core.springbuilder</buildcommand>
                    </additionalBuildcommands>
                    <downloadSources>true</downloadSources>
                    <downloadJavadocs>true</downloadJavadocs>
                </configuration>
            </plugin>
            <plugin>
                <groupId>org.apache.maven.plugins</groupId>
                <artifactId>maven-compiler-plugin</artifactId>
                <version>2.5.1</version>
                <configuration>
                    <source>1.6</source>
                    <target>1.6</target>
                    <compilerArgument>-Xlint:all</compilerArgument>
                    <showWarnings>true</showWarnings>
                    <showDeprecation>true</showDeprecation>
                </configuration>
            </plugin>
            <plugin>
                <groupId>org.codehaus.mojo</groupId>
                <artifactId>exec-maven-plugin</artifactId>
                <version>1.2.1</version>
                <configuration>
                    <mainClass>org.test.int1.Main</mainClass>
                </configuration>
            </plugin>
        </plugins>
    </build>
</project>
찬찬히 읽어보면 알 수 있지만 기본적인 이름과 버전등이 담겨있는 것을 알 수 있습니다.
POM(Project Object Model)이란 maven의 빌드정보를 가지고 있는 파일이라 볼 수 있습니다.
다른 태그보다도 특히 다룰 일이 많은 태그는 <dependency> 태그입니다. 말 그대로 의존하는 라이브러리를 담고 있는 태그로, 작성한 것을 보면 특히 servlet 같은 클라이언트의 요청을 받아 응답하는 객체, junit 같은 테스트 환경을 제공하는 것 등을 작성하는 것을 볼 수 있습니다.
MyBatis든, db connection 관련이든 dependency 태그를 작성해서 추가할 수 있습니다. 예를 들어서 아래와 같습니다.
...
		<!-- Lombok 라이브러리 -->
		<dependency>
		    <groupId>org.projectlombok</groupId>
		    <artifactId>lombok</artifactId>
		    <version>1.18.32</version>
		    <scope>provided</scope>
		</dependency>

		<!-- 1. 데이터베이스(오라클, 마이바티스) 관련 라이브러리 -->
		<!-- 1_1 ojdbc6 라이브러리 -->
		<dependency>
		    <groupId>com.oracle.database.jdbc</groupId>
		    <artifactId>ojdbc6</artifactId>
		    <version>11.2.0.4</version>
		</dependency>

		<!-- 1_2 스프링에서 JDBC기능을 사용하기위해서는 별도의 라이브러리가 필요함 -->
		<dependency>
		    <groupId>org.springframework</groupId>
		    <artifactId>spring-jdbc</artifactId>
		    <version>${org.springframework-version}</version>
		</dependency>

		<!-- 1_3. 순수 MyBatis라이브러리 -->
		<dependency>
		    <groupId>org.mybatis</groupId>
		    <artifactId>mybatis</artifactId>
		    <version>3.5.7</version>
		</dependency>

		<!-- 1_4. 스프링에서 MyBatis을 사용하기 위한 라이브러리 -->
		<dependency>
		    <groupId>org.mybatis</groupId>
		    <artifactId>mybatis-spring</artifactId>
		    <version>2.0.6</version>
		</dependency>

		<!-- 1_5. 커넥션풀을 사용하기위한 라이브러리 -->
		<dependency>
		    <groupId>commons-dbcp</groupId>
		    <artifactId>commons-dbcp</artifactId>
		    <version>1.4</version>
		</dependency>
...
다만 lombok과 taglib 등 일부 기능들은 제대로 작동하지 않을 수도 있습니다. 그럴 경우는 직접 추가를 해주면 됩니다.
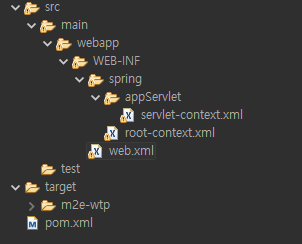
파일구조
다음과 같이 파일구조를 만들어줍니다. WEB-INF에 들어갈 모든 파일들은 war로 사용하여 웹 환경에 배포되게 됩니다.
web.xml에는 아래와 같은 코드를 넣어줍니다.
<?xml version="1.0" encoding="UTF-8"?>
<web-app version="2.5" xmlns="http://java.sun.com/xml/ns/javaee"
	xmlns:xsi="http://www.w3.org/2001/XMLSchema-instance"
	xsi:schemaLocation="http://java.sun.com/xml/ns/javaee https://java.sun.com/xml/ns/javaee/web-app_2_5.xsd">

	<!-- The definition of the Root Spring Container shared by all Servlets and Filters -->
	<context-param>
		<param-name>contextConfigLocation</param-name>
		<param-value>
			/WEB-INF/spring/root-context.xml
		</param-value>
	</context-param>

	<!-- Creates the Spring Container shared by all Servlets and Filters -->
	<listener>
		<listener-class>org.springframework.web.context.ContextLoaderListener</listener-class>
	</listener>

	<!-- Processes application requests -->
	<servlet>
		<servlet-name>appServlet</servlet-name>
		<servlet-class>org.springframework.web.servlet.DispatcherServlet</servlet-class>
		<init-param>
			<param-name>contextConfigLocation</param-name>
			<param-value>/WEB-INF/spring/appServlet/servlet-context.xml</param-value>
		</init-param>
		<load-on-startup>1</load-on-startup>
	</servlet>

	<servlet-mapping>
		<servlet-name>appServlet</servlet-name>
		<url-pattern>/</url-pattern>
	</servlet-mapping>

</web-app>
잘 읽어보면 웹에서 핵심이 되는 객체인 servlet에 해당하는 태그 <servlet>에서 DispatcherServlet이라는 것이 보입니다. 클라이언트의 request를 servlet으로 직접 전달하는 대신 이 DispatcherServlet을 한번 거쳐가게 되면서 필터 작업 등을 수행하게 됩니다. 이는 요청을 서블릿으로, 즉 적절한 컨트롤러와 메소드를 찾는 작업을 거치게 되는데, 이는 스프링의 핵심이라 볼 수 있습니다.
그리고 servlet-context.xml은 아래와 같습니다.
<?xml version="1.0" encoding="UTF-8"?>
<beans:beans xmlns="http://www.springframework.org/schema/mvc"
	xmlns:xsi="http://www.w3.org/2001/XMLSchema-instance"
	xmlns:beans="http://www.springframework.org/schema/beans"
	xmlns:context="http://www.springframework.org/schema/context"
	xsi:schemaLocation="http://www.springframework.org/schema/mvc https://www.springframework.org/schema/mvc/spring-mvc.xsd
		http://www.springframework.org/schema/beans https://www.springframework.org/schema/beans/spring-beans.xsd
		http://www.springframework.org/schema/context https://www.springframework.org/schema/context/spring-context.xsd">

	<!-- DispatcherServlet Context: defines this servlet's request-processing infrastructure -->

	<!-- Enables the Spring MVC @Controller programming model -->
	<annotation-driven />

	<!-- Handles HTTP GET requests for /resources/** by efficiently serving up static resources in the ${webappRoot}/resources directory -->
	<resources mapping="/resources/**" location="/resources/" />

	<!-- Resolves views selected for rendering by @Controllers to .jsp resources in the /WEB-INF/views directory -->
	<beans:bean class="org.springframework.web.servlet.view.InternalResourceViewResolver">
		<beans:property name="prefix" value="/WEB-INF/views/" />
		<beans:property name="suffix" value=".jsp" />
	</beans:bean>

	<context:component-scan base-package="com.example.spring" />

</beans:beans>
servlet-context는 bean을 다루고 있습니다. bean은 스프링에서 컨테이너가 관리하는 객체로, 기존에는 어떤 객체를 생성할 때 아래와 같이 프로그래머가 직접 new를 입력하는 방식을 사용하였습니다.
Book book = new Book();하지만, bean을 사용하면 인터페이스만 만들어놓고 annotation을 달아놓으면 컨테이너가 알아서 생성주기를 관리합니다. 즉, new라는 키워드가 머릿속에 삭제되는 꼴입니다.
(참고) 컨테이너에서 객체를 가져와 사용할 때는 일반적으로 싱글턴 방식으로 생성된 객체를 많이 사용합니다만, 경우에 따라 프로토타입 패턴(기존 객체들을 복사하는 패턴)인 경우도 있습니다.
root-context.xml은 아래와 같이 설정합니다.
<?xml version="1.0" encoding="UTF-8"?>
<beans xmlns="http://www.springframework.org/schema/beans"
	xmlns:xsi="http://www.w3.org/2001/XMLSchema-instance"
	xsi:schemaLocation="http://www.springframework.org/schema/beans https://www.springframework.org/schema/beans/spring-beans.xsd">


</beans>
서버를 실행하면서 바로 세팅해주는 일반적인 빈을 등록해주는 파일이 바로 root-context입니다.
정상적으로 실행되는지 확인하려면 webapp 내부에 index.jsp 파일을 작성해서 잘 실행되는지 확인합니다.
<%@ page language="java" contentType="text/html; charset=UTF-8"
    pageEncoding="UTF-8"%>
<!DOCTYPE html>
<html>
<head>
<meta charset="UTF-8">
<title>Insert title here</title>
</head>
<body>
	<h1>Hello Spring!</h1>
</body>
</html>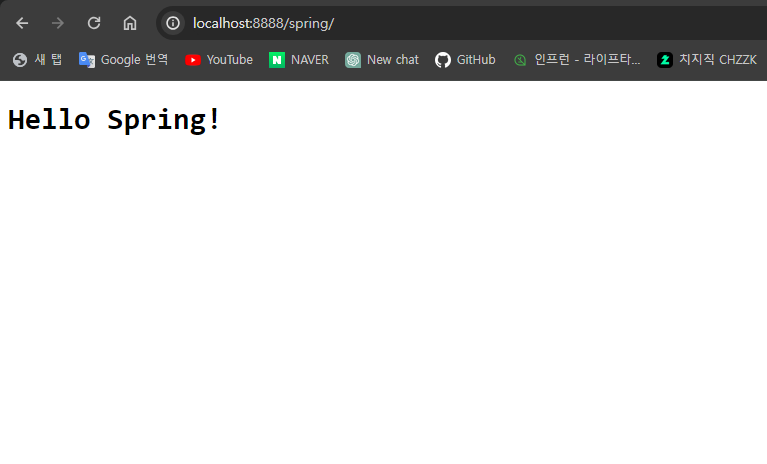
참고
- pom에 대해서 https://coding-hyeok.tistory.com/47
- DispatcherServlet 동작과정 https://mangkyu.tistory.com/216