✏️ 도입
1주차 프로젝트에서
MVC 패턴을 적용해보고 싶다는 마음이 들었고,
사실 MVC 패턴에 대한 기억이 가물가물했기에
복습을 겸해서 다시 살펴보게 되었습니다.
🧩 MVC 패턴이란?
프로그래밍에서 MVC 패턴은
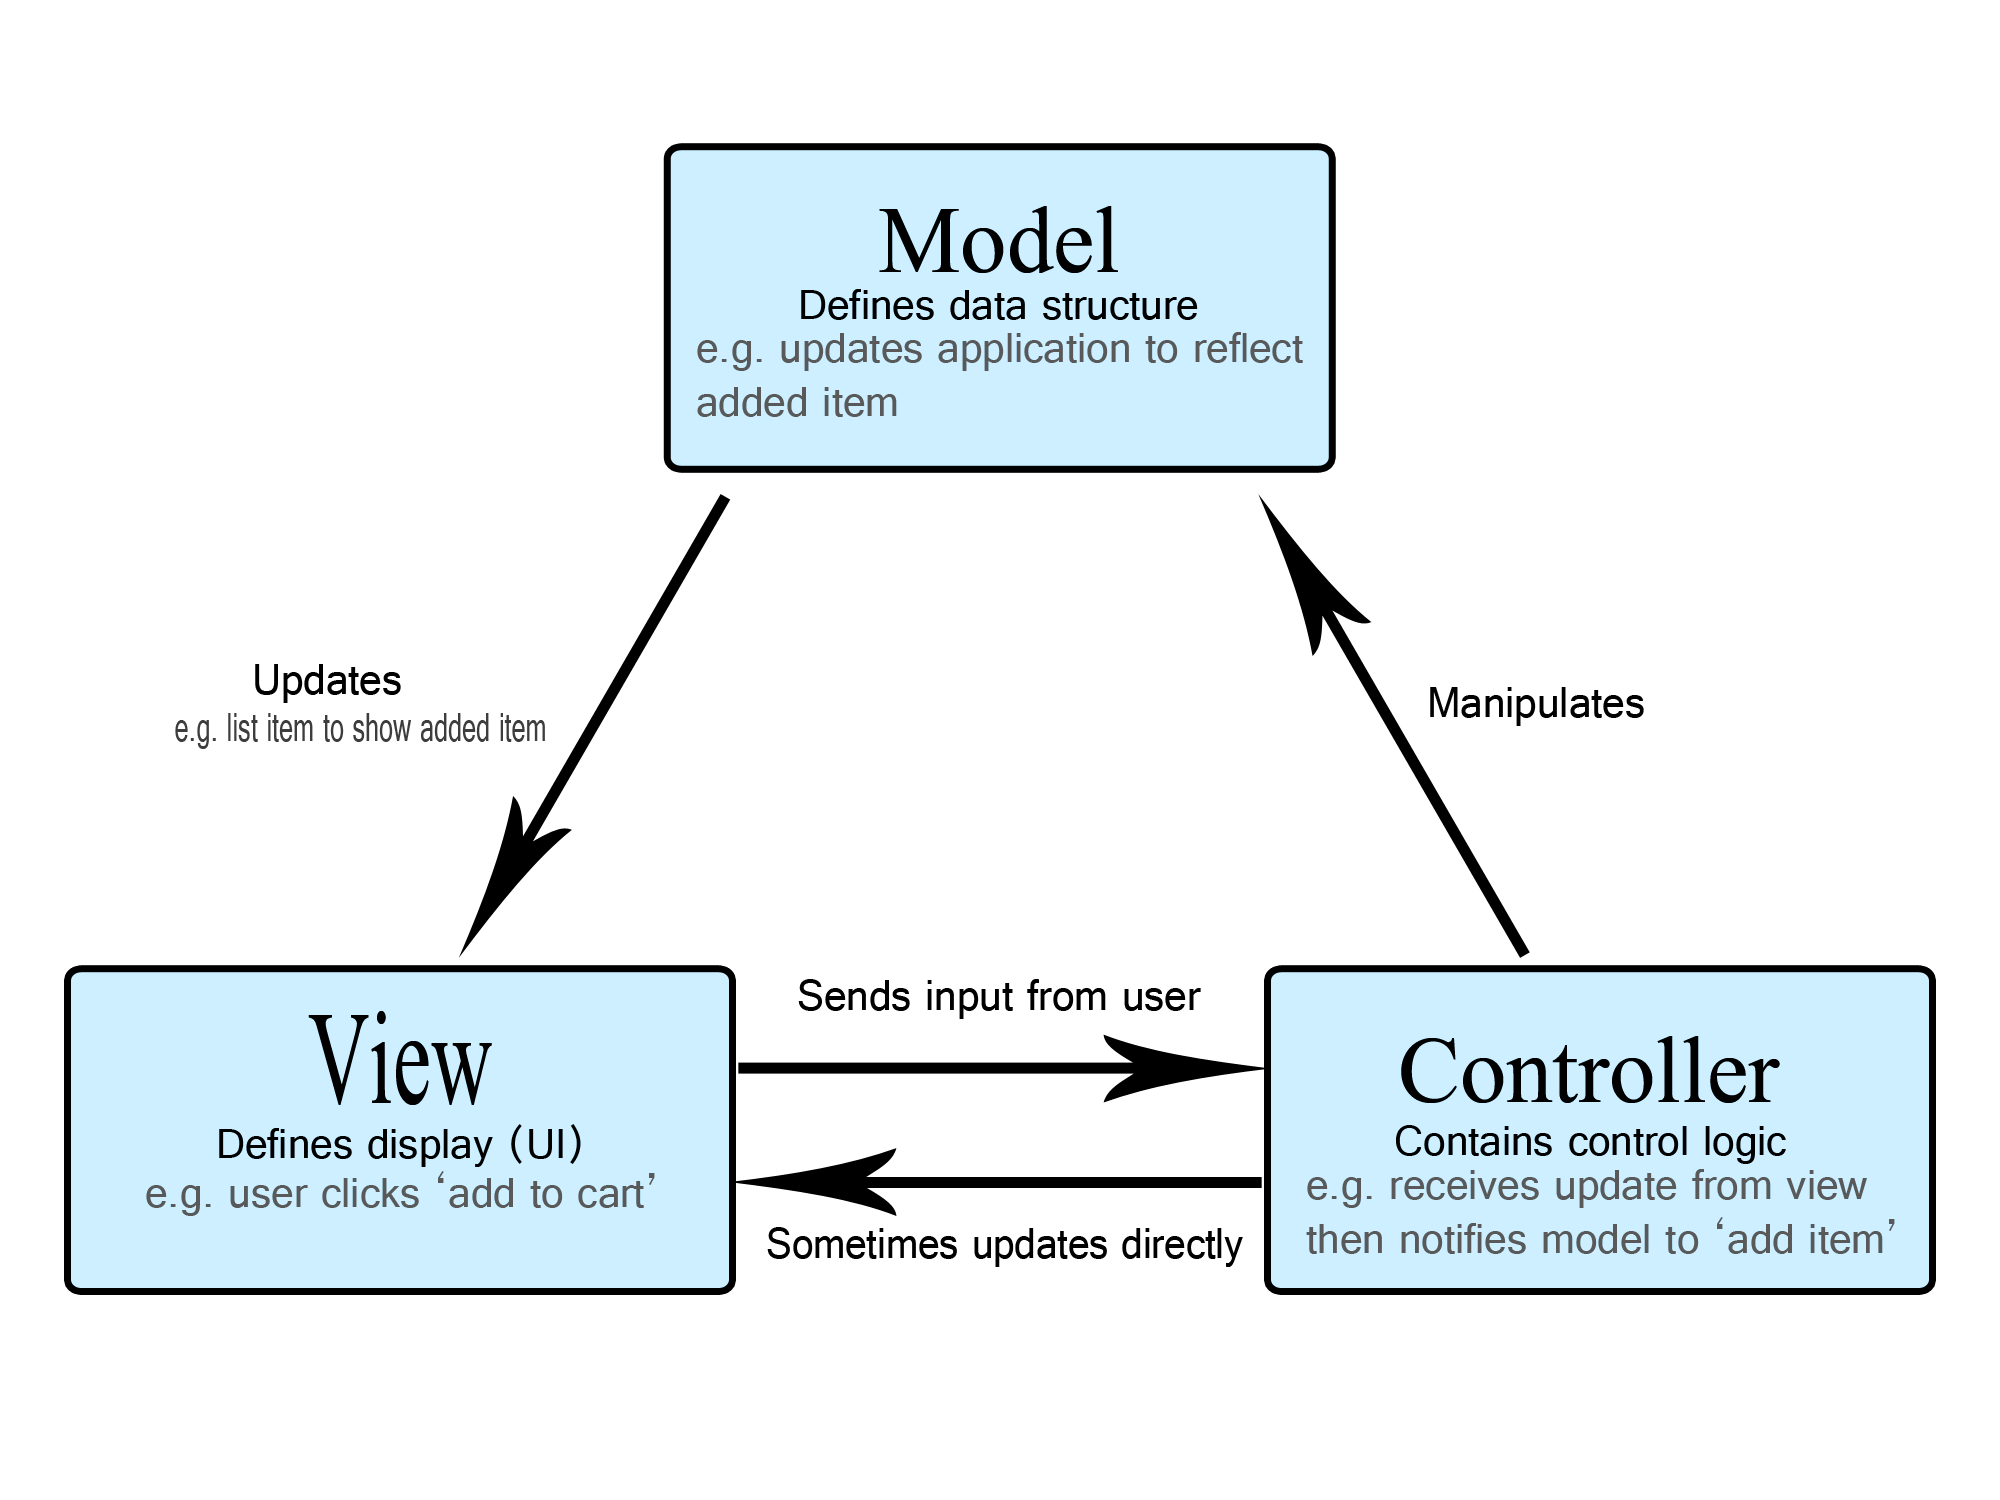
Model–View–Controller의 약자로,
애플리케이션을 “역할별로 분리해서 관리”하기 위한 대표적인 구조입니다.
| 구성 요소 | 역할 | 비유 |
|---|---|---|
| Model | 데이터 및 로직 관리 | 시나리오(대본) |
| View | 사용자에게 보여지는 화면 | 촬영된 장면(화면) |
| Controller | 입력을 받아 Model과 View를 연결 | 조감독(지시자) |
이렇게 나누면 코드가 깔끔해지고,
화면(View)을 바꿔도 내부 로직(Model)은 그대로 둘 수 있습니다.
🧩 App, Model, View, Controller
1️⃣ App
- 프로그램의 진입점(Entry Point) 역할
- Controller를 호출해 전체 흐름을 시작시킴
- MVC의 “외부 조립자” 같은 존재로, 프로그램 전체의 시동 버튼
// App.js
import CalculatorModel from "./model/CalculatorModel.js";
import CalculatorView from "./view/CalculatorView.js";
import CalculatorController from "./controller/CalculatorController.js";

class App {
  async run() {
    const model = new CalculatorModel();
    const view = new CalculatorView();
    const controller = new CalculatorController(model, view);

    await controller.start();
  }
}

export default App;
2️⃣ Model
- 데이터를 보관하고 계산하는 역할
- 예: DB 접근, 데이터 검증, 연산 로직
class CalculatorModel {
  add(numbers) {
    return numbers.reduce((acc, cur) => acc + cur, 0);
  }
}
3️⃣ View
- 사용자와의 입출력(UI) 담당
- 콘솔, HTML, React 컴포넌트 등
class CalculatorView {
  async getInput() {
    return await Console.readLineAsync("문자열을 입력하세요: ");
  }
  render(result) {
    Console.print(`결과 : ${result}`);
  }
}
4️⃣ Controller
- View로부터 입력을 받고
Model을 조작한 뒤
결과를 View로 전달
class CalculatorController {
  constructor(model, view) {
    this.model = model;
    this.view = view;
  }

  async start() {
    const input = await this.view.getInput();
    const numbers = input.split(",").map(Number);
    const result = this.model.add(numbers);
    this.view.render(result);
  }
}
🧩 그럼 Model과 Service는 무슨 차이?!
둘 다 로직을 담지만, “책임의 범위”가 다릅니다.
| 항목 | Model | Service |
|---|---|---|
| 정의 | 데이터와 관련된 로직 (저장, 조회, 계산 등) | 비즈니스 규칙과 시나리오 정의 |
| 책임 | 데이터의 “모양”과 “조작 방법” 정의 | 사용자의 “요구사항”을 해결하는 절차 결정 |
| 관심사 | 데이터 구조, 계산, 저장소 인터페이스 | 검증, 정책, 예외처리, 순서 제어 |
| 알고 있는 것 | 데이터 자체 (User, Order, Product 등) | 도메인 규칙 (회원가입, 주문, 결제 등) |
| 모르는 것 | 업무 규칙, 정책 | DB 세부 구현, UI |
| 테스트 방식 | 단위 테스트 (입력 → 계산 결과) | 통합 테스트 (흐름, 정책 검증) |
| 예시 | add(numbers) → 합 계산 | calculate(input) → 문자열 파싱 + Model 호출 |
| 비유 | 🧑🎭 배우 (역할 수행) | ⚙️ 촬영감독 (언제 어떻게 연기할지 지시) |
💡 한 문장으로 요약하자면
Model은 “데이터를 다루는 방법”을 알고,
Service는 “그 데이터를 언제·어떻게 쓸지”를 안다.
🧱 회원가입으로 MVC 패턴 이해하기
회원가입 기능을 예로 들어보겠습니다.
사용자가 이메일과 비밀번호를 입력하면,
계정이 생성되고 환영 메일이 발송되는 시나리오입니다.
🧩 Model (데이터 로직)
// domain/User.js
export class User {
  constructor({ id, email, passwordHash }) {
    this.id = id;
    this.email = email;
    this.passwordHash = passwordHash;
  }

  setPasswordHash(hash) {
    this.passwordHash = hash;
  }
}
🗂️ Repository (저장소)
// domain/UserRepository.js
export class UserRepository {
  constructor() {
    this._store = new Map();
  }

  async findByEmail(email) {
    return this._store.get(email);
  }

  async save(user) {
    this._store.set(user.email, user);
    return user;
  }
}
⚙️ Service (비즈니스 로직)
// application/UserService.js
import { User } from "../domain/User.js";

export class UserService {
  constructor({ userRepository, passwordHasher, mailer }) {
    this.userRepository = userRepository;
    this.passwordHasher = passwordHasher;
    this.mailer = mailer;
  }

  async signUp({ email, plainPassword }) {
    if (!/^[^\s@]+@[^\s@]+\.[^\s@]+$/.test(email))
      throw new Error("이메일 형식이 올바르지 않습니다.");

    if (await this.userRepository.findByEmail(email))
      throw new Error("이미 가입된 이메일입니다.");

    const hash = await this.passwordHasher.hash(plainPassword);
    const user = new User({ id: crypto.randomUUID(), email });
    user.setPasswordHash(hash);

    await this.userRepository.save(user);
    await this.mailer.sendWelcome(email);

    return user;
  }
}
🎮 Controller
// interface/UserController.js
export class UserController {
  constructor(userService) {
    this.userService = userService;
  }

  async postSignUp(req, res) {
    try {
      const { email, password } = req.body;
      const user = await this.userService.signUp({ email, plainPassword: password });
      res.status(201).json({ ok: true, user });
    } catch (e) {
      res.status(400).json({ ok: false, message: e.message });
    }
  }
}
🧰 App 조립 예 (의존성 주입, 실행 진입점)
아래 예시는 도메인/인프라/애플리케이션/인터페이스 레이어를 실제로 와이어링(조립)하는 코드입니다.
테스트가 쉬워지도록 의존성 주입(DI) 방식으로 구성했습니다.
// App.js
import { UserRepository } from "./domain/UserRepository.js";
import { PasswordHasher } from "./infra/PasswordHasher.js";
import { MailerPort } from "./infra/MailerPort.js";
import { UserService } from "./application/UserService.js";
import { UserController } from "./interface/UserController.js";

export function createAppContainer() {
  const userRepository = new UserRepository();
  const passwordHasher = new PasswordHasher();
  const mailer = new MailerPort();

  const userService = new UserService({
    userRepository,
    passwordHasher,
    mailer,
  });

  const userController = new UserController(userService);

  return {
    userRepository,
    passwordHasher,
    mailer,
    userService,
    userController,
  };
}
Express 같은 웹 서버를 쓴다면 라우팅은 이렇게 붙이면 된다고 합니다.
// server.js
import express from "express";
import bodyParser from "body-parser";
import { createAppContainer } from "./App.js";

const app = express();
app.use(bodyParser.json());

const { userController } = createAppContainer();

app.post("/api/sign-up", (req, res) => userController.postSignUp(req, res));

app.get("/health", (_req, res) => res.status(200).send("ok"));

const PORT = process.env.PORT ?? 3000;
app.listen(PORT, () => {
  console.log(`✅ Server listening on http://localhost:${PORT}`);
});
✅ 이렇게 조립하면 좋은 점
- 교체 가능성: 구성요소를 쉽게 교체 가능
- 테스트 용이성: 서버 없이도 테스트 가능
- 관심사 분리: 실행, 서비스, 데이터 접근 분리
🧭 정리
| 구분 | 역할 | 비유 |
|---|---|---|
| App | 프로그램 전체 실행을 지휘 | 🎬 감독 |
| Controller | 흐름 제어 (입력–처리–출력 연결) | 🎥 조감독 |
| Service | 규칙과 시나리오 (비즈니스 로직) | ⚙️ 촬영감독 |
| Model | 데이터 구조 및 연산 (데이터 로직) | 🧑🎭 배우 |
| View | 사용자와 소통하는 부분 | 📺 화면 |
💭 느낀 점
회원가입 기능을 예시로 MVC패턴에 대해서 공부했는데
공부하면서 단일책임원칙?!
분업해서 열심히 일하는 공장이 떠올랐습니다.
이렇게 역할을 분리하면
테스트 코드 작성이나 유지보수할 때 편리할 것 같다는 생각이 들었기에
1주차 프로젝트에서도 MVC패턴을 잘 적용해보고 싶어졌습니다.

1.01^365