실습 😎
DI03 학생정보
Student.java


package DI03;

package DI03;

public class Student {
    private String name;
    private int  age;
    private String gradeNum;
    private String classNum;

    //getter ,setter을 했지만
    //생성자가 있기때문에 생성자가 우선순위가 됨 그래서
    //나중에 constructor-arg을 사용해줘야함

    public Student(String name, int age, String gradeNum,  String classNum ) {
    	this.name = name;
    	this.age = age;
    	this.gradeNum = gradeNum;
    	this.classNum = classNum;


    }


	public String getName() {
		return name;
	}


	public int getAge() {
		return age;
	}


	public String getGradeNum() {
		return gradeNum;
	}


	public String getClassNum() {
		return classNum;
	}


	public void setName(String name) {
		this.name = name;
	}

	public void setAge(int age) {
		this.age = age;
	}

	public void setGradeNum(String gradeNum) {
		this.gradeNum = gradeNum;
	}

	public void setClassNum(String classNum) {
		this.classNum = classNum;
	}


}
StudentInfo.java
package DI03;
public class StudentInfo {
private Student student;
public StudentInfo(Student student) { //생성자 만듬
this.student = student; //1 student를 먼저 넣어줫기때문에 먼저 출력
}
public void getStudentInfo() { //2 getStudentInfo 가 출력
if(student != null) {
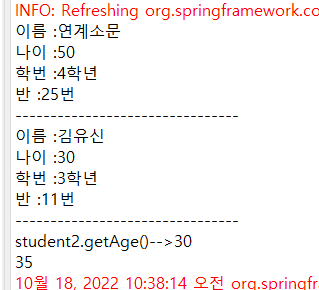
System.out.println("이름 :" + student.getName());
System.out.println("나이 :" + student.getAge());
System.out.println("학번 :" + student.getGradeNum());
System.out.println("반 :" + student.getClassNum());
System.out.println("--------------------------------" );
}
}
public Student getStudent() {
return student;
}
public void setStudent(Student student) {
this.student = student;
}
}
MainClass03.java


package DI03;

import org.springframework.context.support.AbstractApplicationContext;
import org.springframework.context.support.GenericXmlApplicationContext;

public class MainClass03 {

	public static void main(String[] args) {
		  String configLocation = "classpath:applicationCTX03.xml";
		  AbstractApplicationContext ctx = new GenericXmlApplicationContext(configLocation);
		  StudentInfo studentInfo = ctx.getBean("studentInfo", StudentInfo.class);
		  studentInfo.getStudentInfo();      //stydentInfo만 불럿지만 참조되어있는 student까지 같이 불러짐 -->student가 먼저 실행되어짐

		  Student student2 = ctx.getBean("student2",Student.class);
		  studentInfo.setStudent(student2);
		  studentInfo.getStudentInfo();
		  System.out.println("student2.getAge()-->"+student2.getAge());
		  System.out.println(student2.getAge()+5);
		  ctx.close();


	}

}
bean id="student1"
1) name 연개소문
2) age 50
3) gradeNum 4학년
4) classNum 25번
bean id="studentInfo"
bean id="student1" 참조해서 넣어라
bean id="student2"
1) name 김유신
2) age 30
3) gradeNum 3학년
4) classNum 11번
setter 설정은 되어있지만 Student.java 에서 생성자가 설정되어있어서 생성자가 우선순위가 되어있기 때문에 생성자 방식으로 값을 넣어줘야함
applicationCTX03.xml

<xml version="1.0" encoding="UTF-8">
<beans xmlns="http://www.springframework.org/schema/beans"
	xmlns:xsi="http://www.w3.org/2001/XMLSchema-instance"
	xsi:schemaLocation="http://www.springframework.org/schema/beans http://www.springframework.org/schema/beans/spring-beans.xsd">

	 <bean id="student1" class="DI03.Student">  //생성자방식
		<constructor-arg  value="연계소문"></constructor-arg>
		<constructor-arg   value="50"></constructor-arg>
		<constructor-arg   value="4학년"></constructor-arg>
		<constructor-arg   value="25번"></constructor-arg>
	</bean>
	<bean id="studentInfo" class="DI03.StudentInfo">   //참조되어있기때문에 먼저 들어가서 값이 뜸

	<constructor-arg ><ref bean="student1"></ref></constructor-arg>
                          //객체를 참조할땐 무조건 ref쓰기
      <bean id="student2" class="DI03.Student">  //생성자방식
	<constructor-arg value="김유신"></constructor-arg>
		<constructor-arg value="30"></constructor-arg>
		<constructor-arg value="3학년"></constructor-arg>
		<constructor-arg value="11번"></constructor-arg>
	</bean>


	</bean>


</beans>
생성자 방식 으로 값넣는법 🎈
(constructor-arg) 생성자 방식이라 적혀 있는 **순서대로** 넣어줘야함 . 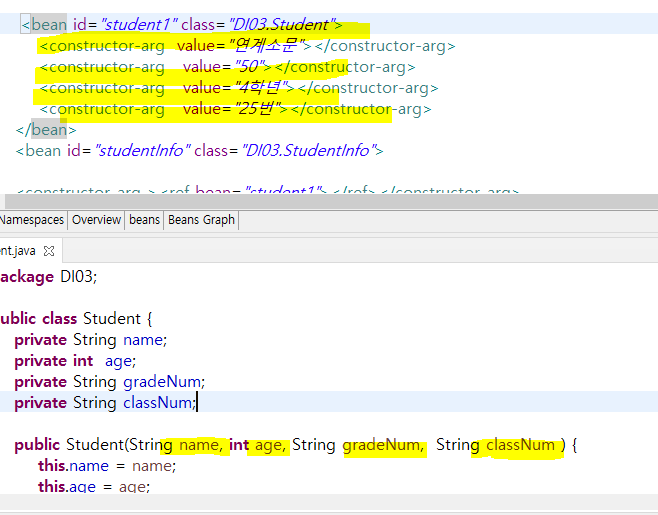
만약 순서를 바꾸고 싶을때 index설정해서 값 넣어주면 바꿀수 있음
int 인데 String 으로 바꿔야 한다면 type 설정해서 값 넣어줘야함
<bean id="student1" class="DI03.Student">
		<constructor-arg  index="1" value="50"  ></constructor-arg>
		<constructor-arg  index="0"  value="연계소문" ></constructor-arg>
		<constructor-arg  type = "java.lang.string" value="4학년"></constructor-arg>
		<constructor-arg   value="25번"></constructor-arg>
	</bean>
DI05 (Map방식)
Map 방식 -> key -value 방식임
CollectionBean.java


package DI05;

import java.util.Map;

public class CollectionBean {
	private Map<String,String> addressList;

	public Map<String, String> getAddressList() {
		return addressList;
	}

	public void setAddressList(Map<String, String> addressList) {
		this.addressList = addressList;
	}


}
MainClass05.java

package DI05;

import java.util.Map;

import org.springframework.context.support.AbstractApplicationContext;
import org.springframework.context.support.GenericXmlApplicationContext;

public class MainClass05 {

	public static void main(String[] args) {
				String configLocation = "classpath:applicationCTX05.xml";
				AbstractApplicationContext ctx = new GenericXmlApplicationContext(configLocation);
				CollectionBean collectionBean = ctx.getBean("collectionBean", CollectionBean.class);
				Map<String , String > addressList = collectionBean.getAddressList();
                //addressList에 키를 받으면 값이 나옴
				System.out.println("홍길동주소:"+ addressList.get("홍길동"));
				System.out.println("중앙주소:"+ addressList.get("중앙"));
				ctx.close();
	}

}
map 방식으로 값 넣는법 🎈
아래와 같이 map entry key value 사용해서 넣음
applicationCTX05.xml


<?xml version="1.0" encoding="UTF-8"?>
<beans xmlns="http://www.springframework.org/schema/beans"
	xmlns:xsi="http://www.w3.org/2001/XMLSchema-instance"
	xsi:schemaLocation="http://www.springframework.org/schema/beans http://www.springframework.org/schema/beans/spring-beans.xsd">

	<bean id="collectionBean" class="DI05.CollectionBean">
		<property name="addressList">
			<map>
				<entry>
					<key>
						<value>홍길동</value>
					</key>
					<value>율도국</value>
				</entry>
				<entry>
					<key>
						<value>중앙</value>
					</key>
					<value>이대캠퍼스</value>
				</entry>

			</map>
		</property>


	</bean>

</beans>
참고 **
처음 bean id 는 Maind에서 getBean으로 이름 설정해줫기때문에 동일하게 적어줘야함
DI06 Method (생성자 + setter 혼합방식)
list 값넣어주는법 🎈
 <list>
		<value>승마</value>
	    <value>정치</value>
 </list>
Student.java

package DI06;

import java.util.ArrayList;

public class Student {
   private String name;
   private int age;
   private ArrayList<String> hobbys;
   private double weight;
   private double height;

    //생성자 3가지  나머지는 setter방식
	public Student (String name, int age, ArrayList<String> hobbys ) {
		this.name = name;
		this.age = age;
		this.hobbys = hobbys;


	}

	public String getName() {
		return name;
	}

	public void setName(String name) {
		this.name = name;
	}

	public int getAge() {
		return age;
	}

	public void setAge(int age) {
		this.age = age;
	}

	public ArrayList<String> getHobbys() {
		return hobbys;
	}

	public void setHobbys(ArrayList<String> hobbys) {
		this.hobbys = hobbys;
	}

	public double getWeight() {
		return weight;
	}

	public void setWeight(double weight) {
		this.weight = weight;
	}

	public double getHeight() {
		return height;
	}

	public void setHeight(double height) {
		this.height = height;
	}


}
StudentInfo.java

package DI06;

	public class StudentInfo {
	  private Student student;  //Studnet만 참조함

      //생성자 없음 setter방식
	  public StudentInfo() {

	  }

	public Student getStudent() {
		return student;
	}

	public void setStudent(Student student) {
		this.student = student;
	}

	}
MainClass06.java

package DI06;

import org.springframework.context.support.AbstractApplicationContext;
import org.springframework.context.support.GenericXmlApplicationContext;

public class MainClass06 {

	public static void main(String[] args) {
		 String configLocation1 = "classpath:applicationCTX610.xml";
		 String configLocation2 = "classpath:applicationCTX611.xml";
		AbstractApplicationContext ctx = new GenericXmlApplicationContext(configLocation1, configLocation2);
                                  //여러개가 나와도 콤마 써서 몇개든 가능함
		Student student1 = ctx.getBean("student1",Student.class); //bean id의 이름 student1
		System.out.println(student1.getName());  //선덕여왕
	    System.out.println(student1.getHobbys()); //승마, 정치

	    StudentInfo studentInfo = ctx.getBean("studentInfo1", StudentInfo.class);
	    Student student2 = studentInfo.getStudent();
	    System.out.println(student2.getName());
	    System.out.println(student2.getHobbys());

	    if(student1.equals(student2)) {
	    	System.out.println( "student1 == student2");

	    }
Student student3 = ctx.getBean("student3", Student.class);
		Student student4 = ctx.getBean("student3", Student.class);
		System.out.println(student3.getName()); // 이순신
		System.out.println(student4.getName()); // 이순신
           //student 3,4로 뽑아도 singleton이라서 값 넣어줘도 똑같은 값 나옴
		if (student1.equals(student3)) {
			System.out.println("student1 == student3");

		} else {
			System.out.println("student1 != student3");

		}
		if (student3.equals(student4)) {
			System.out.println("student3 == student4");

		} else {
			System.out.println("student3 != student4");

		}
	}

}
bean id="student1"
name 선덕여왕
age 30
hobbys 승마 / 정치
weight 55
height 162
bean id="studentInfo1"
id="student1" 참조
bean id="student3"
name 이순신
age 55
hobbys 활쏘기 / 검술
weight 70
height 177
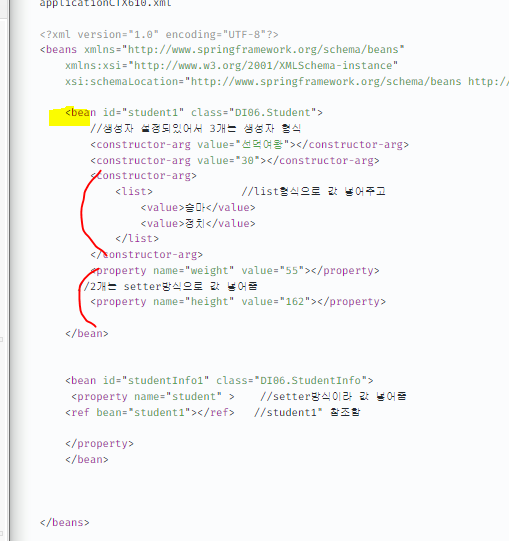
applicationCTX610.xml

<?xml version="1.0" encoding="UTF-8"?>
<beans xmlns="http://www.springframework.org/schema/beans"
	xmlns:xsi="http://www.w3.org/2001/XMLSchema-instance"
	xsi:schemaLocation="http://www.springframework.org/schema/beans http://www.springframework.org/schema/beans/spring-beans.xsd">

	<bean id="student1" class="DI06.Student">
        //생성자 설정되있어서 3개는 생성자 형식
		<constructor-arg value="선덕여왕"></constructor-arg>
		<constructor-arg value="30"></constructor-arg>
		<constructor-arg>
			<list>              //list형식으로 값 넣어주고
				<value>승마</value>
				<value>정치</value>
			</list>
		</constructor-arg>
         //2개는 setter property 방식으로 값 넣어줌
		<property name="weight" value="55"></property>
		<property name="height" value="162"></property>

	</bean>


	<bean id="studentInfo1" class="DI06.StudentInfo">
	 <property name="student" >    //setter방식이라 값 넣어줌
	<ref bean="student1"></ref>   //student1" 참조함

	</property>
	</bean>


</beans>
  applicationCTX611.xml

  <?xml version="1.0" encoding="UTF-8"?>
<beans xmlns="http://www.springframework.org/schema/beans"
	xmlns:xsi="http://www.w3.org/2001/XMLSchema-instance"
	xsi:schemaLocation="http://www.springframework.org/schema/beans http://www.springframework.org/schema/beans/spring-beans.xsd">

                                                  //싱글톤 :기본
	<bean id="student3" class="DI06.Student" scope="singleton">
	<constructor-arg value="이순신"></constructor-arg>
		<constructor-arg value="55"></constructor-arg>
		<constructor-arg>
			<list>

				<value>활쏘기</value>
				<value>검술</value>

			</list>
		</constructor-arg>
		<property name="weight" value="70"></property>
		<property name="height" value="177"></property>


	</bean>


</beans>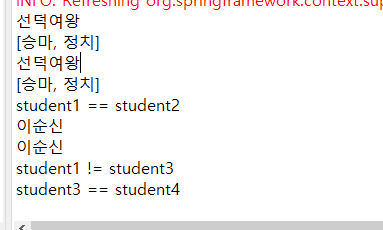
DI07 Annotation (xml ❌)
값을 불러올때 xml이 아니라 Annotation 로 값을 가져오는 방법
Student.java


package DI07;

import java.util.ArrayList;

public class Student {
	private String name;
	private int age;
	private ArrayList<String> hobbys;
	private double weight;
	private double height;

	public Student(String name, int age, ArrayList<String> hobbys) {
		this.name = name;
		this.age = age;
		this.hobbys = hobbys;

	}

	public String getName() {
		return name;
	}

	public void setName(String name) {
		this.name = name;
	}

	public int getAge() {
		return age;
	}

	public void setAge(int age) {
		this.age = age;
	}

	public ArrayList<String> getHobbys() {
		return hobbys;
	}

	public void setHobbys(ArrayList<String> hobbys) {
		this.hobbys = hobbys;
	}

	public double getWeight() {
		return weight;
	}

	public void setWeight(double weight) {
		this.weight = weight;
	}

	public double getHeight() {
		return height;
	}

	public void setHeight(double height) {
		this.height = height;
	}


}
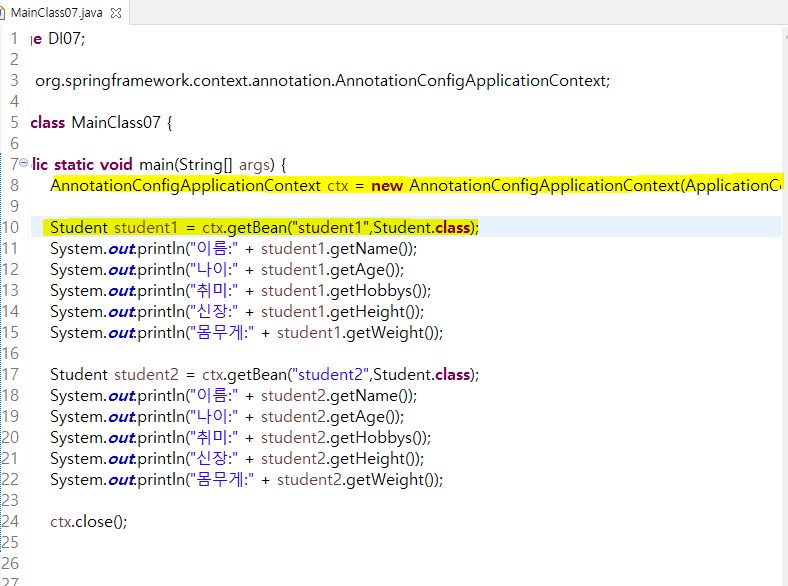
MainClass07.java
package DI07;
import org.springframework.context.annotation.AnnotationConfigApplicationContext;
public class MainClass07 {
public static void main(String[] args) {
// xml과 annotation은 호출객체가 다름
AnnotationConfigApplicationContext ctx = new AnnotationConfigApplicationContext(ApplicationConfig.class);
Student student1 = ctx.getBean("student1",Student.class);
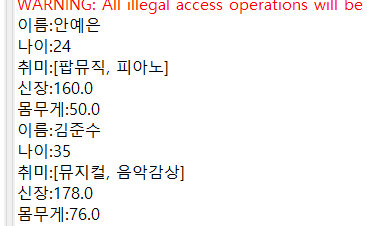
System.out.println("이름:" + student1.getName());
System.out.println("나이:" + student1.getAge());
System.out.println("취미:" + student1.getHobbys());
System.out.println("신장:" + student1.getHeight());
System.out.println("몸무게:" + student1.getWeight());
Student student2 = ctx.getBean("student2",Student.class);
System.out.println("이름:" + student2.getName());
System.out.println("나이:" + student2.getAge());
System.out.println("취미:" + student2.getHobbys());
System.out.println("신장:" + student2.getHeight());
System.out.println("몸무게:" + student2.getWeight());
ctx.close();
}
}
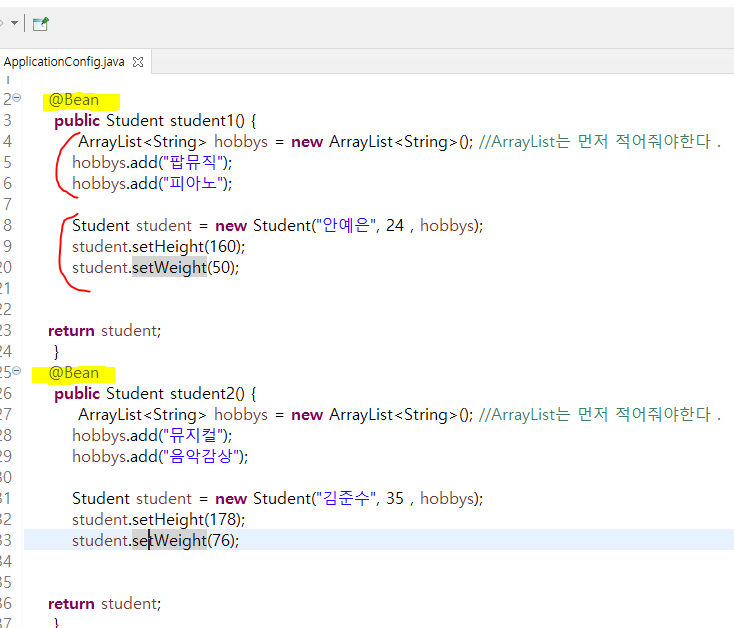
환경설정 해줄때 @Configuration 해준다
@bean 을사용해서 설정해줌
ArrayList 같은것은 제일 처음에적어줘야한다
ApplicationConfig.java

package DI07;

import java.util.ArrayList;

import org.springframework.context.annotation.Bean;
import org.springframework.context.annotation.Configuration;

@Configuration

public class ApplicationConfig {

	@Bean  // @bean 을 annotation으로 설정해주기
	 public Student student1() {
       //ArrayList는 먼저 값을 적어줘야한다 .
	 	ArrayList<String> hobbys = new ArrayList<String>();
		hobbys.add("팝뮤직");
		hobbys.add("피아노");

      //생성자방식이라 3가지는 이렇게 넣어주고
		Student student = new Student("안예은", 24 , hobbys);
      //setter방식이라 2가지는 이렇게 넣어줌
		student.setHeight(160);
		student.setWeight(50);


	return student;
	 }
   @Bean   @bean 을 annotation으로 설정해주기
	 public Student student2() {
		 ArrayList<String> hobbys = new ArrayList<String>();
		hobbys.add("뮤지컬");
		hobbys.add("음악감상");

		Student student = new Student("김준수", 35 , hobbys);
		student.setHeight(178);
		student.setWeight(76);


	return student;
	 }


}


}
XML 방식과 Annotation 비교해보기
java 에서 작성하는법 -->classpath 안해줌 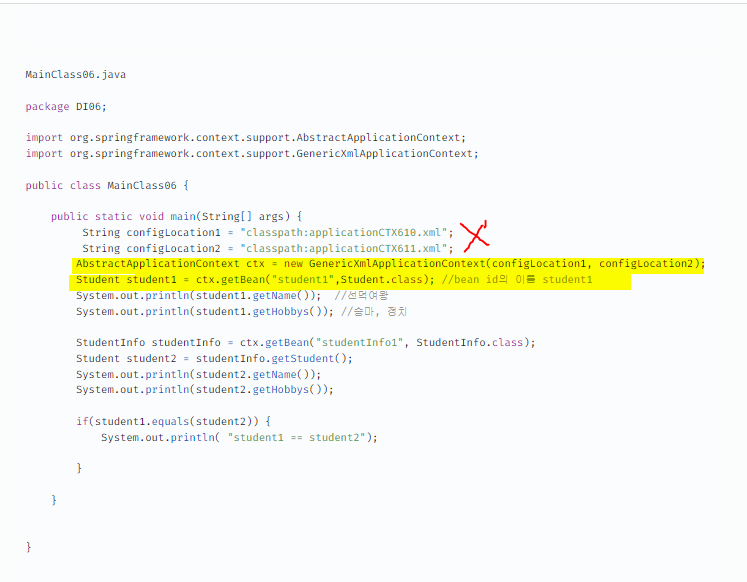
👇👇👇
xml 대신 config.java에서 작성해줌 @Bean 사용
👇👇👇
Config = 환경
DI08 ( xml + annotation 방식 혼합 )
Student.java

package DI08;

import java.util.ArrayList;

public class Student {

	private String name;
	private int age;
	private ArrayList<String> hobbys;
	private double weight;
	private double height;

	public Student(String name, int age, ArrayList<String> hobbys) {
		this.name = name;
		this.age = age;
		this.hobbys = hobbys;


}

	public String getName() {
		return name;
	}

	public void setName(String name) {
		this.name = name;
	}

	public int getAge() {
		return age;
	}

	public void setAge(int age) {
		this.age = age;
	}

	public ArrayList<String> getHobbys() {
		return hobbys;
	}

	public void setHobbys(ArrayList<String> hobbys) {
		this.hobbys = hobbys;
	}

	public double getWeight() {
		return weight;
	}

	public void setWeight(double weight) {
		this.weight = weight;
	}

	public double getHeight() {
		return height;
	}

	public void setHeight(double height) {
		this.height = height;
	}


}
MainClass08.java
package DI08;
import org.springframework.context.support.AbstractApplicationContext;
import org.springframework.context.support.GenericXmlApplicationContext;
public class MainClass08 {
public static void main(String[] args) {
//pplicationCTX8.xml 에서 context:annotation-config 라고 (작성)연결시켜놨기때문에 하나만 해도 연결가능
//xml부르는 방식
AbstractApplicationContext ctx = new GenericXmlApplicationContext("classpath:applicationCTX8.xml");
//annatation 방식 설정
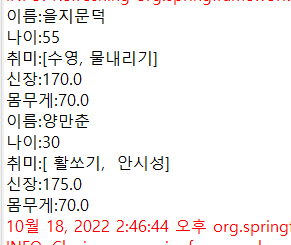
Student student1 = ctx.getBean("student1", Student.class);
System.out.println("이름:" + student1.getName());
System.out.println("나이:" + student1.getAge());
System.out.println("취미:" + student1.getHobbys());
System.out.println("신장:" + student1.getHeight());
System.out.println("몸무게:" + student1.getWeight());
//xml 방식 설정
Student student2 = ctx.getBean("student2",Student.class);
System.out.println("이름:" + student2.getName());
System.out.println("나이:" + student2.getAge());
System.out.println("취미:" + student2.getHobbys());
System.out.println("신장:" + student2.getHeight());
System.out.println("몸무게:" + student2.getWeight());
ctx.close();
}
}
🔥🔥🔥
```xml
applicationCTX8.xml
<?xml version="1.0" encoding="UTF-8"?>
<beans xmlns="http://www.springframework.org/schema/beans"
xmlns:xsi="http://www.w3.org/2001/XMLSchema-instance"
xmlns:context="http://www.springframework.org/schema/context"
xsi:schemaLocation="http://www.springframework.org/schema/beans http://www.springframework.org/schema/beans/spring-beans.xsd
http://www.springframework.org/schema/context http://www.springframework.org/schema/context/spring-context-4.1.xsd">
<context:annotation-config /> <!-- anotation과 xml과 주거니 받거니 한다는 설정 같이쓸거야 -->
<bean class="DI08.ApplicationConfig"> <!-- anotation방식과 연결을 시킨다 -->
</bean>
//xml방식으로 넣어줌
<bean id="student2" class="DI08.Student">
<constructor-arg value="양만춘"></constructor-arg>
<constructor-arg value="30"></constructor-arg>
<constructor-arg>
<list>
<value> 활쏘기</value>
<value> 안시성</value>
</list>
</constructor-arg>
<property name="height" value="175"></property>
<property name="weight" value="70"></property>
</bean>
</beans>
🔥🔥🔥
ApplicationConfig.java

package DI08;

import java.util.ArrayList;

import org.springframework.context.annotation.Bean;

public class ApplicationConfig {


	@Bean
	public Student student1() {
		ArrayList<String> hobbys = new ArrayList<String>();
		hobbys.add("수영");
		hobbys.add("물내리기");

		Student student = new Student("을지문덕", 55, hobbys);
		student.setHeight(170);
		student.setWeight(70);


		return student;
	}

}
och04 생명주기 🐥🐥
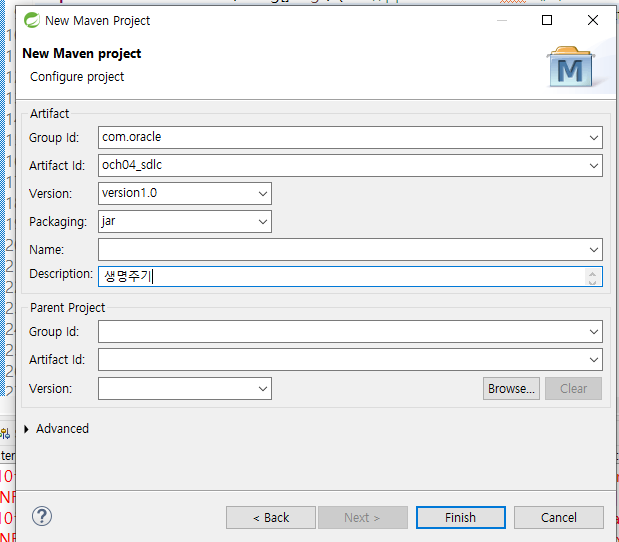
파일새로만들고 나면 pom.xml가서 기본설정 다운로드 받아주기 .
<project xmlns="http://maven.apache.org/POM/4.0.0" xmlns:xsi="http://www.w3.org/2001/XMLSchema-instance" xsi:schemaLocation="http://maven.apache.org/POM/4.0.0 http://maven.apache.org/xsd/maven-4.0.0.xsd">
<modelVersion>4.0.0</modelVersion>
<groupId>org.springframework.samples</groupId>
<artifactId>sch04_SDLC</artifactId>
<version>0.0.1-SNAPSHOT</version>

<properties>

		<!-- Generic properties -->
		<java.version>1.8</java.version>
		<project.build.sourceEncoding>UTF-8</project.build.sourceEncoding>
		<project.reporting.outputEncoding>UTF-8</project.reporting.outputEncoding>

		<!-- Spring -->
		<spring-framework.version>4.2.3.RELEASE</spring-framework.version>

		<!-- Hibernate / JPA -->
		<hibernate.version>4.2.1.Final</hibernate.version>

		<!-- Logging -->
		<logback.version>1.0.13</logback.version>
		<slf4j.version>1.7.5</slf4j.version>

		<!-- Test -->
		<junit.version>4.11</junit.version>

	</properties>

	<dependencies>
		<!-- Spring and Transactions -->
		<dependency>
			<groupId>org.springframework</groupId>
			<artifactId>spring-context</artifactId>
			<version>${spring-framework.version}</version>
		</dependency>
		<dependency>
			<groupId>org.springframework</groupId>
			<artifactId>spring-tx</artifactId>
			<version>${spring-framework.version}</version>
		</dependency>


		<dependency>
			  <!--  Only bundled with java 1.6+ -->
			  <groupId>javax.annotation</groupId>
			  <artifactId>jsr250-api</artifactId>
			  <version>1.0</version>
		</dependency>

	</dependencies>
</project>


</project>
소멸자 소멸전 / 소멸자 생성이후 두개 설정하기
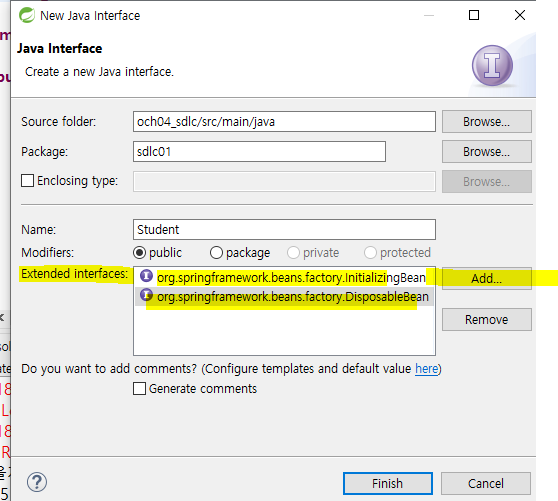
sdlc01 생성자 소멸자 📖
//생성자 소멸자 상속 받았을때
Student.java
package sdlc01;
import org.springframework.beans.factory.DisposableBean;
import org.springframework.beans.factory.InitializingBean;
//InitializingBean-->afterPropertiesSet
//DisposableBean --> destroy
public class Student implements InitializingBean, DisposableBean {
private String name;
private int age;
//소멸자 소멸전
public void destroy() throws Exception {
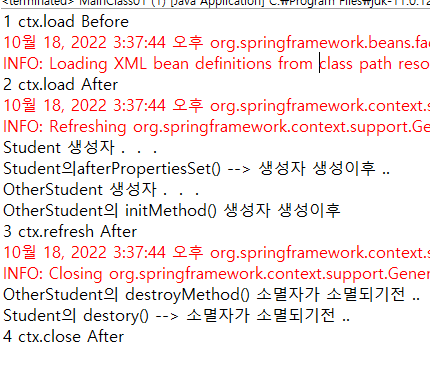
System.out.println("Student의 destory() --> 소멸자가 소멸되기전 ..");
}
//소멸자 생성이후
public void afterPropertiesSet() throws Exception {
System.out.println("Student의afterPropertiesSet() --> 생성자 생성이후 ..");
}
public Student(String name, int age) {
this.name = name;
this.age = age;
System.out.println("Student 생성자 . . .");
}
public String getName() {
return name;
}
public void setName(String name) {
this.name = name;
}
public int getAge() {
return age;
}
public void setAge(int age) {
this.age = age;
}
}
 //생성자 소멸자 상속 안 받았을때
OtherStudent.java

package sdlc01;

import javax.annotation.PostConstruct;
import javax.annotation.PreDestroy;

public class OtherStudent {
  private String name;
  private int age;

  //생성자 생성이후
  @PostConstruct  //생성자 소멸자 상속설정안해둿을때  -->afterPropertiesSet랑 같음
  public void initMethod() {
  	System.out.println("OtherStudent의 initMethod() 생성자 생성이후");

  }
  //생성자 소멸전
  @PreDestroy  //생성자 소멸자 상속설정안해둿을때  -->destroy랑 같
  public void destroyMethod() {
  	System.out.println("OtherStudent의 destroyMethod() 소멸자가 소멸되기전 ..");

  }
public OtherStudent(String name, int age) {
	  this.name = name;
	  this.age = age;


	  }
	public String getName() {
		return name;
	}
	public void setName(String name) {
		this.name = name;
	}
	public int getAge() {
		return age;
	}
	public void setAge(int age) {
		this.age = age;
	}

	}
  package sdlc01;

import org.springframework.context.support.GenericXmlApplicationContext;

public class MainClass01 {

	 public static void main(String[] args) {
		 GenericXmlApplicationContext ctx = new GenericXmlApplicationContext();
		 System.out.println("1 ctx.load Before");
		 ctx.load("classpath:applicationCTX01.xml");
		 System.out.println("2 ctx.load After");
		 //실제 Bean 생성
		ctx.refresh(); //refresh하면 생성자 생성됨
		 System.out.println("2 ctx.refresh After");
		 ctx.close();
		 System.out.println("2 ctx..refresh After");


	 }

}
<?xml version="1.0" encoding="UTF-8"?>
<beans xmlns="http://www.springframework.org/schema/beans"
	xmlns:xsi="http://www.w3.org/2001/XMLSchema-instance"
	xmlns:context="http://www.springframework.org/schema/context"
	xsi:schemaLocation="http://www.springframework.org/schema/beans http://www.springframework.org/schema/beans/spring-beans.xsd
		http://www.springframework.org/schema/context http://www.springframework.org/schema/context/spring-context-4.2.xsd">

	<context:annotation-config />
	<bean id="'student" class="sdlc01.Student">
		<constructor-arg value="김춘추"></constructor-arg>
		<constructor-arg value="30"></constructor-arg>


	</bean>
	<bean id="otherStudent" class="sdlc01.OtherStudent">
		<constructor-arg value="유성룡"></constructor-arg>
		<constructor-arg value="50"></constructor-arg>


	</bean>


</beans>
sdlc02 📖
Student.java
package sdlc02;

	public class Student {
		   private String name;
		   private int age;

		   public Student(String name, int age) {
			   this.name = name;
			   this.age = age;

		   }

		public String getName() {
			return name;
		}

		public void setName(String name) {
			this.name = name;
		}

		public int getAge() {
			return age;
		}

		public void setAge(int age) {
			this.age = age;
		}


		}
MainClass02 .java
package sdlc02;
import org.springframework.context.support.AbstractApplicationContext;
import org.springframework.context.support.GenericXmlApplicationContext;
public class MainClass02 {
//1가져와서
public static void main(String[] args) {
AbstractApplicationContext ctx = new GenericXmlApplicationContext("classpath:applicationCTX02.xml");
//2같은 bean 에서 가져와서 student1, 2를 만듬
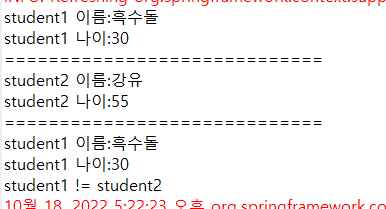
Student student1 = ctx.getBean("student",Student.class);
System.out.println("student1 이름:" +student1.getName());
System.out.println("student1 나이:" +student1.getAge());
System.out.println("=============================");
Student student2 = ctx.getBean("student",Student.class);
//같은 bean(student)을 뽑았을때 값을 넣어주면 student1 도변경되어진다
student2.setName("강유");
student2.setAge(55);
System.out.println("student2 이름:" +student2.getName());
System.out.println("student2 나이:" +student2.getAge());
System.out.println("=============================");
System.out.println("student1 이름:" +student1.getName());
System.out.println("student1 나이:" +student1.getAge());
if(student1.equals(student2)) {
System.out.println("student1 == student2");
}else {
System.out.println("student1 != student2");
}
ctx.close();
}
}
applicationCTX02.xml

<?xml version="1.0" encoding="UTF-8"?>
<beans xmlns="http://www.springframework.org/schema/beans"
	xmlns:xsi="http://www.w3.org/2001/XMLSchema-instance"
	xsi:schemaLocation="http://www.springframework.org/schema/beans http://www.springframework.org/schema/beans/spring-beans.xsd">

   <-- //1 싱글톤은 기본값 넣어주는대로 값이 변함 -->
	<bean id="student" class="sdlc02.Student" scope="singleton">
   <-- //2 prototype 값이 변하지 않고 가지고 감  -->
   <-- <bean id="student" class="sdlc02.Student" scope="prototype"> -->

		<constructor-arg value="흑수돌"></constructor-arg>
		<constructor-arg value="30"></constructor-arg>
	</bean>


</beans>
같은 bean을 참조할 때 각각의 instance 가 달라진다 ⭐⭐✔✔
scope="singleton" 해줬을땐 기본값 : 값이변경됨
같은 bean을 뽑아서 다른 instance를 만들어줘도 값이 변경됨
scope="prototype" 자기의 값을 가지고 감 :값이 변경되지 않음
같은 bean을 뽑아서 다른 instance를 만들어주면 값이 변경안됨
och05.env 환경작업 🌍
pom.xml 설정해주고 시작
env02
AdminConnection.java
package env02;
import org.springframework.beans.factory.DisposableBean;
import org.springframework.beans.factory.InitializingBean;
public class AdminConnection implements InitializingBean, DisposableBean {
private String adminId;
private String adminPw;
private String sub_adminId;
private String sub_adminPw;
public void destroy() throws Exception {
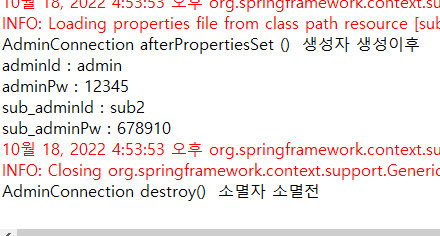
System.out.println("AdminConnection destroy() 소멸자 소멸전 ");
}
public void afterPropertiesSet() throws Exception {
System.out.println("AdminConnection afterPropertiesSet () 생성자 생성이후 ");
}
public String getAdminId() {
return adminId;
}
public void setAdminId(String adminId) {
this.adminId = adminId;
}
public String getAdminPw() {
return adminPw;
}
public void setAdminPw(String adminPw) {
this.adminPw = adminPw;
}
public String getSub_adminId() {
return sub_adminId;
}
public void setSub_adminId(String sub_adminId) {
this.sub_adminId = sub_adminId;
}
public String getSub_adminPw() {
return sub_adminPw;
}
public void setSub_adminPw(String sub_adminPw) {
this.sub_adminPw = sub_adminPw;
}
}
EnvMainClass.java

package env02;

import org.springframework.context.support.AbstractApplicationContext;
import org.springframework.context.support.GenericXmlApplicationContext;

public class EnvMainClass {

	public static void main(String[] args) {
		AbstractApplicationContext ctx = new GenericXmlApplicationContext("classpath:applicationCTX02.xml");
		AdminConnection connection = ctx.getBean("adminConnection" ,AdminConnection.class);
		System.out.println("adminId : "   + connection.getAdminId());
		System.out.println("adminPw : "   + connection.getAdminPw());
		System.out.println("sub_adminId : "  + connection.getSub_adminId());
		System.out.println("sub_adminPw : "  + connection.getSub_adminPw());
      ctx.close();

	}

}
xml에서 context:property-placeholder location="" 을 사용하여 파일의 위치 연결시켜서
el표기법으로 properties 에서 저장해 놓은 벨류 값 사용가능함
applicationCTX02.xml

<<?xml version="1.0" encoding="UTF-8"?>
<beans xmlns="http://www.springframework.org/schema/beans"
	xmlns:xsi="http://www.w3.org/2001/XMLSchema-instance"
	xmlns:context="http://www.springframework.org/schema/context"
	xsi:schemaLocation="http://www.springframework.org/schema/beans http://www.springframework.org/schema/beans/spring-beans.xsd
		http://www.springframework.org/schema/context http://www.springframework.org/schema/context/spring-context-4.2.xsd">

         <!-- 파일의 위치  연결시키면 el표기법으로 연결시킬수 있음  -->
		<context:property-placeholder location="classpath:admin2.properties, classpath:sub_admin2.properties"/>  //location부터 시작됨
		<bean id="adminConnection" class="env02.AdminConnection">
		<property name="adminId"  		value="${admin.id}"></property>
		<property name="adminPw" >   	<value>${admin.pw}</value></property>
		<property name="sub_adminId"     value="${sub_admin.id}"></property>
		<property name="sub_adminPw"    value="${sub_admin.pw}" ></property>
                                   <!-- 이엘 표기법으로 값을 넣어두고  파일의 위치를 뒤에 두개의  properties 경로로 가서 읽어서
                                        name의 키를 읽어서  값에 벨류값을 가져옴 -->


		 </bean>


</beans>
admin2.properties 에서 키값 입력해줌
admin.id=admin
admin.pw=12345
sub_admin2.properties 에서 키값 입력해줌
sub_admin.id=sub2
sub_admin.pw=678910