➰복습
배열값 잡아주고
원하는 만큼 properties 잡아서 넣어줌
PropertySource... -->만 잡아주면 벨류 값 이용해서 값을 가져올수 있다
빈이라 적어주고 선언가능
around방식 -> 위 아래 사용 가능 (Before, after)
annotation방식 --> @Aspect 적어주면됨
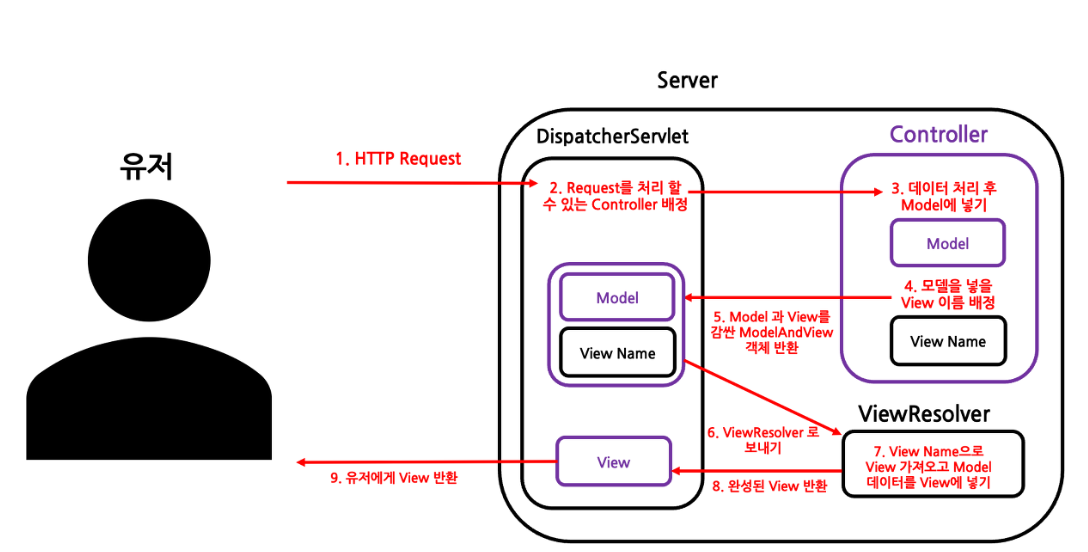
🌈MVC
mvc흐름
-
DispatcherServlet : 제일 앞단에서 HTTP Request를 처리하는 Controller (front Controller 패턴이라고도 한다 )
-
Controller(Handler) : Model을 만들고 View 를 지정
필요한 데이터를 뽑아 Model에 저장
HTTP 가 보여줄 View Name 을지정 -
ModelAndView : Controller에 의해 반환된 Model 과 View가 Wrapping된 객체 (한방에 처리할때 사용 )
-
Model : Map<String,Vulue> 형태의 데이터 저장소
키와 값 쌍으로 만들어 저장한다 .- Model은 값을 넣을 때 addAttribute()를 사용
- Model과 View를 합쳐놓은 것으로,값을 넣을때 addObject()를 사용
- setViewName()으로 보낼 곳 View를 세팅
-
view, viewName : ViewResolver에서 그릴 View 지정
-
- ViewReslover : ModelAndView 를 이용해 View 를 그리기
ModelAndView 객체를 처리해 View를 그린다
여기서 모델에 저장된 데이트를 사용해 사용자에게 보여줄 완성된 View 를 그려준다-> View 는 그대로 유저에게 반환
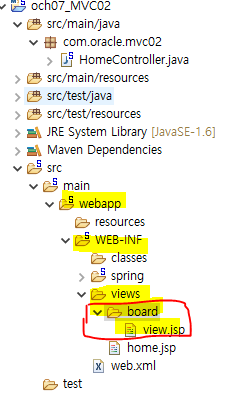
파일만들기 💫
NEW Spring Legacy Project 설정
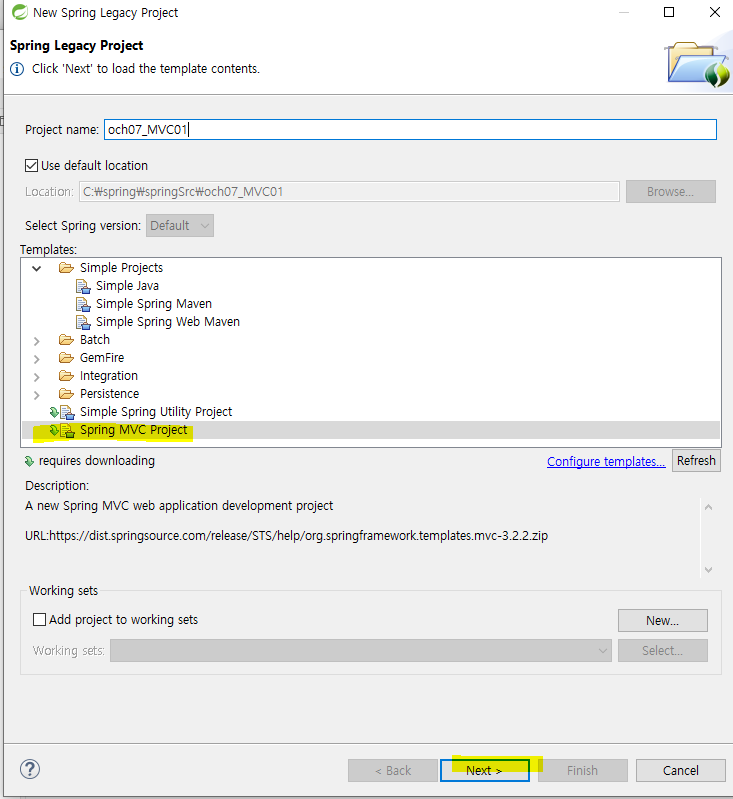
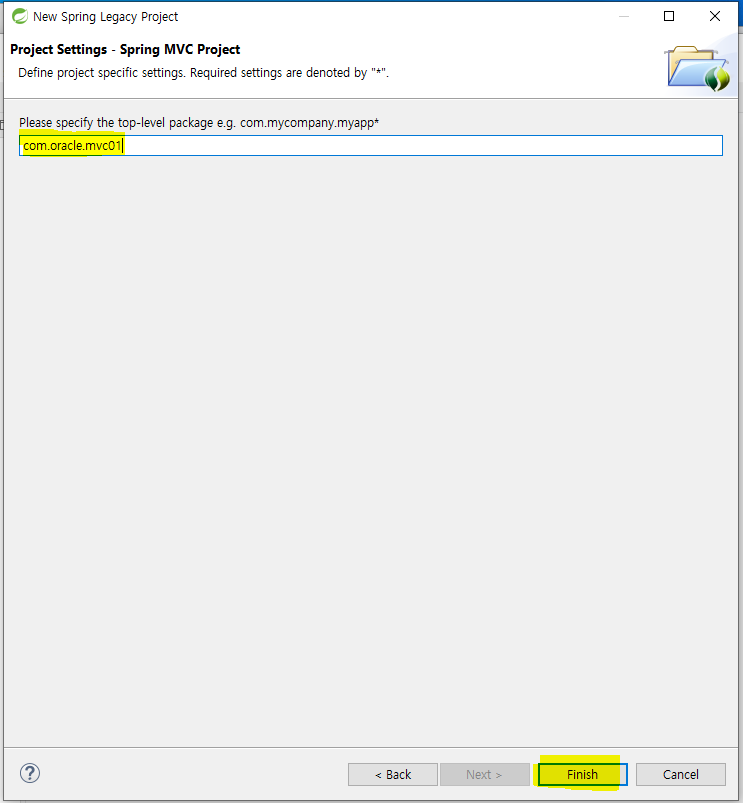
알아서 환경 다운로드 되어짐
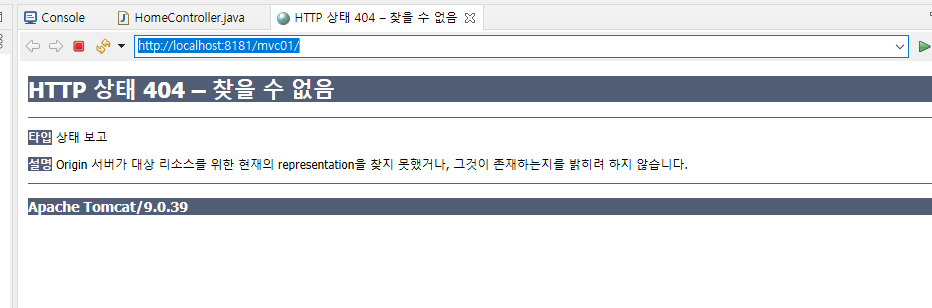
디스패처가 뷰를 찾는 방법

prefix와 suffix가 있다
디스페쳐는 알아서 view를 찾을수 있따
WEB-INF/view/+뷰의 이름 +jsp
즉, WEB-INF/view/ 디렉토리 안에 있는 뷰의 파일 이라는것을 알려주는것이다 .
och07_MVC01
logger 사용가능 ->자동으로 잡힘
logger 이용하면 나의메세지를 뿌려줌
📛sysout과 기능이 똑같음
파일생성될때 자동으로 만들어진 Controller
package com.oracle.mvc01;
import java.text.DateFormat;
import java.util.Date;
import java.util.Locale;
import org.slf4j.Logger;
import org.slf4j.LoggerFactory;
import org.springframework.stereotype.Controller;
import org.springframework.ui.Model;
import org.springframework.web.bind.annotation.RequestMapping;
import org.springframework.web.bind.annotation.RequestMethod;
/**
* Handles requests for the application home page.
*/
@Controller //@Controller 해줘야 controller로 넘어감
public class HomeController {
private static final Logger logger = LoggerFactory.getLogger(HomeController.class);
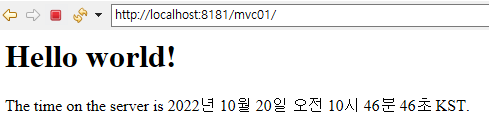
/**
* Simply selects the home view to render by returning its name.
*/ //겟방식
@RequestMapping(value = "/", method = RequestMethod.GET)
public String home(Locale locale, Model model) {
logger.info("Welcome home! The client locale is {}.", locale);
System.out.println("HomeController home start ... ");
Date date = new Date();
DateFormat dateFormat = DateFormat.getDateTimeInstance(DateFormat.LONG, DateFormat.LONG, locale);
String formattedDate = dateFormat.format(date);
model.addAttribute("serverTime", formattedDate );
//model에 담아두면 jsp에서 el표기법으로 사용가능
return "home";
}
}

mvc01/ 뒤는 다 삭제해주면 실행 0
⛔패키지 만들때 주의
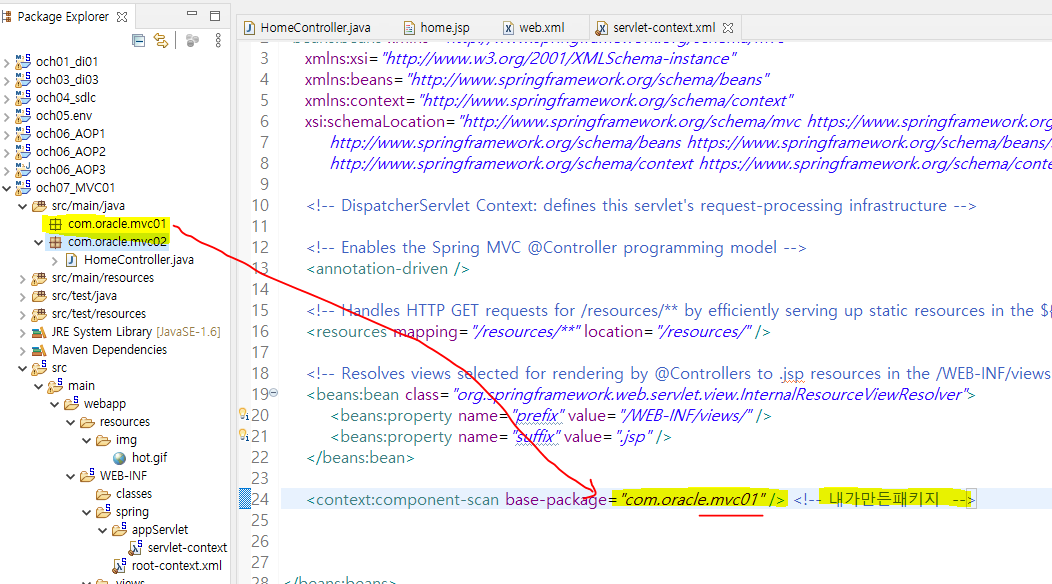
원래만든파일이 com.oracle.mvc01 이라서 자동으로 저렇게 설정되어있는데
임의로 mvc2만들어서 변경 하면 안됨
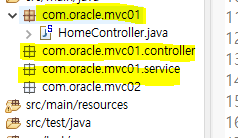
com.oracle.mvc01 를 찍고 그뒤에 .붙여서 파일 생성해주기
📛한글깨짐 -> 처리
  web.xml
<!-- 한글처리 -->
   <filter>
      <filter-name>encodingFilter</filter-name>
      <filter-class>org.springframework.web.filter.CharacterEncodingFilter</filter-class>

      <init-param>
         <param-name>encoding</param-name>
         <param-value>UTF-8</param-value>
      </init-param>
      <init-param>
         <param-name>forceEncoding</param-name>
         <param-value>true</param-value>
      </init-param>
   </filter>
   <filter-mapping>
      <filter-name>encodingFilter</filter-name>
      <url-pattern>/*</url-pattern>
   </filter-mapping>
▶한글깨짐 처리완료
✅ 이미지 넣는법
webapp안에 resources 안에 img파일 만들기
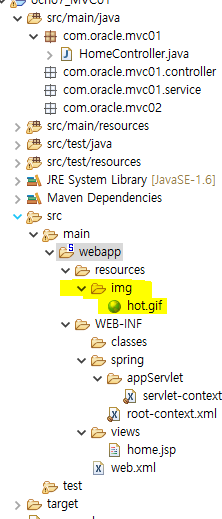
home.jsp에서 img 걸어주면 이미지 출력 home.jsp
<p> <img alt="반짝" src="resources/img/hot.gif"></p> 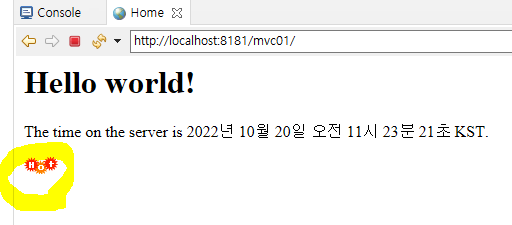
och07_MVC02
파일생성하면 기본으로 생성됨
HomeController 밑에다가 계속 코딩해주면 됨
package com.oracle.mvc02;
HomeCotroller.java
package com.oracle.mvc02;
import java.text.DateFormat;
import java.util.Date;
import java.util.Locale;
import org.slf4j.Logger;
import org.slf4j.LoggerFactory;
import org.springframework.stereotype.Controller;
import org.springframework.ui.Model;
import org.springframework.web.bind.annotation.RequestMapping;
import org.springframework.web.bind.annotation.RequestMethod;
/**
* Handles requests for the application home page.
*/
@Controller
public class HomeController {
private static final Logger logger = LoggerFactory.getLogger(HomeController.class);
/**
* Simply selects the home view to render by returning its name.
*/
@RequestMapping(value = "/", method = RequestMethod.GET)
public String home(Locale locale, Model model) {
logger.info("Welcome home! The client locale is {}.", locale);
Date date = new Date();
DateFormat dateFormat = DateFormat.getDateTimeInstance(DateFormat.LONG, DateFormat.LONG, locale);
String formattedDate = dateFormat.format(date);
model.addAttribute("serverTime", formattedDate );
return "home";
}
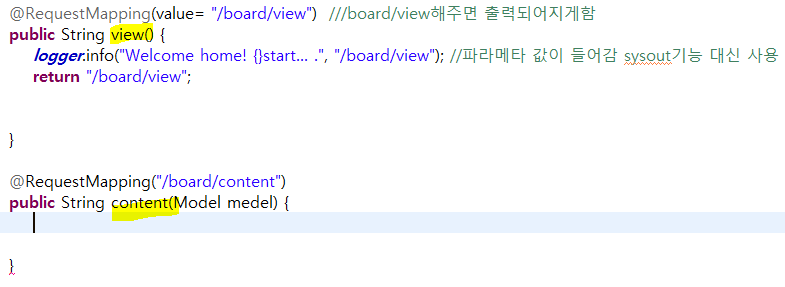
// 여기부터 내가 작성한 코드
@RequestMapping(value= "/board/view") ///board/view해주면 출력되어지게함
public String view() {
logger.info("Welcome home! {}start... .", "/board/view"); //파라메타 값이 들어감 sysout기능 대신 사용
return "/board/view";
}
}
작성후에 폴더 만들어주고 파일만들기
view.jsp 에서 입력하면 출력되어짐
view.jsp

<body>

<h1>view.jsp</h1>

</body>
두개 이름은 겹치면 안됨 --> 오류
HomeController.java
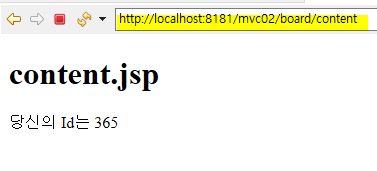
@RequestMapping("/board/content") //board/content해주면 출력되어지게함
public String content(Model model) {
System.out.println("HomeController center start. . . .");
model.addAttribute("id",365); //모델의 id에 365을 set함
return "/board/content";
}
  content.jsp

<body>
    <h1>content.jsp</h1>
	 당신의 Id는 ${id}
</body>
ModelAndView
ModelAndView
모델앤뷰를 사용하면 그안에서 뷰이름까지 한번에 전달해주기 때문에 리턴형으로 선언
목적 : parameter와 View 를 한방에 처리
- 파라매터는 addObject 사용
- 뷰이름 setViewName 사용
HomeController.java
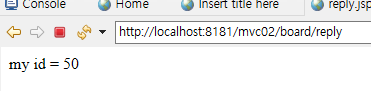
@RequestMapping("/board/reply")
public ModelAndView reply() {
System.out.println("HomeController reply start. . . .");
//목적 : parameter와 View 를 한방에 처리
ModelAndView mav = new ModelAndView();
mav.addObject("id", 50);
mav.setViewName("board/reply");
return mav;
}
reply.jsp
<body>
	my id = ${id }
</body>
och07_MVC03
Dto를 사용해 작업하기
httpServletRequest
httpServletRequest
값을 받아올수 있다 .
원하는 데이터를 꺼낼때는 getParameter()
->getParameter() 반환타입은 string타입 이다 .
HomeController.java


	@RequestMapping("board/confirmId")
	public String confirmId(HttpServletRequest httpServletRequest, Model model) {
		logger.info("confirmId Start .  .   .");
		String id = httpServletRequest.getParameter("id");
//httpServletRequest객체안의 id값을 string타입으로 가져온다.
		String pw = httpServletRequest.getParameter("pw");
		System.out.println("board/confirmId id -->"+id);
		System.out.println("board/confirmId pw -->"+pw);

		model.addAttribute("id", id);   //모델에 담아서
		model.addAttribute("pw", pw);


		return "board/confirmId";  //뷰로 이동 (값을넘김)

	}
 confirmId.jsp

<body>
  <h1>confirmId.jsp</h1>
    ID:  ${id }<br>
    PW: ${pw }

</body>
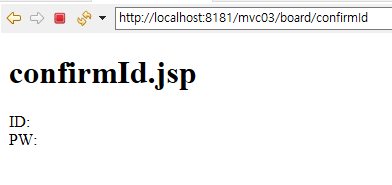
▶파라매터값이 없어도 출력은 되어짐
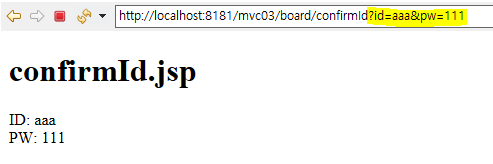
▶값을 입력해주면 입력한 값 출력
  HomeController.java

	@RequestMapping("board/checkId")
	public String checkId(@RequestParam("id") String idd,
			                   @RequestParam("pw") int passwd,
			                   Model model) //모델값을 이용,뷰로 값 전달
			{
		logger.info("checkId Start .  .   .");
		System.out.println("board/checkId idd ->"+idd);
		System.out.println("board/checkId passwd ->"+passwd);
		model.addAttribute("identufy",idd);
		model.addAttribute("password", passwd);

		return "board/checkId";
	}
  checkId.jsp

<%@ page language="java" contentType="text/html; charset=UTF-8"
  pageEncoding="UTF-8"%>
<!DOCTYPE html>
<html>
<head>
<meta charset="UTF-8">
<title>Insert title here</title>
</head>
<body>
<h1>checkId.jsp</h1>
    ID:  ${identufy }<br>
    PW: ${password }


</body>
</html>
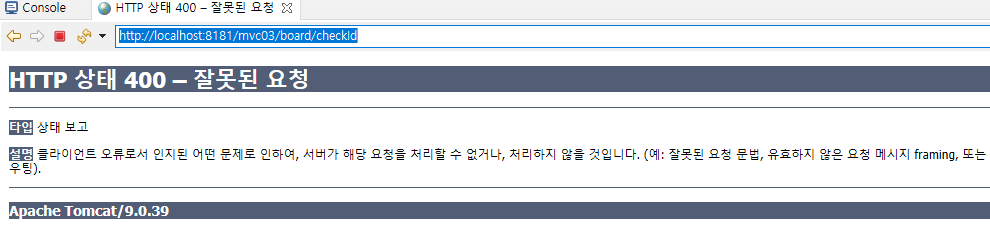
@RequestParam
@RequestParam((가져올데이터이름)데이터타입 ,가져올데이터를 담을 변수))
- httpServleRequest에서는 getParameter()메소드를 이용했지만
@RequestParam 으로 받아오는 방법도 있다- 메소드의 파라미터 값으로 @RequestParam 넣어주면된다
💥400->파라매터가 필수로 들어가야하는 오류

▶값을 안넘겨주면 400오류가 뜨고 필히 파라매터값 입력해야함
Member
   Member.java
     package com.oracle.mvc03.dto;

public class Member {
		private String name;
		private String id;
		private String pw;
		private String email;
		public String getName() {
			return name;
		}
		public void setName(String name) {
			this.name = name;
		}
		public String getId() {
			return id;
		}
		public void setId(String id) {
			this.id = id;
		}
		public String getPw() {
			return pw;
		}
		public void setPw(String pw) {
			this.pw = pw;
		}
		public String getEmail() {
			return email;
		}
		public void setEmail(String email) {
			this.email = email;
		}


}
 HomeController.java
     	@RequestMapping("member/join")
	public String memberDto(@RequestParam("name")String name,
									@RequestParam("id")String id,
									@RequestParam("pw")String pw,
									@RequestParam("email")String email,
									Model model
			                            )

	{

		System.out.println("member/join name ->"+name);
		System.out.println("member/join id ->"+id);
		System.out.println("member/join pw ->"+pw);
		System.out.println("member/join email ->"+email);

		Member member = new Member();
		member.setName(name);
		member.setId(id);
		member.setPw(pw);
        member.setEmail(email);

        model.addAttribute("member" , member);

		return "member/join";
 }
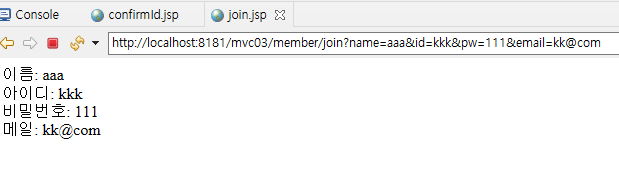
<body>
 이름:          ${member.name } <br/>
 아이디:        ${member.id } <br/>
 비밀번호:      ${member.pw } <br/>
 메일:         ${member.email } <br/>


</body>
Member DTO Parameter
   //DTO parameter
		@RequestMapping("member/join/dto")
		public String memberDto(Member member,
										Model model
				                            )

		{

			System.out.println("member/join member.getName->"+member.getName());
			System.out.println("member/join getId ->"+member.getId());
			System.out.println("member/join getpw ->"+member.getPw());
			System.out.println("member/join getemail ->"+member.getEmail());


	        model.addAttribute("member" , member);

			return "member/join";
	 }
och07_MVC041
mvc2방식
Get방식요청과 POST 방식요청
방식에따라 맨뒤에 바꿔서 걸어주면 됨
Method=RequestMethod.Get
Method=RequestMethod.post
만약 상관없이 해주고 싶으면 method부분 지우면 됨
    HomeController.java

 @RequestMapping("index") //아무것도 없어도 인덱스로 시작해주기 mvc2방식임
	public String goIndex() {
		logger.info("index Start. . . ");
		return "index";

	}


	//@RequestMapping("student") //설정안해주면 그냥 받아짐
   //********일부러 오류 출력 post방식인데 get방식으로 출력****오류수정은 코드 밑에 적어둠******
    @RequestMapping( value = "student" , method = RequestMethod.GET )
	public String getStudent(HttpServletRequest request , Model model) {
		logger.info("getStudent Start.  .  . ");
		String id = request.getParameter("id");
		System.out.println("GET  Id  : " +id);

		model.addAttribute("studentId" , id);  //모델에 담아둠


	return "student/studentIp";
	}
 index.jsp

 <body>

	<form action="student" method="post">
	student id : <input type="text" name="id"> <br />
	<input type="submit" value="전송">

	</form>

</body>
studentId.jsp

 <body>
	<h1>studentId.jsp</h1>
	studentId: ${studentId }

 </body>
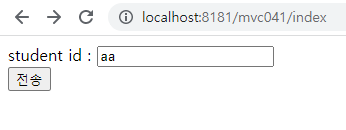
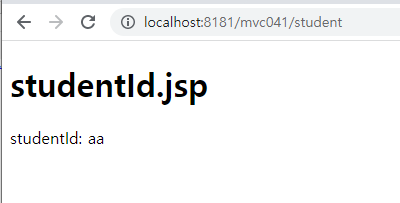

▶console보면
cotroller에서 index start 되고
index.jsp에서
값을 입력해서 submit 하면 id 값이 전송
cotroller에서 student start 됨
id를 담아서 studentId.jsp로 이동
studentId.jsp
에서 이엘 표기법으로 값을 받아옴
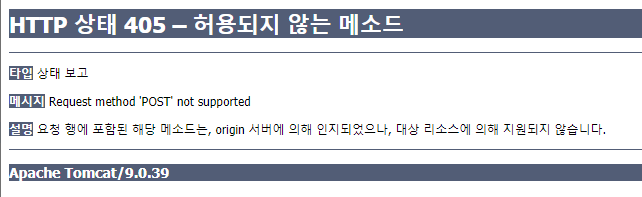
405 -> 잘못된 메소드
post방식인데 get방식이라고 해서 오류가 남
post방식으로 수정해주기
  HomeController.java

  @RequestMapping( value = "student" , method = RequestMethod.POST)
	public String postStudent(HttpServletRequest request , Model model) {
		logger.info("psostgetStudent Start.  .  . ");
		String id = request.getParameter("id");
		System.out.println("GET  Id  : " +id);

		model.addAttribute("studentId" , id);  //모델에 담아둠


	return "student/studentId";
	}
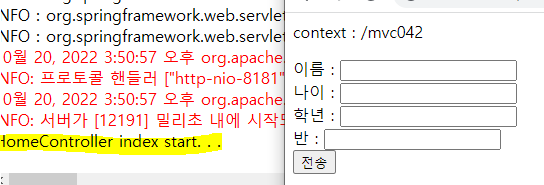
och07_MVC042
  	@RequestMapping("/index")
		public String index() {
		System.out.println("HomeController index start. . . ");
		return "index";


	}
  index.jsp
  <html>
<head>
<meta charset="UTF-8">
<title>Insert title here</title>
</head>
 <% String context = request.getContextPath() %>

<body>
   context : <%=context %> <p></p>
   <form action="studentView" method="post">
  <!-- <form action="studentView2" method="post"> -->
       이름 : <input type="text"  name="name"> <br />
       나이 : <input type="text"  name="age"> <br />
       학년 : <input type="text"  name="gradeNum"> <br />
       반 : <input type="text"  name="classNum"> <br />
       <input type="submit" value="전송">

   </form>


</body>
</html>
dto만들어주기
 StudentInformation.java


 package com.oracle.mvc042.dto;

public class StudentInformation {
   private String name;
   private String age;
   private String gradeNum;
   private String classNum;
	public String getName() {
		return name;
	}
	public void setName(String name) {
		this.name = name;
	}
	public String getAge() {
		return age;
	}
	public void setAge(String age) {
		this.age = age;
	}
	public String getGradeNum() {
		return gradeNum;
	}
	public void setGradeNum(String gradeNum) {
		this.gradeNum = gradeNum;
	}
	public String getClassNum() {
		return classNum;
	}
	public void setClassNum(String classNum) {
		this.classNum = classNum;
	}


}
@ModelAttribute
데이터 보낼때 vo객체를 만들어서 한번에 보낼수 있다
이름을 바꿔서 보낼수도 있다
vo객체 앞에 @ModelAttribute사용하면 그이름으로 값을 가져올수 있다 .
HomeController.java


@RequestMapping("/studentView1")                  //dto로 퉁쳐서 받기
	public String studentView1(StudentInformation studentInformation, Model model) {
		logger.info("studentView1 Start .  .   . ");
		System.out.println("StudentInformation.getName()--> " +studentInformation.getName());
		System.out.println("StudentInformation.getClassNum()--> " +studentInformation.getClassNum());
		System.out.println("StudentInformation.getGradeNum()--> " +studentInformation. getGradeNum());
		System.out.println("StudentInformation.getAge()--> " +studentInformation.getAge());


		model.addAttribute("StudentInfo" ,studentInformation);


		return "studentView";
	}


**********************************
//studentView1랑 같은데 한번에 쓸수 있는 다른방법  --> 하지만 studentView1로 사용하는게 더 좋음

	@RequestMapping("/studentView2")
	public String studentView2(@ModelAttribute("studentInfo") StudentInformation studentInformation ) {
		logger.info("studentView2 Start .  .   . ");
		System.out.println("StudentInformation2.getName()--> " +studentInformation.getName());
		System.out.println("StudentInformation2.getClassNum()--> " +studentInformation.getClassNum());
		System.out.println("StudentInformation2.getGradeNum()--> " +studentInformation. getGradeNum());
		System.out.println("StudentInformation2.getAge()--> " +studentInformation.getAge());


		return "studentView";
	}
studentView.jsp

<body>
	<h1>studentView.jsp</h1>

	이름:${studentInfo.name }
	<br /> 나이:${studentInfo.age }
	<br /> 학년:${studentInfo.classNum }
	<br /> 반:${studentInfo.gradeNum }
	<br />


</body>
och07_MVC043
컨트롤러 여러개 만들어서 사용하기 -개인별로
redirect
리다이렉트는 페이지를 넘겨줄때 사용한다

HomeController.java
RedirectController.java
package com.oracle.mvc043;
import javax.servlet.http.HttpServletRequest;
import org.slf4j.Logger;
import org.slf4j.LoggerFactory;
import org.springframework.stereotype.Controller;
import org.springframework.ui.Model;
import org.springframework.web.bind.annotation.RequestMapping;
@Controller
public class RedirectController {
private static final Logger logger = LoggerFactory.getLogger(RedirectController.class);
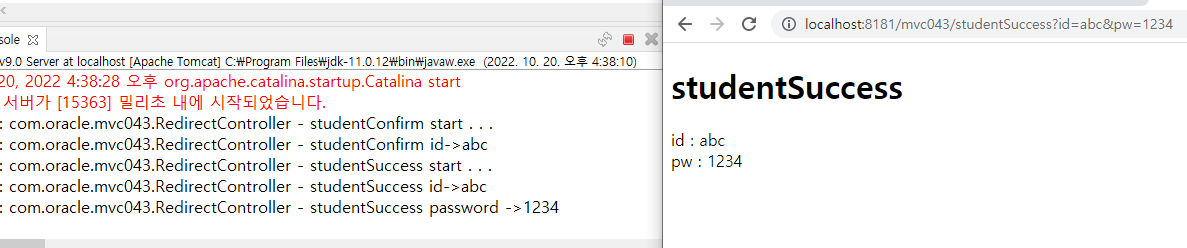
@RequestMapping("studentConfirm")
public String studentRedirect(HttpServletRequest httpServletRequest, Model model) {
logger.info("studentConfirm start . . . ");
String id = httpServletRequest.getParameter("id");
logger.info("studentConfirm id->{}", id);
String pw = "1234";
model.addAttribute("id" ,id);
model.addAttribute("pw", pw);
//성공이라고 가정 -->같은 Controller 내method 이동
if(id.equals("abc")) {
return "redirect:studentSuccess" ;
}
//아니면 실패
return "redirect:studentError";
}
//성공했을때 여기로 이동
@RequestMapping("studentSuccess")
public String studentSuccess(HttpServletRequest request, Model model ) {
logger.info("studentSuccess start . . . ");
String id = request.getParameter("id");
String password = request.getParameter("pw");
logger.info("studentSuccess id->{}", id);
logger.info("studentSuccess password ->{}", password);
model.addAttribute("id" , id);
model.addAttribute("password" , password);
return "student/studentSuccess";
}
//실패했을때 여기로 이동
@RequestMapping("studentError")
public String studentError(Model model) {
logger.info("studentError start . . . ");
return "student/studentError";
}
}
💢 logger.info("studentSuccess id->{}", id);
{}사이에 공백 들어가면 null값으로잡힘 공백 넣지말기
  studentSuccess.jsp   //성공했을때 출력 페이지

  <%@ page language="java" contentType="text/html; charset=UTF-8"
    pageEncoding="UTF-8"%>
<!DOCTYPE html>
<html>
<head>
<meta charset="UTF-8">
<title>Insert title here</title>
</head>
<body>
    <h1>studentSuccess</h1>
    id  : ${id } <br>
    pw : ${password }


</body>
</html>
   studentError.jsp //에러낫을때 뜨는 페이지

 <body>
 넌누구냐 <p>
 <h1>오류  </h1>.. ..
  id  : ${id }

</body>
✅ java복습
✔ Encapsule 정보보호
직접접근하면 에러가남 , get과 set으으로 접근한다 get(얻음) set(보여줌)
   package ch06;

class Encapsule{ set(보여줌)
	private String name;
	private int age;

	public String getName() {
		return name;
	}
	public int getAge() {
		return age;
	}
	public void setName(String name) {
		this.name=name;
	}
	public void setAge(int age) {
		if(age<0) System.out.println("나이입력오류 ㅎㅎㅎ");
		else this.age = age;
	}

}

public class EncapsuleEx {
	public static void main(String[] args) {
		Encapsule h1 = new Encapsule();
		//h1.name = "홍길동";
		h1.setName("홍길동");
		h1.setAge(-10);
	System.out.println("이름:"+h1.getName());
	System.out.println("나이:"+h1.getAge());


	}

}
✔ Factorial 팩토리얼
// 재귀함수 - 자기자신을 다시 호출함
 package ch06;

import java.util.Scanner;

class Factorial { // 5! =5*4*3*2*1 = 5factorial
	int result = 1;

	// 재귀함수 - 자기자신을 다시 호출함
	void factorial(int cnt) {
		if (cnt > 1) {   //1보다 크면 하나씩 작아지면서 계속 곱해줌
			result *= cnt;
			System.out.print(cnt + "*");
			factorial(--cnt);
		} else {
			System.out.println(cnt);
			System.out.println("factorial결과는 " + result);
			return;
		}
	}

}

public class FactorialEx {

	public static void main(String[] args) {
		Factorial fac = new Factorial();
		int InNum;
		System.out.println("Factorial 할 10이하의 숫자를 입력하세요 ? ");
		Scanner sc = new Scanner(System.in);
		InNum = sc.nextInt();
		fac.factorial(InNum);

	}

}
✔Method overLodding 오버로딩
같은 class 내 매개변수 갯수가 다르거나 Data형이 다른 경우 package ch06;
class MethodOV {
void print() {
System.out.println("매개변수 없음");
}
void print(int a1) {
System.out.println("매개변수 int 1개:" + a1);
}
void print(String x1) {
System.out.println("매개변수 Str 1개:" + x1);
}
void print(int a1, String x1) {
System.out.printf("매개변수 int 1개[%d] Str 1개[%s]:",a1,x1);
}
}
public class MethodOVEx {
public static void main(String[] args) {
MethodOV mov1 = new MethodOV();
mov1.print();
mov1.print(7);
mov1.print("짜장면");
mov1.print(3, "짜장면");
}
}
✔수정할때 mddify사용
✔ SingleTon 싱글톤
SingleTon쓰는이유 : 자원절감
   package ch06;
class SingleTon {
	String str;
	private static SingleTon instanse;  //나의 인스턴트를 공유한다 그치만 싱글통은 private 보호 되어있어서 아무나 생성못함

	// private -> 아무나 나를 생성하지 못함
	private SingleTon() {
	}

	public static SingleTon getInstance() { // SingleTon 아무나 못부르지만
		if (instanse == null) // getInstance로 부를수 잇음 .
			instanse = new SingleTon(); //같은 싱글톤안에서는 뉴 싱글톤으로 생성가능
		return instanse;

	}
}

public class SingleTonEx {

	public static void main(String[] args) {
		SingleTon st1 = SingleTon.getInstance(); //st1,st2 껍데기만 다를뿐 싱글톤으로 들어가면 같은 값임 .
		// SingleTon st1 = new SingleTon();
		SingleTon st2 = SingleTon.getInstance(); //st1,st2 껍데기만 다를뿐 싱글톤으로 들어가면 같은 값임 .
		st1.str = "스스로 있는자";
		System.out.println(st2.str);
		if(st1==st2) System.out.println("같다");
		else 		 System.out.println("다르다");

	}

}
✔overRiding 오버라이딩
    package ch07;

public class Car2 { //Car2의 아버지는 Object
	int a = 7;

	void move() {
		System.out.println("차 이동...");

	}

}

class Bus extends Car2 { //버스의 아버지는 칼투
	int a = 25;
//overRiding

	void move() {
		System.out.println("40명 태우고 이동");
	}
}

class Ambulance extends Car2 {
	int a = 100;

	void move() {
		System.out.println("사이렌 울리며 이동");
	}

	void speacial() {
		System.out.println("환자를 태우고 있다");
	}
}

	class FireEngine extends Car2 {
		int a = 11;

    void move( ) {
		System.out.println("물뿌리며 이동 ");
}

	}
✔ 오버라이딩 오버로딩 비교 ⭐⭐⭐⭐⭐
- OverLoading
- 정의 같은 class 여러개 동일 인물 메서드
- 유형 생성자 /method OverLoading
- 특징 호출에 따라 type/변수 Count자동 대응
- OverRidding
- 정의 다른 class상속
- 유형 extends/implement
- 특징 method -> 내꺼 , 변수 ->부모꺼
생성자
  package ch07;

class Parent {
	int a = 7;
	int b = 7;

	void display( ) {
			System.out.println("Parent 대박");
	}

	void pring() {
		System.out.println("Parent 난 부모 print 메소드");
	}

}

	class Child extends Parent {
		int a = 10;

		void print() {
			super.pring(); // 1 부모 Method 찾는다.
			System.out.println("Child 부모멤버   a= " + super.a);
			System.out.println("Child 난 자식 메소드 a= " + this.a); //this 생략가능
			System.out.println("Child 난 자식 메소드 b= " + b);
			System.out.println("=============");

		}
	}


public class Super1 {

	public static void main(String[] args) {
		Child child = new Child();
		child.print();


	}

}
Parent 난 부모 print 메소드
Child 부모멤버 a= 7
Child 난 자식 메소드 a= 10
Child 난 자식 메소드 b= 7