전체 코드: 깃헙 링크
무한 스크롤의 필요성
- 한 페이지에서 대량의 데이터를 보여줄 수 있다는 장점이 있다(페이지네이션과 대치되지만, 요즘은 무한 스크롤을 사용하는 곳들이 많이 보인다)
사용한 방법
검색을 해보니 여러 가지 방법으로 무한 스크롤을 구현할 수 있는 것 같다.
- scroll event
- Intersection Observer API
- 라이브러리도 있음(검색을 해보시면 나옵니다!)
본 글에서 따라해볼 방법은 2 번째 방법이다. 일단 관련 내용들을 찾아보면 scroll event의 경우 리플로우 때문에 렌더링 성능에 문제가 생긴다고 한다. 그리고 마지막 3번째의 경우 라이브러리를 쓰면 혼자 구현해볼 기회가 없기 때문에 애초에 고려하지 않았다.
Intersection Observer API
-
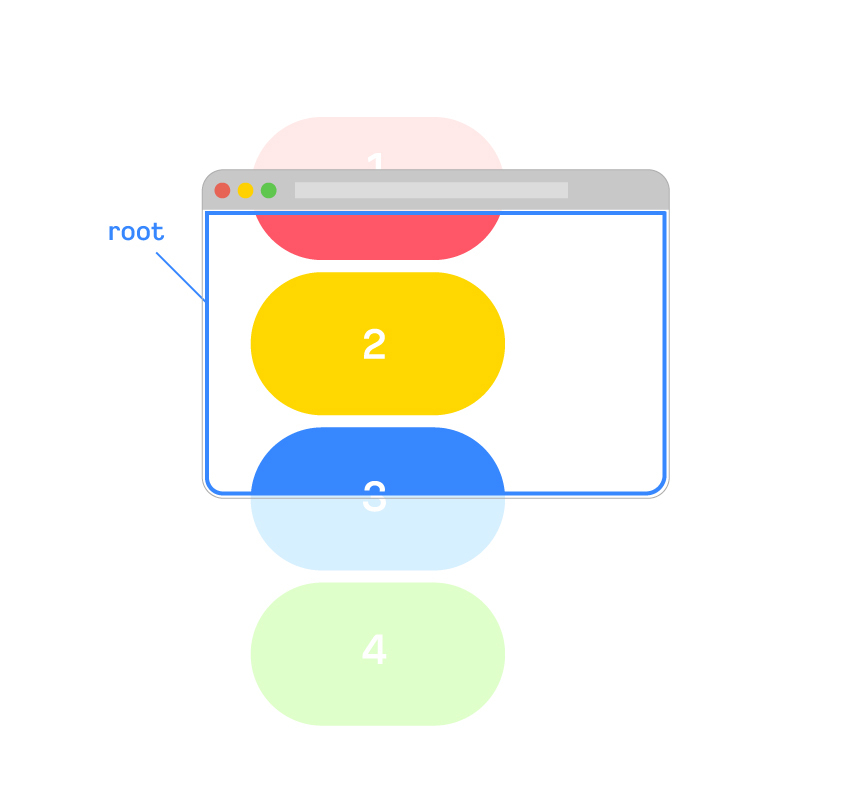
IntersectionObserver를 사용하기 전 간략하게 설명을 해보자면, Intersection Observer API는 브라우저 viewport와 target으로 설정한 요소의 교차점을 관찰 => target이 viewport에 포함됐는지 구별해준다.
-
Intersection Observer API는 다음과 같은 상황에서 콜백을 호출하는 기능을 제공한다.
대상(target) 으로 칭하는 요소가 기기 뷰포트나 특정 요소(이 API에서 이를 root 요소 혹은 root로 칭함)와 교차함.
observer가 최초로 타겟을 관측하도록 요청받을 때마다
출처: https://developer.mozilla.org/ko/docs/Web/API/Intersection_Observer_API
target과 교차할 떄 콜백을 호출하는 기능을 제공해준다고 보면 된다(보통 무한 스크롤에서 target은 가장 아래 있는 tag로 지정함!)
intersection observer 생성하기
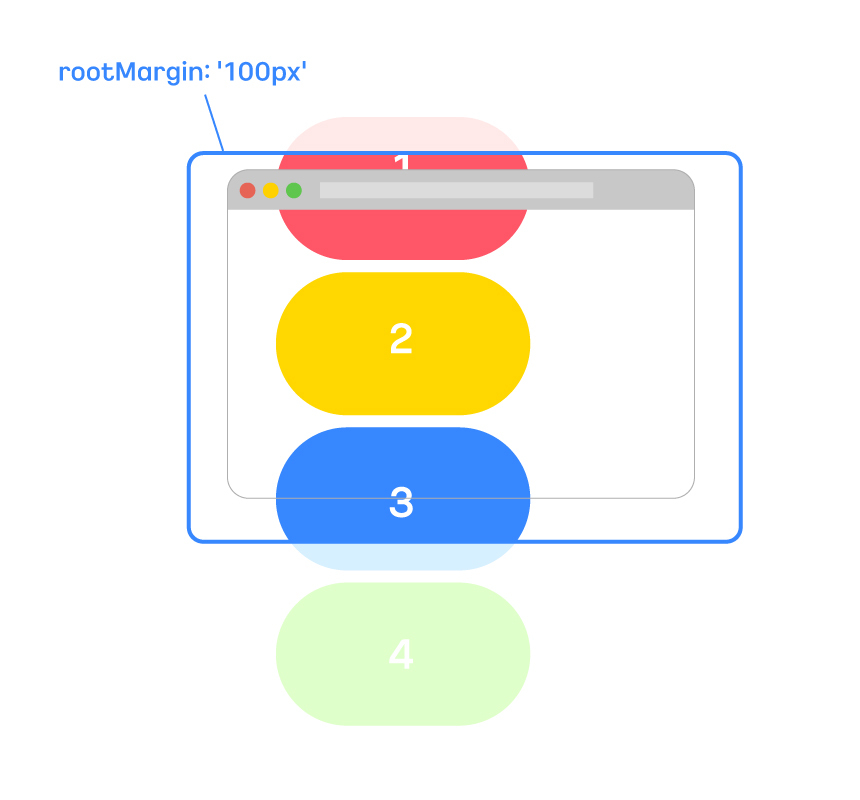
let options = {
  root: document.querySelector('#scrollArea'),
  rootMargin: '0px',
  threshold: 1.0
}

let observer = new IntersectionObserver(callback, options);
이미 언급했듯이 생성자 호출시 콜백함수를 제공해야 한다. options의 경우 observer의 콜백이 호출되는 상황을 조작할 수 있다. options에는 다음과 같은 3가지 필드가 존재한다.
1. root: 대상 객체의 가시성을 확인할 때 사용되는 뷰포트 요소이다. 기본값은 브라우저의 뷰포트이면 null이나 값을 입력하지 않을 시 기본값이 적용된다.
2. rootMargin: root가 가진 여백을 의미한다. margin과 유사하게 px 혹은 %로 지정해줄 수 있다. (기본값은 0으로 지정된다)-root의 마진으로 생각하면 될듯
3. threshold: observer의 콜백이 실행될 때 대상(target)요소의 가시성의 퍼센트를 나타낸다. 즉 화면에 target으로 한 요소가 어느 정도(퍼센트)로 보여야 콜백을 실행할지 결정하는 것이라고 생각하면 편할듯 (사진의 경우 0.3 즉 30%가 보이면 콜백이 실행된다)
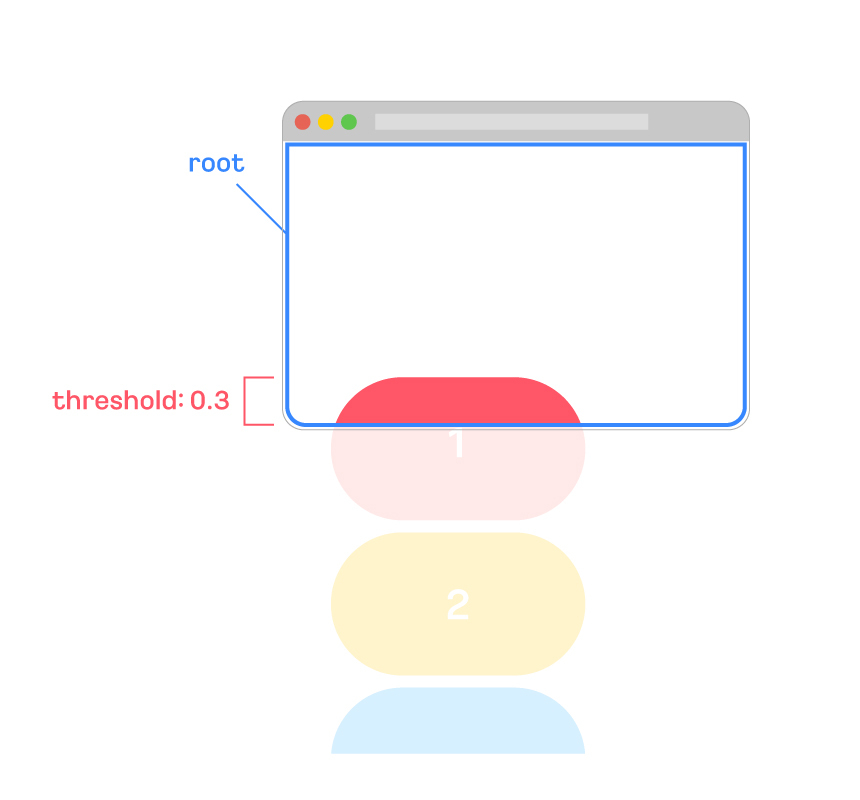
사진 출처: https://tech.kakaoenterprise.com/149
코드 구현:
// useFetchMain.js

import axios from "axios";
import { useEffect, useState } from "react";

export default function useFetchMainPage(pageNumber) {
  const [loading, setLoading] = useState(false);
  const [error, setError] = useState(false);
  const [datas, setData] = useState([]);
  const [hasMore, setHasMore] = useState(false);
  const [dataAmount, setDataAmount] = useState(0);
  useEffect(() => {
    setLoading(true);
    setError(false);
    axios({
      method: "GET",
      url: `${process.env.REACT_APP_API_URL}/questions/`,
      params: {
        page: pageNumber,
      },
    })
      .then((res) => {
        setData((datas) => {
          return [...new Set([...datas, ...res.data.data])];
        });
        setDataAmount(res.data.pageInfo.totalElements);
        setHasMore(res.data.data.length > 0);
        setLoading(false);
      })
      .catch((error) => {
        console.log(error);
        setError(true);
      });
  }, [pageNumber]);
  return { datas, loading, error, hasMore, dataAmount };
}
//Content.jsx

import styled, { css } from "styled-components";

//컴포넌트들
import UpperPart from "./UpperPart";
import DownerPart from "./DonwerPart";
import Questions from "./Question";
import Bottom from "./Bottom";

//React Hook
import useFetchMainPage from "../../hooks/useFetchMainPage";
import { useState, useRef, useCallback } from "react";

//loading
import LoadingSpinner from "../common/Loading";

const ContentPart = () => {
  const [pageNumber, setPageNumber] = useState(1);
  const { datas, loading, hasMore, dataAmount } = useFetchMainPage(pageNumber);
  const observer = useRef();
  const lastDataElementRef = useCallback(
    //마지막 element가 render되면 해당 node element이 =>node로 들어간다.
    (node) => {
      if (loading) return;
      if (observer.current) observer.current.disconnect();
      observer.current = new IntersectionObserver((entries) => {
        if (entries[0].isIntersecting && hasMore) {
          setPageNumber((prePageNumber) => prePageNumber + 1);
        }
      });
      //node(list의 마지막)이 있다면 해당 node를 observe하도록 지정한다.
      if (node) observer.current.observe(node);
    },
    [loading, hasMore],
  );

  return (
    <>
      {loading ? (
        <SpinnerWrap>
          <LoadingSpinner />
        </SpinnerWrap>
      ) : (
        <Content>
          <CotentHead>
            <UpperPart />
            <DownerPart dataAmount={dataAmount} />
          </CotentHead>
          <ContentBody>
            {datas.map((el, index) => {
              //마지막 데이터의 경우 ref={useCallback} 함수를 넣어준다.
              if (datas.length === index + 1) {
                return (
                  <Questions ref={lastDataElementRef} key={index} data={el} />
                );
              } else {
                return <Questions key={index} data={el} />;
              }
            })}
            <Bottom />
          </ContentBody>
        </Content>
      )}
    </>
  );
};

const Content = styled.div`
  flex: 0 1 802px;
  box-sizing: border-box;
  border: 1px solid hsl(210, 8%, 85%);
  border-left-width: 1px;
  border-top-width: 0;
  border-right-width: 0;
  border-bottom-width: 0;
  /* overflow: hidden; */
`;

const CommonStyle = css`
  width: 100%;
  box-sizing: border-box;
`;

const CotentHead = styled.div`
  ${CommonStyle}
  margin-bottom: 1rem;
`;
const ContentBody = styled.div`
  ${CommonStyle}/* height: 100vh; */
`;
const SpinnerWrap = styled.div`
  flex: 0 1 802px;
  display: flex;
  justify-content: center;
  align-items: center;
`;
export default ContentPart;
전체 로직:
전체 코드의 로직을 간략하게 설명하자면 page 1부터 시작해서 GET요청을 할 때 불어온 데이터의 page의 배열의 길이가 0 이상이면 pageNumber+1씩 해서 추가적으로 데이터를 불러오는 형식이다. 즉 마지막 컴포넌트에(target) 뷰포트가 걸리게 되면 새롭게 계속 PageNumber+1해서 GET해오는 형식으로 무한 스크롤이 구현돼 있다고 생각하면 된다.
세부 로직:
<Questions ref={lastDataElementRef} key={index} data={el} />위 element가 생성되면 lastDataElementRef(useCallback 함수)의 콜백 함수 (node)에 위 element가 주어지게 된다(정확히는 해당 컴포넌트에 props로 내려준 div 태그에 해당한다.

- Questions 컴포넌트의 경우 코드가 너무 길어서 무한 스크롤에 중요하게 작용한 코드들만 첨부하고자 한다. 전체 코드를 확인하고 싶다면 최상단의 깃헙 링크를 클릭하면 확인할 수 있다.
//Questions.jsx에 있는 코드들
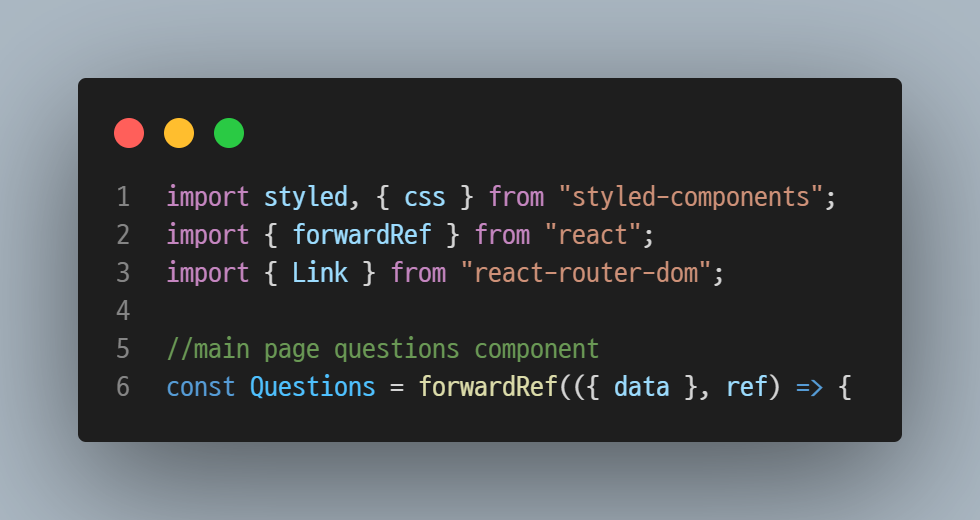

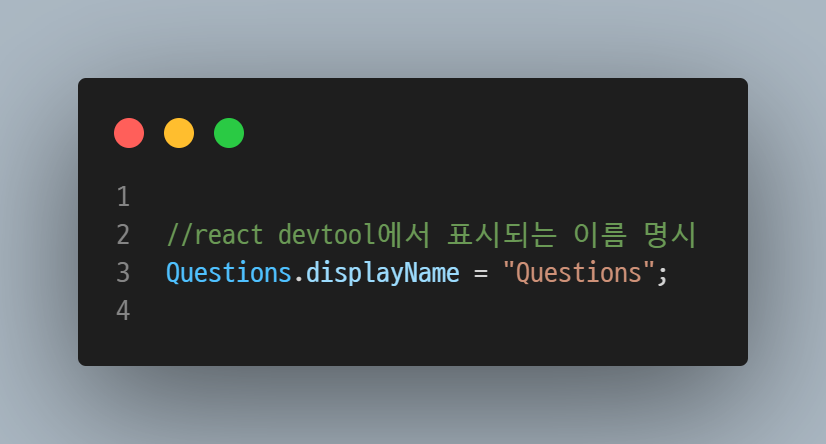
위의 코드의 경우 리액트 컴포넌트에 ref를 사용하기 위한 코드를 보여주고 있다. 일단 html태그인 경우 ref={ref}를 사용해서 html element을 추출?할 수 있지만 react 컴포넌트의 경우 forwardRef를 사용해서 props로 ref를 내려줘야 한다. 따라서, 위의 코드 사진들은 해당 과정을 담고 있다고 보면 된다. 추가적으로 forwardRef를 사용할 경우 react devtool에 명시할 이름을 추가적으로 지정을 해줘야 한다(컴포넌트의). 마지막 코드 사진의 경우 해당 과정을 보여주고 있다.
-
추가로 학습해야 할 내용들
1. useRef()는 HTML nodeElement를 담고 있다고 생각하면 편할듯 하다.-
IntersectionObserver에 대한 추가적인 학습이 필요해 보인다. (코딩 애플 참고하기)
-
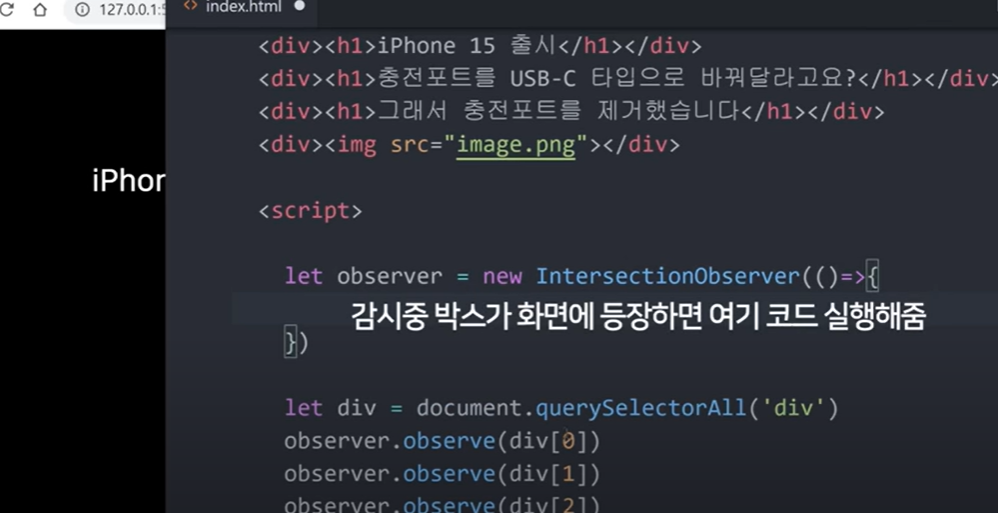
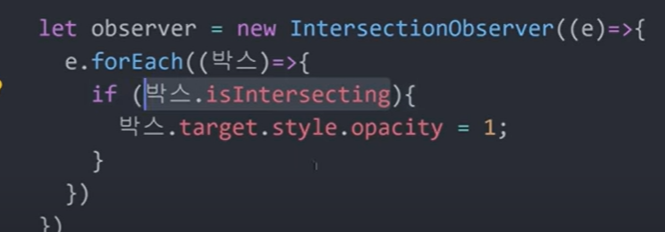
Observer.observe:원하는 html요소를 감시: (화면 등장 여부를 판별 가능!)
-
위 사진에서 보이는 것처럼 observe하고 있는 태그(대상)이 화면에 나타나면 내부 콜백함수를 실행하게 된다.
-
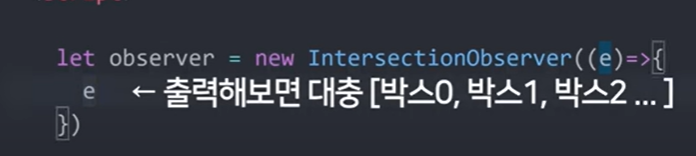
대충 위와 같은 형식이다.
-
-
-
is Intersecting은 화면에 해당 element가 등장했을 때만 실행해줄 수 있도록 조건문으로 조절할 수 있다.
-
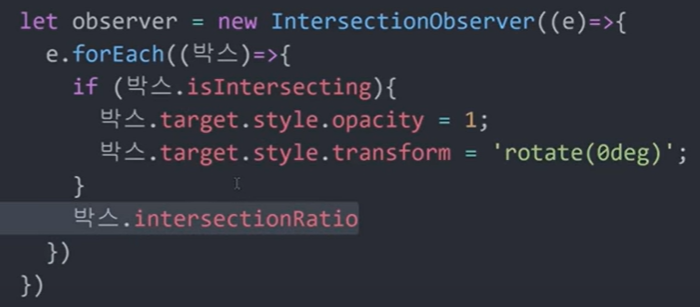
intersectionRatio의 경우 박스가 몇퍼센트 화면에 등장하고 있는지 보여준다.
- cancelToken: new axios.CancelToken((c) => (cancel = c))에 대한 내용 추가적으로 학습하기
-
취소 토큰을 이영해 요청을 취소할 수 있는 기능이다.
-
axios의 영어문서에선 0.22.0 버전 부터 js가 제공하는 AbortController를 사용하는 것을 권장하고, axios가 제공하는 CancelToken은 deprecated 되었다고 한다. 그럼에도 CancelToken을 이용한 취소 토큰은 여전히 사용 가능하며 이왕 사용한 것 간략하게 분석해보고자 한다.
const CancelToken = axios.CancelToken;
const source = CancelToken.source();

axios.get('/user/12345', {
  cancelToken: source.token
}).catch(function (thrown) {
  if (axios.isCancel(thrown)) {
    console.log('Request canceled', thrown.message);
  } else {
    // 에러 핸들링
  }
});

axios.post('/user/12345', {
  name: 'new name'
}, {
  cancelToken: source.token
})

// 요청 취소하기 (메시지 파라미터는 옵션입니다)
source.cancel('Operation canceled by the user.');
-
요청 취소가 필요한 axios 요청에 cancelToken에 source.token을 넣은 것을 확인할 수 있다.
-
source.cancel("취소")메세지를 통해 source token을 가지고 있는 요청을 취소할 수 있다.
class CancelToken {
 ...
 static source() {
   let cancel;
   const token = new CancelToken(function executor(c) {
     cancel = c;
   });
   return {
     token,
     cancel
   };
 }
}
export default CancelToken;
- 내가 작성한 코드를 참고하면 (cancel=c)를 함으로써 =>cancel 변수에 c 즉 cancel 함수를 값으로 넣어주는 것으로 보인다. cancel()함수를 호출하면 listener함수들이 호출돼 요청일 취소되게 되는 것이다.
참고한 링크는 아래
- https://axios-http.com/kr/docs/cancellation
- https://hmos.dev/en/how-to-cancel-at-axios
- https://axios-http.com/kr/docs/cancellation
Yes, I can explain how cancelToken works in the provided code.
cancelToken is a way to cancel a request that has been sent but not yet received a response. In the provided code, it is used to cancel the Axios request in case the component unmounts before the response is received.
When the useEffect hook is called, it sets the cancel variable to a new CancelToken object created by calling the new operator on the CancelToken constructor of Axios. This cancel variable is used to cancel the request by calling its cancel method.
If the component unmounts before the response is received, the return statement in the useEffect hook is called, which in turn calls the cancel method on the cancel variable. This cancels the request, and the error returned by Axios is caught in the catch block.
In summary, cancelToken is used to cancel an Axios request if the component unmounts before the response is received, preventing a memory leak and avoiding unnecessary network requests.
For more information on canceling Axios requests, you can refer to the official Axios documentation [2].
- 내가 작성한 코드의 경우 useEffect return 즉 component amount에서 작동한다. 해당 예시에서의 무한 스크롤은 글자를 입력해 데이터를 받아오는 형식이다. 하지만 알파벳 하나씩 입력할 때마다 요청을 보내게 되어 쓸모없는 axios request를 지속적으로 보내게 된다. 따라서, useEffect의 return을 이용해
4. 다양한 선택이 가능한가를 보는 것이다.
```js
//App.js
import "./App.css";
import useBookSearch from "./useBookSearch";
import { useState, useRef, useCallback } from "react";
//useCallback:함수를 재사용하는 것?
//useRef:value that persist after each render; (state를 사용하지 않고 유지하고자 할 때)
function App() {
const [query, setQuery] = useState("");
const [pageNumber, setPageNumber] = useState(1);
const { books, hasMore, loading, error } = useBookSearch(query, pageNumber);
//화면에 title을 렌더링하다가 마지막 부분을 지정한다?
const observer = useRef();
const lastBookElementRef = useCallback(
(node) => {
//loading하고 있을 때 무한 스크롤을 하게 되면 계속 data get만 하게 된다...좋지 않음!
if (loading) return;
//기존의 connect을 끊어줘야 새롭게 connect 가능
//이미 마지막에 도달했기 때문에 새롭게 호출을 해야 한다.
console.log(observer);
console.log("observer.current", observer.current);
if (observer.current) observer.current.disconnect();
console.log("obsever.current.disconnect", observer.current);
observer.current = new IntersectionObserver((entries) => {
if (entries[0].isIntersecting && hasMore) {
//페이지 어딘가에 존재한다는 의미임!
setPageNumber((prePageNumber) => prePageNumber + 1);
console.log("visible");
}
});
//이건 왜 해주는 거냐??
if (node) observer.current.observe(node);
console.log(node); //ref={}을 담고 있는 element node가 들어온다.
},
[loading, hasMore]
);
//input이 변경될 때매다 useBookSearch 실행
const handleSearch = (e) => {
setQuery(e.target.value);
//새로운 query가 발생할 때마다 page=>1에 명시하게 된다!
setPageNumber(1);
};
//value={query} query값이 다른 곳에서 변경되더라도,value가 추적할 수 있도록 함!
return (
<>
<input type="text" value={query} onChange={handleSearch}></input>
{books.map((book, index) => {
if (books.length === index + 1) {
return (
//마지막일 경우 해당 node ele ment를 return 한다.
<div ref={lastBookElementRef} key={book}>
{book}
</div>
);
} else {
return <div key={book}>{book}</div>;
}
})}
<div>{loading && "isLoading...."}</div>
<div>{error && "Error...."}</div>
</>
);
}
export default App;
//useBookSearch.js

import axios from "axios";
import { useEffect, useState } from "react";
//pageNumber의 경우 http query를 보낼 때 which page를 요구하지 담게 된다.
export default function useBookSearch(query, pageNumber) {
  //내부에 따로 pagination이 존재한다.(params로 전달하면 된다!)
  const [loading, setLoading] = useState(false);
  const [error, setError] = useState(false);
  const [books, setBooks] = useState([]);
  const [hasMore, setHasMore] = useState(false);

  //new Set에서 기존의 것+새 것을 했으니
  //input이 reset되더라도, 이전 자료가 남아 있음
  //그것을 reset해주는 용도(하지만 공식문서에 따르면,특정값에 따른 동작을 하기 위해)
  //useEfffect을 사용하는 것은 좋지 않다고 한다.
  useEffect(() => {}, [query]);
  //AJAX 데이터 보내기
  useEffect(() => {
    setLoading(true);
    setError(false);
    let cancel;
    axios({
      method: "GET",
      url: "http://openlibrary.org/search.json",
      params: {
        q: query,
        page: pageNumber,
      },
      cancelToken: new axios.CancelToken((c) => (cancel = c)),
    })
      .then((res) => {
        setBooks((books) => {
          //제목만을 가져온다.기존의 title이랑 새롭게 추가된 title이 추가된다.
          // 기존 데이터 + 새 데이터 ([],[],[],+새롭게 fetch한 데이터들이 나온다.)
          //밑과 같이 하면 중복된 것을 제외한 배열로 나온다.
          return [
            ...new Set([...books, ...res.data.docs.map((el) => el.title)]),
          ];
        });
        //pageNumber가 계속 추가되기 때문에 밑 과정이 충족될 수 있는 것이다!
        setHasMore(res.data.docs.length > 0);
        setLoading(false);
      })
      .catch((err) => {
        //이렇게 입력하면, input이 변경하더라도, 한 번만 fetch하게 된다!
        if (axios.isCancel(err)) return;
        setError(true);
      });
    return () => cancel();
  }, [query, pageNumber]);
  return { books, loading, error, hasMore };
}