Kotlin 문법에 슬 적응하고 있던 시점, 몇 가지 과제를 마치고 Kotlin 공식 Document에 제공되어 있는 Spring 튜토리얼을 따라가 보고 싶어졌다.
Spring에 대해 배우려고 검색하다 보면 Java 기반으로 되어 있는 경우가 많아 헷갈려서 그냥 공식 Document를 보았는데 생각보다 매우 이해하기 쉽게 정리되어 있었다. 한 번 따라가보자.
1. Spring Boot 프로젝트 생성
먼저, IntelliJ IDEA에서 새 프로젝트를 생성하자.
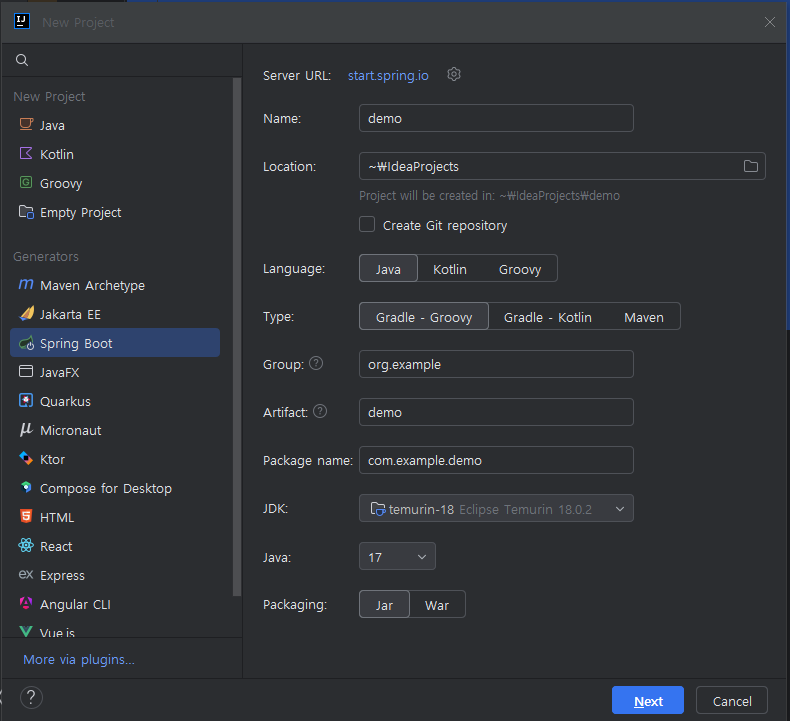
좌측에서 Spring Boot를 선택하고 아래와 같이 설정을 하자.
- Language: Kotlin
- Type : Gradle - Kotlin
- Java : 17
다음을 누르게 되면 Dependency를 추가 할 수 있는 페이지가 나온다. 간단한 프로젝트이므로 아래에 해당하는 부분들만 선택해주자.
- Web -> Spring Web
- SQL -> Spring DataJDBC
- SQL -> H2 Database
H2 Database
Spring Boot에서 지원하는 인메모리 RDBMS로 테스트 환경에서 자주 사용한다.
다른 DBMS를 연결하고 싶으면 진행해도 되지만 여기서는 H2를 사용하자.
프로젝트 생성을 완료했으면 간단하게 Controller 생성을 진행해보자.
2. RestController 생성
이제 정말 간단한 Get 메소드를 지원하는 Controller를 만들어보자.
DemoApplication.kt
@RestController
class MessageController {
    @GetMapping("/")
    fun index(@RequestParam("name") name: String) = "Hello, $name!"
}- @RestController : 해당 annotation의 경우
MessageController가 REST Controller라는 것을 Spring에게 알려준다. - @GetMapping : 아래에 오는 함수가 HTTP GET call에 해당하는 endpoint를 위한 것이라는 표기.
해당 프로그램을 실행하고 아래 주소로 들어가보면 다음과 같은 응답이 오는 것을 알 수 있다.
http://localhost:8080?name=John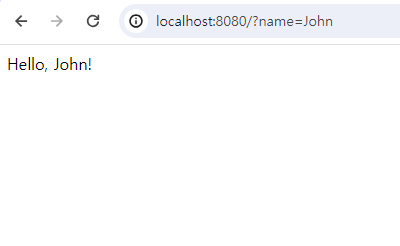
3. Data Class 활용하기
이제 data class를 활용하여 프로젝트를 한 단계 발전시켜 보자.
HTTP call들은 data 전달을 수반하는 경우가 많다. 그렇기 때문에 미리 data의 형태를 class로 만들어두고, 이를 통해 편하게 data를 활용해보자.
DemoApplication.kt
data class Message(val id: String?, val text: String)

@RestController
class MessageController {
    @GetMapping("/")
    fun index() = listOf(
        Message("1", "Hello!"),
        Message("2", "Bonjour!"),
        Message("3", "Privet!"),
    )
}
위의 코드를 통해 간단하게 id와 내용을 담고 있는 Message class를 만들었다.
그 후 3개의 Message 인스턴스를 생성해 response에 담아준다.
http://localhost:8080이후 해당 주소로 들어가 보면 JSON format으로 구성된 Response를 확인할 수 있다.
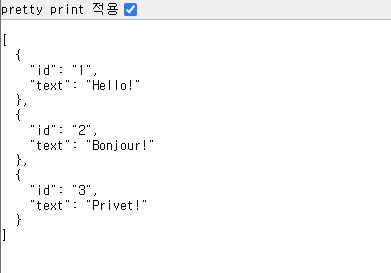
Spring Application의 모든 Controller JSON format의 response를 기본으로 가진다.
따라서, 만약 endpoint가 JSON serializable한 data structure를 리턴하는 경우 JSON형태로 자동으로 변경시켜준다.
4. Database 연결하기
Service Layer 만들기
일반적으로 프로젝트를 구현하게 되면 반드시 Database를 활용하게 될 것이다. 이 때, 아무래도 database 접근 로직 (service-layer)을 구현해야 한다. @Service annotation을 활용해 어떻게 service layer를 만드는 지 살펴보자.
DemoApplication.kt
import org.springframework.stereotype.Service
import org.springframework.jdbc.core.JdbcTemplate

import java.util.UUID

@Service
class MessageService(val db: JdbcTemplate) {
    fun findMessages(): List<Message> = db.query("select * from messages") { response, _ ->
        Message(response.getString("id"), response.getString("text"))
    }

    fun save(message: Message) {
        val id = message.id ?: UUID.randomUUID().toString()
        db.update(
            "insert into messages values ( ?, ? )",
            id, message.text
        )
    }
}
생성자를 통해 받아온 db 변수를 통해 직접 query하거나 값을 저장하는 함수가 구현되어 있다. MessageController는 이제 직접 database에 접근하지 않고, MessageService를 통해 db와 소통할 수 있게 된다.
이제 MessageController가 service-layer를 활용하도록 코드를 수정해보자.
DemoApplication.kt
import org.springframework.web.bind.annotation.RequestBody
import org.springframework.web.bind.annotation.PostMapping

@RestController
class MessageController(val service: MessageService) {
    @GetMapping("/")
    fun index(): List<Message> = service.findMessages()

    @PostMapping("/")
    fun post(@RequestBody message: Message) {
       service.save(message)
    }
}@PostMapping: 아래 함수가 HTTP POST call에 해당하는 endpoint를 위한 것이라는 표기.@RequestBody: HTTP Body를 통해 전달된 JSON 형태의 값을 object(여기서는 Message)로 변경하기 위해 필요하다.
Database 구성하기
이제 데이터베이스를 연결하기 위해 다음과 같은 과정을 따르자.
- 먼저
src/main/resources경로에schema.sql파일을 생성한다. - 해당 파일의 내용을 아래와 같이 입력하자.
CREATE TABLE IF NOT EXISTS messages (
id       VARCHAR(60)  PRIMARY KEY,
text     VARCHAR      NOT NULL
);- 같은 경로에 존재하는 application.properties를 열어 아래와 같이 내용을 추가하자.
spring.datasource.driver-class-name=org.h2.Driver
spring.datasource.url=jdbc:h2:file:./data/testdb
spring.datasource.username=name
spring.datasource.password=password
spring.sql.init.schema-locations=classpath:schema.sql
spring.sql.init.mode=always
HTTP request 활용하기
위의 configuration 설정이 제대로 완료되었으면, HTTP 요청을 통해 데이터베이스에 접근이 가능할 것이다.
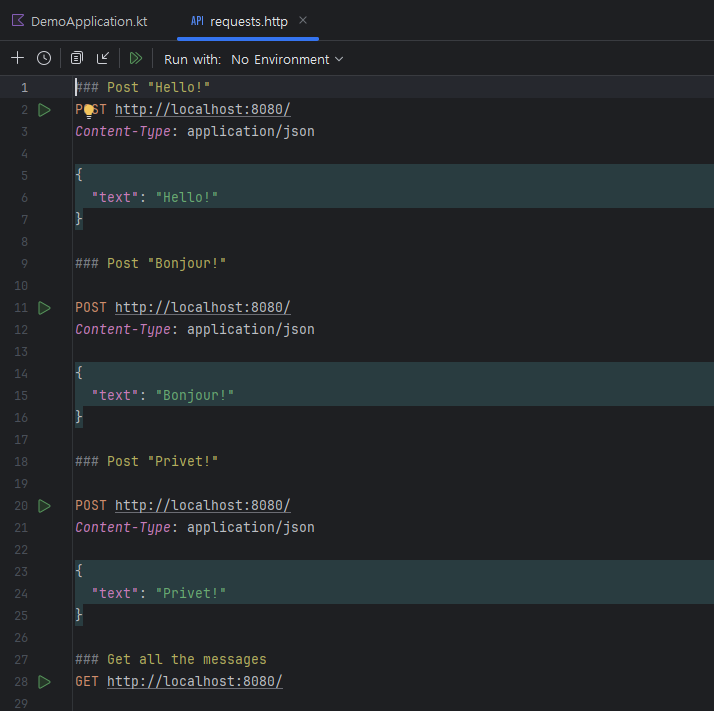
src/main/resources 경로에 requests.http라는 이름의 파일을 생성하고 여기에 요청하고 싶은 request들을 넣어보자. 아래 예시 처럼 넣으면 된다.
### Post "Hello!"
POST http://localhost:8080/
Content-Type: application/json

{
  "text": "Hello!"
}

### Post "Bonjour!"

POST http://localhost:8080/
Content-Type: application/json

{
  "text": "Bonjour!"
}

### Post "Privet!"

POST http://localhost:8080/
Content-Type: application/json

{
  "text": "Privet!"
}

### Get all the messages
GET http://localhost:8080/
이렇게 파일을 생성해두면 아래와 같이 IntelliJ 내부에서 편하게 요청을 보낼 수 있다.
이제 추가적으로 id를 통해 특정 message를 가져오는 함수를 구현해보자.
MessageService 에서 findMessageById 함수를 추가하여 아래와 같이 작성해보자.
import org.springframework.jdbc.core.query

@Service
class MessageService(val db: JdbcTemplate) {

    fun findMessages(): List<Message> = db.query("select * from messages") { response, _ ->
        Message(response.getString("id"), response.getString("text"))
    }

    fun findMessageById(id: String): List<Message> = db.query("select * from messages where id = ?", id) { response, _ ->
        Message(response.getString("id"), response.getString("text"))
    }

    fun save(message: Message) {
        val id = message.id ?: UUID.randomUUID().toString()
        db.update(
            "insert into messages values ( ?, ? )",
            id, message.text
        )
    }
}
이제 Controller에서도 해당 함수를 활용하는 Get Method를 추가해보자.
import org.springframework.web.bind.annotation.*

@RestController
class MessageController(val service: MessageService) {
    @GetMapping("/")
    fun index(): List<Message> = service.findMessages()

    @GetMapping("/{id}")
    fun index(@PathVariable id: String): List<Message> =
        service.findMessageById(id)

    @PostMapping("/")
    fun post(@RequestBody message: Message) {
        service.save(message)
    }
}
이제 Post를 통해 새로운 Message를 생성하여 저장하고, GET("/")요청을 통해 모든 message들을 가져와보자.
그리고 그 중 하나의 id를 복사해서 GET("/{id}") 요청의 Path parameter로 넣어서 올바른 response가 돌아오는지 확인해보자!
5. 정리
오늘은 간단하게 Spring Boot에 대해서 맛볼 수 있는 튜토리얼을 따라해보았다.
Database를 연결하는 부분이나, 각 annotation에 대한 설명이 조금 부족해 어렵게 느껴지는 부분도 있었지만, 전체적으로 이해하기 쉽게 흐름을 가져갈 수 있었다.
다른 Framework를 많이 사용해본 것은 아니지만, data전달 과정에서 자동으로 JSON 변환을 해주는 것이 정말 신기했다.
내일은 Spring의 더 많은 부분을 공부해보자.