데이터베이스 사용자 만들기 / 권한 / 백업과 복원 / JDBC / 자바와 데이터베이스 연동
복습
DDL
- 데이터를 기록할 장소에 대한 정의
-
데이터베이스
-
테이블
컬럼에 대한 설정
constraint 설정
index
view
DML
데이터의 운영
select / insert / update / delete
DDL 정의를 알아야 한다.
=> ERD
logical diagram
physical diagram
project 기획
- 기획서
기획적 분석
디자인 분석
프로그램 분석 ( uml, erd, 시스템분석, 프로그램 언어 추천이유 )
파일 -> 데이터베이스 사용 목적
-
다중 사용자(동시 접속)을 해결하기 위함
관리자 = root / 암호는 확실하게 암호화
일반 사용자에게 권한주기(관리자급으로 권한을 주지는 않음) -
네트워크(원격접속) 파일같은건 원격접속이 안되는데, 되게 하기위함
네트워크 카드
유선
무선
루프백 - 기본적으로 있는 것 (127.0.0.1 / localhost)
인터넷용 아이피 - 반드시 인터넷에 접속(공유기, 라우터)
인트라넷 (내부아이피(사내망) - 192.168.xxx.xxx 대부분 이런식
인터넷 - 다름
일반 사용자에 대한 설정은 관리자(root)가 한다.
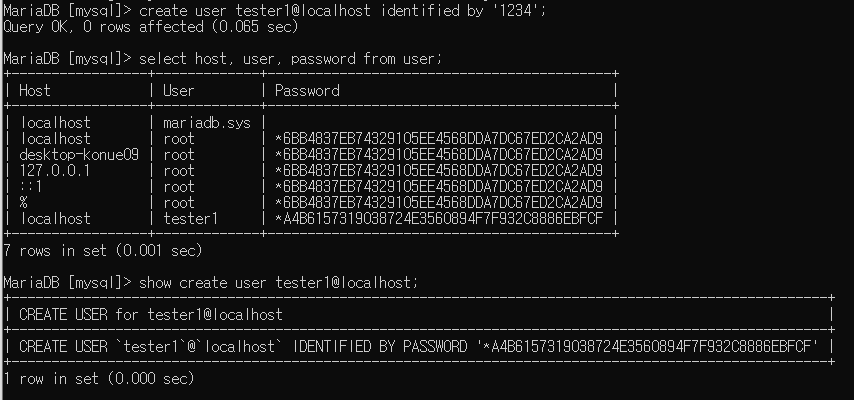
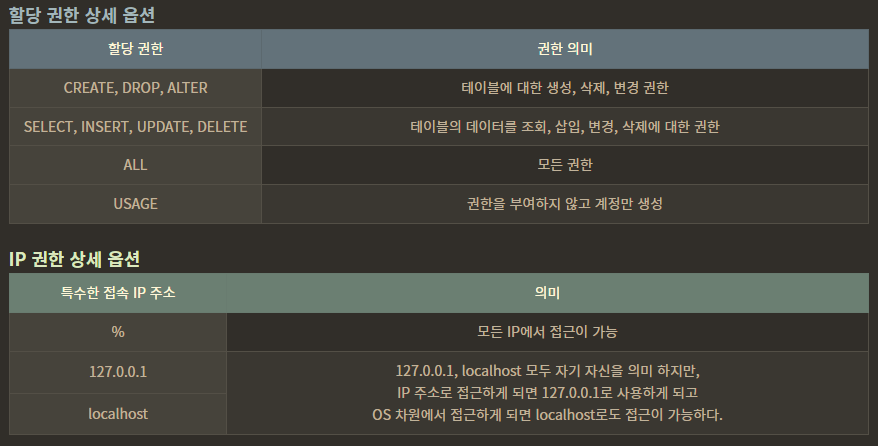
사용자 만들기
localhost로 하면 내부ip만 접속할 수 있고 localhost자리에 '%'로 표시하면 외부ip에서도 접속이 가능!
내부ip접속 : create user '계정아이디'@localhost identified by '비밀번호';
외부ip접속 : create user '계정아이디'@'%' identified by '비밀번호';
'%' = 외부와 내부 둘 다 접속 가능.
create user 사용자명@localhost indentified by(비밀번호) '1234';
테이블 생성 쿼리 보기 : show create table 사용자명@localhost
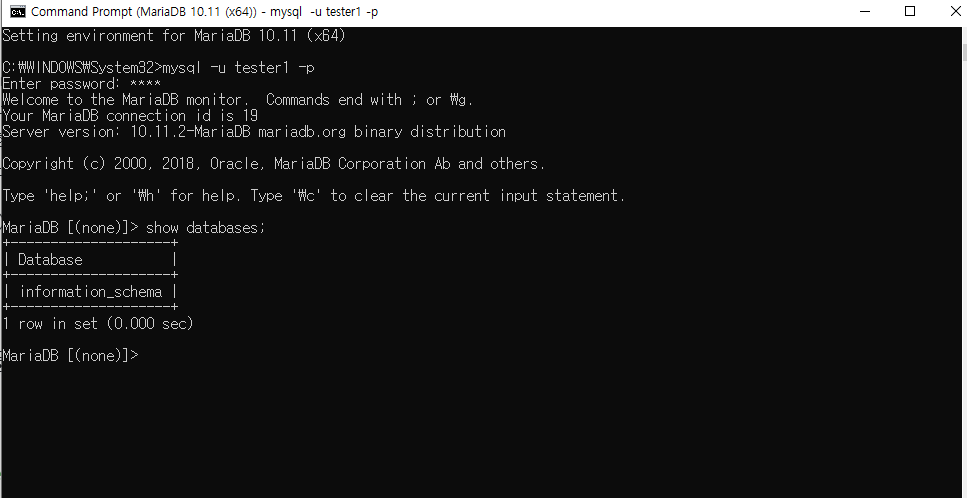
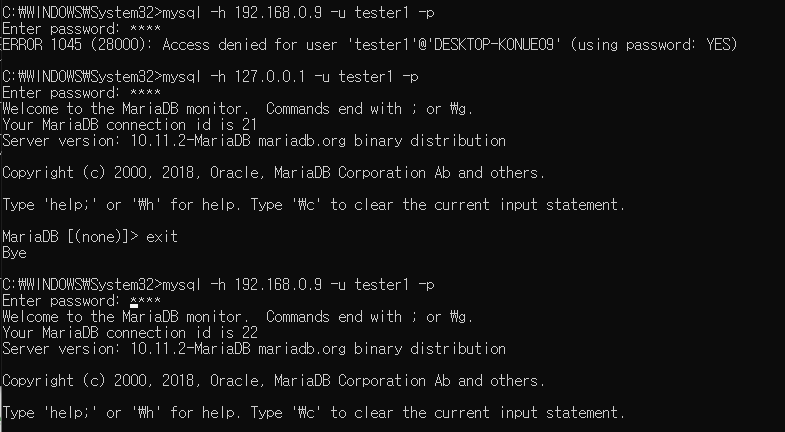
접속하기
다른 프롬프트에서 tester1 접속하기 비밀번호 1234
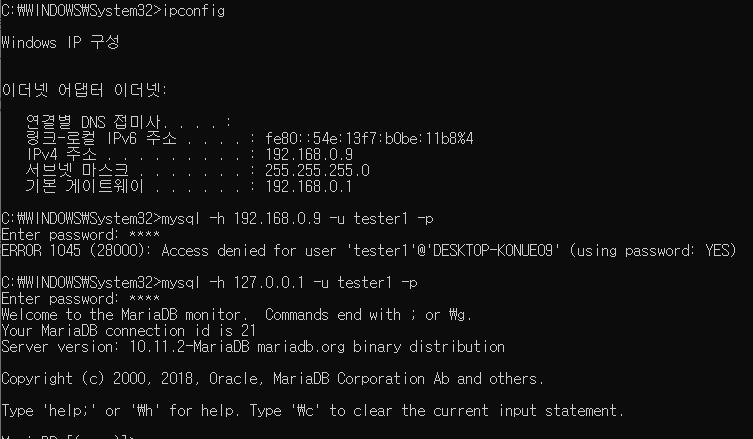
192.168.0.9 는 나의 아이피지만 접속이 불가능하다 (외부 권한이 없기때문)
권한주기 외부 아이피 접속
외부와 local호스트에서도 접속 할 수있다
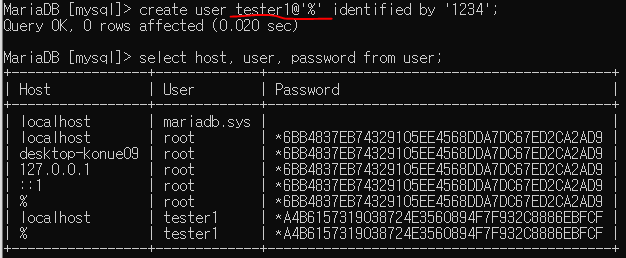
외부아이피 접속
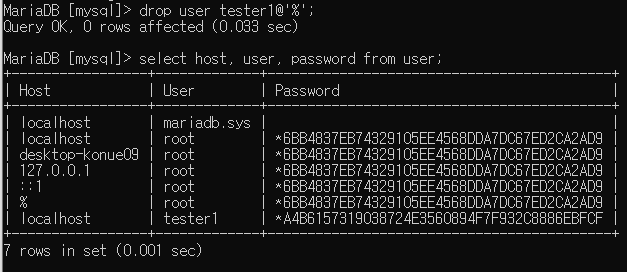
사용자 지우기 - drop user 사용자명@포트;
제거 후 재접속 하기 전까지는 남아있지만 나갔다가 다시 접속은 안된다.
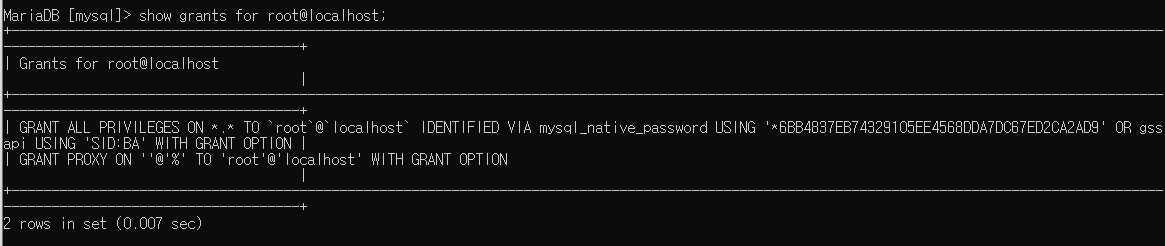
권한 - Privileges, DCL (Date Control Lang)
grant all privileges on 데이터베이스 명.테이블 명 to 계정 명@'접속 IP 주소' identified by '비밀번호'; / grant all privileges on - 전체 권한 할당
grant - 사용자에게 권한 부여
grant 권한 on 데이터베이스.테이블 to '아이디'@'호스트' identified by '비밀번호'
revoke - 권한 제거
권한 확인 - show privileges
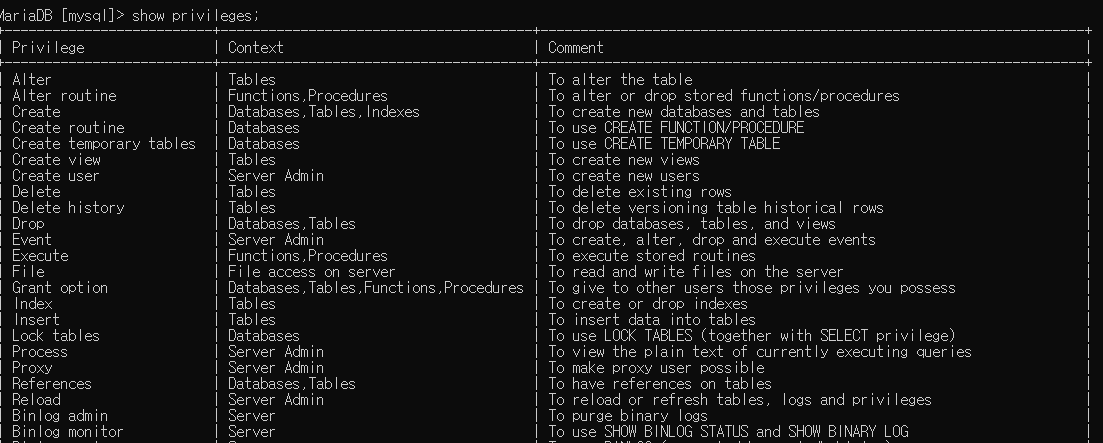
주어진(부여된) 권한에 대한 확인
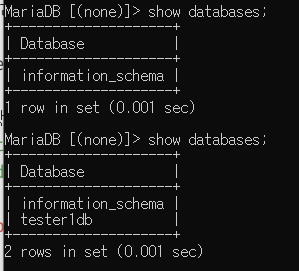
권한주기
tester1db 데이터베이스 생성
tester1db에 tester1@localhost권한 줌
create - 생성에 대한 권한
tester1@localhost 사용자의 tester1db 데이터베스에게 create 권한을 줌

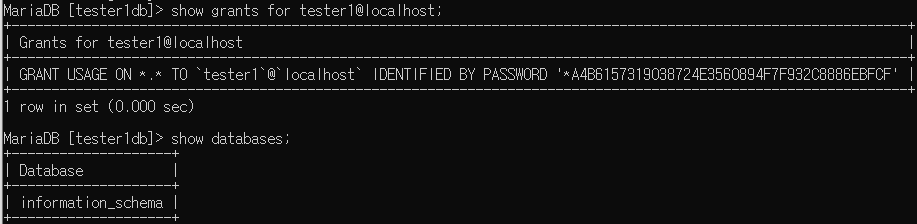
들어간거 확인해보기
'user'@'host' 사용자에게 거부된 SELECT 명령 오류는 현재 연결된 MySQL 사용자에게 대상 데이터베이스에 대한 SELECT 권한이 없을 때 종종 발생

tester1@localhost의 권한 보기

권한 지우기 - revoke
tester1@localhost 사용자의 tester1db 데이터베이스의 테이블 create(생성)에 권한 지움

모든 권한 주기


권한 빼기

빠진거 확인하기
세부적인 dml
tester1db.emp를 만듦


권한주기
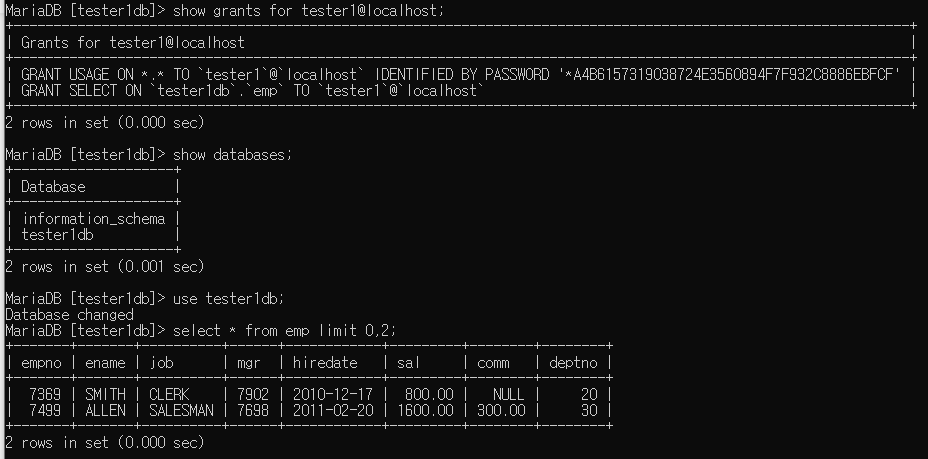
tester1@localhost의 tester1db.emp에게 select 권한을 줌

사용자에서 확인
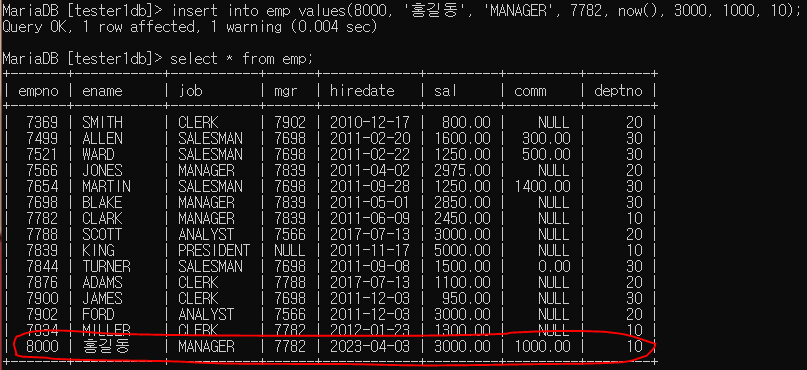
데이터 넣기
insert권한이 없어서 에러남

insert 권한 넣기 / 들어간거 확인

select와 insert의 권한이 부여돼있음.

insert 권한을 받아서 데이터 삽입이 가능해짐
권한과 동시에 사용자 만들기
grant all privileges on - 전체 권한 할당
grant all privileges on 데이터베이스 명.테이블 명 to 계정 명@'접속 IP 주소' identified by '비밀번호';
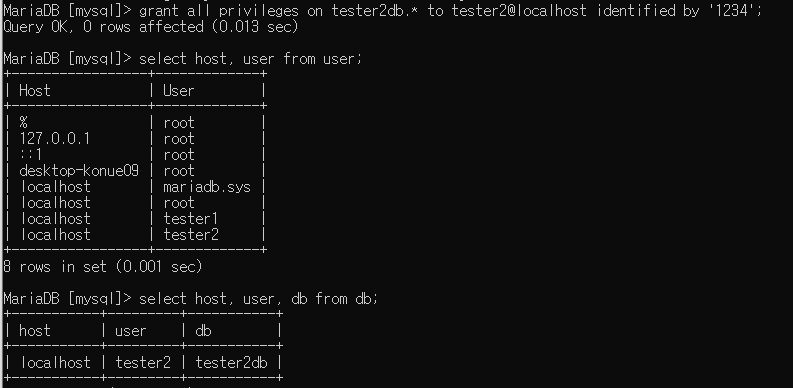
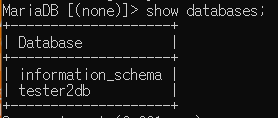
tester2db
데이터베이스에 대한 백업/복원
데이터파일의 위치가 중요
백업받기 위해서 데이터베이스 멈추고 작업 ( 그냥 받으면 깨짐 )
mysqldump - 아무데서나 실행시킬 수 있는 명령어 / 복원용 스크립트 생성
csv
특정 테이블만 백업
sample의 emp를 dump_em.sql로 백업한다. sample > dump_emp.sql ->방향으로 넣는다는 느낌

복원하기
emp 복원 sample < dump_emp.sql / <- 방향으로 넣는다는 느낌

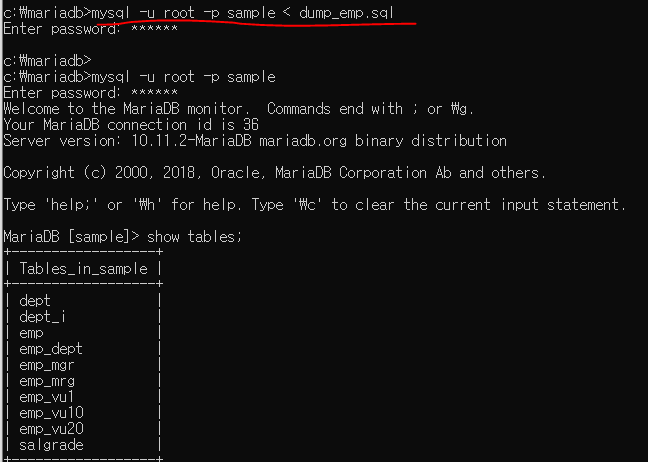
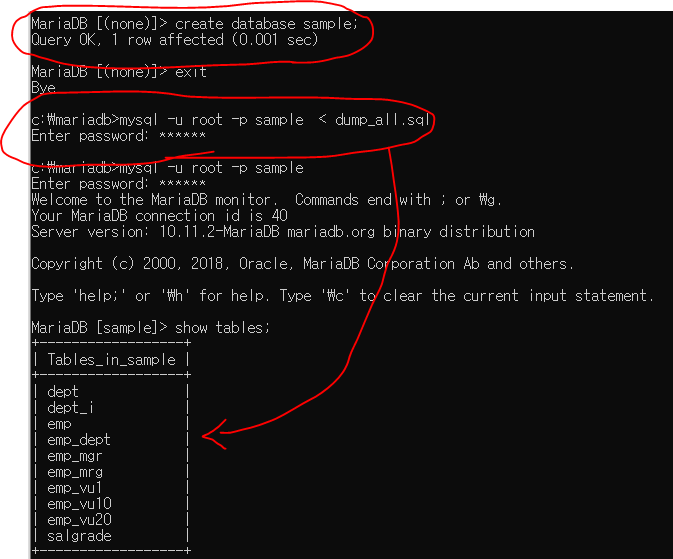
데이터베이스 생성 / 복원
데이터베이스 sample 생성 후 dump_all.sql로 데이터 복원
JDBC
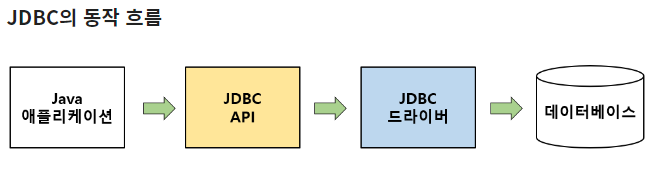
JDBC(Java Database Connectivity)는 Java 기반 애플리케이션의 데이터를 데이터베이스에 저장 및 업데이트하거나, 데이터베이스에 저장된 데이터를 Java에서 사용할 수 있도록 하는 자바 API이다.
JDBC는 Java 애플리케이션에서 데이터베이스에 접근하기 위해 JDBC API를 사용하여 데이터베이스에 연동할 수 있으며, 데이터베이스에서 자료를 쿼리(데이터베이스에 정보를 요청하는 것)하거나 업데이트하는 방법을 제공한다.
응용프로그램과 DBMS간의 통신을 중간에서 번역해주는 역할을 한다.
자바와 데이터베이스 연동
오타 조심 !
jdbc driver 내용 파악 - 클래스로 작성
mariadb 드라이버 시작 : org.mariadb.jdbc.Driver
연결경로 : url(내가 접속할 url) - jdbc:mysql://ip번호:포트번호/데이터베이스명
=> jdbc:mysql://localhost:3306/sample
id - root
password
JDBC API 사용 흐름
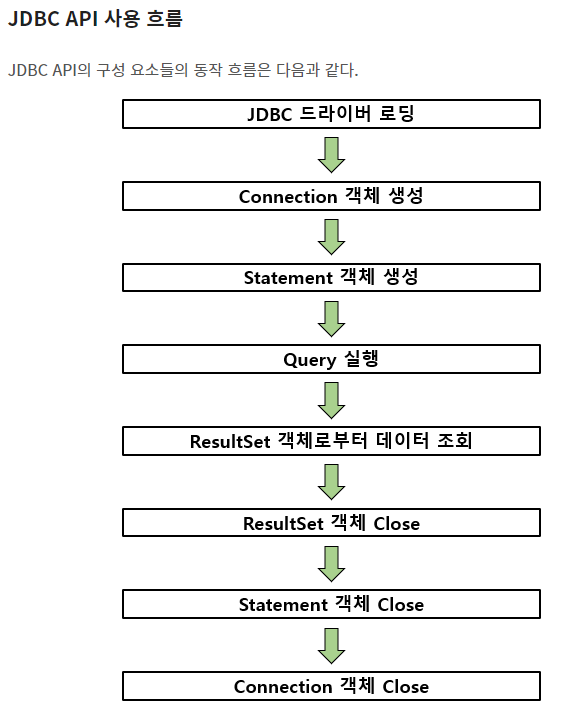
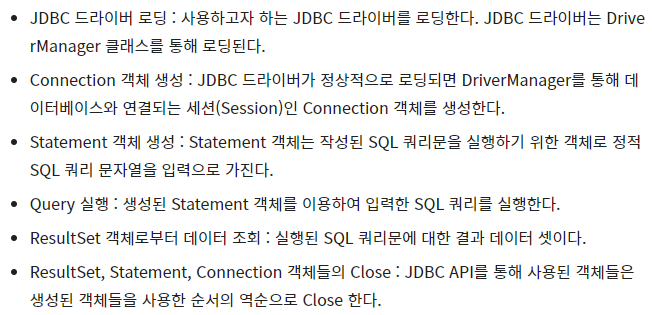
Class.forName : JDBC 를 사용하여 DB에 접근하기 위해서는 제일 먼저 드라이버 클래스를 로드해야 하는데, 그 때 Class.forName을 사용
DriverManager.getConnection(연결문자열, DB_ID, DB_PW) 으로 Connection 객체를 생성.
DriverManager 클래스는 JDBC 드라이버를 통하여 Connection을 만드는 역할을 한다.
DriverManager는 Class.forName( ) 메소드를 통해서 생성된다.
Connection : 데이터베이스와 연결하는 객체.
마리아디비 로딩
public class JDBCEx01 {
public static void main(String[] args) {
// TODO Auto-generated method stub
try {
// 이 클래스를 중심으로 마리아디비 연결
// Connector 제공업체에서 알 수 있음.
Class.forName("org.mariadb.jdbc.Driver");
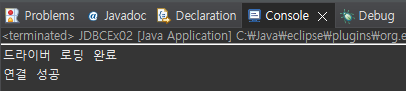
System.out.println("드라이버 로딩 완료");
} catch (ClassNotFoundException e) {
// TODO Auto-generated catch block
System.out.println("[에러] : " + e.getMessage());
}
}
}

마리아디비 연결
- Class.forName() 으로 드라이버 로딩해줌
- 접속할 url과 id, password 각가 변수로 선언해줌
- DriverManager.getConnection(연결문자열, DB_ID, DB_PW) 으로 Connection 객체를 생성.
만약 마리아디비와 값을 다르게 입력하다면 에러가 난다. / 기존 정보와 다르게 입력시 에러
import java.sql.Connection;
import java.sql.DriverManager;
import java.sql.SQLException;

public class JDBCEx02 {

	public static void main(String[] args) {
		// TODO Auto-generated method stub

		try {
			// 이 클래스를 중심으로 마리아디비 연결
			// Connector 제공업체에서 알 수 있음.
			Class.forName("org.mariadb.jdbc.Driver");
			System.out.println("드라이버 로딩 완료");
		} catch (ClassNotFoundException e) {
			// TODO Auto-generated catch block
			System.out.println("[에러] : " + e.getMessage());
		}

		String url = "jdbc:mysql://localhost:3306/sample";
		String user = "root";
		String password = "123456";

		Connection conn = null;

		try {
        	// 접속
            //DriverManager.getConnection(연결문자열, DB_ID, DB_PW) 으로 Connection 객체를 생성.
			conn = DriverManager.getConnection(url, user, password);
			System.out.println("연결 성공");
		} catch (SQLException e) {
			// TODO Auto-generated catch block
			System.out.println("[에러] : " + e.getMessage());
		} finally {
			if(conn != null) try {conn.close();} catch(SQLException e) {}
		}
	}

}
위치 정리
import java.sql.Connection;
import java.sql.DriverManager;
import java.sql.SQLException;

public class JDBCEx03 {

	public static void main(String[] args) {
		// TODO Auto-generated method stub
		String url = "jdbc:mysql://localhost:3306/sample";
		String user = "root";
		String password = "123456";

		Connection conn = null;


			try {
				// 데이터베이스 처리 로직
				Class.forName("org.mariadb.jdbc.Driver");
				System.out.println("드라이버 로딩 완료");

				conn = DriverManager.getConnection(url, user, password);
				System.out.println("연결 성공");
			} catch (ClassNotFoundException e) {
				// TODO Auto-generated catch block
				System.out.println("[에러] : " + e.getMessage());
			} catch (SQLException e) {
				// TODO Auto-generated catch block
				System.out.println("[에러] : " + e.getMessage());
			} finally {
				if(conn != null) try {conn.close();} catch(SQLException e) {}
			}

	}

}
쿼리를 던지는 방법
-
Statement
Statement (java.sql. Statement : Connection으로 연결한 객체에게, Query 작업을 실행하기 위한 객체.
정적인 쿼리를 처리할 수 있다.
즉 쿼리를 처리할 때는 반드시 값이 미리 입력되어야만 처리가 가능하다
Statement 생성하기
Statement 객체를 생성하려면 Connection 객체가 제공하는 createStatement( ) 메소드를 사용. -
PreparedStatment
미리 준비되어진 Statement
Statement 클래스보다 기능이 향상된 클래스
코드의 안정성과 가독성이 높다.
인자 값으로 전달이 가능하다.
java.sql. Statement 와 동일한 기능을 제공한다.
차이점이 있다면 PreparedStatement 는 SQL 쿼리의 틀을 미리 생성해 놓고 값을 나중에 지정한다는 것.
- executeUpdate
executeUpdate 메서드는 데이터베이스에서 데이터를 추가(Insert), 삭제(Delete), 수정(Update)하는 SQL 문을 실행.
메서드의 반환 값은 해당 SQL 문 실행에 영향을 받는 행 수를 반환.
1-1. select 이외 모든 sql에 사용
1-2. int 처리 결과
- ResultSet executeQuery
executeQuery 메서드는 데이터베이스에서 데이터를 가져와서 결과 집합을 반환.
이 메서드는 Select 문에서만 실행하는 특징이 있다.
2-1. select만 사용가능
2-2. 데이터
import java.sql.Connection;
import java.sql.DriverManager;
import java.sql.SQLException;
import java.sql.Statement;
public class JDBCEx04 {
public static void main(String[] args) {
// TODO Auto-generated method stub
String url = "jdbc:mysql://localhost:3306/sample";
String user = "root";
String password = "123456";
Connection conn = null;
Statement stmt = null;
try {
// 데이터베이스 처리 로직
Class.forName("org.mariadb.jdbc.Driver");
System.out.println("드라이버 로딩 완료");
conn = DriverManager.getConnection(url, user, password);
System.out.println("연결 성공");
stmt = conn.createStatement();
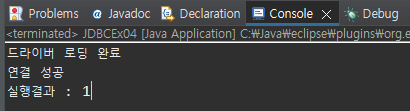
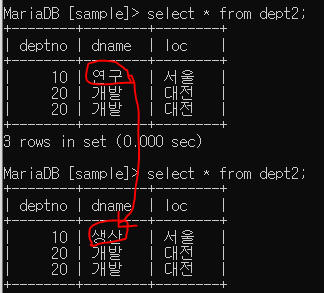
int result = stmt.executeUpdate("insert into dept2 values (10,'연구', '서울')");
System.out.println("실행결과 : " + result);
} catch (ClassNotFoundException e) {
// TODO Auto-generated catch block
System.out.println("[에러] : " + e.getMessage());
} catch (SQLException e) {
// TODO Auto-generated catch block
System.out.println("[에러] : " + e.getMessage());
} finally {
if(conn != null) try {conn.close();} catch(SQLException e) {}
if(stmt != null) try {stmt.close();} catch(SQLException e) {}
}
}
}
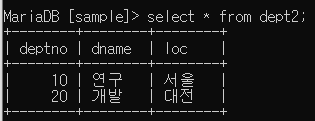
프롬프트에서 빈 껍데기를 만들어주고 이클립스에서 데이터를 직접 입력하여 넣어줌

데이터 변수에 할당하여 입력
import java.sql.Connection;
import java.sql.DriverManager;
import java.sql.SQLException;
import java.sql.Statement;
public class JDBCEx04 {
public static void main(String[] args) {
// TODO Auto-generated method stub
String url = "jdbc:mysql://localhost:3306/sample";
String user = "root";
String password = "123456";
Connection conn = null;
Statement stmt = null;
try {
// 데이터베이스 처리 로직
Class.forName("org.mariadb.jdbc.Driver");
System.out.println("드라이버 로딩 완료");
conn = DriverManager.getConnection(url, user, password);
System.out.println("연결 성공");
stmt = conn.createStatement();
String deptno = "20";
String dname = "개발";
String loc = "대전";
// value(값)의 숫자는 프롬프트에서는 int지만 이클릾에서는 문자열로 취급
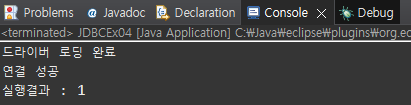
String sql = "insert into dept2 values (" + deptno + ", '" + dname + "', '" + loc + "')";
// 위의 String sql문을 더 편하게 바꿔보기
String sql = String.format("insert into dept2 values(%s,'%s', '%s')", deptno, dname, loc);
int result = stmt.executeUpdate(sql);
System.out.println("실행결과 : " + result);
} catch (ClassNotFoundException e) {
// TODO Auto-generated catch block
System.out.println("[에러] : " + e.getMessage());
} catch (SQLException e) {
// TODO Auto-generated catch block
System.out.println("[에러] : " + e.getMessage());
} finally {
if(conn != null) try {conn.close();} catch(SQLException e) {}
if(stmt != null) try {stmt.close();} catch(SQLException e) {}
}
}
}
결과
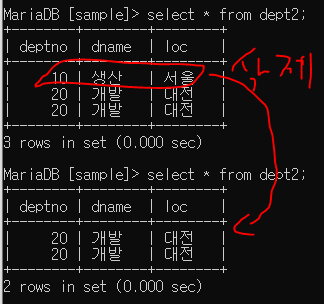
update문으로 변경하기
dname이 연구였던것을 update로 생산으로 변경해주었음.
import java.sql.Connection;
import java.sql.DriverManager;
import java.sql.SQLException;
import java.sql.Statement;

public class JDBCEx05 {

	public static void main(String[] args) {
		// TODO Auto-generated method stub
		String url = "jdbc:mysql://localhost:3306/sample";
		String user = "root";
		String password = "123456";

		Connection conn = null;
		Statement stmt = null;


			try {
				// 데이터베이스 처리 로직
				Class.forName("org.mariadb.jdbc.Driver");
				System.out.println("드라이버 로딩 완료");

				conn = DriverManager.getConnection(url, user, password);
				System.out.println("연결 성공");

				stmt = conn.createStatement();

				String deptno = "10";
				String dname = "생산";


				// String 의 static 메서드인 format 메서드는 문자열의 형식을 설정하는 메서드
				String sql = String.format("update dept2 set dname = '%s' where deptno = %s", dname, deptno);
				int result = stmt.executeUpdate(sql);


				System.out.println("실행결과 : " + result);

			} catch (ClassNotFoundException e) {
				// TODO Auto-generated catch block
				System.out.println("[에러] : " + e.getMessage());
			} catch (SQLException e) {
				// TODO Auto-generated catch block
				System.out.println("[에러] : " + e.getMessage());
			} finally {
				if(conn != null) try {conn.close();} catch(SQLException e) {}
				if(stmt != null) try {stmt.close();} catch(SQLException e) {}
			}

	}

}
dname이 연구였던것을 update로 생산으로 변경해주었음.
delete문으로 삭제하기
delete문으로 deptno가 10인 행을 삭제
import java.sql.Connection;
import java.sql.DriverManager;
import java.sql.SQLException;
import java.sql.Statement;

public class JDBCEx05 {

	public static void main(String[] args) {
		// TODO Auto-generated method stub
		String url = "jdbc:mysql://localhost:3306/sample";
		String user = "root";
		String password = "123456";

		Connection conn = null;
		Statement stmt = null;


			try {
				// 데이터베이스 처리 로직
				Class.forName("org.mariadb.jdbc.Driver");
				System.out.println("드라이버 로딩 완료");

				conn = DriverManager.getConnection(url, user, password);
				System.out.println("연결 성공");

				stmt = conn.createStatement();

				String deptno = "10";
				String dname = "생산";

				// delete문으로 deptno가 10인 행을 삭제
				String sql = String.format("delete from dept2 where deptno = %s", deptno);
				int result = stmt.executeUpdate(sql);


				System.out.println("실행결과 : " + result);

			} catch (ClassNotFoundException e) {
				// TODO Auto-generated catch block
				System.out.println("[에러] : " + e.getMessage());
			} catch (SQLException e) {
				// TODO Auto-generated catch block
				System.out.println("[에러] : " + e.getMessage());
			} finally {
				if(conn != null) try {conn.close();} catch(SQLException e) {}
				if(stmt != null) try {stmt.close();} catch(SQLException e) {}
			}

	}

}
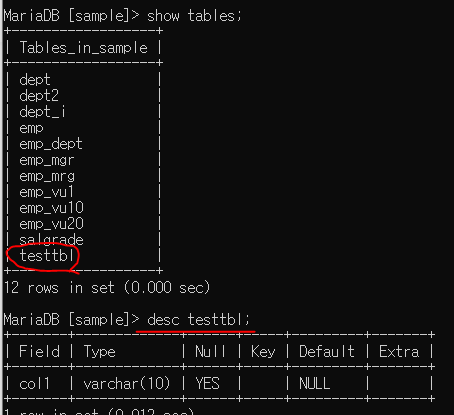
create table 문장 만들기 - DDL / 테이블 생성
table 생성하기
import java.sql.Connection;
import java.sql.DriverManager;
import java.sql.SQLException;
import java.sql.Statement;

public class JDBCEx06 {

	public static void main(String[] args) {
		// TODO Auto-generated method stub
		String url = "jdbc:mysql://localhost:3306/sample";
		String user = "root";
		String password = "123456";

		Connection conn = null;
		Statement stmt = null;


			try {
				// 데이터베이스 처리 로직
				Class.forName("org.mariadb.jdbc.Driver");
				System.out.println("드라이버 로딩 완료");

				conn = DriverManager.getConnection(url, user, password);
				System.out.println("연결 성공");

				stmt = conn.createStatement();

				String deptno = "10";
				String dname = "생산";


				String sql = "create table testtbl (col1 varchar(10) )";
				int result = stmt.executeUpdate(sql);


				System.out.println("실행결과 : " + result);

			} catch (ClassNotFoundException e) {
				// TODO Auto-generated catch block
				System.out.println("[에러] : " + e.getMessage());
			} catch (SQLException e) {
				// TODO Auto-generated catch block
				System.out.println("[에러] : " + e.getMessage());
			} finally {
				if(conn != null) try {conn.close();} catch(SQLException e) {}
				if(stmt != null) try {stmt.close();} catch(SQLException e) {}
			}

	}

}
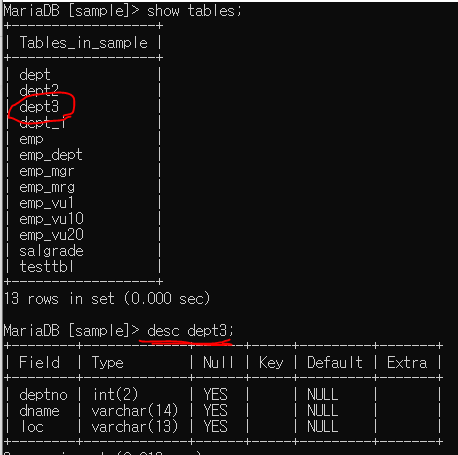
테이블 만들어보기
create table dept3 (
deptno int(2),
dname varchar(14),
loc varchar(13)
);
import java.sql.Connection;
import java.sql.DriverManager;
import java.sql.SQLException;
import java.sql.Statement;

public class JDBCEx06 {

	public static void main(String[] args) {
		// TODO Auto-generated method stub
		String url = "jdbc:mysql://localhost:3306/sample";
		String user = "root";
		String password = "123456";

		Connection conn = null;
		Statement stmt = null;


			try {
				// 데이터베이스 처리 로직
				Class.forName("org.mariadb.jdbc.Driver");
				System.out.println("드라이버 로딩 완료");

				conn = DriverManager.getConnection(url, user, password);
				System.out.println("연결 성공");

				stmt = conn.createStatement();

				String deptno = "10";
				String dname = "생산";


				String sql = "create table dept3 ( deptno int(2), dname varchar(14), loc varchar(13))";
				int result = stmt.executeUpdate(sql);


				System.out.println("실행결과 : " + result);

			} catch (ClassNotFoundException e) {
				// TODO Auto-generated catch block
				System.out.println("[에러] : " + e.getMessage());
			} catch (SQLException e) {
				// TODO Auto-generated catch block
				System.out.println("[에러] : " + e.getMessage());
			} finally {
				if(conn != null) try {conn.close();} catch(SQLException e) {}
				if(stmt != null) try {stmt.close();} catch(SQLException e) {}
			}

	}

}
StringBuilder로 해보기 (결과는 위의 코드와 동일)
import java.sql.Connection;
import java.sql.DriverManager;
import java.sql.SQLException;
import java.sql.Statement;

public class JDBCEx06 {

	public static void main(String[] args) {
		// TODO Auto-generated method stub
		String url = "jdbc:mysql://localhost:3306/sample";
		String user = "root";
		String password = "123456";

		Connection conn = null;
		Statement stmt = null;


			try {
				// 데이터베이스 처리 로직
				Class.forName("org.mariadb.jdbc.Driver");
				System.out.println("드라이버 로딩 완료");

				conn = DriverManager.getConnection(url, user, password);
				System.out.println("연결 성공");

				stmt = conn.createStatement();

				String deptno = "10";
				String dname = "생산";


				StringBuilder sbSQL = new StringBuilder();
				sbSQL.append("create table dept3(");
				sbSQL.append("deptno int(2),");
				sbSQL.append("dname varchar(14),");
				sbSQL.append("loc varchar(13)");
				sbSQL.append(")");

				int result = stmt.executeUpdate(sbSQL.toString());


				System.out.println("실행결과 : " + result);

			} catch (ClassNotFoundException e) {
				// TODO Auto-generated catch block
				System.out.println("[에러] : " + e.getMessage());
			} catch (SQLException e) {
				// TODO Auto-generated catch block
				System.out.println("[에러] : " + e.getMessage());
			} finally {
				if(conn != null) try {conn.close();} catch(SQLException e) {}
				if(stmt != null) try {stmt.close();} catch(SQLException e) {}
			}

	}

}
데이터 읽어오기 - next()
Result Set은 커서를 통해 데이터 접근
최초 커서는 1행 이전에 존재
next()메서드는 커서의 다음행이 존재할 경우 true를 리턴하고 커서를 그 행으로 이동시킴
커서는 순차적으로 다음 행으로 이동, 다음 행이 없을경우 false 반환
import java.sql.Connection;
import java.sql.DriverManager;
import java.sql.ResultSet;
import java.sql.SQLException;
import java.sql.Statement;

public class JDBCEx06 {

	public static void main(String[] args) {
		// TODO Auto-generated method stub
		String url = "jdbc:mysql://localhost:3306/sample";
		String user = "root";
		String password = "123456";

		Connection conn = null;
		Statement stmt = null;
		ResultSet rs = null;


			try {
				// 데이터베이스 처리 로직
				Class.forName("org.mariadb.jdbc.Driver");
				System.out.println("드라이버 로딩 완료");

				conn = DriverManager.getConnection(url, user, password);
				System.out.println("연결 성공");

				stmt = conn.createStatement();

				// 쿼리 생성
				String sql = "select * from dept2";

				// 쿼리 던지고 결과 가져옴
				rs = stmt.executeQuery(sql);

				// rs.next로 다음행 으로 옮김 / 한줄 뒤 읽기
				// next()의 값이 false면 읽을값이 없다는뜻. / false나올때까지 반복하기
				while(rs.next()) {

				System.out.println(rs.getString("deptno"));
				System.out.println(rs.getString("dname"));
				System.out.println(rs.getString("loc"));
				}


			} catch (ClassNotFoundException e) {
				// TODO Auto-generated catch block
				System.out.println("[에러] : " + e.getMessage());
			} catch (SQLException e) {
				// TODO Auto-generated catch block
				System.out.println("[에러] : " + e.getMessage());
			} finally {
				if(rs != null) try {rs.close();} catch(SQLException e) {}
				if(conn != null) try {conn.close();} catch(SQLException e) {}
				if(stmt != null) try {stmt.close();} catch(SQLException e) {}
			}

	}

}
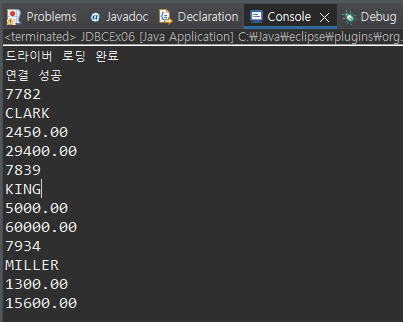
문제
10번 부서의 사원번호, 사원이름, 급여, 연봉을 출력하는 프로그램 작성
sal12+comm
import java.sql.Connection;
import java.sql.DriverManager;
import java.sql.ResultSet;
import java.sql.SQLException;
import java.sql.Statement;

public class JDBCEx06 {

	public static void main(String[] args) {
		// TODO Auto-generated method stub
		String url = "jdbc:mysql://localhost:3306/sample";
		String user = "root";
		String password = "123456";

		Connection conn = null;
		Statement stmt = null;
		ResultSet rs = null;


			try {
				// 데이터베이스 처리 로직
				Class.forName("org.mariadb.jdbc.Driver");
				System.out.println("드라이버 로딩 완료");

				conn = DriverManager.getConnection(url, user, password);
				System.out.println("연결 성공");

				stmt = conn.createStatement();

				String sql = "select empno, ename, sal, sal*12+ifnull(comm, 0) '연봉' from emp where deptno = 10";

				rs = stmt.executeQuery(sql);


				while(rs.next()) {

                // alias 이름으로도 가져올 수 있다.
				System.out.println(rs.getString("empno"));
				System.out.println(rs.getString("ename"));
				System.out.println(rs.getString("sal"));
				System.out.println(rs.getString("연봉"));

                // 번호로도 가능
				// System.out.println(rs.getString( 1 ));
				// System.out.println(rs.getString( 2 ));
				// System.out.println(rs.getString( 3 ));
				// System.out.println(rs.getString( 4 ));
				}


			} catch (ClassNotFoundException e) {
				// TODO Auto-generated catch block
				System.out.println("[에러] : " + e.getMessage());
			} catch (SQLException e) {
				// TODO Auto-generated catch block
				System.out.println("[에러] : " + e.getMessage());
			} finally {
				if(rs != null) try {rs.close();} catch(SQLException e) {}
				if(conn != null) try {conn.close();} catch(SQLException e) {}
				if(stmt != null) try {stmt.close();} catch(SQLException e) {}
			}

	}

}
mysqldump
1. create 구문
2. insert 구문 1
java 클래스명 emp
emp 안에 있는 데이터에 대한 insert문 만들기
emp테이블을 생성할 수 있는 create 문 => emp.sql에 저장
