스프링 부트 환경에서 서블릿을 등록하고 사용해보자
참고
서블릿은 톰캣 같은 웹 애플리케이션 서버를 직접 설치하고, 그 위에 서블릿 코드를 클래스 파일로 빌드해서 올린 다음, 톰캣 서버를 실행하면 된다. 하지만 이 과정은 매우 번거롭다.
스프링 부트는 톰캣 서버를 내장하고 있으므로, 톰캣 서버 설치 없이 편리하게 서블릿 코드를 실행할 수 있다.
스프링 부트 서블릿 환경 구성
@ServletComponentScan
스프링 부트는 서블릿을 직접 등록해서 사용할 수 있도록 @ServletComponentScan을 지원한다. 다음과 같이 추가하자.
hello.servlet.ServletApplication
package hello.servlet;

import org.springframework.boot.SpringApplication;
import org.springframework.boot.autoconfigure.SpringBootApplication;
import org.springframework.boot.web.servlet.ServletComponentScan;

@ServletComponentScan //서블릿 자동 등록
@SpringBootApplication
public class ServletApplication {

	public static void main(String[] args) {
		SpringApplication.run(ServletApplication.class, args);
	}

}
실제 등록하는 서블릿 코드를 등록해보자.
hello.servlet.basic.HelloServlet
package hello.servlet.basic;

import javax.servlet.ServletException;
import javax.servlet.annotation.WebServlet;
import javax.servlet.http.HttpServlet;
import javax.servlet.http.HttpServletRequest;
import javax.servlet.http.HttpServletResponse;
import java.io.IOException;

@WebServlet(name = "helloServlet", urlPatterns = "/hello")
public class HelloServlet extends HttpServlet {

    @Override
    protected void service(HttpServletRequest request, HttpServletResponse response) throws ServletException, IOException {

        System.out.println("HelloServlet.service");
        System.out.println("request = " + request);
        System.out.println("response = " + response);

        String username = request.getParameter("username");
        System.out.println("username = " + username);

        response.setContentType("text/plain");
        response.setCharacterEncoding("utf-8");
        response.getWriter().write("hello " + username);
    }
}
@WebServlet서블릿 애노테이션- name: 서블릿 이름
- urlPatterns: URL 매핑
HTTP 요청을 통해 매핑된 URL이 호출되면 서블릿 컨테이너는 다음 메서드를 실행한다.
protected void service(HttpServletRequest request, HttpServletResponse response)
- 웹 브라우저 실행
- http://localhost:8080/hello?username=kang
- 결과: hello kang
- 콘솔 실행결과
HelloServlet.service
request = org.apache.catalina.connector.RequestFacade@1daa3677
response = org.apache.catalina.connector.ResponseFacade@2d2a0dbb
username = kang
HTTP 요청 메시지 로그로 확인하기
다음 설정을 추가하자.
application.properties
logging.level.org.apache.coyote.http11=debug서버를 다시 시작하고, 요청해보면 서버가 받은 HTTP 요청 메시지를 출력하는것을 확인할 수 있다.
참고
운영서버에 이렇게 모든 요청 정보를 다 남기면 성능저하가 발생할 수 있다. 개발 단계에서만 적용하자.
서블릿 컨테이너 동작 방식 설명
내장 톰캣 서버 생성
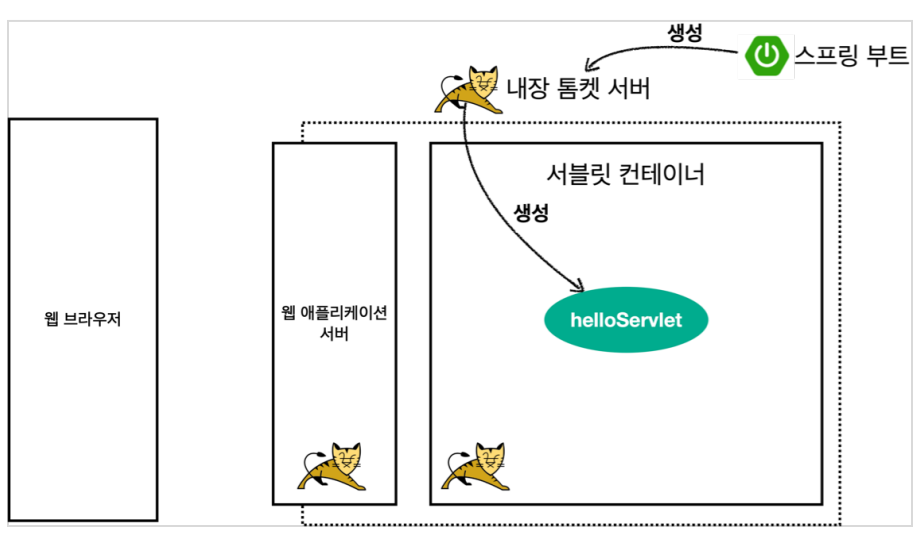
HTTP 요청, HTTP 응답 메시지

웹 애플리케이션 서버의 요청 응답 구조
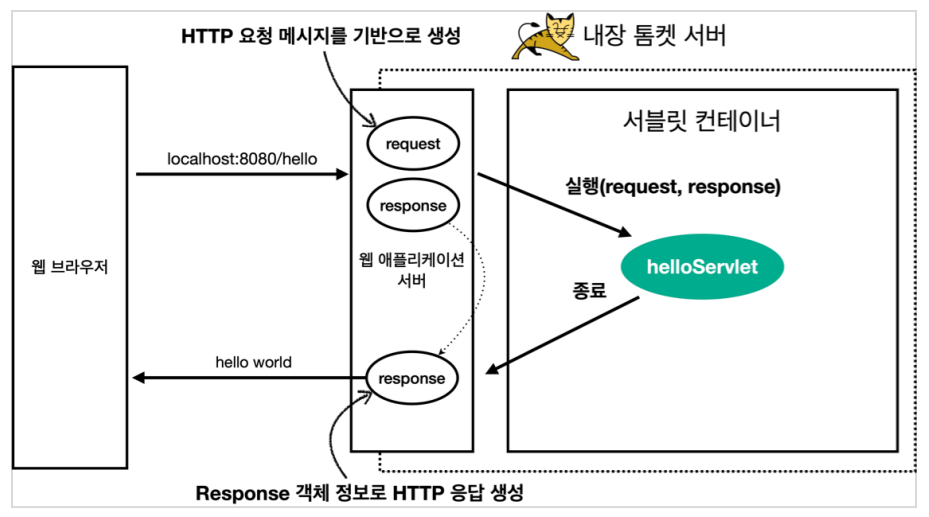
참고
HTTP 응답에서 Content-Length는 웹 애플리케이션 서버가 자동으로 생성해준다.
welcome 페이지 추가
지금부터 개발할ㄹ 내용을 편리하게 참고할 수 있도록 welcome 페이지를 만들어두자.
webapp 경로에 index.html을 두면 웰컴페이지가 된다.
main/webapp/index.html
<!DOCTYPE html>
<html>
<head>
    <meta charset="UTF-8">
    <title>Title</title>
</head>
<body>
<ul>
    <li><a href="basic.html">서블릿 basic</a></li>
</ul>
</body>
</html>
이번 장에서 학습할 내용은 다음 basic .html이다.
main/webapp/basic.html
<!DOCTYPE html>
<html>
<head>
    <meta charset="UTF-8">
    <title>Title</title>
</head>
<body>
<ul>
    <li>hello 서블릿
        <ul>
            <li><a href="/hello?username=servlet">hello 서블릿 호출</a></li>
        </ul>
    </li>
    <li>HttpServletRequest
        <ul>
            <li><a href="/request-header">기본 사용법, Header 조회</a></li>
            <li>HTTP 요청 메시지 바디 조회
                <ul>
                    <li><a href="/request-param?username=hello&age=20">GET -
                        쿼리 파라미터</a></li>
                    <li><a href="/basic/hello-form.html">POST - HTML Form</a></
                    li>
                    <li>HTTP API - MessageBody -> Postman 테스트</li>
                </ul>
            </li>
        </ul>
    </li>
    <li>HttpServletResponse
        <ul>
            <li><a href="/response-header">기본 사용법, Header 조회</a></li>
            <li>HTTP 응답 메시지 바디 조회
                <ul>
                    <li><a href="/response-html">HTML 응답</a></li>
                    <li><a href="/response-json">HTTP API JSON 응답</a></li>
                </ul>
            </li>
        </ul>
    </li>
</ul>
</body>
</html>