💡 MVC란?
MVC란 Model, View, Controller의 약자이다.
View : 화면에 보여지는 관련된 일
Controller : 비즈니스 로직 서버에 관련된 일
Model : 화면에 필요한 자료들을 담에서 화면에 표시하는 일
같은 일들의 역할을 나눈것이 MVC 패턴이라고 볼 수 있다.
💡 @RequestParam을 이용한 Controller
이전에 MVC 패턴으로 Controller를 사용하였을 때는 Model 객체만을 전달하였지만, 이번에는 @RequestParam을 이용하여 변수를 받아보자.
public String helloMvc(@RequestParam("name") String nameVal, Model model){
    model.addAttribute("name", nameVal);
    return "hello-template";
}
@RequestParam을 사용하여 String nameVal의 값을 받아올 수 있게 되었다. 이후 Model 객체에 addAttribute를 통해 값을 저장한다. hello-template를 return 하므로 resources/templates/hello-template.html을 찾아가는 것을 알 수 있다.
hello-template.html을 생성해주자.
첫째 줄을 통해 Thymeleaf 문법을 사용하는 것을 알 수 있고 ${name} 값에 value 값이 들어간다는것도 알 수 있다.
<html xmlns:th="http://www.thymeleaf.org">
<body>
<p th:text="'hello ' + ${name}">hello! empty</p>
</body>
</html>
이제 localhost:8080에 접속해보자. 예상과 달리 WhiteLabel Error 페이지가 뜬다. 에러 코드를 살펴보자.
Required request parameter 'nameVal' for method parameter type String is not present
위와 같은 에러코드가 뜨는것을 볼 수 있는데 parameter인 nameVal이 없다는 뜻의 에러메시지이다.
아래와 같은 방법으로 nameVal이 없을때도 에러가 나지않게 할 수 있다.
required = false 라는 값이 추가된 코드인데 required의 기본값이 true이기 때문에 적지 않는다면 key값이 필수로 필요하게 되는것이다.
값을 전달하는 방법은 localhost:8080/hello-mvc?name=spring 으로 접속하여 해당 페이지를 출력 시킬 수 있다.
@GetMapping("hello-mvc")
public String helloMvc(@RequestParam(value = "name", required = false) String nameVal, Model model){
    model.addAttribute("name", nameVal);
    return "hello-template";
}
💡 MVC 작동방식
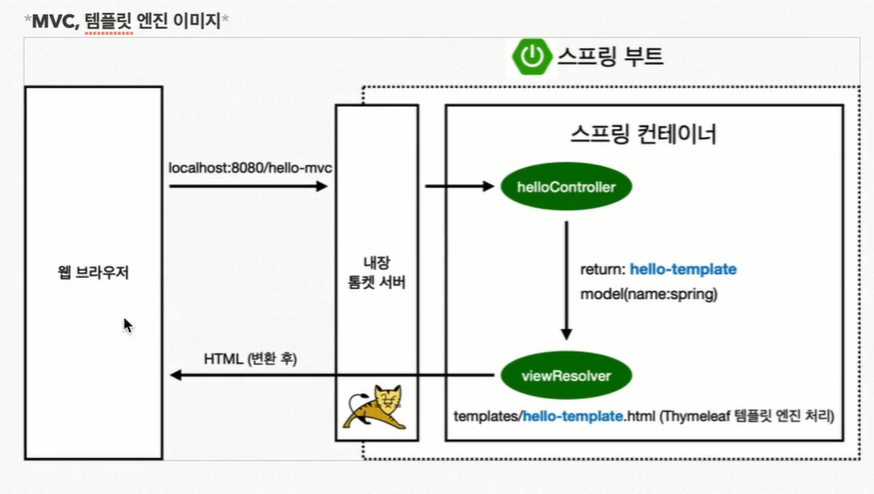
-
웹 브라우저에서 localhost:8080/hello-mvc를 요청한다.
-
tomcat 서버를 거쳐 hello-mvc 요청을 스프링에게 넘긴다.
-
spring은 helloController에 hello-mvc가 매핑된 메서드를 찾아 실행한다. 메서드내에 "hello-template"을 return하고 model 객체에 key는 name value는 spring인 값을 넣어 스프링에게 넘긴다.
-
viewResolver가 동작하여 view를 찾고 템플릿 엔진을 연결시킨다.
templates/hello-template.html을 찾아서 Thymeleaf에게 넘긴다. -
Thymeleaf가 렌더링 후 웹 브라우저에 반환한다.
