Ansible은 자동화를 통해 일관성을 유지하고, 수동 작업을 줄이며, 효율성을 높이는 도구입니다.
에이전트가 필요 없고, YAML 파일을 사용하여 쉽게 구성할 수 있어 배우기 쉽고 강력합니다.
-
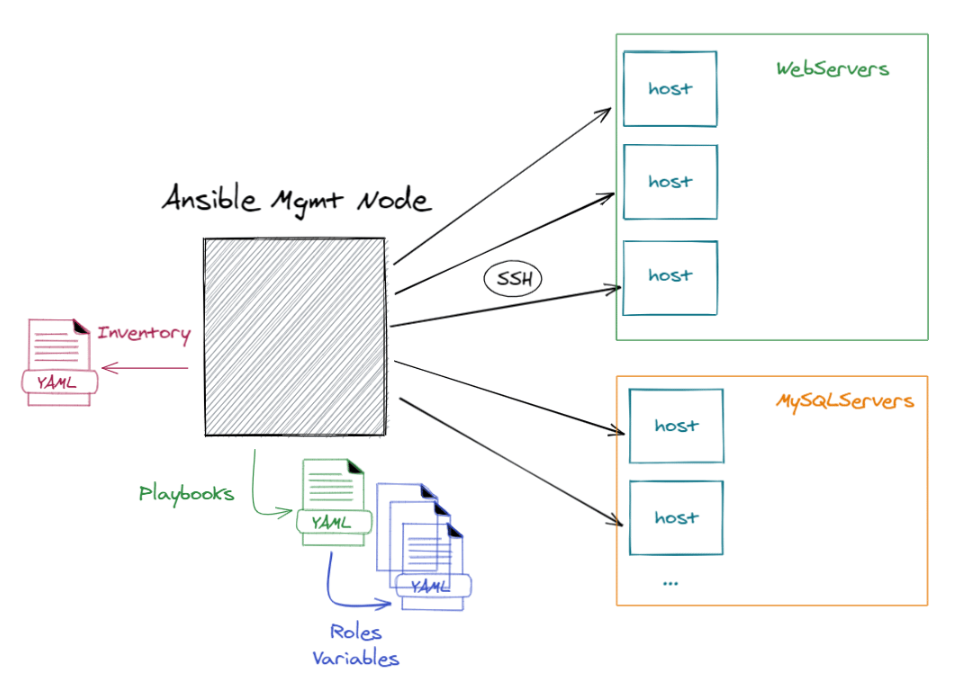
에이전트리스(Agentless)
별도의 소프트웨어 설치 없이 SSH를 통해 서버에 접속하여 명령을 실행 -
플레이북(Playbook)
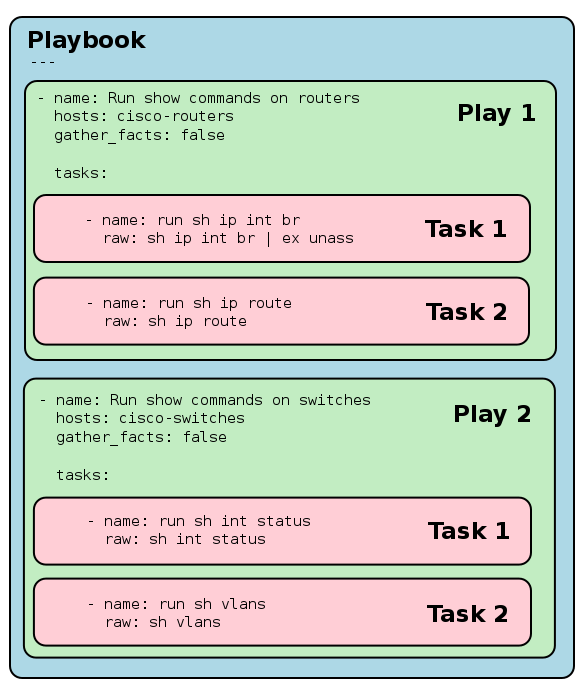
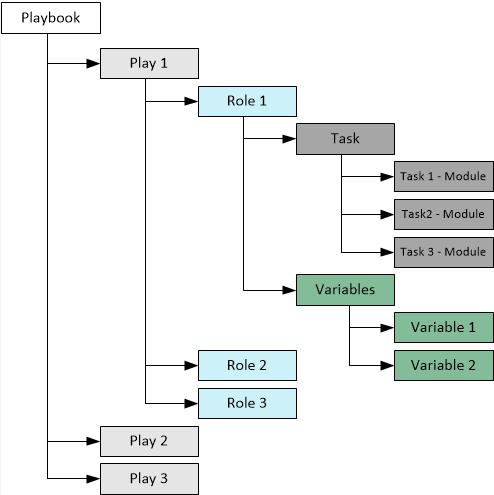
YAML 형식의 설정 파일로, 자동화할 작업을 정의
호스트(Hosts): 작업을 실행할 서버 지정
태스크(Tasks): 실행할 작업 목록
롤(Roles): 관련 태스크와 파일을 그룹화하여 관리
모듈(Modules):다양한 작업(패키지 설치, 파일 복사 등)을 수행하는 기능, 재사용 가능 -
인벤토리(Inventory)
관리할 서버 목록과 정보를 담고 있는 파일. Ansible이 작업할 서버를 결정 -
핸들러(Handlers)
특정 태스크가 변경되었을 때만 실행되는 태스크 ex) 설정 파일 수정 후 서비스 재시작 -
변수(Variables)
구성 정보를 동적으로 관리 ex) IP 주소나 패키지 이름을 변수로 지정 -
조건문과 반복문
특정 조건에 따라 태스크를 실행하거나 리스트 항목을 반복
플레이북 구조
기본적인 패키지 설치
- name: Install packages
  hosts: all
  become: yes
  tasks:
    - name: Install nginx
      apt:
        name: nginx
state: present- 모든 호스트에 대해 nginx 패키지를 설치
- become: yes를 사용하여 루트 권한으로 작업을 수행
- apt 모듈은 Ubuntu/Debian 기반 시스템에서 패키지를 설치
서비스 시작 및 활성화
- name: Start and enable nginx service
  hosts: all
  become: yes
  tasks:
    - name: Start nginx
      service:
        name: nginx
        state: started
enabled: yes- nginx 서비스를 시작하고 시스템 부팅 시 자동으로 시작되도록 설정
- service 모듈을 사용하여 서비스를 관리
파일 배포
- name: Copy configuration file
  hosts: all
  become: yes
  tasks:
    - name: Copy nginx configuration
      copy:
        src: ./nginx.conf
        dest: /etc/nginx/nginx.conf
        owner: root
        group: root
mode: '0644'- 현재 디렉토리의 nginx.conf 파일을 모든 호스트의 /etc/nginx/nginx.conf로 복사
- 파일의 소유자, 그룹, 권한을 설정
여러 호스트에서 작업 수행
- name: Install packages on multiple hosts
  hosts: webservers
  become: yes
  tasks:
    - name: Install common packages
      apt:
        name: "{{ item }}"
        state: present
      loop:
        - git
        - vim
- curl- webservers 그룹에 정의된 호스트에서 git, vim, curl 패키지를 설치
- loop를 사용하여 여러 패키지를 한 번에 설치
조건부 작업 실행
- name: Conditional task execution
  hosts: all
  tasks:
    - name: Install httpd if RedHat based
      yum:
        name: httpd
        state: present
when: ansible_os_family == "RedHat"- 호스트가 RedHat 계열인 경우에만 httpd 패키지를 설치
- when 조건을 사용하여 특정 조건에 따라 작업을 실행
변수 사용
- name: Using variables
  hosts: all
  vars:
    http_port: 80
    max_clients: 200
  tasks:
    - name: Configure httpd
      template:
        src: httpd.conf.j2
dest: /etc/httpd/conf/httpd.conf- 변수를 정의하고 httpd.conf.j2 템플릿을 사용하여 /etc/httpd/conf/httpd.conf 파일을 생성
핸들러 사용
- name: Handlers example
  hosts: all
  become: yes
  tasks:
    - name: Install nginx
      apt:
        name: nginx
        state: present
      notify: restart nginx

  handlers:
    - name: restart nginx
      service:
        name: nginx
state: restarted- nginx를 설치하고, 변경 사항이 있을 경우 restart nginx 핸들러를 호출하여 서비스를 재시작
- 핸들러는 notify를 통해 호출
사용자 생성 및 관리
- name: Manage users
  hosts: all
  become: yes
  tasks:
    - name: Ensure user is present
      user:
        name: newuser
        state: present
        shell: /bin/bash
groups: sudo- newuser라는 사용자를 생성하고, sudo 그룹에 추가
- shell 속성을 통해 기본 쉘을 설정
파일 및 디렉터리 생성
- name: Create directories and files
  hosts: all
  become: yes
  tasks:
    - name: Create a directory
      file:
        path: /var/www/myapp
        state: directory
        mode: '0755'

    - name: Create a file
      copy:
        content: "Welcome to my app!"
dest: /var/www/myapp/index.html- /var/www/myapp 디렉터리를 생성하고, 해당 디렉터리 안에 index.html 파일을 생성
- 파일의 내용은 content 속성을 통해 설정
시스템 업데이트
- name: Update all packages
  hosts: all
  become: yes
  tasks:
    - name: Update apt packages
      apt:
        update_cache: yes
upgrade: dist- 모든 패키지 관리자에서 시스템 패키지를 업데이트
- apt 모듈을 사용하여 패키지 캐시를 업데이트하고, 시스템을 최신 상태로 유지
Cron 작업 설정
- name: Manage cron jobs
  hosts: all
  become: yes
  tasks:
    - name: Add a cron job
      cron:
        name: "Backup my files"
        minute: "0"
        hour: "2"
job: "/usr/bin/rsync -av /home/user/ /backup/user/"- 매일 새벽 2시에 /home/user/ 디렉터리를 /backup/user/로 백업하는 Cron 작업을 추가
Docker 컨테이너 배포
- name: Deploy Docker containers
  hosts: all
  become: yes
  tasks:
    - name: Pull nginx image
      docker_image:
        name: nginx
        tag: latest
        state: present

    - name: Run nginx container
      docker_container:
        name: my_nginx
        image: nginx
        state: started
        ports:
- "80:80"- nginx 이미지를 다운로드하고, my_nginx라는 이름의 컨테이너를 실행하여 80번 포트를 매핑
패키지 제거
- name: Remove packages
  hosts: all
  become: yes
  tasks:
    - name: Remove apache2
      apt:
        name: apache2
state: absent- state: absent를 사용하여 apache2 패키지를 제거
템플릿 사용
- name: Template example
  hosts: all
  become: yes
  tasks:
    - name: Configure nginx with template
      template:
        src: nginx.conf.j2
        dest: /etc/nginx/nginx.conf
notify: restart nginx- 템플릿 파일(nginx.conf.j2)을 사용하여 /etc/nginx/nginx.conf 파일을 구성
- 템플릿을 사용하면 동적으로 값을 삽입 가능
API 요청 보내기
- name: Send API requests
  hosts: localhost
  tasks:
    - name: Make a GET request
      uri:
        url: http://api.example.com/data
        method: GET
        return_content: yes
      register: response

    - name: Show response
      debug:
var: response.content- 외부 API에 GET 요청을 보내고 응답 내용을 출력합니다. uri 모듈을 사용하여 HTTP 요청을 수행