1. 개발 및 학습일지
1) 스프링 입문 과제 추가 구현
- @Controller와 @RestController의 차이를 학습하며, 일반 컨트롤러에서 Model, View를 ThymLeaf로 보내 동적 페이지(HTML)를 받는 과정을 구현하고자 했다.
- 게시글 목록에서 상세 페이지로 이동하는 과정을 구현했다.
- 이러한 방식은 developer tools의 network를 열어보면 실제로는 text/html로 받아오는 것을 알 수 있는데, html 코드를 모두 가져와 띄우는 형식이라고 한다.
- 참고로 spring boot의 디폴트 루트는 static 폴더의 index.html이다.
- 🔗 @Controller 페이지 이동 기능 추가
2) HTTP Request message 다양한 방식으로 받기

@PathVariable
- GET 방식에서 주소 안에 담긴 변수 값을 가져온다.
@RequestParam
- spring에서는 @RequestParam이 알아서 GET 방식인지 POST 방식인지를 구분하여 헤더나 바디에 담긴 정보를 자동으로 가져온다.
- GET 방식의 경우 주소의 바깥에서 ?뒤의 값을 가져온다.
- 신기했던 부분은 POST 방식의 경우 데이터가 바디에 form 형식으로 들어오는데도 알아서 잘 매핑해준다는 점이었다.
- 아래에서 언급하지만, 여기에 자바 객체(일반 클래스)를 넣으면 400 Bad Request 에러가 발생한다. (❗주의)
➕ @RequestParam은 생략해줘도 변수에 알아서 매핑해준다.. 그래도 명시적으로 써주자
@ModelAttribute
- POST 방식에서의 @RequestParam과 받는 내용은 동일하지만 받는 부분이 자바 객체(참조자료형인 일반클래스)라는 차이점을 지닌다.
- 즉 일반 클래스도 멤버변수 명이 같다면 매핑이 잘된다.
- 일반 클래스를 받으려면 @ModelAttribute!
@RequestBody
- POST 방식에서 쓰이며, content-type: application/json으로 온 데이터를 자바 객체와 매핑해준다.
- 이 때 매핑되는 변수끼리는 이름이 같아야 오류가 발생하지 않는다.
- 역시 일반 클래스도 멤버변수 명이 같다면 매핑이 잘된다.
@Controller
@RequestMapping("/hello/request")
public class HelloRequestController {
    @GetMapping("/form/html")
    public String helloForm() {
        return "hello-request-form";
    }

    // [Request sample]
    // GET http://localhost:8080/hello/request/star/BTS/age/28
    @GetMapping("/star/{name}/age/{age}")
    @ResponseBody
    public String helloRequestPath(@PathVariable String name, @PathVariable int age)
    {
        //String에서 %s 와 %d는 뒤에 변수를 넣어줄 공간임
        return String.format("Hello, @PathVariable.<br> name = %s, age = %d", name, age);
    }

    // [Request sample]
    // GET http://localhost:8080/hello/request/form/param?name=BTS&age=28
    @GetMapping("/form/param")
    @ResponseBody
    public String helloGetRequestParam(@RequestParam String name, @RequestParam int age) {
        return String.format("Hello, @RequestParam.<br> name = %s, age = %d", name, age);
    }

    // [Request sample]
    // POST http://localhost:8080/hello/request/form/param
    // Header
    //  Content type: application/x-www-form-urlencoded
    // Body
    //  name=BTS&age=28
    @PostMapping("/form/param")
    @ResponseBody
    public String helloPostRequestParam(@RequestParam String name, @RequestParam int age) {
        return String.format("Hello, @RequestParam.<br> name = %s, age = %d", name, age);
    }

    // [Request sample]
    // POST http://localhost:8080/hello/request/form/model
    // Header
    //  Content type: application/x-www-form-urlencoded
    // Body
    //  name=BTS&age=28
    // 위와 받는 내용은 완전 동일하지만 받는 부분이 @ModelAttribute 자바 객체일 뿐임
    @PostMapping("/form/model")
    @ResponseBody
    public String helloRequestBodyForm(@ModelAttribute Star star) {
        return String.format("Hello, @RequestBody.<br> (name = %s, age = %d) ", star.name, star.age);
    }

    // [Request sample]
    // POST http://localhost:8080/hello/request/form/json
    // Header
    //  Content type: application/json
    // Body
    //  {"name":"BTS","age":"28"}
    @PostMapping("/form/json")
    @ResponseBody
    public String helloPostRequestJson(@RequestBody Star star) {
        return String.format("Hello, @RequestBody.<br> (name = %s, age = %d) ", star.name, star.age);
    }
}
3) service와 repository는 왜 필요한가?
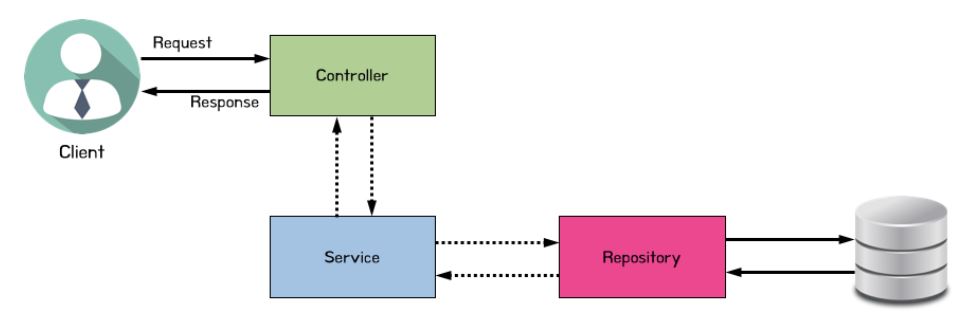
- 오늘 강의에서 AllInOneController를 만들어 요청 처리, 비즈니스 로직 구현, DB 연결 부터 종료까지의 모든 과정, 응답 처리를 모두 담은 괴물을 만들었다.
- 이 방식은 절차적 프로그래밍 기법(컴퓨터가 해야할 일들을 순차적으로 나열해놓은 코딩 방식)에 의거한다.
- 구현하고 보니 엄청난 양의 코드를 지닌 괴물 컨트롤러가 탄생했다..
AllInOneController의 문제점
- 한 개의 클래스에 너무 많은 양의 코드가 존재
- 코드 이해가 어려움: 처음부터 끝까지 다 읽어야 코드 내용을 이해할 수 있음
→ 3개의 클래스에 역할 별로 코드가 정리되어야 함
- 현업에서는 코드 추가 혹은 변경 요청이 계속 생김
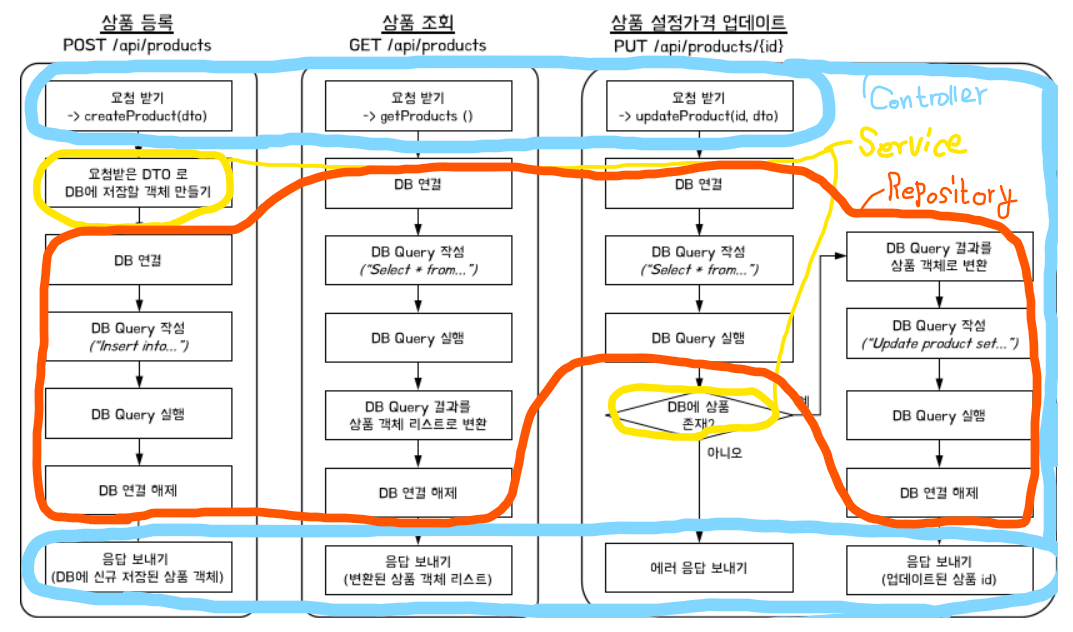
변경 요청의 예)
- 1) 신규 상품 등록 시 Client 에게 응답 (Response) 하는 값 변경
- 등록된 Product 전체 정보 → 등록된 Product 의 id
→ Controller에 구현되어야 함
- 등록된 Product 전체 정보 → 등록된 Product 의 id
- 2) 최저가 (Myprice) 업데이트 조건 변경
- Client 가 최저가를 0원 이하로 입력 → 에러 발생
→ Service에 구현되어야 함
- Client 가 최저가를 0원 이하로 입력 → 에러 발생
- 3) DB 테이블 이름 변경
- Product 테이블의 lprice → lowprice 변경
→ Repository에 구현되어야 함
- Product 테이블의 lprice → lowprice 변경
- 현업에서는 코드 추가 혹은 변경 요청이 계속 생김
- 위와 같은 문제점을 직접 겪어보니, service와 repository 영역이 필요하는 것을 절실히 깨달았다.
- 위에 작성한 것과 같이 controller, service, repository는 각각의 역할에만 충실해야 한다.
- 오늘 구현했던 나만의 셀렉샵 기능 구분
- 그림을 보면 service가 하는 일이 상당히 적어보이지만, 아주 간단한 기능만 가진 웹이라서 그렇다. 보통 Repository는 spring이 자동으로 처리해주는 기능이 많기에
service즉,비즈니스 로직을 다루는 곳이 spring의 핵심이라고 한다.
4) 의존성 주입DI(Dependency Injection), 제어의 역전 IOC(Inversion of Control)
- 먼저
강한 결합에 대해 알아보자 - 강한 결합은 어떠한 객체가 다른 객체에 강한 의존성을 가지고 있음을 뜻한다.
- 이를테면, A라는 클래스의 멤버 변수 타입으로 B라는 클래스가 존재하는 경우 A는 B에 의존하는 관계가 된다. (B의 초기화가 A의 기본 생성자에 담김)
public class A {
    private B b;

    public A() {
        this.b = new B(); // 이 부분 때문에 강한 결합이 된다.
    }

    public void startEat() {
        b.being();
    }
}

public class B {
    public void being() {
        System.out.println("b의 메서드가 실행되었습니다.");
    }
}- 즉, A는 B가 없으면 정의할 수도 없고, B 클래스의 생성자를 포함한 메서드 등이 바뀌면 이에 요구되는 파라미터 값도 일일이 추가해줘야하기 때문이다.
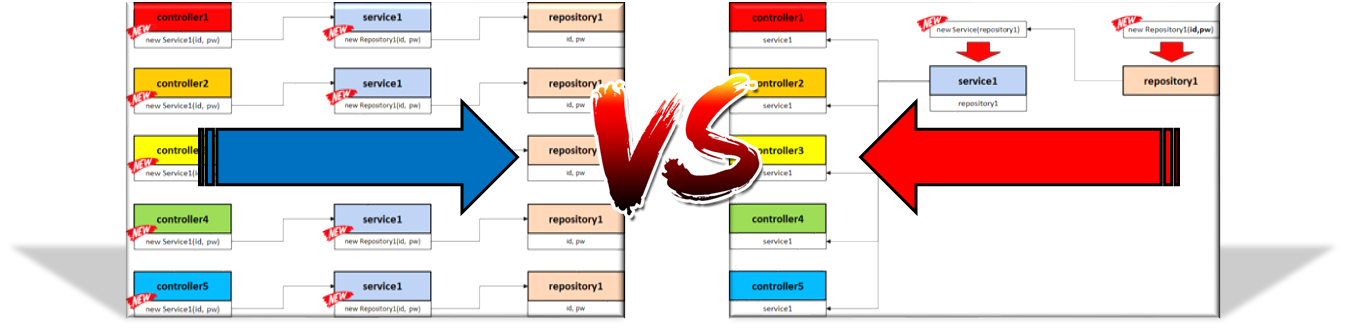
- 만약 controller - service - repository를 강한 결합으로 구현하면

- 위와 같은 의존성을 지니게 되는데, 만약 repository에서 생성자에 id와 pw를 담는 방식으로 변경한다면, 이에 의존하는 controller와 service에 구현된 모든 코드가 변경되어야 한다.
- 이는 유지보수 측면에서 굉장히 취약하다고 할 수 있다.
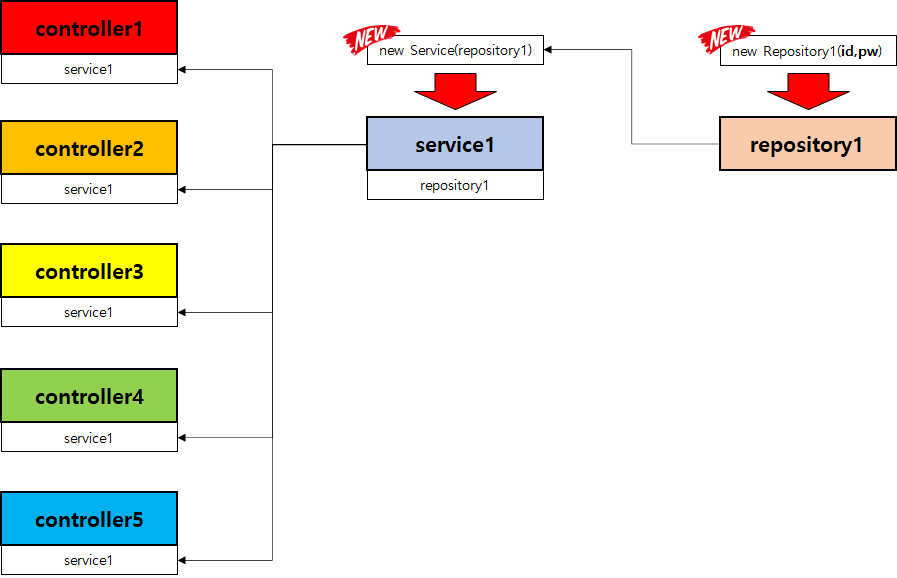
강한 결합을 해결할 방법은- 각 객체에 대한 객체 생성은 딱 1번만 한다.
- 생성된 객체를 모든 곳에서 재사용한다.
- 이러한 해결 방법은 스프링의 DI 즉, 의존성 주입의 방식과 비슷하다.
- 위의 상황에서의 해결방법은, controller와 service의 생성자에서 각 service와 repository의 new 연산을 제거하고, 이미 만들어진 객체 그대로를 사용하는 것이다.
- 이러한 방식을
느슨한 결합이라고 한다.
- 확실히 강한 결합의 상황보다 유지보수성이 뛰어나 보인다.
✨IoC (제어의 역전)
- 두 상황을 비교하면 아래와 같다.

느슨한 결합의 흐름은 강한 결합의 흐름과 반대로 간다.
이처럼 프로그램의 제어 흐름이 뒤바뀌는 것을 제어의 역전(IOC)이라고 한다.
- 조금 더 설명을 덧붙이자면, 일반적인 경우 사용자가 자신이 필요한 객체를 생성해서 사용하지만,
- IoC 상황에서는 용도에 맞게 필요한 객체를 그냥 가져다 사용한다고 생각하면 된다.
✨DI(의존관계 주입)
- 이 때 객체를 가져다 사용한다는 것을 DI, 의존성 주입이라고 한다.
- 정확히 말하자면 이미 정의된 객체를 사용한다는 것은 외부에서 의존관계를 결정하고 주입한다는 것이다.
토비의 스프링이 말하는 의존관계 주입의 세가지 조건
- 1) 클래스 모델이나 코드에는 런타임 시점의 의존관계가 드러나지 않는다. 그러기 위해서는 인터페이스만 의존하고 있어야 한다.
- 2) 런타임 시점의 의존관계는 컨테이너나 팩토리 같은 제3의 존재가 결정한다.
- 3) 의존관계는 사용할 오브젝트에 대한 레퍼런스를 외부에서 제공(주입)해줌으로써 만들어진다.
- 이일민, 토비의 스프링 3.1, 에이콘(2012), p114
- DI는 의존 관계를 외부에서 결정하는 것이기 때문에, 클래스 변수를 결정하는 방법들이 곧 DI를 구현하는 방법이다.
오늘 구현했던 DI는 생성자를 이용하여 이미 정의된 객체(Bean)를 넣어주고 생성자에 @Autowired를 붙여주는 방식이었다.
	//아래 @Autowired가 붙은 생성자의 역할은
	//클래스 위 @RequiredArgsConstructor에 의해 완벽히 대체된다. 따라서 같이 쓰면 오류 발생
	// productService라는 Bean을 넣어줌 (DI: 의존성 주입)
    @Autowired
    public ProductController(ProductService productService){
        this.productService = productService;
    }
➕Bean / IoC Container란?
- 코드를 구현해봤다면, 그렇다면 이 때 넣어줄 객체는 어디에서 구현하는 것인가? 라는 의문이 자동으로 떠올라야 한다.
- 위의 코드를 보면 지금까지 생성자에 new연산자가 아닌 일반 객체를 넣어줬기 때문이다.
- 아주 고맙게도 스프링 프레임워크가 필요한 객체를 생성하여 관리하는 역할을 대신 해준다!
Bean: 스프링이 관리하는 객체
Spring IoC Container: Bean을 모아둔 통 - 그렇다면 IoC 컨테이너에 어떻게 빈을 등록하고 사용하는걸까?
➕Bean 등록 방법
1) @Component
- 스프링 서버가 뜰 때 스프링 IoC 에 '빈' 저장
- @Component 클래스에 대해서 스프링이 해 주는 일
- @Component 클래스에 대해서 스프링이 해 주는 일
// 1. ProductService 객체 생성
ProductService productService = new ProductService();
// 2. 스프링 IoC 컨테이너에 빈 (productService) 저장
// productService -> 스프링 IoC 컨테이너- 스프링 '빈' 이름: 클래스의 앞글자만 소문자로 변경
- public class ProductServcie → productServcie

'빈' 아이콘 확인 → 스프링 IoC 에서 관리할 '빈' 클래스라는 표시
- @Component 적용 조건
- @ComponentScan 에 설정해 준 packages 위치와 하위 packages 들까지만 스캔 범위에 속한다. (패키지 외부에 @Component는 등록 안됨)
@Configuration
@ComponentScan(basePackages = "com.sparta.springcore")
class BeanConfig { ... }
- @SpringBootApplication 에 의해 default 설정이 되어 있어서 따로 설정하지 않아도 된다.
2) @Bean
- 직접 객체를 생성하여 빈으로 등록 요청
- 아래 코드는 메서드에 @Bean을 붙여 return된 값을 빈으로 등록하는 것
import org.springframework.context.annotation.Bean;
import org.springframework.context.annotation.Configuration;

@Configuration
public class BeanConfiguration {

    @Bean
    public ProductRepository productRepository() {
        String dbUrl = "jdbc:h2:mem:springcoredb";
        String dbId = "sa";
        String dbPassword = "";

        return new ProductRepository(dbUrl, dbId, dbPassword);
    }
}- 스프링 서버가 뜰 때 스프링 IoC에 빈을 저장한다.
// 1. @Bean 설정된 함수 호출
ProductRepository productRepository = beanConfiguration.productRepository();

// 2. 스프링 IoC 컨테이너에 빈 (productRepository) 저장
// productRepository -> 스프링 IoC 컨테이너- 스프링 '빈' 이름: @Bean 이 설정된 함수명
- public ProductRepository productRepository() {..} → productRepository

- 위 아이콘은 스프링 IoC의 빈에 등록될 것이라는 표시이다.
➕Bean 사용 방법
- 사용 방법도 아주 간단하다.
- 멤버 변수 선언 위에 @Autowired만 붙여주면 끝이다.
- (혹은 빈을 사용할 메서드 위에 붙여도 된다.)
- 즉, @Autowired를 붙여두면 스프링에 의해 DI(의존 관계 주입)이 되는 것이다.
- 위의 설명에서 외부란 스프링이 되는 것이다. ( 외부인 스프링이 의존 관계를 주입한다)
@Component
public class ProductService {

    @Autowired
    private ProductRepository productRepository;

		// ...
}
- 단, @Autowired는 스프링 IoC 컨테이너에 의해 관리되는 클래스에서만 가능하다.
스프링 입문 강의에서 무지성으로 사용했던 @RequiredArgsConstructor는 final로 선언된 멤버 변수 (빈)을 담은 생성자를 자동으로 만들어주며 @Autowired 까지 붙여준다.
- 그동안 @RequiredArgsConstructor의 편리성도 모르고 무지성으로 사용해왔는데, 앞으로는 롬복에게 고마워하며 사용해야겠다.😅
+) ApplicationContext -> 스프링 IoC 컨테이너에서 빈을 수동적으로 가져오는 방법
@Component
public class ProductService {
    private final ProductRepository productRepository;

    @Autowired
    public ProductService(ApplicationContext context) {
        // 1.'빈' 이름으로 가져오기
        ProductRepository productRepository = (ProductRepository) context.getBean("productRepository");
        // 2.'빈' 클래스 형식으로 가져오기
        // ProductRepository productRepository = context.getBean(ProductRepository.class);
        this.productRepository = productRepository;
    }

		// ...
}
5) 번외
- 스프링 3계층 annotation은 모두 @Component를 상속받는다.
- @Controller, @RestController
- @Service
- @Repository
- 그동안 JpaRepository도 구현부가 없어서 신기해 하고만 있었는데 구현부는 SimpleJpaRepository에 담겨있었다.
- JpaRepository 우클릭 goto implementations에 SimpleJpaRepository -> 실제 구현부가 담긴 구현체!
6) 스프링 심화 강의 1주차 핵심
- 받아들이는 정보량이 너무 많아서 큰 틀을 놓칠 것 같다
- 다시 한번 짚어보는 1주차 핵심
- 스프링에서 Controller, Service, Repository로 구분한 이유와 각 역할을 이해
- 스프링 MVC 이해
- 스프링 DI와 스프링 IoC 컨테이너 역할 이해
2. 코멘트
오늘은 코멘트를 쓸 체력이 남지 않았다..
얼른 자고 내일도 힘내자..!!!!

BackEnd Developer