[TIL] Day 45 Local Notification & TensorFlow & YOLO & StatefulWidget Lifecycle & Isolate
[TIL] Flutter 9기
📝 유저에게 알림 보내기 Local Notification
✏️ Local Notification이란?
서버 없이, 디바이스 내부에서 직접 알림을 보내는 기능
푸시(Firebase 등) ❌
앱 내부 로직으로 알림 ⭕️
- 사용 예시
알람 / 리마인더
일정 시간 후 알림
버튼 클릭 → 즉시 알림
백그라운드 작업 완료 알림
✏️ Flutter에서 바로 못 쓰는 이유
Flutter 프레임워크 자체는 알림 기능 미지원
각 플랫폼 네이티브 API를 사용해야 함
| 플랫폼 | 네이티브 API |
|---|---|
| Android | NotificationCompat API |
| iOS | UserNotification API |
이걸 Flutter와 연결해 둔 패키지가
flutter_local_notifications
✏️ 사용 패키지
flutter pub add flutter_local_notificationsAndroid / iOS 모두 지원
알림 표시, 클릭 이벤트 처리 가능
백그라운드 콜백 지원
✏️ iOS 설정 요약
📁 ios/Runner/AppDelegate.swift
① 패키지 import
import flutter_local_notifications② 알림 클릭 시 Flutter와 연결
FlutterLocalNotificationsPlugin.setPluginRegistrantCallback { (registry) in
  GeneratedPluginRegistrant.register(with: registry)
}
③ 알림 델리게이트 설정 (iOS 10+)
if #available(iOS 10.0, *) {
 UNUserNotificationCenter.current().delegate =
   self as? UNUserNotificationCenterDelegate
}
import Flutter
import UIKit
import flutter_local_notifications
@main
@objc class AppDelegate: FlutterAppDelegate {
override func application(
_ application: UIApplication,
didFinishLaunchingWithOptions launchOptions: [UIApplication.LaunchOptionsKey: Any]?
) -> Bool {
FlutterLocalNotificationsPlugin.setPluginRegistrantCallback { (registry) in
GeneratedPluginRegistrant.register(with: registry)
}
if #available(iOS 10.0, *) {
UNUserNotificationCenter.current().delegate = self as? UNUserNotificationCenterDelegate
}
GeneratedPluginRegistrant.register(with: self)
return super.application(application, didFinishLaunchingWithOptions: launchOptions)
}
}
의미
백그라운드 / 종료 상태에서 알림 클릭 가능
Flutter ↔ iOS 네이티브 브릿지 연결
✏️ Android 설정 요약
📁 android/app/build.gradle
compileSdk = 34
...
coreLibraryDesugaringEnabled true
...
multiDexEnabled true
...
targetSdk = 34
...
dependencies {
  coreLibraryDesugaring 'com.android.tools:desugar_jdk_libs:1.2.2'
  implementation 'androidx.window:window:1.0.0'
  implementation 'androidx.window:window-java:1.0.0'
}
plugins {
id("com.android.application")
id("kotlin-android")
// The Flutter Gradle Plugin must be applied after the Android and Kotlin Gradle plugins.
id("dev.flutter.flutter-gradle-plugin")
}
android {
namespace = "com.example.flutter_noti_example"
compileSdk = 34 // 💛 여기
ndkVersion = flutter.ndkVersion
compileOptions {
coreLibraryDesugaringEnabled true // 💛 여기
sourceCompatibility = JavaVersion.VERSION_17
targetCompatibility = JavaVersion.VERSION_17
}
kotlinOptions {
jvmTarget = JavaVersion.VERSION_17.toString()
}
defaultConfig {
multiDexEnabled true // 💛 여기
// TODO: Specify your own unique Application ID (https://developer.android.com/studio/build/application-id.html).
applicationId = "com.example.flutter_noti_example"
// You can update the following values to match your application needs.
// For more information, see: https://flutter.dev/to/review-gradle-config.
minSdk = flutter.minSdkVersion
targetSdk = 34 // 💛 여기
versionCode = flutter.versionCode
versionName = flutter.versionName
}
buildTypes {
release {
// TODO: Add your own signing config for the release build.
// Signing with the debug keys for now, so `flutter run --release` works.
signingConfig = signingConfigs.getByName("debug")
}
}
}
// 💛 여기
dependencies {
coreLibraryDesugaring 'com.android.tools:desugar_jdk_libs:1.2.2'
implementation 'androidx.window:window:1.0.0'
implementation 'androidx.window:window-java:1.0.0'
}
flutter {
source = "../.."
}Android 13+ 알림 대응
최신 알림 API 사용 가능
📁 AndroidManifest.xml
권한 설정
   <uses-permission android:name="android.permission.RECEIVE_BOOT_COMPLETED"/>
   <uses-permission android:name="android.permission.VIBRATE" />
   <uses-permission android:name="android.permission.USE_FULL_SCREEN_INTENT" />
   <uses-permission android:name="android.permission.USE_EXACT_ALARM" />
   <uses-permission android:name="android.permission.POST_NOTIFICATIONS"/>
   <uses-permission android:name="android.permission.FOREGROUND_SERVICE" />
<uses-permission android:name="android.permission.FOREGROUND_SERVICE_SPECIAL_USE" /> android:showWhenLocked="true"
android:turnScreenOn="true"알림 리시버 등록
<receiver android:exported="false" android:name="com.dexterous.flutterlocalnotifications.ActionBroadcastReceiver" />
<receiver android:exported="false" android:name="com.dexterous.flutterlocalnotifications.ScheduledNotificationReceiver" />
<receiver android:exported="false" android:name="com.dexterous.flutterlocalnotifications.ScheduledNotificationBootReceiver">
<intent-filter>
<action android:name="android.intent.action.BOOT_COMPLETED"/>
<action android:name="android.intent.action.MY_PACKAGE_REPLACED"/>
<action android:name="android.intent.action.QUICKBOOT_POWERON" />
<action android:name="com.htc.intent.action.QUICKBOOT_POWERON"/>
</intent-filter>
</receiver>기기 재부팅 후에도 예약 알림 유지
알림 클릭 / 스케줄 알림 정상 동작
<manifest xmlns:android="http://schemas.android.com/apk/res/android">
<uses-permission android:name="android.permission.RECEIVE_BOOT_COMPLETED"/>
<uses-permission android:name="android.permission.VIBRATE" />
<uses-permission android:name="android.permission.USE_FULL_SCREEN_INTENT" />
<uses-permission android:name="android.permission.USE_EXACT_ALARM" />
<uses-permission android:name="android.permission.POST_NOTIFICATIONS"/>
<uses-permission android:name="android.permission.FOREGROUND_SERVICE" />
<uses-permission android:name="android.permission.FOREGROUND_SERVICE_SPECIAL_USE" />
<application
android:label="flutter_noti_example"
android:name="${applicationName}"
android:icon="@mipmap/ic_launcher">
<activity
android:name=".MainActivity"
android:exported="true"
android:launchMode="singleTop"
android:taskAffinity=""
android:theme="@style/LaunchTheme"
android:configChanges="orientation|keyboardHidden|keyboard|screenSize|smallestScreenSize|locale|layoutDirection|fontScale|screenLayout|density|uiMode"
android:hardwareAccelerated="true"
            android:showWhenLocked="true"
            android:turnScreenOn="true"
android:windowSoftInputMode="adjustResize">
<!-- Specifies an Android theme to apply to this Activity as soon as
the Android process has started. This theme is visible to the user
while the Flutter UI initializes. After that, this theme continues
to determine the Window background behind the Flutter UI. -->
<meta-data
android:name="io.flutter.embedding.android.NormalTheme"
android:resource="@style/NormalTheme"
/>
<intent-filter>
<action android:name="android.intent.action.MAIN"/>
<category android:name="android.intent.category.LAUNCHER"/>
</intent-filter>
</activity>
<!-- Don't delete the meta-data below.
This is used by the Flutter tool to generate GeneratedPluginRegistrant.java -->
<meta-data
android:name="flutterEmbedding"
android:value="2" />
        <receiver android:exported="false" android:name="com.dexterous.flutterlocalnotifications.ActionBroadcastReceiver" />
        <receiver android:exported="false" android:name="com.dexterous.flutterlocalnotifications.ScheduledNotificationReceiver" />
        <receiver android:exported="false" android:name="com.dexterous.flutterlocalnotifications.ScheduledNotificationBootReceiver">
            <intent-filter>
                <action android:name="android.intent.action.BOOT_COMPLETED"/>
                <action android:name="android.intent.action.MY_PACKAGE_REPLACED"/>
                <action android:name="android.intent.action.QUICKBOOT_POWERON" />
                <action android:name="com.htc.intent.action.QUICKBOOT_POWERON"/>
            </intent-filter>
        </receiver>
</application>
<!-- Required to query activities that can process text, see:
https://developer.android.com/training/package-visibility and
https://developer.android.com/reference/android/content/Intent#ACTION_PROCESS_TEXT.
In particular, this is used by the Flutter engine in io.flutter.plugin.text.ProcessTextPlugin. -->
<queries>
<intent>
<action android:name="android.intent.action.PROCESS_TEXT"/>
<data android:mimeType="text/plain"/>
</intent>
</queries>
</manifest>✏️ NotificationHelper 구조
📁 notification_helper.dart
백그라운드 알림 클릭 함수
('vm:entry-point')
void notificationTapBackground(NotificationResponse notificationResponse) {
// 백그라운드에서 푸시알림 클릭했을 때 실행할 로직 작성
}@pragma('vm:entry-point')
왜 필요할까??
릴리즈(AOT) 모드에서 함수 제거 방지
백그라운드 isolate에서 실행되기 때문
초기화 메서드
static Future<void> initiailize() async {
    // 안드로이드 초기화 설정
    // @mipmap/ic_launcher => android/src/main/mipmap/ic_launcher.png
    const AndroidInitializationSettings initializationSettingsAndroid =
        AndroidInitializationSettings('@mipmap/ic_launcher');

    // iOS에서 알림 초기화 설정
    final DarwinInitializationSettings initializationSettingsDarwin =
        DarwinInitializationSettings(
          // 알림 알림 권한을 요청
          requestAlertPermission: true,
          // 배지 권한을 요청
          requestBadgePermission: true,
          // 사운드 권한을 요청
          requestSoundPermission: true,
        );

    final InitializationSettings initializationSettings =
        InitializationSettings(
          android: initializationSettingsAndroid,
          iOS: initializationSettingsDarwin,
        );

    // 초기화
    await flutterLocalNotificationsPlugin.initialize(
      settings: initializationSettings,
      onDidReceiveNotificationResponse: (noti) {
        // 포그라운드에서 알림 터치했을 때
        print(noti.payload);
      },
      onDidReceiveBackgroundNotificationResponse: notificationTapBackground,
    );

    // 안드로이드 33 부터는 권한 요청해줘야함!
    await _requestAndroidPermissionForOver33();
  }
역할
Android / iOS 알림 초기화
알림 클릭 이벤트 등록
Android 13+ 권한 요청
알림 표시 메서드
static Future<void> show(String title, String content) async {
    return flutterLocalNotificationsPlugin.show(
      id: 0, // 알림 ID (중복된 알림을 관리하기 위한 고유 ID)
      title: title, // 알림 제목
      body: content, // 알림 내용
      notificationDetails: const NotificationDetails(
        android: AndroidNotificationDetails(
          'test channel id', // 안드로이드 8.0 이상에서 알림을 그룹화하고 분류하는 용도. 고유한 값으로 설정
          'General Notifications', // 알림 채널 이름. 사용자가 설정에서 채널별로 알림 끄고 킬 수 있슴
          importance: Importance.high, // 알림의 우선순위
          playSound: true, // 알림 소리 재생 여부
        ),
        iOS: DarwinNotificationDetails(
          presentSound: true, // 알림 소리 재생 여부
          presentAlert: true, // 알림 표시 여부
          presentBadge: true, // 배지 표시 여부
        ),
      ),
      // 알림의 부가적인 데이터
      // 포그라운드, 백그라운드에서 알림 터치했을 때 실행될 함수에 전달됨
      payload: 'Open from Local Notification',
    );
  }
핵심 포인트
채널 ID: Android 8.0 이상 필수
payload: 알림 클릭 시 전달할 데이터
main.dart 연결 흐름
import 'package:flutter/material.dart';
import 'package:flutter_noti_example/notification_helper.dart';
void main() async {
WidgetsFlutterBinding.ensureInitialized();
await NotificationHelper.initiailize();
runApp(const MyApp());
}
class MyApp extends StatelessWidget {
const MyApp({super.key});
Widget build(BuildContext context) {
return MaterialApp(
home: HomePage(),
);
}
}
class HomePage extends StatelessWidget {
Widget build(BuildContext context) {
return Scaffold(
appBar: AppBar(),
floatingActionButton: FloatingActionButton(
onPressed: () async {
await NotificationHelper.show('title', 'content');
},
),
);
}
}실행 흐름
앱 시작
알림 시스템 초기화
버튼 클릭 → 로컬 알림 즉시 표시
📝 AI 기능 넣어보기
TensorFlow Lite (feat. YOLOv8)
✏️ TensorFlow
TensorFlow란?
Google에서 개발한 오픈 소스 머신러닝 라이브러리
- 주 목적
딥러닝 모델 생성
데이터로 학습
성능 평가
실제 서비스에 배포
딥러닝 모델이란?
인간의 뇌(신경망 구조)를 모방한 알고리즘
복잡한 패턴을 스스로 학습하고 예측 가능
TensorFlow 활용 분야
이미지 인식
자연어 처리
음성 인식
강화 학습 등
TensorFlow Lite란?
왜 Lite가 필요할까?
일반 TensorFlow는:
무겁고
연산량이 많고
모바일 환경에 부적합
👉 그래서 나온 게 TensorFlow Lite
모델은 누가 만드나?
앱 개발자가 직접 학습 ❌
이미 학습된 모델 사용 ⭕️
이미지 분류
객체 감지
텍스트 분류 등
👉 이번 실습에서는 객체 감지 모델 YOLO 사용
✏️ YOLO
YOLO (You Only Look Once)
이미지를 한 번에 분석하여 객체 탐지
실시간 처리에 적합
이미지 전체에서 여러 객체 동시 감지 가능
COCO Dataset
YOLO 모델이 학습된 데이터셋
실생활 객체 중심
총 80개 클래스
사람, 동물, 차량, 가구 등
Flutter에서 YOLO 사용 흐름
전체 흐름 요약
- 학습된 YOLOv8 tflite 모델 준비
- Flutter에서 모델 로드
- 이미지 입력
- 모델 추론 실행
- 결과(객체, 점수, 위치) 가공
- UI에 표시
✏️ 프로젝트 세팅
프로젝트 생성
flutter_yolo_example
assets 추가
- 학습된 tflite 모델과
labels.txt파일 다운받은 후assets/폴더에 추가 - labels.txt : yolo 모델에서 객체를 감지하면 학습한 데이터셋의 클래스 인덱스를 반환
https://github.com/this-is-spartaa/YOLO-v8-model
assets/yolov8n.tflite
assets/labels.txt
📌 labels.txt
모델이 반환하는 클래스 인덱스 → 실제 이름 매핑용
assets:
  - assets/
사용 패키지 정리
tflite_flutter
TensorFlow Lite 공식 Flutter 패키지
모델 추론 담당
flutter pub add tflite_flutterimage
YOLO 입력 사이즈 맞추기용
이미지 리사이즈 (640×640)
flutter pub add imageimage_picker
갤러리에서 이미지 선택
flutter pub add image_picker- iOS 시뮬레이터에서는 tflite 동작 ❌
(이번 실습에서는 Android 기준)
yolo_helper
YOLO 출력 결과를 사람이 쓰기 좋은 형태로 변환
pub.dev 업로드 되어있지 않아 GitHub 직접 연결
yolo_helper:
  git:
    url: https://github.com/fhelper/flutter-yolo-helper.git
ref: main- YOLO 출력
클래스 인덱스
신뢰도(score)
바운딩 박스(bbox)
→ 다차원 배열 → 가공 필요
✏️ YOLOv8 객체 감지 코드 구조 정리
YoloDetection
📄 yolo_detection.dart
AI 모델과 관련된 모든 책임을 가진 클래스
import 'package:flutter/services.dart';
import 'package:image/image.dart';
import 'package:tflite_flutter/tflite_flutter.dart';
import 'package:yolo_helper/yolo_helper.dart';

class YoloDetection {
  int? _numClasses;
  List<String>? _labels;
  Interpreter? _interpreter;

  String label(int index) => _labels?[index] ?? '';

  bool get isInitialized => _interpreter != null && _labels != null;

  // 1. 모델 불러오기
  Future<void> initialize() async {
    _interpreter = await Interpreter.fromAsset('assets/yolov8n.tflite');
    final labelAsset = await rootBundle.loadString('assets/labels.txt');
    _labels = labelAsset.split('\n');
    _numClasses = _labels!.length;
  }

  // 2. 이미지 입력받아서 추론
  List<DetectedObject> runInference(Image image) {
    if (!isInitialized) {
      throw Exception('The model must be initialized');
    }

    // 3. 이미지를 YOLO v8 input 에 맞게 640x640 사이즈로 변환
    final imgResized = copyResize(image, width: 640, height: 640);

    // 4. 변환된 이미지 픽셀 nomalize(정규화)
    // 640x640 이미지에서 각 픽셀값을 가져와서
    // 0~255 사이의 값인 RGB 값을 0~1 로 변환
    final imgNormalized = List.generate(
      640,
      (y) => List.generate(640, (x) {
        final pixel = imgResized.getPixel(x, y);
        return [pixel.rNormalized, pixel.gNormalized, pixel.bNormalized];
      }),
    );

    final output = [
      List<List<double>>.filled(4 + _numClasses!, List<double>.filled(8400, 0)),
    ];
    _interpreter!.run([imgNormalized], output);
    // 원본 이미지 사이즈 넘기기!!!
    return YoloHelper.parse(output[0], image.width, image.height);
  }
}
YOLO 모델 담당 파일
YOLO tflite 모델 + 라벨 로딩
이미지 → 640×640 변환
정규화 후 모델 실행
객체 탐지 결과(List<DetectedObject>) 반환
👉 UI랑 완전 무관, AI 로직만 있음
HomePage
📄 lib/home_page.dart
class HomePage extends StatefulWidget {
const HomePage({super.key});
State<HomePage> createState() => _HomePageState();
}
class _HomePageState extends State<HomePage> {
final YoloDetection model = YoloDetection();
final ImagePicker picker = ImagePicker();
List<DetectedObject>? detectedObjects;
Uint8List? imageBytes;
int? imageWidth;
int? imageHeight;
void initState() {
super.initState();
model.initialize();
}
Widget build(BuildContext context) {
return Scaffold(
appBar: AppBar(),
body: GestureDetector(
onTap: () async {
if (!model.isInitialized) {
return;
}
final XFile? newImageFile = await picker.pickImage(
source: ImageSource.gallery,
);
if (newImageFile != null) {
final bytes = await newImageFile.readAsBytes();
final image = img.decodeImage(bytes)!;
imageWidth = image.width;
imageHeight = image.height;
setState(() {
imageBytes = bytes;
});
detectedObjects = model.runInference(image);
}
},
child: ListView(
children: [
if (imageBytes == null)
const Icon(Icons.file_open_outlined, size: 80)
else
Stack(
children: [
AspectRatio(
aspectRatio: imageWidth! / imageHeight!,
child: Image.memory(imageBytes!, fit: BoxFit.cover),
),
if (detectedObjects != null)
...detectedObjects!.map(
// (e) => Text('${model.label(e.labelIndex)} ${e.score}'),
(e) => Bbox(
detectedObject: e,
imageWidth: imageWidth!,
imageHeight: imageHeight!,
label: model.label(e.labelIndex),
),
),
],
),
],
),
),
);
}
}메인 화면 + 전체 흐름 제어
앱 시작 시 YOLO 모델 초기화
화면 터치 → 갤러리 이미지 선택
이미지 화면에 표시
YOLO 추론 실행
결과를 박스로 화면에 표시
👉 “유저 행동 ↔ 모델 연결하는 중심 역할”
Bbox
📄 lib/bbox.dart
import 'dart:math';
import 'package:flutter/material.dart';
import 'package:yolo_helper/yolo_helper.dart';
class Bbox extends StatelessWidget {
final DetectedObject detectedObject;
final int imageWidth;
final int imageHeight;
final String label;
const Bbox({
super.key,
required this.detectedObject,
required this.imageWidth,
required this.imageHeight,
required this.label,
});
Widget build(BuildContext context) {
final deviceWidth = MediaQuery.of(context).size.width;
final resizedFactor = deviceWidth / imageWidth;
// 객체를 감싸고 있는 박스의 중간 좌표
final resizedX = detectedObject.x * resizedFactor;
final resizedY = detectedObject.y * resizedFactor;
// 박스의 크기
final resizedW = detectedObject.width * resizedFactor;
final resizedH = detectedObject.height * resizedFactor;
final random = Random();
return Positioned(
left: resizedX - (resizedW / 2),
top: resizedY - (resizedH / 2),
child: Container(
width: resizedW,
height: resizedH,
decoration: BoxDecoration(
border: Border.all(
color: Color(0xFF00FF00 + random.nextInt(0xFFFFFF)),
width: 3.0,
),
),
child: Text(
label,
style: const TextStyle(
color: Colors.red,
fontSize: 11,
fontWeight: FontWeight.bold,
),
),
),
);
}
}탐지 결과를 화면에 그리는 위젯
YOLO 좌표 → 화면 좌표로 변환
객체 크기/위치 계산
이미지 위에 네모 박스 + 라벨 표시
👉 계산 + 그리기만 담당
📝 StatefulWidget Lifecycle
✏️ StatefulWidget Lifecycle이란?
StatefulWidget이 생성 → 화면에 표시 → 업데이트 → 제거되는 전체 흐름
“언제 무엇을 초기화하고, 언제 정리해야 하는가”를 알려주는 생명주기
✏️ 전체 라이프사이클 흐름
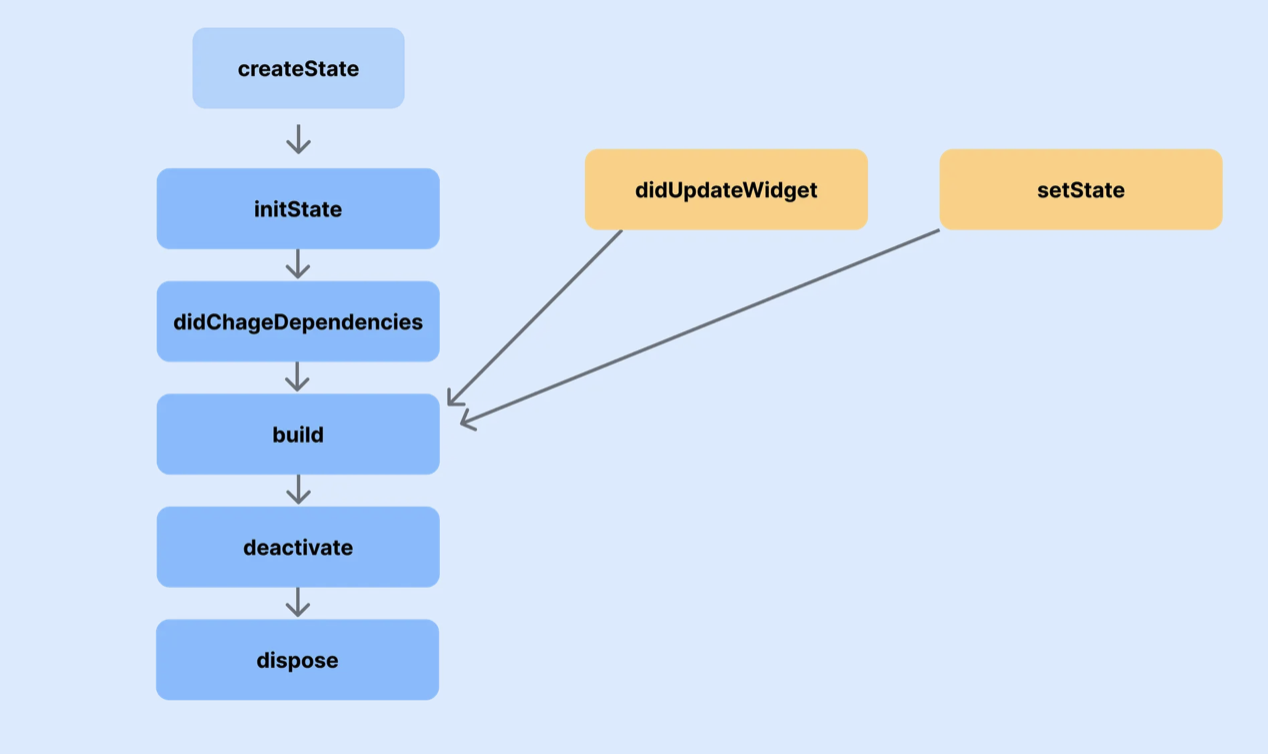
createState
   ↓
initState
   ↓
didChangeDependencies
   ↓
build (여러 번 호출)
   ↓
didUpdateWidget (부모로부터 변경 발생 시)
   ↓
deactivate
   ↓
dispose
✏️ Lifecycle 메서드별 역할
createState()
StatefulWidget이 처음 생성될 때
State 객체를 생성
거의 수정할 일 없음
initState()
State 객체 생성 직후 단 한 번만 호출
초기화 작업 담당
- 주로 하는 것
AnimationController 생성
Stream / Timer 시작
초기 API 호출
void initState() {
super.initState();
}didChangeDependencies()
InheritedWidget 의 값이 변경되었을 때 호출
Theme, MediaQuery, Provider, Riverpod 등 의존성 변경 감지
- 특징
initState 다음에 바로 1회 호출
이후에도 의존성이 바뀌면 다시 호출됨
void didChangeDependencies() {
super.didChangeDependencies();
}InheritedWidget & BuildContext 개념
위젯 트리
Flutter는 모든 위젯을 트리 구조로 관리
BuildContext
위젯이 트리 안에서 어디에 위치하는지에 대한 정보
이 정보를 통해 상위 위젯 데이터 접근 가능
Theme.of(context)
MediaQuery.of(context)
- 내부적으로 InheritedWidget을 통해 값 전달
build()
UI를 그리는 메서드
아주 자주 호출됨
-
호출 시점
최초 렌더링
setState()호출
didUpdateWidget()이후 -
주의
여기서 로직 처리 ✘
가벼운 UI 구성만
didUpdateWidget()
- 언제 호출되나?
부모 위젯이 같은 타입의 위젯을 다시 빌드하면서
프로퍼티 값이 변경될 때
void didUpdateWidget(covariant FadeInText oldWidget) {
super.didUpdateWidget(oldWidget);
}deactivate()
위젯이 트리에서 제거되기 직전
거의 사용 안 함
재삽입 가능성이 있는 경우만 의미 있음
dispose()
위젯이 완전히 제거되기 직전
리소스 해제 필수
void dispose() {
controller.dispose();
super.dispose();
}반드시 해제해야 할 것
- AnimationController
- TextEditingController
- Stream / Timer
❗ 안 하면 메모리 누수
정리
initState → 한 번
build → 매우 자주
didUpdateWidget → 부모 값 변경 대응
dispose → 정리 담당
📝 더 빠르고 더 효율적인 동작을 위한 Isolate
✏️ Isolate를 이해하기 위한 기초 개념
프로세스(Process)
운영체제로부터 자원을 할당받아 실행 중인 프로그램
예) 실행된 크롬 브라우저 = 하나의 프로세스
스레드(Thread)
-
하나의 프로세스 안에서 실행되는 작업 단위
-
멀티 스레드 환경에서는
파일 다운로드
동영상 재생
→ 각각 다른 스레드에서 실행 -
운영체제가 시분할 방식으로 스레드를 번갈아 실행
→ 동시에 실행되는 것처럼 보임
✏️ Flutter는 왜 싱글 스레드인가?
Flutter의 기본 구조
- 싱글 스레드 기반
- 하나의 스레드에서 처리하는 것
UI 렌더링 (60~120fps)
터치 이벤트
함수 실행
동시에 처리되는 것처럼 보이는 이유
Flutter는 이벤트 큐 + 이벤트 루프 방식 사용
| 개념 | 설명 |
|---|---|
| 이벤트 큐 | 실행할 작업들이 대기하는 공간 (Queue, FIFO) |
| 이벤트 루프 | 큐에서 이벤트를 하나씩 꺼내 실행 |
멀티 스레드 쓰면 더 빠르지 않나?
- 멀티 스레드에서는 컨텍스트 스위칭 발생
실행 중인 스레드 상태 저장
다음 스레드 상태 복원 - 잦은 전환 → 성능 저하
Flutter는 이를 피하기 위해
싱글 스레드 + 이벤트 루프 구조 채택
문제가 되는 상황
UI 스레드에서 무거운 작업을 하면?
터치 이벤트 안에서
대용량 연산 (예: 30MB JSON 파싱)
- 결과
이벤트 루프가 막힘
UI 업데이트 불가
애니메이션 끊김 / 화면 멈춤
이때 필요한 것이 Isolate
✏️ Isolate란?
정의
Dart에서 제공하는 독립적인 작업 단위
스레드 ❌
메모리를 공유하지 않음
스레드 vs Isolate
| 구분 | 스레드 | Isolate |
|---|---|---|
| 메모리 | 공유 | 완전 분리 |
| 데이터 접근 | 자유 | 불가능 |
| 안전성 | 낮음 | 매우 높음 |
Main Isolate
- UI 업데이트
- 터치 이벤트
- IO 처리
다른 Isolate는
Main Isolate의 객체 접근 ❌ (반대도 동일)
Isolate 간 통신
SendPort / ReceivePort 사용
직렬화 가능한 데이터만 전달 가능
Main Isolate ↔ SendPort / ReceivePort ↔ Worker Isolate✏️ Isolate 사용이 필요한 대표 상황
대용량 JSON 파싱
이미지 처리
복잡한 계산
데이터 변환 작업
- UI와 직접 관련 없는 무거운 작업
Isolate 사용 방법
Isolate.spawn
Isolate에서 실행할 함수
void isolateTask(SendPort mainSendPort) async {
  // 무거운 작업 처리
  mainSendPort.send("result");
}
⚠️ 주의
rootBundle, BuildContext 사용 불가