📝 StatefulWidget
상태란?
UI에 반영되는 변경되는 데이터
- 버튼을 눌러 숫자가 증가 → 숫자가 상태
- 토글스위치 on/off → on off 여부가 상태
StatefulWidget 이란?
- 상태를 가질 수 있는 위젯
- 변수를 업데이트 후 setState 함수를 통해 다시 그려달라고(build) 요청 가능
구현 방법
- StatefulWidget 상속받은 클래스 구현
- 불변(immutable) 위젯 클래스
- createState() 메서드로 State 객체와 연결
- 껍데기 위젯, 상태를 만들어야함
class MyWidget extends StatefulWidget {
_MyWidgetState createState() => _MyWidgetState();
}- State 상속받은 클래스 구현
- 진짜 상태 보관, UI 재구성, 로직 처리
- T(제너릭) 은 어떤 위젯에 대한 상태인지 명시
- 변하는 상태(state)와 UI 로직을 담는 클래스
- build() 메서드로 위젯 트리를 그림
- setState() 호출 시 build()가 다시 실행되어 UI가 갱신됨
class _MyWidgetState extends State<MyWidget> {
// 상태 변수
int counter = 0;
// UI 로직
void _increment() {
// setState에 익명함수 넘겨주면 해당 함수 호출하고
// build 메서드 재호출됨 -> 화면에 반영
setState(() {
counter++;
});
}
Widget build(BuildContext context) {
return Text('Count: $counter');
}
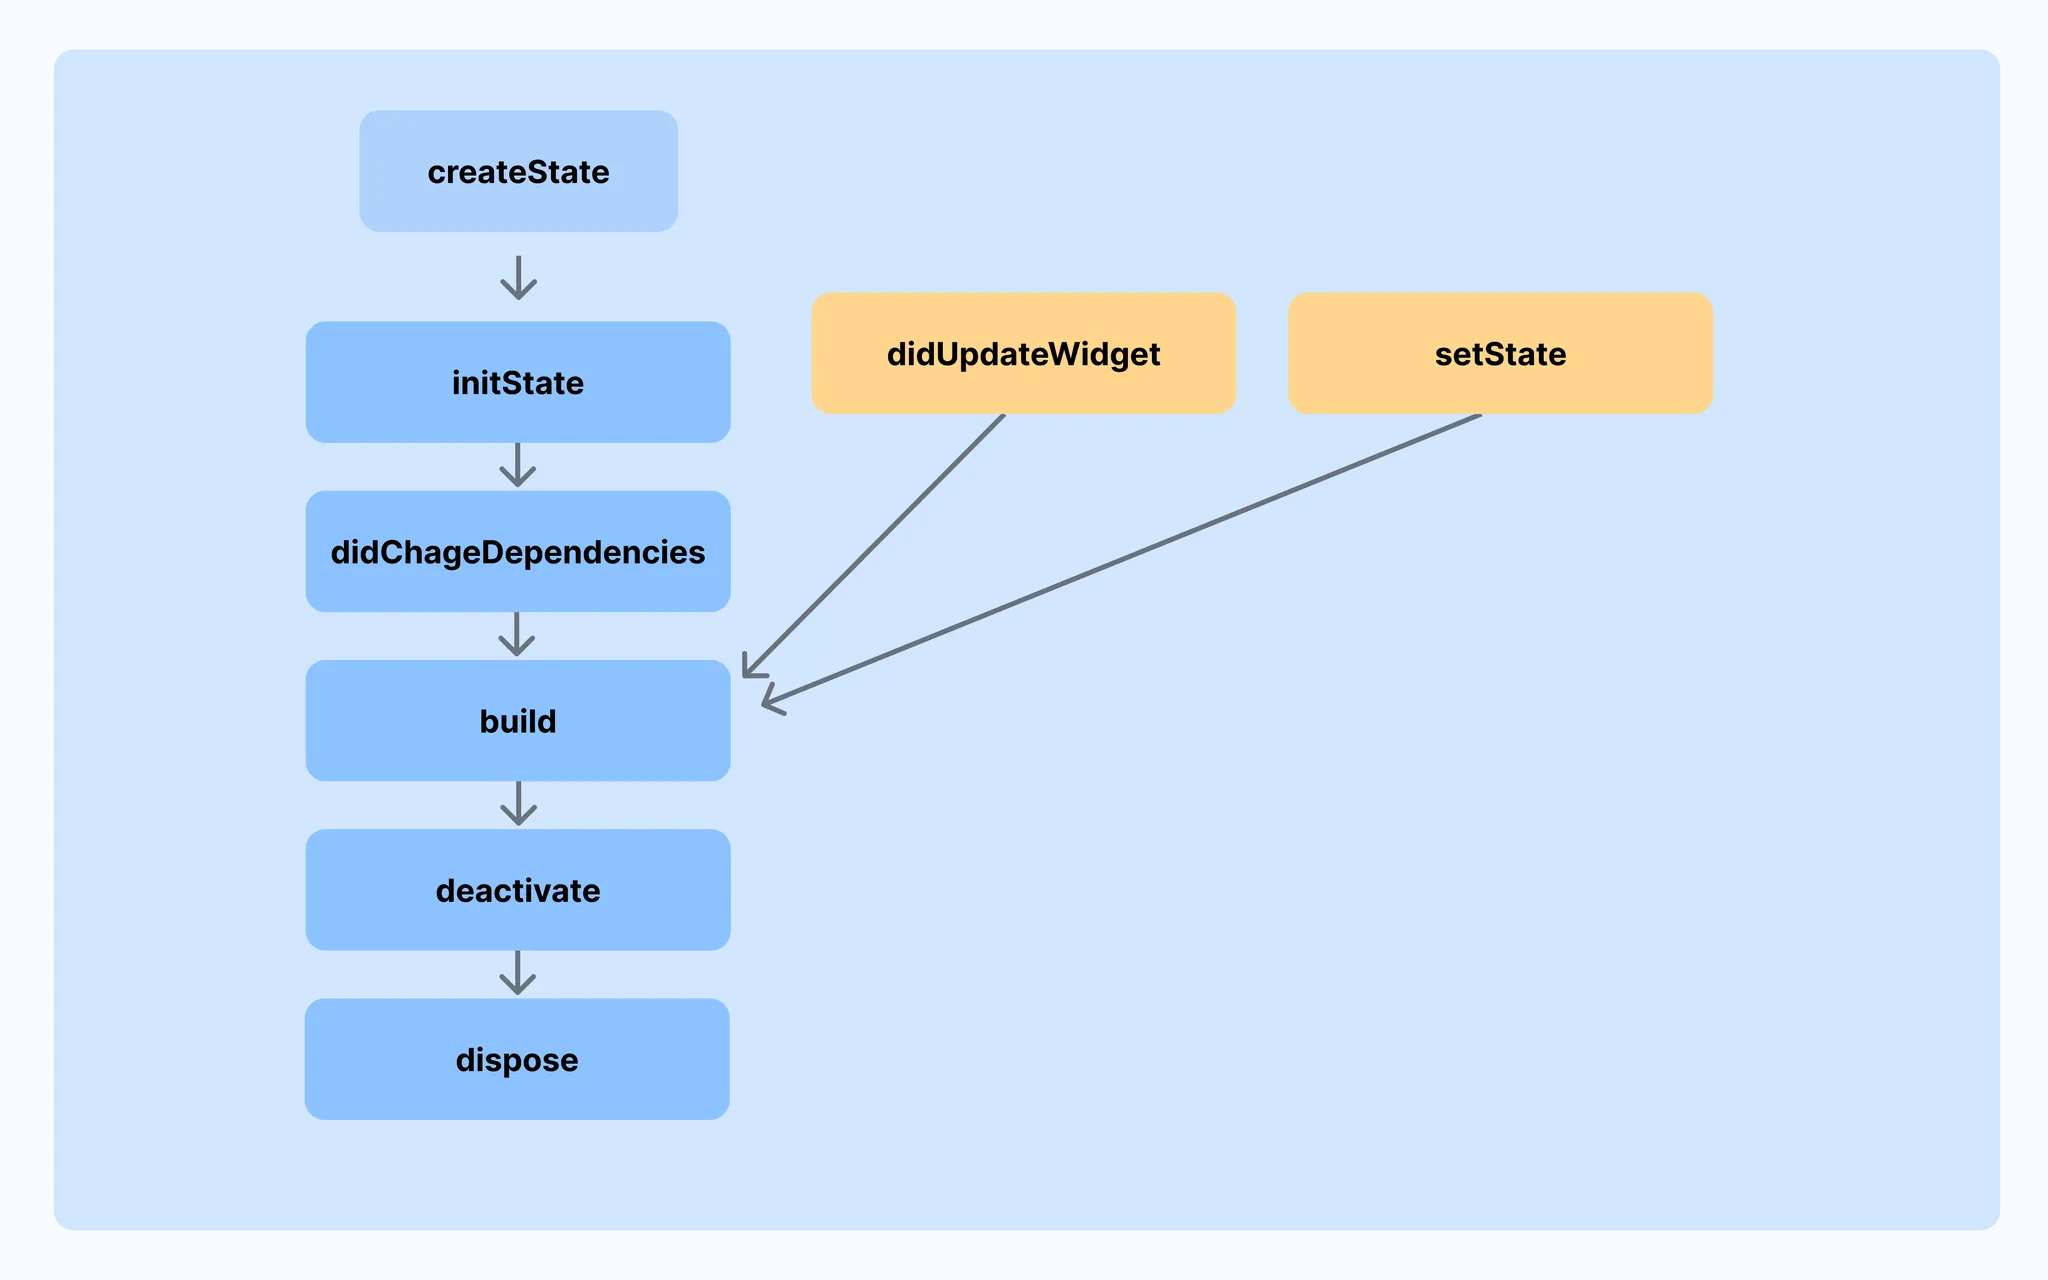
}StatefulWidget LifeCycle
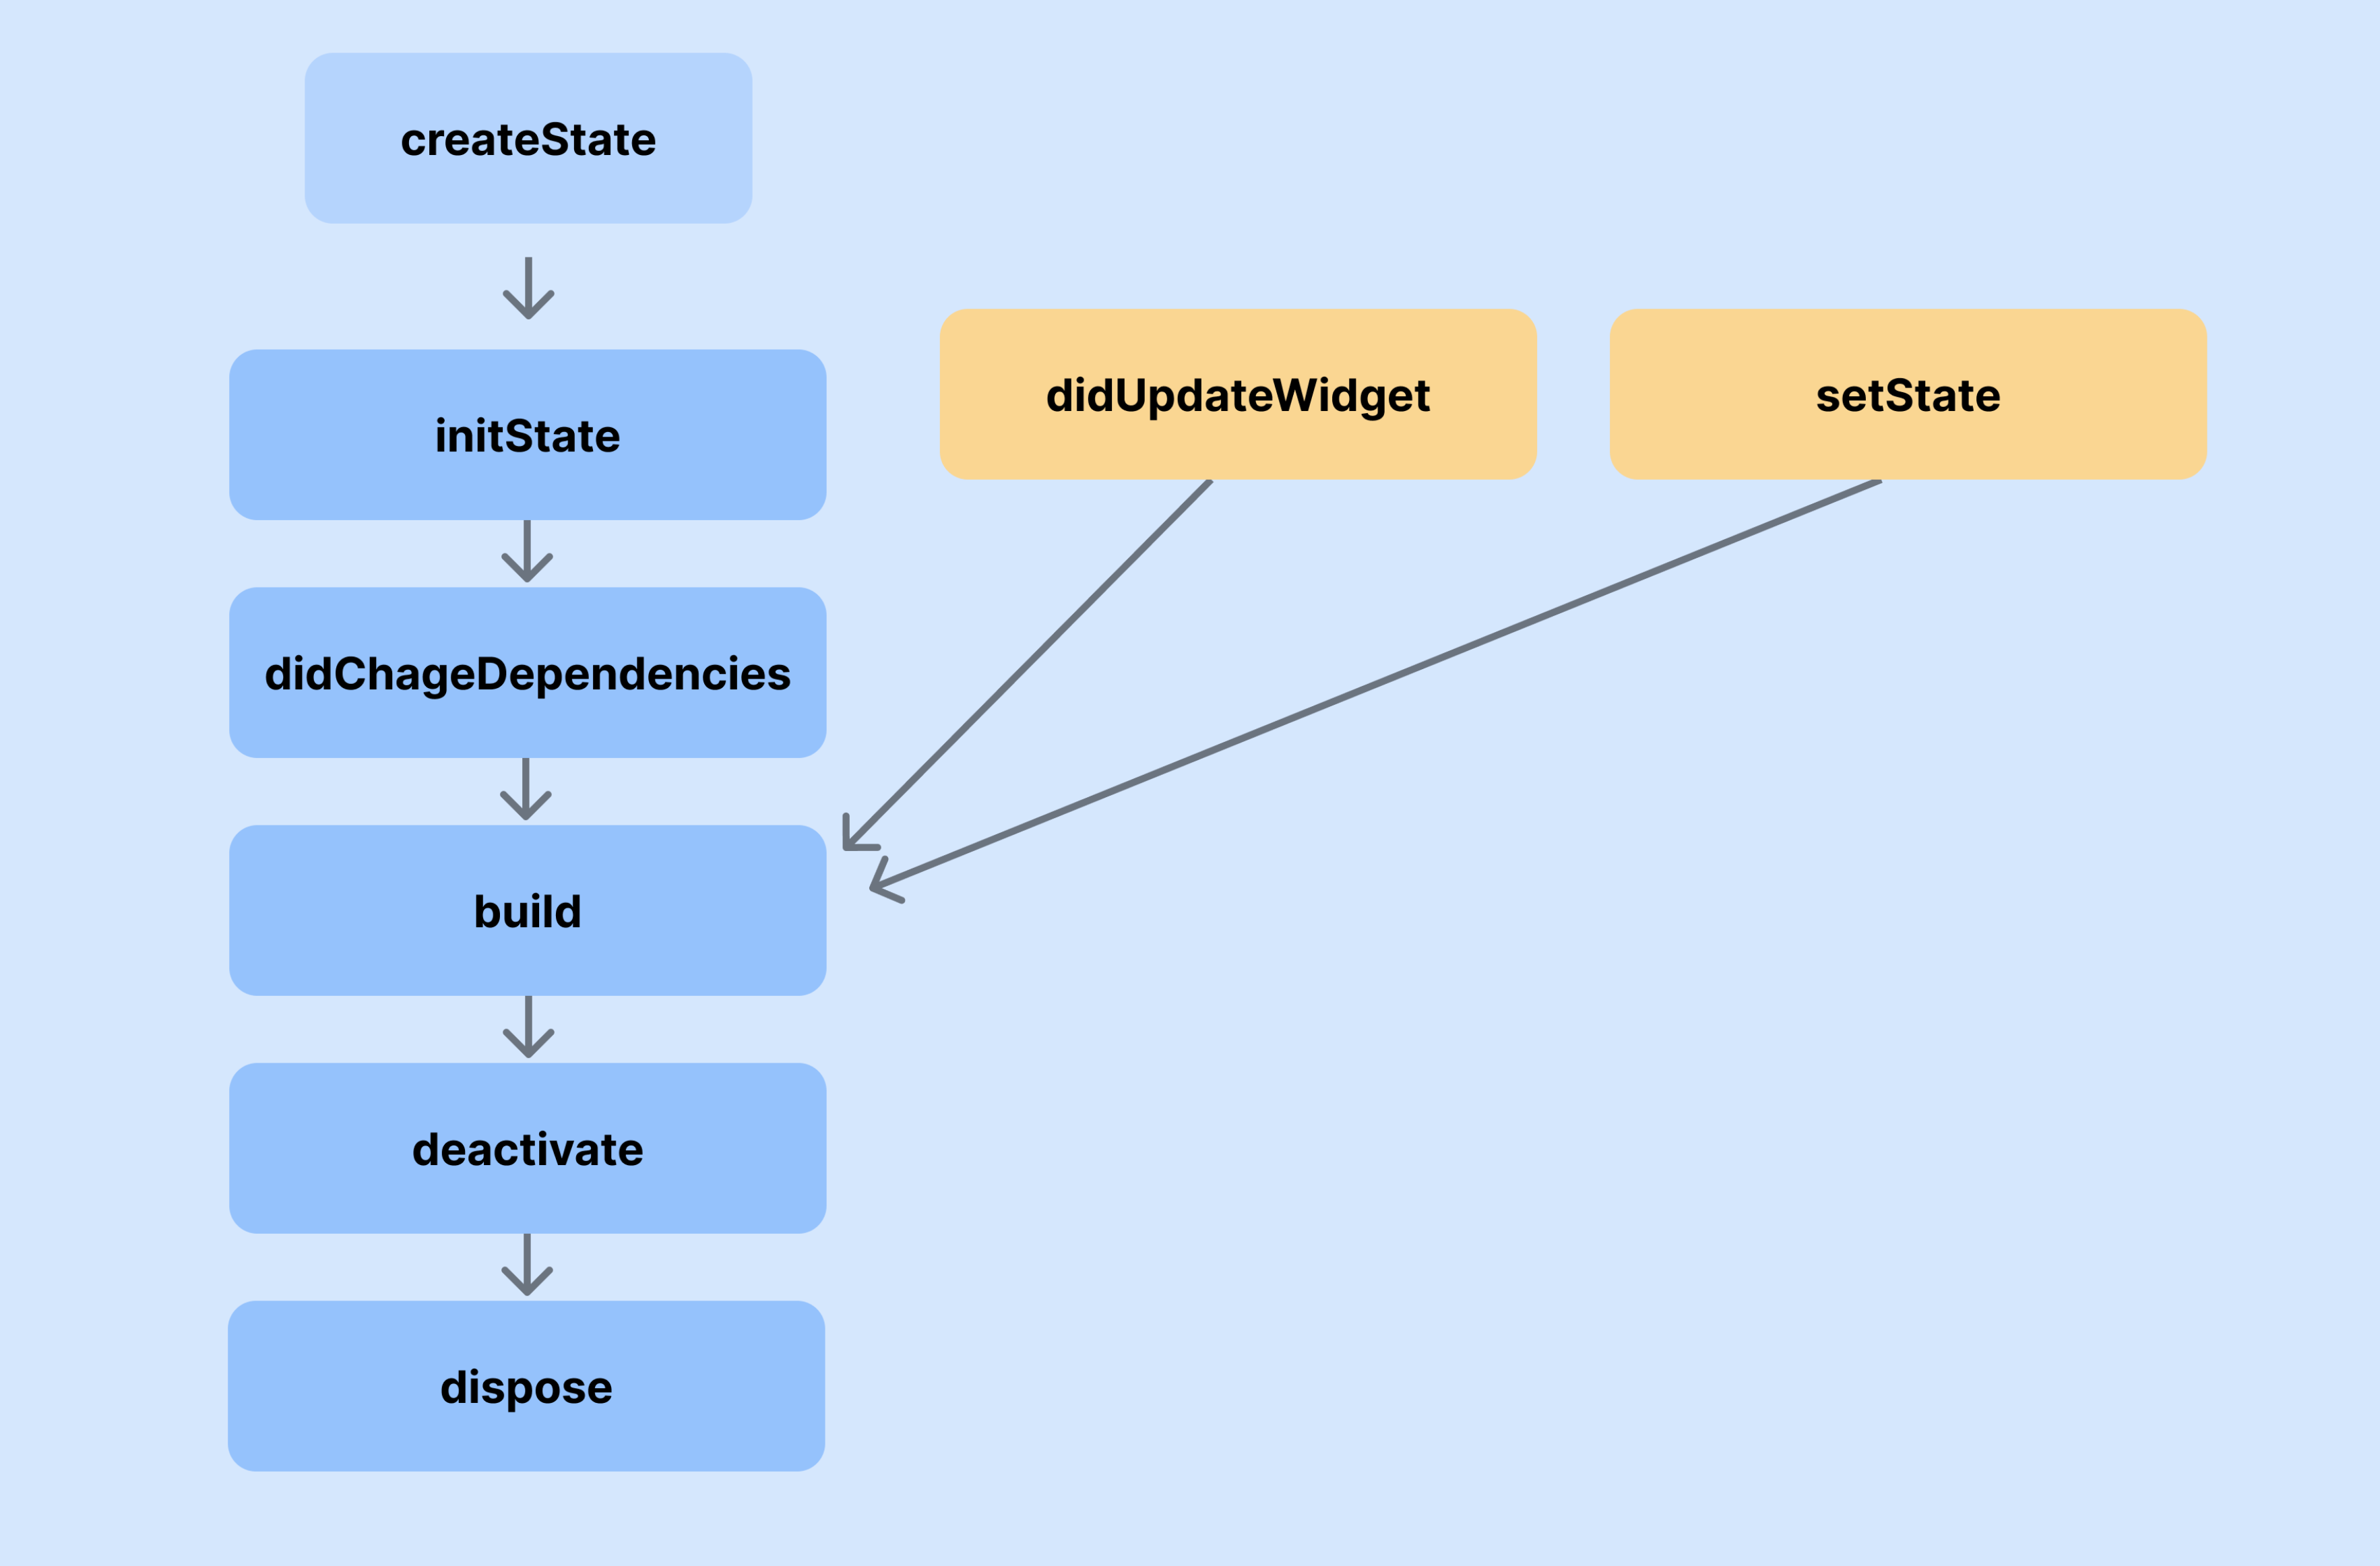
| 메서드 이름 | 호출 시점 및 조건 | 주요 역할 |
|---|---|---|
| createState() | StatefulWidget이 처음 생성될 때 | State 객체를 생성하여 연결 |
| ⭐️initState() | State가 처음 초기화될 때 1회 호출 | 초기 상태 설정, 리스너 등록 |
| didChangeDependencies() | initState() 이후 또는 InheritedWidget이 변경되었을 때 | 의존성 관련 값 접근 가능 |
| ⭐️build() | 위젯이 처음 그려질 때, 또는 setState()/didUpdateWidget() 호출 후 | UI 구성 |
| didUpdateWidget() | 부모가 위젯을 새 인스턴스로 다시 그릴 때 (State는 유지) | 새 파라미터 반영. 이후 자동으로 build() |
| setState() | 상태 변경 발생 시 호출 | 상태 변경 → build() 트리거 |
| deactivate() | 위젯이 트리에서 제거되기 직전 | 위젯이 제거될 준비 단계 |
| ⭐️dispose() | 위젯이 완전히 트리에서 제거될 때 | 리소스 해제, 컨트롤러/리스너 정리 |
📝 TextField
TextField란?
사용자의 글자 입력을 받을 수 있는 위젯
- textInputAction
키보드의 액션 버튼(오른쪽 아래 버튼)의 형태와 동작을 결정
| 타입명 | 키보드 버튼에 표시되는 텍스트 | 용도/설명 |
|---|---|---|
| ⭐️ TextInputAction.done | Done | 입력 완료 시 사용 (폼 제출, 입력 종료) |
| TextInputAction.next | Next | 다음 입력 필드로 이동 |
| TextInputAction.previous | Previous | 이전 입력 필드로 이동 (드물게 사용됨) |
| ⭐️ TextInputAction.search | Search | 검색 창 등에서 검색 트리거 |
| TextInputAction.send | Send | 채팅/메시지 등에서 전송 기능 |
| ⭐️ TextInputAction.go | Go | URL 이동, 진행 버튼 등에 사용 |
| TextInputAction.continueAction | Continue | 다음 단계로 계속 진행할 때 (iOS에서 주로 사용) |
| TextInputAction.join | Join | 가입이나 참여 관련 입력창 |
| TextInputAction.route | Route | 경로 탐색, 내비게이션 목적의 입력 |
| TextInputAction.emergencyCall | Emergency | 긴급 전화 관련 UI |
| ⭐️ TextInputAction.newline | Enter / 줄 바꿈 | 멀티라인 입력 시 줄 바꿈 기능 (채팅/메모장 등에서 자주 사용) |
| TextInputAction.unspecified | 플랫폼 기본값 사용 | 특별히 지정하지 않음 (기본 동작 사용) |
- expands
- TextField가 부모 위젯의 남은 세로 공간을 전부 차지
- maxLines: null과 함께 반드시 사용해야 동작함
- maxLines
- 줄 수 제한
- null 일 땐 줄 수 제한 없음
- onChanged
- 사용자가 입력을 변경할 때마다 호출
- 실시간 입력 감지, 자동 저장 등에 활용 가능
- onSubmitted
- 사용자가 Enter 키를 눌러 입력을 제출했을 때 호출
- 작성 완료 처리, 입력값 저장 등에 사용
TextEditingController
- TextField의 입력 값을 직접 제어하거나 읽을 수 있도록 하는 객체
- 입력 초기값 설정, 실시간 값 추적, clear 등 다양한 작업 가능
- 더이상 사용되지 않을 때 dispose 해줘야함 → StatefulWidget 내에서만 선언해줘야 안전(메모리 누수 안됨)
class HomePage extends StatefulWidget {
State<HomePage> createState() => _HomePageState();
}
class _HomePageState extends State<HomePage> {
TextEditingController controller = TextEditingController();
void dispose() {
controller.dispose();
super.dispose();
}
Widget build(BuildContext context) {
return Scaffold(
appBar: AppBar(title: Text("Test")),
body: Column(
children: [
TextField(controller: controller),
ElevatedButton(
onPressed: () {
controller.clear();
},
child: Text("초기화"),
),
ElevatedButton(
onPressed: () {
print(controller.text);
},
child: Text("현재값"),
),
],
),
);
}
}TextField 꾸미기
Style 관련 속성
- decoration: 입력창 꾸미기
| 속성명 | 설명 |
|---|---|
| labelText | 입력창 위에 항상 표시되는 라벨 텍스트 |
| hintText | 입력 전, 입력창 안에 흐릿하게 보이는 힌트 |
| prefixIcon / suffixIcon | 입력창 안쪽에 표시할 아이콘 |
| prefix / suffix | 아이콘 외에 텍스트/위젯도 가능 |
| filled | 배경을 채울지 여부 (true 설정 시 fillColor 필요) |
| fillColor | 배경색 설정 |
| border | 기본 상태 테두리 |
| enabledBorder | 포커스되지 않은 상태의 테두리 |
| focusedBorder | 포커스된 상태의 테두리 |
| contentPadding | 내부 여백 (입력값과 테두리 사이 간격) |
- style: 입력 텍스트 스타일
- cursorColor, cursorWidth: 커서 색상/굵기
- textAlign: 정렬 위치
- obscureText: 비밀번호 처리
TextField(
  decoration: InputDecoration(
    labelText: '이메일',
    hintText: 'example@domain.com',
    prefixIcon: Icon(Icons.email),
    border: OutlineInputBorder(
      borderRadius: BorderRadius.circular(12),
    ),
    filled: true,
    fillColor: Colors.grey[100],
  ),
  style: TextStyle(fontSize: 16, color: Colors.black87),
  cursorColor: Colors.blueAccent,
)
📝 ListView
ListView란?
스크롤 가능한 위젯 리스트를 만들 때 사용
children 내 리스트에 위젯들 배치
주요 속성
- children: 직접 나열할 위젯 리스트
- scrollDirection: 스크롤 방향 (기본: Axis.vertical)
- padding: 안쪽 여백 설정
- shrinkWrap: true 시 자식 크기에 맞게 리스트 축소
사용 예제
ListView(
  children: [
    Container(
      width: double.infinity,
      color: Colors.amber,
      margin: EdgeInsets.all(10),
      child: Text("1", style: TextStyle(fontSize: 100)),
    ),
    Container(
      width: double.infinity,
      color: Colors.amber,
      margin: EdgeInsets.all(10),
      child: Text("2", style: TextStyle(fontSize: 100)),
    ),
    Container(
      width: double.infinity,
      color: Colors.amber,
      margin: EdgeInsets.all(10),
      child: Text("3", style: TextStyle(fontSize: 100)),
    ),
    Container(
      width: double.infinity,
      color: Colors.amber,
      margin: EdgeInsets.all(10),
      child: Text("4", style: TextStyle(fontSize: 100)),
    ),
    Container(
      width: double.infinity,
      color: Colors.amber,
      margin: EdgeInsets.all(10),
      child: Text("5", style: TextStyle(fontSize: 100)),
    ),
  ],
)
ListView.builder
for문처럼 인덱스를 기반으로 위젯을 하나씩 만들어줌
반복적으로 동일한 위젯 그릴 때 유용!
주요 속성
- itemCount: 전체 항목 수
- itemBuilder: 리스트 항목 위젯을 생성하는 함수
사용 예제
ListView.builder(
  itemCount: 10,
  itemBuilder: (context, index) {
    // 반복문처럼 작동하나
    // 화면에 보이는 갯수만 build
    return Container(
      width: double.infinity,
      color: Colors.amber,
      margin: EdgeInsets.all(10),
      child: Text("${index + 1}", style: TextStyle(fontSize: 100)),
    );
  },
)
ListView.seperated
ListView.builder와 거의 동일하지만, 아이템 사이에 위젯(구분자)을 삽입 가능
주요 속성
- itemCount: 전체 항목 수
- separatorBuilder : 항목 사이에 들어갈 위젯 생성하는 함수
- itemBuilder: 리스트 항목 위젯을 생성하는 함수
사용 예제
ListView.separated(
  itemCount: 10,
  separatorBuilder: (context, index) {
    return Container(
      width: double.infinity,
      height: 5,
      color: Colors.blue,
    );
  },
  itemBuilder: (context, index) {
    return Container(
      width: double.infinity,
      color: Colors.amber,
      margin: EdgeInsets.all(10),
      child: Text("${index + 1}", style: TextStyle(fontSize: 100)),
    );
  },
)
공부 소감
위젯 심화 강의를 시작했는데 난이도는 아직 비슷비슷한 것 같다
이 위젯들을 어떻게 사용해서 어플을 구성할지는 아직 감이 잡히진 않지만 재미는 있다룡