
Swift Macro(이하 매크로)는 WWDC23에 발표된 Swift의 새로운 기능 중 하나로 이름에서 알 수 있듯이, 다른 언어와 마찬가지로 컴파일 단계에서 새로운 코드를 전개합니다.
Swift의 매크로는 다른 언어의 매크로와 결이 무척이나 다릅니다. Swift의 매크로는 새로운 코드로 전개하는 걸 넘어 처음 버전의 선언과 선언 위치 및 방법에 따라 다재자능하게 전개합니다. 이를 위해 SyntaxTree라는 코드 블록 트리라는 개념을 도입했으며, 코드 작성자는 이러한 SyntaxTree를 구성해 새로운 코드로 전개할 수 있습니다.
아울러, [부록] 라이브러리 알아보기을 첨부해 Swift의 매크로가 어떻게 동작하는지 깊게 탐구해보고자 하였습니다. 잘 익혀두면 지루한 보일러 플레이트(Boiler Plate) 코드를 제거할 수 있을 뿐만 아니라 읽기도 쉬워집니다.
기본 개념
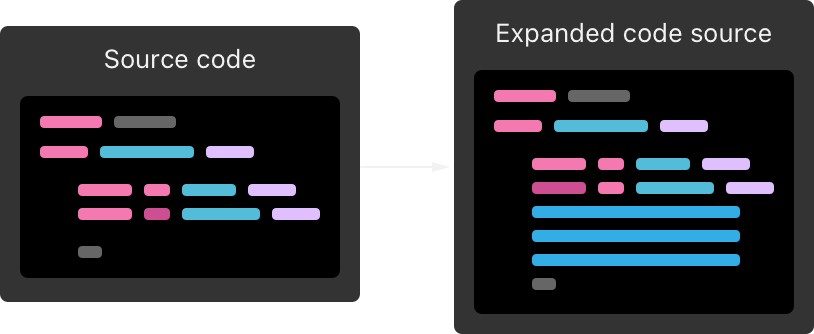
매크로는 코드를 컴파일 할 때 새로운 코드를 전개해 지루한 보일러 플레이트 코드 제거에 도움을 줍니다. 컴파일하는 동안 코드를 빌드하기 전에 코드에서 인식되는 모든 매크로를 전개합니다. 매크로는 새로운 코드를 추가하는 방식으로 작동하며, 기존의 코드를 절대로 삭제하거나 수정하지 않습니다. 이는 매크로가 항상 부가적인(Addictive) 방식으로 작동함을 의미합니다.
매크로는 C/C++언어의 매크로가 가진 한계를 극복합니다. C/C++언어의 매크로는 전처리(Preprocessing)를 할 때 매개변수의 타입을 검사해주지 못합니다. 게다가, 매크로의 크기가 커지면 커질수록 코드 가독성이 떨어지며, 디버깅또한 매우 어렵다는 문제가 있습니다. Swift의 매크로는 이 같은 문제를 해결했습니다. 매크로 매개변수의 타입이 올바르지 않다면 컴파일 경고를 내보내며, 전개식도 빠르게 소스코드에서 볼 수 있을 뿐만 아니라 중단점(Break Point)를 찍어 디버깅또한 가능합니다.
매크로는 컴파일러를 수정할 필요없이 패키지 속에 배포하는 방식으로 작동합니다. 다시 말해, 우리가 직접 라이브러리를 만들어야 합니다. 이는 소스파일에 직접 매크로를 구현하는 C/C++언어와 달리 무척이나 귀찮은 작업입니다. 하지만, 이 덕분에 매크로는 다양한 프로젝트에 쉽게 적용할 수 있을 뿐만 아니라 다른 코드 작성자와 공유하기도 쉽다는 장점이 있습니다.
작동 방식
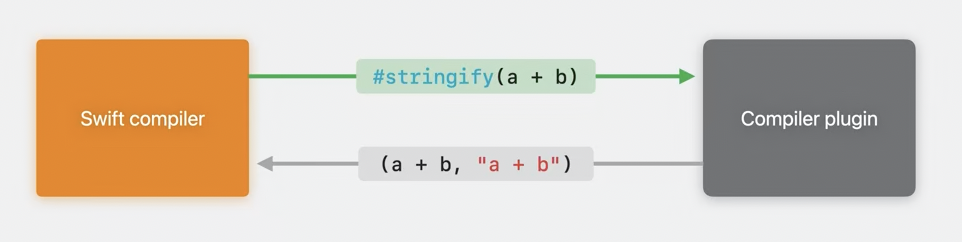
매크로는 어떻게 전개될까요? Swift 컴파일러는 컴파일 도중 매크로를 인식하면 해당 매크로를 매크로의 구현을 포함하는 컴파일러 플러그인(Compiler Pulgin)에 보냅니다. 이후 컴파일러 플러그인은 매크로 전개식을 코드에 추가하고 전개된 결과 코드를 컴파일합니다.
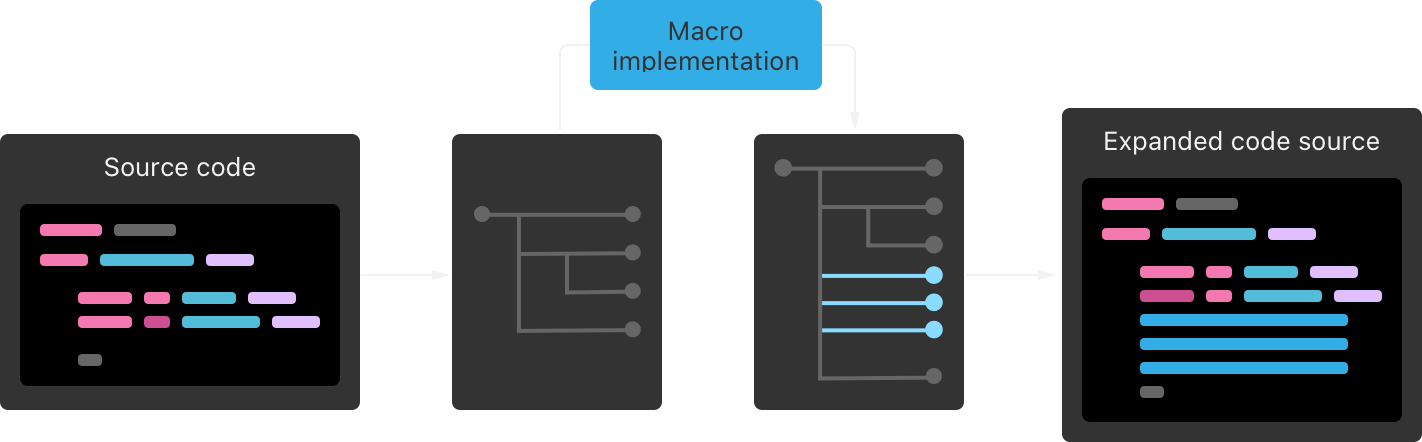
조금 더 자세하게 톺아보겠습니다. Swift 컴파일러는 매크로를 컴파일러 플러그인에게 보내면 컴파일러 플러그인은 제일 먼저 매크로 표현식을 포함한 모든 코드를 SyntaxTree로 파싱합니다. 이후 코드 작성자가 구현한 매크로 구현(Macro Implementation)에서 새로운 SyntaxTree를 구성하고 반환합니다. 컴파일러 플러그인은 반환된 SyntaxTree를 다시 코드로 직렬화해 전개하는 과정를 거치게 됩니다.
이 과정을 이해하기 위해 #URL 매크로를 URL(string:)!로 확장하는 단계를 살펴보겠습니다.
let url = #URL("www.apple.com/kr")Swift 컴파일러는 컴파일 도중 #URL 매크로를 인식하면 해당 매크로를 매크로의 구현을 포함하는 컴파일러 플러그인에 보냅니다. 컴파일러 플러그인은 제일 먼저 매크로 표현식을 포함한 모든 코드를 SyntaxTree로 파싱합니다.
- SourceFileSyntax
├─statements: CodeBlockItemListSyntax
│ ╰─[0]: CodeBlockItemSyntax
│   ╰─item: MacroExpansionExprSyntax
│     ├─pound: pound
│     ├─macroName: identifier("URL")
│     ├─leftParen: leftParen
│     ├─arguments: LabeledExprListSyntax
│     │ ╰─[0]: LabeledExprSyntax
│     │   ╰─expression: StringLiteralExprSyntax
│     │     ├─openingQuote: stringQuote
│     │     ├─segments: StringLiteralSegmentListSyntax
│     │     │ ╰─[0]: StringSegmentSyntax
│     │     │   ╰─content: stringSegment("www.apple.com/kr")
│     │     ╰─closingQuote: stringQuote
│     ├─rightParen: rightParen
│     ╰─additionalTrailingClosures: MultipleTrailingClosureElementListSyntax
╰─endOfFileToken: endOfFile
그리고 코드 작성자가 구현한 매크로 구현에서 파싱된 SyntaxTree를 토대로 새로운 SyntaxTree를 구성하고 반환합니다.
- SourceFileSyntax
├─statements: CodeBlockItemListSyntax
│ ╰─[0]: CodeBlockItemSyntax
│   ╰─item: ForceUnwrapExprSyntax
│     ├─expression: FunctionCallExprSyntax
│     │ ├─calledExpression: DeclReferenceExprSyntax
│     │ │ ╰─baseName: identifier("url")
│     │ ├─leftParen: leftParen
│     │ ├─arguments: LabeledExprListSyntax
│     │ │ ╰─[0]: LabeledExprSyntax
│     │ │   ├─label: identifier("string")
│     │ │   ├─colon: colon
│     │ │   ╰─expression: StringLiteralExprSyntax
│     │ │     ├─openingQuote: stringQuote
│     │ │     ├─segments: StringLiteralSegmentListSyntax
│     │ │     │ ╰─[0]: StringSegmentSyntax
│     │ │     │   ╰─content: stringSegment("www.apple.com/kr")
│     │ │     ╰─closingQuote: stringQuote
│     │ ├─rightParen: rightParen
│     │ ╰─additionalTrailingClosures: MultipleTrailingClosureElementListSyntax
│     ╰─exclamationMark: exclamationMark
╰─endOfFileToken: endOfFile
마지막으로 Swift 컴파일러는 직렬화된 SyntaxTree를 바탕으로 코드를 전개합니다. Swift 컴파일러는 전개된 코드가 문제가 없다면 컴파일을 계속하고, 그렇지 않다면 컴파일 경고를 내보냅니다. 전개식은 아래와 같습니다.
let url = URL(string: "www.apple.com/kr")!디자인 철학
매크로는 명확성, 완전성, 부가성, 투명성을 염두에 두고 디자인되었습니다.
① 명확성
#makeSomeFunction@Codable
struct MemberResponse {
var name: String
@Codable(key: "day_of_birth") var dayOfBirth: String
var age: Int
}매크로를 쓸 때는 명확해야 합니다. 매크로는 항상 #과 @ 기호로 시작합니다. 해당 기호가 보이지 않는다면 매크로가 전혀 쓰이지 않았다고 생각해도 좋습니다. Swift에서 해당 기호는 @available이나 #warning과 같이 컴파일러의 동작을 의미합니다. 매크로도 마찬가지 의미를 지닙니다.
② 완전성
@freestanding(expression)
public macro convertStringToInt(_ value: String) -> Int = ...
let value = #convertStringToInt(19980321) // 🚨Cannot convert value of type 'Int' to expected argument type 'String'컴파일러 플러그인에게 넘긴 매크로와 이것으로부터 넘어온 코드는 완전해야 합니다. Swift 컴파일러는 매크로를 인식하면 매크로 매개변수의 타입이 올바른지 검사합니다. 매크로는 함수의 매개변수와 마찬가지로 똑같이 타입 검사를 받습니다. Swift 컴파일러는 확장된 코드 블록도 마찬가지로 검증하고 잘못된 경우 컴파일러 경고나 오류 메시지를 내어 올바르게 쓰고 있는지 확신할 수 있습니다.
③ 부가성
struct SomeStruct {

	func someFunction() { ... }

    #makeAnotherFunction

}
매크로는 항상 부가적인 방식으로 전개되어야 합니다. 매크로는 새로운 코드를 추가하는 방식으로 작동하며, 기존의 코드를 절대로 삭제하거나 수정하지 않습니다. 위 예제에서 #makeAnotherFunction 매크로의 용도를 모르더라도 이 매크로가 절대로 someFunction() 함수를 지우거나 수정하지 않으리라는 걸 알 수 있습니다.
④ 투명성
final class DependencyValueMacroTests: XCTestCase {

    func testDendencyValue() throws {
        assertMacroExpansion(
            """
            extension DependencyValues {
                @DependencyValue(for: WeatherClientKey.self)
                var weatherClient: WeatherClient
            }
            """,
            expandedSource:
            """
            extension DependencyValues {
                var weatherClient: WeatherClient {
                    get {
                        self[WeatherClientKey.self]
                    }
                    set {
                        self[WeatherClientKey.self] = newValue
                    }
                }
            }
            """,
            macros: testMacros
        )
    }

}
매크로는 투명하게 공개되어야 합니다. 매크로에 의해 전개된 코드는 매크로 사용 위치에서 우클릭 > Expand a Macro로 코드가 어떻게 전개되는지 확인할 수 있습니다. 게다가 전개된 코드에 중단점을 추가해 디버깅도 용이하게 할 수 있죠. 또한 매크로에 대한 단위 테스트(Unit Test)도 가능해 매크로가 예상대로 작동하는지 확인할 수 있습니다.
역할(Role)
매크로 역할(role)은 매크로에 대한 일련의 규칙을 의미합니다. 매크로를 어디에, 어떻게 적용할지와 어떤 코드로 전개되는지, 이 전개식이 코드의 어디에 삽입될지를 결정합니다. 매크로 역할은 매크로 선언(Macro Declaration)에 작성하며 매크로 선언에서 매크로 역할만 보더라도 해당 매크로가 어떤 역할을 할지 예측하고 알맞은 위치에 코드를 전개하도록 도와주는 게 매크로 역할입니다.
매크로 역할은 크게 독립 매크로(freestanding)과 첨부 매크로(attached)로 나뉩니다. 그리고 각 매크로는 member, extension 등 세부 역할로도 나뉠 수 있습니다. 첨부 매크로는 한가지 세부 역할뿐만 아니라 여러 세부 역할도 동시에 겸할 수 있습니다. 매크로 하나가 새로운 프로퍼티와 프로토콜 준수성을 동시에 추가할 수 있는 거죠.
그렇다면 세부 역할을 동시에 겸하는 매크로는 무엇이 먼저 전개될까요?
- 정답은 상관없다입니다. Swift 컴파일러는 서로 다른 역할을 가진 매크로가 언제, 어떤 순서로 전개되든 최종 전개식만 보게 됩니다.
- 반대로, 한 매크로 역할은 다른 매크로 역할에 영향을 받지 않고 독립적으로 코드 전개를 수행합니다. 매크로는 선언된 코드의 처음 버전만을 보고 코드를 전개하기 때문입니다.
freestanding
독립 매크로는 독립적으로 사용되며 표현식(Expression) 또는 선언식(Declaration) 코드를 전개합니다. 독립 매크로는 어느 선언과도 관련이 없으며 다른 선언에 영향을 끼치지도 않습니다. 독립 매크로는 # 기호로 시작하며 매개변수를 포함할 수 있습니다.
expression
@freestanding(expression)
public macro unwrap<T>(_ T?, deafult: T) -> T = ...
let optionalValue: Int? = 32
let value = #unwrap(optionalValue, default: -1)
// begin exansion of "#unwrap(_:default:)"
{
guard
let value = optionalValue
else { return -1 }
return value
}()
// end expansion of "#unwrap(_:default:)"freestanding(expression) 매크로는 값을 반환하는 코드 조각(Piece of Code)을 생성합니다. 위 예제는 첫 번째 인자를 옵셔널 바인딩(Optional Binding)한 결과를 반환하고, 실패한다면 두 번째 인자를 반환하는 코드 조각을 전개하는 방법을 보여줍니다.
declaration
@freestanding(declaration, names: named(MyEnum))
public macro makeCustomEnum(_: String...) = ...#makeCustomEnum("zizi_Kim", "jenny_kim", "mimi_ma")
// begin expansion of "#makeCustomEnum(_:)"
enum MyEnum {
case zizi_kim
case jenny_kim
case mimi_ma
}
// end expansion of "#makeCustomEnum(_:)"freestanding(declaration) 매크로는 하나 또는 여러 개의 선언을 생성합니다. 선언은 클래스, 구조체나 열거형이 될 수 있습니다. 위 예제는 가변 인자로 주어진 문자열을 열거형의 케이스(Case)로 두는 열거형을 전개하는 방법을 보여줍니다.
attached
첨부 매크로는 어느 선언과 멤버에 첨부되어 해당 선언과 멤버에 프로퍼티 옵저버(Observer), 속성(Attribute) 및 확장(Extension) 코드를 전개합니다. 첨부 매크로는 첨부된 선언과 멤버에 영향을 끼칩니다. 첨부 매크로는 @ 기호로 시작하며 매개변수를 포함할 수 있습니다.
peer
@attached(peer, names: overloaded)
public macro AddCompletionHandler() = ...@AddCompletionHandler
func request(_ url: URL) async throws -> Data { ... }
// Begin expansion of "@AddCompletionHandler"
func request(
_ url: URL,
completionHandler: @escaping (Result<Data, Error>) -> Void
) { ... }
// End expansion of "@AddCompletionHandler"attached(peer) 매크로는 첨부된 선언과 더불어 새로운 선언을 생성합니다. 위 예제는 func request(_ url:) async throws 함수에 async throws 키워드를 없애고 completionHandler:라는 새로운 매개변수를 추가해 전통적인 새로운 비동기 처리 함수를 전개하는 방법을 보여줍니다.
매크로 선언을 보면 names: 매개변수가 보입니다. 이 매개변수에 코드를 전개할 때 생성될 멤버의 이름을 이름 지정자(names)로 알려줘야 합니다. 위 예제에서는 overloaded로 되어 있는데, 이는 첨부된 선언과 똑같은 이름을 가진 선언을 전개한다는 걸 의미합니다. 이러한 이름 지정자는 overloaded 뿐만 아니라 named, arbitrary 등 존재합니다.
이름 지정자 | 내용 | 예시 |
|---|---|---|
| overloaded | 첨부된 선언과 똑같은 이름을 가진 선언을 전개 (첨부 매크로 전용) | @attached(peer, names: overloaded) |
| suffixed(_:) | 첨부된 선언 이름 접미사에 가 붙는 선언을 전개, 는 $로 시작할 수 있음 (첨부 매크로 전용) | @attached(peer, names: suffixed(Key)) |
| prefixed(_:) | 첨부된 선언 이름 접두사에 가 붙는 선언을 전개, 는 $로 시작할 수 있음 (첨부 매크로 전용) | @attached(peer, names: prefixed(_peer)) |
| named(_:) | 첨부된 선언에 의 이름을 가진 선언을 전개 | #attached(memeber, names: named(stroage), named(init(_:))) |
| arbitray | 위 이름 지정자로 묘사할 수 없는 기타 이름을 가진 선언을 전개 | @attached(member, names: arbitrary) |
일반적으로 arbitrary 이름 지장자를 흔하게 사용하지만, 이름 지정자 중 하나를 사용할 수 있다면 이를 권장합니다.
member
@attached(member, names: named(storage), named(init(_:)))
public macro DictionaryStorage() = ...@DictionaryStorage
struct DictionaryStorage {
// Begin expansion of "@DictionaryStroage"
var storage: [String: Any]
init(_ straoge: [String: Any]) {
self.storage = storage
}
// End expansion of "@DictionaryStorage"
}attached(member) 매크로는 첨부된 선언에 새로운 맴버를 생성합니다. 위 예제는 DictionaryStorage 구조체에 새로운 프로퍼티와 이니셜라이저를 전개하는 방법을 보여줍니다.
memberAttribute
@attached(memberAttribute)
public macro Inlinable() = ...@Inlinable
struct FourBasicOperations<T: Numeric> {
// Begin expansion of "@makeInlinable"
@inlinable
// End expansion of "@makeInlinable"
func add(_ x: T, _ y: T) -> T {
return x + y
}
// Begin expansion of "@makeInlinable"
@inlinable
// End expansion of "@makeInlinable"
func minus(_ x: T, _ y: T) -> T {
return x - y
}
}attached(memberAttribute) 매크로는 첨부된 멤버에 새로운 속성을 전개합니다. 속성은 @DictionaryStorageKey(_:)와 같이 매크로가 될 수도 있고, @frozen과 같이 속성이 될 수 있습니다. 위 예제는 각 함수마다 @inlinable 속성을 전개하는 방법을 보여줍니다.
accessor
@attached(accessor)
public macro DictionaryStorageKey() = ...
struct DictionaryStorage {
...
@DictionaryStorageKey
var name: String = "김소월"
// Begin expansion of "@DictionaryStorageKey"
{
get { self.storage["name", defaults: "김소월"] as! String }
set { self.storage["name"] = newValue as Any }
}
// End expansion of "@DictionaryStorageKey"
}attached(accessor) 매크로는 첨부된 프로퍼티에 프로퍼티 옵저버(Observer)를 생성합니다.** 프로퍼티 옵저버는 get, set, willSet과 didSet이 될 수 있습니다. 위 예제는 각 프로퍼티마다 get, set 옵저버를 전개하는 방법을 보여줍니다.
extension
@attached(extension, conformances: Reactor)
public macro Reactor() = ...@Reactor
struct HomeReactor { }
// Begin expansion of "@Reactor"
extension HomeReactor: Reactor { }
// End expansion of "@Reactor"attached(extension) 매크로는 첨부된 선언에 새로운 확장을 전개합니다. 위 예제는 Reactor** 프로토콜을 준수하는 새로운 확장을 전개하는 방법을 보여줍니다.
코드 블록 트리(SyntaxTree)
Swift 컴파일러는 매크로를 컴파일러 플로그인에게 보내면 컴파일러 플러그인은 제일 먼저 매크로 표현식을 포함한 모든 코드를 SyntaxTree로 파싱합니다. 코드 작성자가 구현한 매크로 구현에서 새로운 SyntaxTree를 구성하고 반환합니다.
SyntaxTree는 이름에서 볼 수 있듯이, 코드를 트리 구조(Tree Structure)로 표현합니다. 속성, 접근 제어자, 프로퍼티, 타입, 이니셜라이저, 함수 및 클로저 모두 트리를 구성하는 주요 요소이며, 심지어 {나 :과 같은 기호도 요소 중 하나입니다.
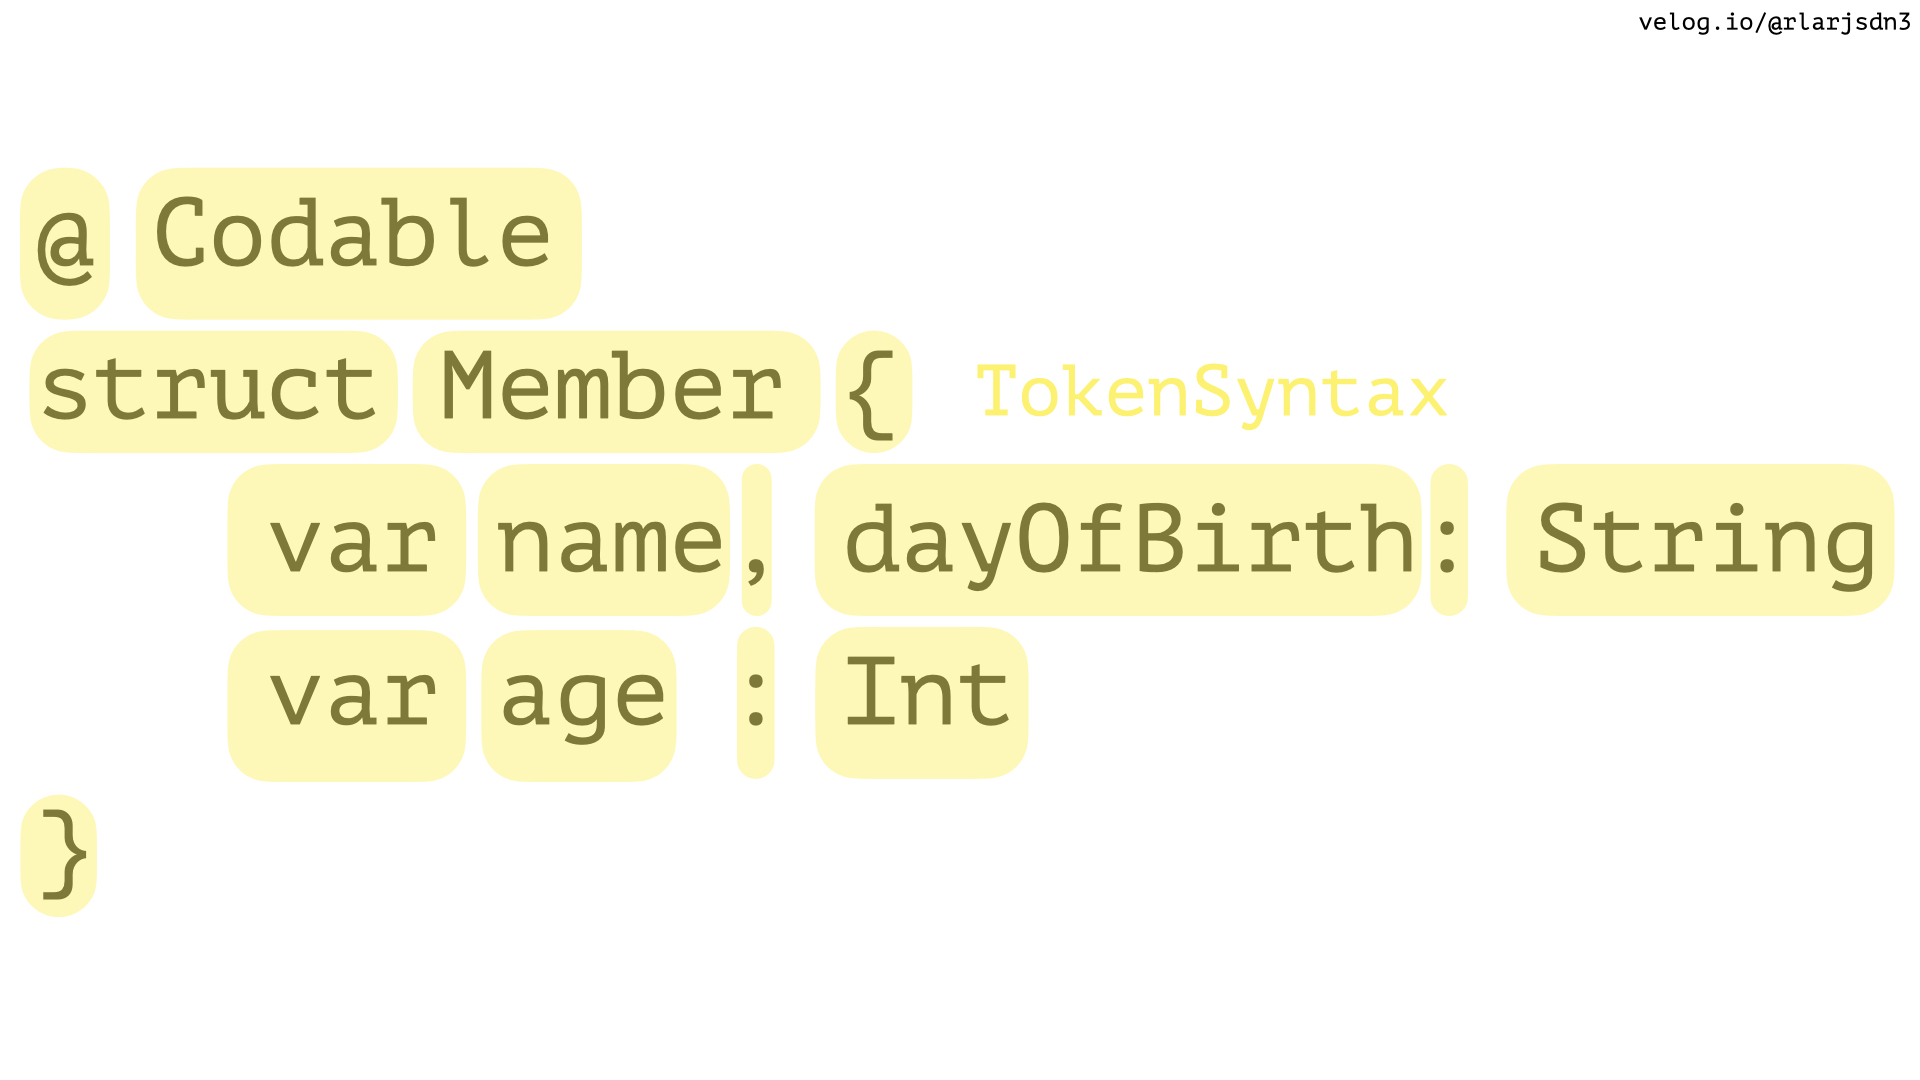
@Codable
struct Member {
    var name, dayOfBirth: String
    var age: Int
}
위 예제로 SyntaxTree를 자세하게 톺아보겠습니다.

위 예제에서 선언된 구조체는 StructDeclSyntax로 표현됩니다. 그리고 @Codable와 같은 @이나 #으로 시작하는 속성은 AttributeSyntax, 구조체 구현부(Body)는 MemberBlockSyntax로 표현됩니다. 구조체 구현부에 선언된 프로퍼티는 VariableDeclSyntax로 표현됩니다.
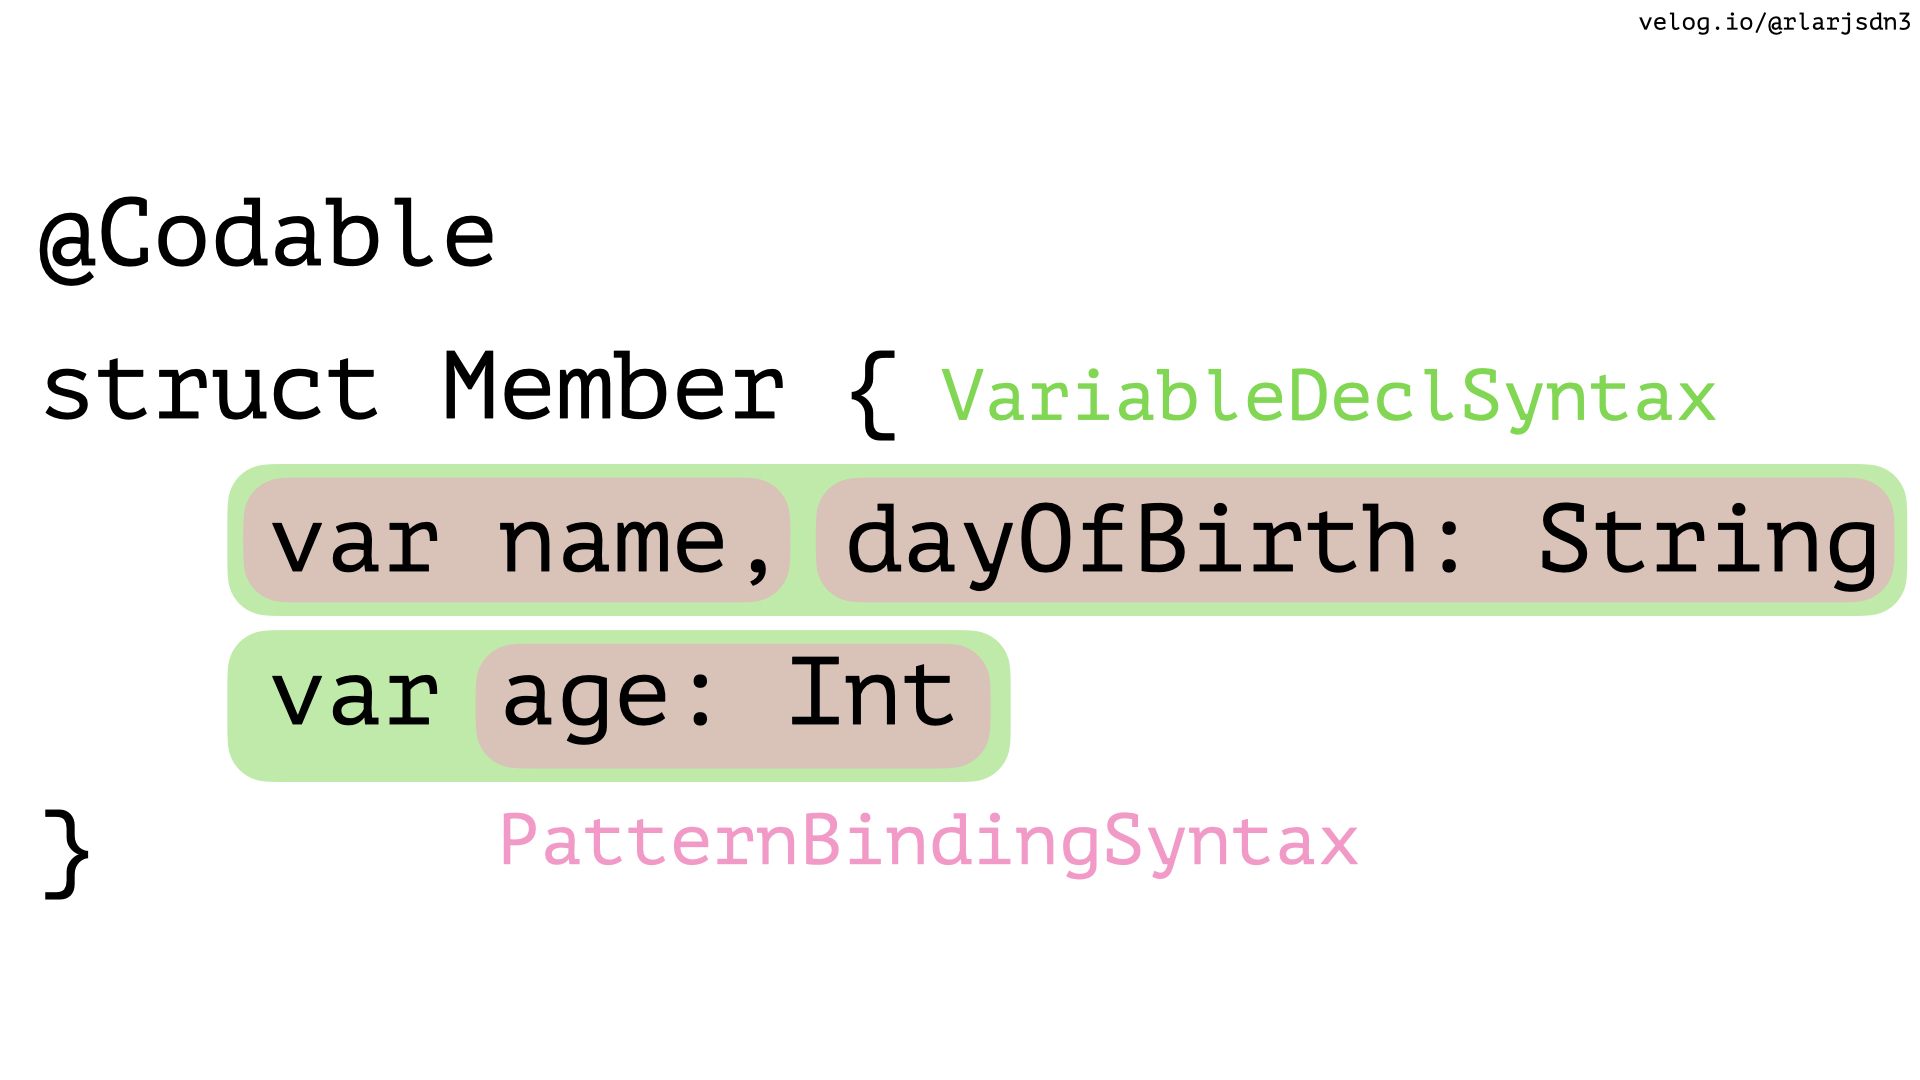
이 뿐만이 아닙니다. VariableDeclSyntax의 각 선언(name과 dayOfBirth: String)은 ParrternBindingSyntax로 쪼개져 표현됩니다. SyntaxTree는 Syntax의 가장 작은 단위인 TokenSyntax까지 쪼개져 표현됩니다. TokenSyntax는 텍스트(identifier)와 공백(Trivia)과 같은 주변 정보를 포함하는 가장 원시적인 Syntax입니다.
위 예제를 SyntaxTree로 파싱한 결과는 아래와 같습니다.
- SourceFileSyntax
├─statements: CodeBlockItemListSyntax
│ ╰─[0]: CodeBlockItemSyntax
│   ╰─item: StructDeclSyntax
│     ├─attributes: AttributeListSyntax
│     │ ╰─[0]: AttributeSyntax
│     │   ├─atSign: atSign
│     │   ╰─attributeName: IdentifierTypeSyntax
│     │     ╰─name: identifier("Codable")
│     ├─modifiers: DeclModifierListSyntax
│     ├─structKeyword: keyword(SwiftSyntax.Keyword.struct)
│     ├─name: identifier("Member")
│     ╰─memberBlock: MemberBlockSyntax
│       ├─leftBrace: leftBrace
│       ├─members: MemberBlockItemListSyntax
│       │ ├─[0]: MemberBlockItemSyntax
│       │ │ ╰─decl: VariableDeclSyntax
│       │ │   ├─attributes: AttributeListSyntax
│       │ │   ├─modifiers: DeclModifierListSyntax
│       │ │   ├─bindingSpecifier: keyword(SwiftSyntax.Keyword.var)
│       │ │   ╰─bindings: PatternBindingListSyntax
│       │ │     ├─[0]: PatternBindingSyntax
│       │ │     │ ├─pattern: IdentifierPatternSyntax
│       │ │     │ │ ╰─identifier: identifier("name")
│       │ │     │ ╰─trailingComma: comma
│       │ │     ╰─[1]: PatternBindingSyntax
│       │ │       ├─pattern: IdentifierPatternSyntax
│       │ │       │ ╰─identifier: identifier("dayOfBirth")
│       │ │       ╰─typeAnnotation: TypeAnnotationSyntax
│       │ │         ├─colon: colon
│       │ │         ╰─type: IdentifierTypeSyntax
│       │ │           ╰─name: identifier("String")
│       │ ╰─[1]: MemberBlockItemSyntax
│       │   ╰─decl: VariableDeclSyntax
│       │     ├─attributes: AttributeListSyntax
│       │     ├─modifiers: DeclModifierListSyntax
│       │     ├─bindingSpecifier: keyword(SwiftSyntax.Keyword.var)
│       │     ╰─bindings: PatternBindingListSyntax
│       │       ╰─[0]: PatternBindingSyntax
│       │         ├─pattern: IdentifierPatternSyntax
│       │         │ ╰─identifier: identifier("age")
│       │         ╰─typeAnnotation: TypeAnnotationSyntax
│       │           ├─colon: colon
│       │           ╰─type: IdentifierTypeSyntax
│       │             ╰─name: identifier("Int")
│       ╰─rightBrace: rightBrace
╰─endOfFileToken: endOfFile
그런데 Swift의 매크로는 왜 굳이 SyntaxTree로 매크로를 전개하는 걸까요? C/C++의 스타일로 매크로를 작성하면 안되나요? 이에 대한 답은 SyntaxTree는 첨부된 선언의 접근 제어자, 초기값 및 getter/setter 유무, 상속 타입, 매개변수 타입 등 다양한 요소를 드러내고, 코드 작성자가 이를 활용해 가장 알맞은 매크로를 구현하는 데 도움을 주기 때문입니다.
예를 들어, 아래와 같이 매크로를 열거형이 아닌 다른 유형의 선언에 적용하면 컴파일러 경고 메시지를 출력하도록 할 수 있습니다.
@RawRepresentable // 🚨이 매크로는 Enum에만 적용할 수 있습니다.
class Region { ... }
또 다른 예시를 보겠습니다. 매크로로 프로퍼티에 getter/setter를 구현할 때, 프로퍼티의 초기값 유무에 따라 다르게 전개하고 싶습니다.
@DictionaryStroageProperty
var name: String
// Begin Expansion of "@DictionaryStorageProperty"
{
	get { self.stroage["name"] as! String }
  	set { self.storage["name"] = newValue as Any }
}
// End expansion of "@DictionaryStorageProperty"

@DictionaryStorageProperty
var dayOfBirth: String = "1998-03-21"
// Begin Expansion of "@DictionaryStorageProperty"
{
	get { self.stroage["dayOfBirth", defaults: "1998-03-21"] as! String }
  	set { self.storage["dayOfBirth"] = newValue as Any }
}
// End expansion of "@DictionaryStorageProperty"
차이가 느껴지시나요? 프로퍼티에 초기값 유무에 따라 딕셔너리(Dictionary)의 기본값(Defaults) 유무를 달리해 코드를 전개할 수 있습니다. 이게 가능한 이유는 매크로 구현에서 SyntaxTree를 구성할 때 InitalizerClauseSyntax를 통해 초기값의 유무를 파악할 수 있기 때문입니다. 아울러, getter에서 as! String과 전개할 수 있는 이유도 IdentifierTypeSyntax를 통해 선언된 프로퍼티의 타입을 가져올 수 있기 때문입니다.
굉장히 매력적이지 않나요? SyntaxTree가 없다면 절대로 불가능했을 일입니다.
작성해보기
이제 매크로를 작성해보겠습니다. Swift의 매크로는 패키지 속에 배포하는 방식으로 작동되기에 새로운 매크로 패키지를 만들어야 합니다. File > New > Pacage..를 눌러 새로운 Swift Macro를 만듭니다. 패키지의 이름은 Zizi로 하겠습니다.
새로운 패키지를 만들면 여러 타겟으로 나누어진 템플릿을 제공합니다. 각 타겟의 역할은 아래와 같습니다.
-
Zizi: 매크로 선언을 작성합니다. 매크로 인터페이스를 클라이언트에 노출합니다.
-
ZiziMacros: 매크로 구현을 작성합니다.
-
ZiziClient: 작성한 코드를 실행합니다.
Playground와 동일합니다. -
ZiziTests: 단위 테스트를 작성합니다.
물론 입맛에 맞게 타겟 구조와 이름을 바꿀 수 있습니다만, 지금은 주어진 템플릿에 따르도록 하겠습니다. 이제 구조체에 init?(rawValue: T), var rawValue: T 멤버와 RawRepresentable 프로토콜 준수성을 전개하는 매크로를 작성해보겠습니다.
선언
클라이언트에게 매크로를 노출시키기 위해 매크로 선언을 작성해야 합니다. Zizi.swift 파일에서 @RawRepresnetable 매크로 선언을 작성하겠습니다.
@attached(member, names: named(init), named(rawValue))
@attached(extension, conformances: RawRepresentable)
public macro RawRepresentable<T>(_ type: T.Type) = ...
우리는 새로운 멤버를 추가하기 위해 attached(member)와 프로토콜 준수성을 추가하기 위해 attached(extension)을 매크로 역할로 부여하겠습니다. 그리고 RawRepresentable 프로토콜의 RawValue 연관 타입(AssocidatedType)의 타입을 지정하기 위해 제네릭 타입 T의 메타 타입을 매개변수로 넘겨 받겠습니다.
그리고 = 오른쪽에는 #externalMacro(module:type:)로 매크로 선언과 실질적인 구현을 서로 이어주어야 합니다. 컴파일러에게 특정 모듈에 위치한 특정 매크로 타입을 보라고 컴파일러에게 알려줍니다.
#externalMacro(module: "ZiziMacros", type: "RawRepresentableMacro")이제 매크로 구현을 작성하겠습니다.
전체 코드
@attached(member, names: named(init), named(rawValue))
@attached(extension, conformances: RawRepresentable)
public macro RawRepresentable<T>(_ type: T.Type) = #externalMacro(
    module: "ZiziMacros",
    type: "RawRepresentableMacro"
)
구현
이제 어떻게 코드를 전개할지 표현하기 위해 매크로 구현을 작성해야 합니다. ZiziMacros.swift 파일에서 @RawRepresnetable 매크로 구현을 작성하겠습니다.
우리는 매크로 선언에서 attached(member)와 attached(extension)을 매크로 역할로 부여했습니다. 따라서 매크로를 구현할 때 MemberMacro와 ExtensionMacro 프로토콜 준수성을 추가하고 필요한 함수를 작성해야 합니다.
먼저 init?(rawValue: T), var rawValue: T 멤버 추가를 위해 MemberMacro 프로토콜의 요구사항부터 작성하겠습니다.
import SwiftSyntax
import SwiftSyntaxBuilder
import SwiftSyntaxMacros

public struct RawRepresentableMacro { }

extension RawRepresentableMacro: MemberMacro {

    public static func expansion(
        of node: AttributeSyntax,
        providingMembersOf declaration: some DeclGroupSyntax,
        in context: some MacroExpansionContext
    ) throws -> [DeclSyntax] {
  		// 구조체가 아닌 열거형이나 클래스에 매크로가 적용되었다면
        guard
            let _ = declaration.as(StructDeclSyntax.self)
        else { return [] } // 빈 코드 전개

  		// 매크로에 입력된 매개변수를 가져오고,
  		// 첫 번째 매개변수로 전달된 `T.self` 중 `T` 토큰 가져오기
        guard
            case let .argumentList(arguments) = node.arguments,
            let type = arguments.first?
                .expression
                .as(MemberAccessExprSyntax.self)?
                .base
        else { return [] } // 빈 코드 전개

  		// 코드 전개식 반환
        return [
            """
            var rawValue: \(type.trimmed)
            """,
            """
            init?(rawValue: \(type.trimmed)) {
                self.rawValue = rawValue
            }
            """
        ]
    }

}
다음으로 RawRepresentable 프로토콜 준수성 추가를 위해 ExtensionMacro 프로토콜의 요구사항을 작성하겠습니다.
extension RawRepresentableMacro: ExtensionMacro {

    public static func expansion(
        of node: AttributeSyntax,
        attachedTo declaration: some DeclGroupSyntax,
        providingExtensionsOf type: some TypeSyntaxProtocol,
        conformingTo protocols: [TypeSyntax],
        in context: some MacroExpansionContext
    ) throws -> [ExtensionDeclSyntax] {
  		// `ExtensionDeclSyntax` 생성
        let rawRepresentableExtension = try ExtensionDeclSyntax("extension \(type.trimmed): RawRepresentable { }")

  		// 코드 전개식 반환
        return [rawRepresentableExtension]
    }

}
마지막으로 Swift 컴파일러에게 우리가 작성한 매크로의 타입을 보이도록 해야 합니다. ZiziMacros.swift 파일 하단에 위치한 ZiziPlugin 구조체에 매크로의 타입을 작성하겠습니다.
@main
struct ZiziPlugin: CompilerPlugin {
	let providingMacors: [Macro.Type] = [
  		RawRepresentableMacro.self
  	]
}
짜잔⭐️ 이렇게 매크로 하나가 완성되었습니다. Zizi-Client.swift에서 잘 작동하는 모습을 볼 수 있습니다. 이제 단위 테스트를 작성하러 가봅시다.
@RawRepresentable(Int.self)
struct Key { }
// Begin expansion for "@RawRepresentable(Int.self)"
{
	var rawValue: Int
  	init?(rawValue: Int) {
  		self.rawValue = rawValue
  	}
}
// End expansion for "@RawRepresentable(Int.self)"

let key = Key(rawValue: 10 )
print("Key-RawValue: \(String(describing: key?.rawValue))")
단위 테스트
단위 테스트는 매크로가 올바르게 전개되는지 검증하고, 그렇지 않다면 어느 코드가 전개되지 않는지 살펴보는 데 유용합니다. 매크로를 테스트하기 위해서 assertMacroExpansion(_:expandedSource:macros:) 메서드를 사용해야 합니다. ZiziTests.swift 파일에 아래와 같이 테스트 케이스를 작성하겠습니다.
import SwiftSyntaxMacros
import SwiftSyntaxMacrosTestSupport
import ZiziMacros
import XCTest

fileprivate let testMacros: [String: Macro.Type] = [
    "RawRepresentable": RawRepresentable.self
]

final class DepdencyValueMacroTests: XCTestCase {

    func testRawRepresentableacro() throws {

        assertMacroExpansion(
            """
  			@RawRepresentable(Int.self)
            struct SomeStruct { }
            """,
            expandedSource:
            """
            struct SomeStruct {
  				var rawValue: Int
  				init?(rawValue: Int) {
  					self.rawValue = rawValue
  				}
  			}
            """,
            macros: testMacros
        )

	}

}
[String: Mcaro.Type] 타입의 testMacros 변수에 문자열 리터럴과 매크로 구현의 메타 타입을 넘겨줘야 합니다. 이는 처음 버전 선언에서 매크로 선언으로 된 문자열 리터럴을 매크로로 간주한다는 의미입니다.
개행이나 공백으로 테스트에 실패할 수 있습니다. 이 경우 첫 번째 매개변수로 넘긴 처음 버전 선언과 두 번째 매개변수로 넘긴 전개된 선언에서 불필요한 공백이나 개행이 있는 확인하시면 됩니다.
전체 코드
public struct RawRepresentableMacro { }

extension RawRepresentableMacro: MemberMacro {

    public static func expansion(
        of node: AttributeSyntax,
        providingMembersOf declaration: some DeclGroupSyntax,
        in context: some MacroExpansionContext
    ) throws -> [DeclSyntax] {
        guard
            let _ = declaration.as(StructDeclSyntax.self)
        else { return [] }

        guard
            case let .argumentList(arguments) = node.arguments,
            let type = arguments.first?
                .expression
                .as(MemberAccessExprSyntax.self)?
                .base
        else { return [] }

        return [
            """
            var rawValue: \(type.trimmed)
            """,
            """
            init?(rawValue: \(type.trimmed)) {
                self.rawValue = rawValue
            }
            """
        ]
    }

}

extension RawRepresentableMacro: ExtensionMacro {

    public static func expansion(
        of node: AttributeSyntax,
        attachedTo declaration: some DeclGroupSyntax,
        providingExtensionsOf type: some TypeSyntaxProtocol,
        conformingTo protocols: [TypeSyntax],
        in context: some MacroExpansionContext
    ) throws -> [ExtensionDeclSyntax] {
        let rawRepresentableExtension = try ExtensionDeclSyntax("extension \(type.trimmed): RawRepresentable { }")

        return [rawRepresentableExtension]
    }

}

@main
struct ZiziPlugin: CompilerPlugin {
	let providingMacors: [Macro.Type] = [
  		RawRepresentableMacro.self
  	]
}
마무리
Swift의 매크로는 코드를 컴파일 할 때 새로운 코드를 전개해 지루한 보일러 플레이트 코드 제거에 도웁을 줍니다. 매크로는 SyntaxTree로 소스코드를 트리 구조로 나타내며, 새로운 SyntaxTrree를 구성해 새로운 코드를 전개할 수 있습니다. 이러한 특징은 C/C++언어의 매크로와 차별되는 기능으로 C/C++언어의 매크로가 가진 한계를 극복합니다.
Swift의 매크로는 분명 학습 난이도 높다고 할 수 있습니다. 하지만, C/C++의 매크로를 경험하신 분이라면 분명 Swift의 매크로에 큰 매력을 느끼시리라 생각합니다. Swift의 매크로는 매크로 역할에 따라 어디에, 어떻게 적용할지와 어떤 코드로 전개되는지, 이 전개식이 코드의 어디에 삽입될지를 결정하고, 이는 Swift의 매크로를 다재다능하게 만들어줍니다.
Swift의 매크로의 이러한 확장성은 다른 언어에서는 보기 힘든 매력적인 것이기도 합니다. Swift의 매크로는 마법 그 자체입니다. 충분히 논의할 가치가 있는 놀라운 도구입니다.
참고 자료
[부록] 라이브러리 알아보기
매크로 구현을 위해 크게 3가지 라이브러리가 필요합니다. - SwiftSyntax, SwiftSyntaxMacros, SwiftSyntaxBuilder. 이 뿐만 아니라 SwiftParser, SwiftDiagnostic과 같이 많은 라이브러리가 있지만 앞서 3가지 라이브러리에 집중하겠습니다. 모든 라이브러리는 오픈 소스이기에 누구나 기여하고 코드를 살펴볼 수 있습니다.
SwiftSyntax
SwiftSyntax는 소스코드를 SyntaxTree로 파싱을 돕는 라이브러리입니다.
SwiftSyntaxMacros
/// Describes a macro that adds accessors to a given declaration.
public protocol AccessorMacro: AttachedMacro {
	/// Expand a macro that's expressed as a custom attribute attached to
  	/// the given declaration. The result is a set of accessors for the
  	/// declaration.
  	static func expansion(
    	of node: AttributeSyntax,
    	providingAccessorsOf declaration: some DeclSyntaxProtocol,
    	in context: some MacroExpansionContext
  	) throws -> [AccessorDeclSyntax]
}SwiftSyntaxMacros는 매크로 구현에 필요한 프로토콜을 제공합니다.
SwiftSyntaxBuilder
return [
	"""
	var rawValue: \(type.trimmed)
	""",
	"""
	init?(rawValue: \(type.trimmed)) {
		self.rawValue = rawValue
	}
	"""
]SwiftSyntaxBuilder는 SyntaxTree를 편리하게 구성하도록 도와주는 API를 제공합니다. 이게 없어도 매크로를 작성할 수 있지만 엄청나게 많은 코드를 작성해야 합니다. 아래는 init?(rawValue: T), var rawValue: T 멤버 추가를 SwiftSyntax로만 구현하는 방법을 보여줍니다.
public struct RawRepresentableMacro { }

extension RawRepresentableMacro: MemberMacro {

    public static func expansion(
        of node: AttributeSyntax,
        providingMembersOf declaration: some DeclGroupSyntax,
        in context: some MacroExpansionContext
    ) throws -> [DeclSyntax] {
        guard
            let _ = declaration.as(StructDeclSyntax.self)
        else {
            throw CustomError.message("해당 매크로는 Struct에만 적용할 수 있습니다.")
        }

        guard
            case let .argumentList(arguments) = node.arguments,
            let type = arguments.first?
                .expression
                .as(MemberAccessExprSyntax.self)?
                .base
        else { return [] }

        let varDecl = VariableDeclSyntax(
            bindingSpecifier: .keyword(.var),
            bindings: PatternBindingListSyntax(
                arrayLiteral: PatternBindingSyntax(
                    pattern: IdentifierPatternSyntax(
                        identifier: .identifier("rawValue")
                    ),
                    typeAnnotation: TypeAnnotationSyntax(
                        type: IdentifierTypeSyntax(
                            name: .identifier(type.description)
                        )
                    )
                )
            )
        )

        let initDecl = InitializerDeclSyntax(
            initKeyword: .identifier("init?"),
            signature: FunctionSignatureSyntax(
                parameterClause: FunctionParameterClauseSyntax(
                    parameters: FunctionParameterListSyntax(
                        arrayLiteral: FunctionParameterSyntax(
                            firstName: .identifier("rawValue"),
                            type: IdentifierTypeSyntax(
                                name: .identifier(type.description)
                            )
                        )
                    )
                )
            ),
            body: CodeBlockSyntax(
                statements: CodeBlockItemListSyntax(
                    arrayLiteral: CodeBlockItemSyntax(
                        item: .expr(
                            ExprSyntax(
                                InfixOperatorExprSyntax(
                                    leftOperand: MemberAccessExprSyntax(
                                        base: DeclReferenceExprSyntax(
                                            baseName: .identifier("self")
                                        ),
                                        period: .periodToken(),
                                        declName: DeclReferenceExprSyntax(
                                            baseName: .identifier("rawValue")
                                        )
                                    ),
                                    operator: AssignmentExprSyntax(
                                        equal: .equalToken()
                                    ),
                                    rightOperand: DeclReferenceExprSyntax(
  										baseName: .identifier("rawValue")
  									)
                                )
                            )
                        )
                    )
                )
            )
        )

        return [
            DeclSyntax(varDecl),
            DeclSyntax(initDecl)
        ]

   }
우리는 앞서 예제에서 이런 복잡한 코드를 작성하지 않았습니다. 단순히 문자열 리터럴(String Literal)만 넘겨주었죠. 어떻게 이게 가능한 걸까요? 정답은 DeclSyntax가 SyntaxExpressibleByStringInterpolation 프로토콜을 준수하고 있기 때문입니다.
extension DeclSyntax: SyntaxExpressibleByStringInterpolation {}

extension SyntaxExpressibleByStringInterpolation {
  public init(stringLiteral value: String) {
    var interpolation = SyntaxStringInterpolation()
    interpolation.appendLiteral(value)
    self.init(stringInterpolation: interpolation)
  }
}
우리가 문자열 리터럴을 반환하면 public init(stringLiteral value: String)가 불리게 되고 적절한 SyntaxTree로 바꿔줍니다. DeclSyntax뿐만 아니라 AccessorDeclSyntax, ExprSyntax 등 다양한 Syntax가 해당 프로토콜을 준수하고 있습니다.
프로토콜 준수성을 추가할 때도 마찬가지입니다. 우리는 ExtensionDeclSyntax를 생성할 때도 문자열 리터럴을 넘겨주었습니다.
// Return Type: [ExtensionDeclSyntax]
let rawRepresentableExtension = try ExtensionDeclSyntax("extension \(type.trimmed): RawRepresentable { }")
ExtensionDeclSyntax는 DeclSyntaxParseable 프로토콜을 준수하고 있기 때문에 이니셜라이저에 문자열 리터럴을 넘겨주는 게 가능합니다. 마찬가지로 적절한 SyntaxTree로 바꿔줍니다.
import SwiftSyntax

/// Adds an initializer that allows the creation of declaration from string
/// interpolations.
public protocol DeclSyntaxParseable: DeclSyntaxProtocol {}
public extension DeclSyntaxParseable {
  /// Create a syntax node from the given string interpolation.
  ///
  /// This initializer throws if the syntax node was not able to be parsed as
  /// this type, e.g. when calling `ClassDeclSyntax("actor Foo {})`.
  init(_ stringInterpolation: SyntaxNodeString) throws {
    let node: DeclSyntax = "\(stringInterpolation)"
    if let castedDecl = node.as(Self.self) {
      self = castedDecl
    } else {
      throw SyntaxStringInterpolationError.producedInvalidNodeType(expectedType: Self.self, actualNode: node)
    }
  }
}
문자열 리터럴뿐만 아니라 @resultBuilder로 선언적인 방식으로 SyntxTree를 구성할 수 있습니다. MemberBlockItemListSyntax, VariableDeclSyntax와 SwitchCaseSytnax 등 다양한 Syntax가 @resultBuilder로 작성되어 있어 if문, for문 등 다양한 방법으로 SyntaxTree를 구성할 수 있습니다.
let variable = try VariableDeclSyntax("var value: \(supersetType)") {
    try SwitchExprSyntax("switch self") {
        for element in elements {
            SwitchCaseSyntax(
                """
                case .\(element.name):
                    return .\(element.name)
                """
            )
        }
    }
}
위 예제는 VariableDeclSyntax의 init(_ header: SyntaxNodeString, @CodeBlockItemListBuilder accessor: () throws -> CodeBlockItemListSyntax) throws로 선언적인 방식으로 VariableDeclSyntax를 구성하는 방법을 보여줍니다. 이니셜라이저의 첫 번째 매겨변수의 타입이 SyntaxNodeString이니 문자열 리터럴로도 SyntaxTree를 구성할 수 있습니다.
// ResultBuilder.swift

@resultBuilder
public struct SwitchCaseListBuilder {
  /// The type of individual statement expressions in the transformed function,
  /// which defaults to Component if buildExpression() is not provided.
  public typealias Expression = SwitchCaseListSyntax.Element

  /// The type of a partial result, which will be carried through all of the
  /// build methods.
  public typealias Component = [Expression]

  /// The type of the final returned result, which defaults to Component if
  /// buildFinalResult() is not provided.
  public typealias FinalResult = SwitchCaseListSyntax

  /// Required by every result builder to build combined results from
  /// statement blocks.
  public static func buildBlock(_ components: Self.Component...) -> Self.Component {
    return components.flatMap {
      $0
    }
  }

  ...

  /// Enables support for 'for..in' loops by combining the
  /// results of all iterations into a single result.
  public static func buildArray(_ components: [Self.Component]) -> Self.Component {
    return components.flatMap {
      $0
    }
}SwiftSyntaxBuilder는 SyntaxTree를 보다 선언적이고 직관적으로 구성하도록 해줍니다. 적극 사용해보시길 추천드립니다.
