HTML CSS JS 사용
간단한 이론
<!-- 텍스트 관련 태그들 -->
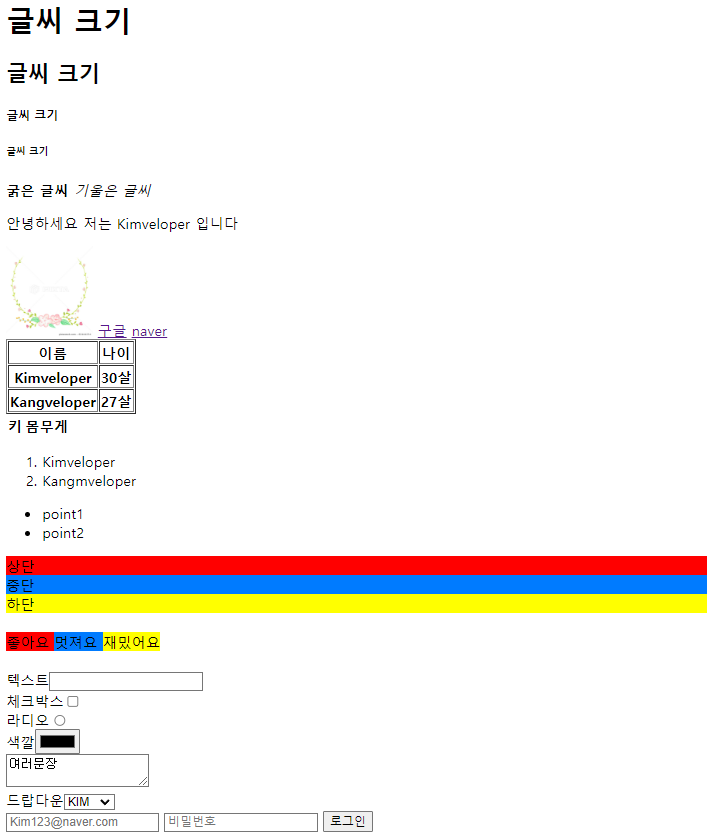
<h1>글씨 크기</h1>
<h2>글씨 크기</h2>
<h5>글씨 크기</h5>
<h6>글씨 크기</h6>
<b> 굵은 글씨 </b>
<i> 기울은 글씨 </i>
<p> 안녕하세요 저는 Kimveloper 입니다 </p>
<!-- 미디어 관련 태그들-->
<img src="../imgFile/62444234.jpg" style="height: 100px;">
<!-- 링크 태그 -->
<a href="http://www.google.com">구글</a>
<a href="http://www.naver.com" target="_blank">naver</a>
<!-- _blank 는 현재 페이지가 아닌 새로운 페이지 창을 띄워서 가는거 -->
<!-- 테이블 태그 -->
<table border="1">
<thead>
<tr>
<th>이름</th>
<th>나이</th>
</tr>
</thead>
<tbody>
<tr>
<th>Kimveloper</th>
<th>30살</th>
</tr>
<tr>
<th>Kangveloper</th>
<th>27살</th>
</tr>
</tbody>
</table>
<table>
<thead>
<tr>
<th>키</th>
<th>몸무게</th>
</tr>
</thead>
</table>
<!-- 목록 태그-->
<ol>
<li> Kimveloper </li>
<li> Kangmveloper </li>
</ol>
<!-- 숫자가 아닌 블랙point만 필요할 시에는 ul 사용-->
<ul>
<li> point1 </li>
<li> point2 </li>
</ul>
<!-- 구역을 나누는 태그 -->
<!-- div는 한줄 전체공간을 차지 하고 span 은 자기 내용물 만큼의 공간만 차지함-->
<div class="top">상단</div>
<div class="mid">중단</div>
<div class="bot">하단</div>
<br>
<span class="good"> 좋아요 </span>
<span class="nice"> 멋져요 </span>
<span class="funny"> 재밌어요 </span>
<br><br>
<!-- 인풋 태그-->
텍스트<input type="text">
<br>
체크박스<input type="checkbox">
<br>
라디오<input type="radio">
<br>
색깔<input type="color">
<br>
<textarea>여러문장</textarea>
<br>
드랍다운<select name="name">
<option> KIM </option>
<option value="Kang"> Kang </option>
</select>
<!-- 간단한 로그인용 form 만들어 보기 -->
<form>
<input type="email" placeholder="Kim123@naver.com">
<input type="password" placeholder="비밀번호">
<button type="submit">로그인</button>
</form>
CSS
.top,.good{
background-color: red;
}
.mid, .nice{
background-color: #007bff;
}
.bot , .funny{
background-color: yellow;
}
페이지 따라 만들어보기
HTML
<!DOCTYPE html>
<html lang="en">
<head>
    <meta charset="UTF-8">
    <title>워니 따라해보기 웹사이트 베껴보기 </title>
    <link href="wony_style.css" rel="stylesheet" type="text/css">
<!-- link 태그는 다른곳에 저장되어있는 css 파일불러올때 사용
    href는 위치를 말하고 rel,type 은 어떤타입의 파일인지 알려줌 -->
    <meta>
<!--    웹페이지가 어떤정보를 담고있는지 더 자세하게 알려줌-->
<!--    웹사이트가 소셜미디어 카톡등에 공유가 될때 웹사이트의 스크린샷이뜨고 소개가뜰때-->


</head>
<body>
<div class="nav">
    <div class="company-name">
        테크보이 워니 따라하기
    </div>
    <div class="nav-right-items">
        <div class="nav-item"> 메뉴1 </div>
        <div class="nav-item"> 메뉴2 </div>
        <div class="nav-item"> 메뉴3 </div>
        <div class="nav-item"> 메뉴4 </div>
    </div>

</div>
<div class="main">
    <div class="title">
        타이틀!
    </div>
    <div class="subtitle">
        서브 타이틀!! 길게길게 쭉쭉 웹사이트 구성요소는 크게 프론트엔드 백엔드가 있다 간단하게 프론트엔드는 ui / ux 를 말하고 보여지는 글 버튼 같은 페이지에 있는 요소를 말함
    </div>
    <div class="prices">
        <div class="price-item">
            <div class="price-item-title">
                HTML
            </div>
            <div class="price-item-price">
                5version
            </div>
            <div class="price-item-detail">
                레이아웃을 잡는 역할
            </div>
            <button class="price-item-button price-item-button--active">
                html 클릭
            </button>

        </div>
        <div class="price-item">
            <div class="price-item-title">
                CSS
            </div>
            <div class="price-item-price">
                5 design
            </div>
            <div class="price-item-detail">
                레이아웃 스타일링을 함
            </div>
            <button class="price-item-button">
                CSS 클릭
            </button>
        </div>
        <div class="price-item">
            <div class="price-item-title">
                JavaScript
            </div>
            <div class="price-item-price">
                5 JS
            </div>
            <div class="price-item-detail">
                기능을 넣어주는 역할을 함
            </div>
            <button class="price-item-button price-item-button--active">
                JS 클릭
            </button>
        </div>

    </div>
</div>
</body>
</html>
CSS
.nav{
    height: 70px;
    border-bottom: 1px solid black;
    display: flex;
    align-items: center;
}
.nav-right-items{
    display: flex;
    margin-left: auto;
}
.nav-item{
    margin-left: 20px;
}
.company-name{
    margin-left: 20px;
}
.title{
    text-align: center;
    font-size: 3.5rem ;
    font-weight: bold;
}
.subtitle{
    text-align: center;
    font-size: 1.25rem;
    font-weight: 300;
}
.main{
    width: 1000px;
    margin: 0 auto;
    margin-top: 60px;
}
.prices{
    display: flex;
}
.price-item{
    width: 300px;
    height: 350px;
    border: 1px solid black;
    margin: 20px;
    border-radius: 5px;
    text-align: center;
}
.price-item-title{
    font-size: 1.5rem;
    background: rgba(0,0,0,.03);
    text-align: center;
    height: 53px;
    line-height: 53px;
    border-bottom: 1px solid black;
}
.price-item-price{
    font-size: 2.5rem;
    font-weight: bold;
    padding: 20px;
}
.price-item-button{
    padding: .5rem 1rem;
    font-size: 1.25rem;
    line-height: 1.5;
    border-radius: .3rem;
    color: #007bff;
    background-color: transparent;
    background-image: none;
    border-color: #007bff;
    margin-top: 30px;
}
.price-item-button--active{
    background-color: #007bff;
    color: white;
}
결과는!!!
많이 허전하지만 따라하기를 우선순위로 두었으니
고도화는 나중에!

Goodsmileman