이번 글에서는 지난 글에 이어서 직접 blue/green을 내 프로젝트에 적용해보도록 하겠다.
현 프로젝트 상황
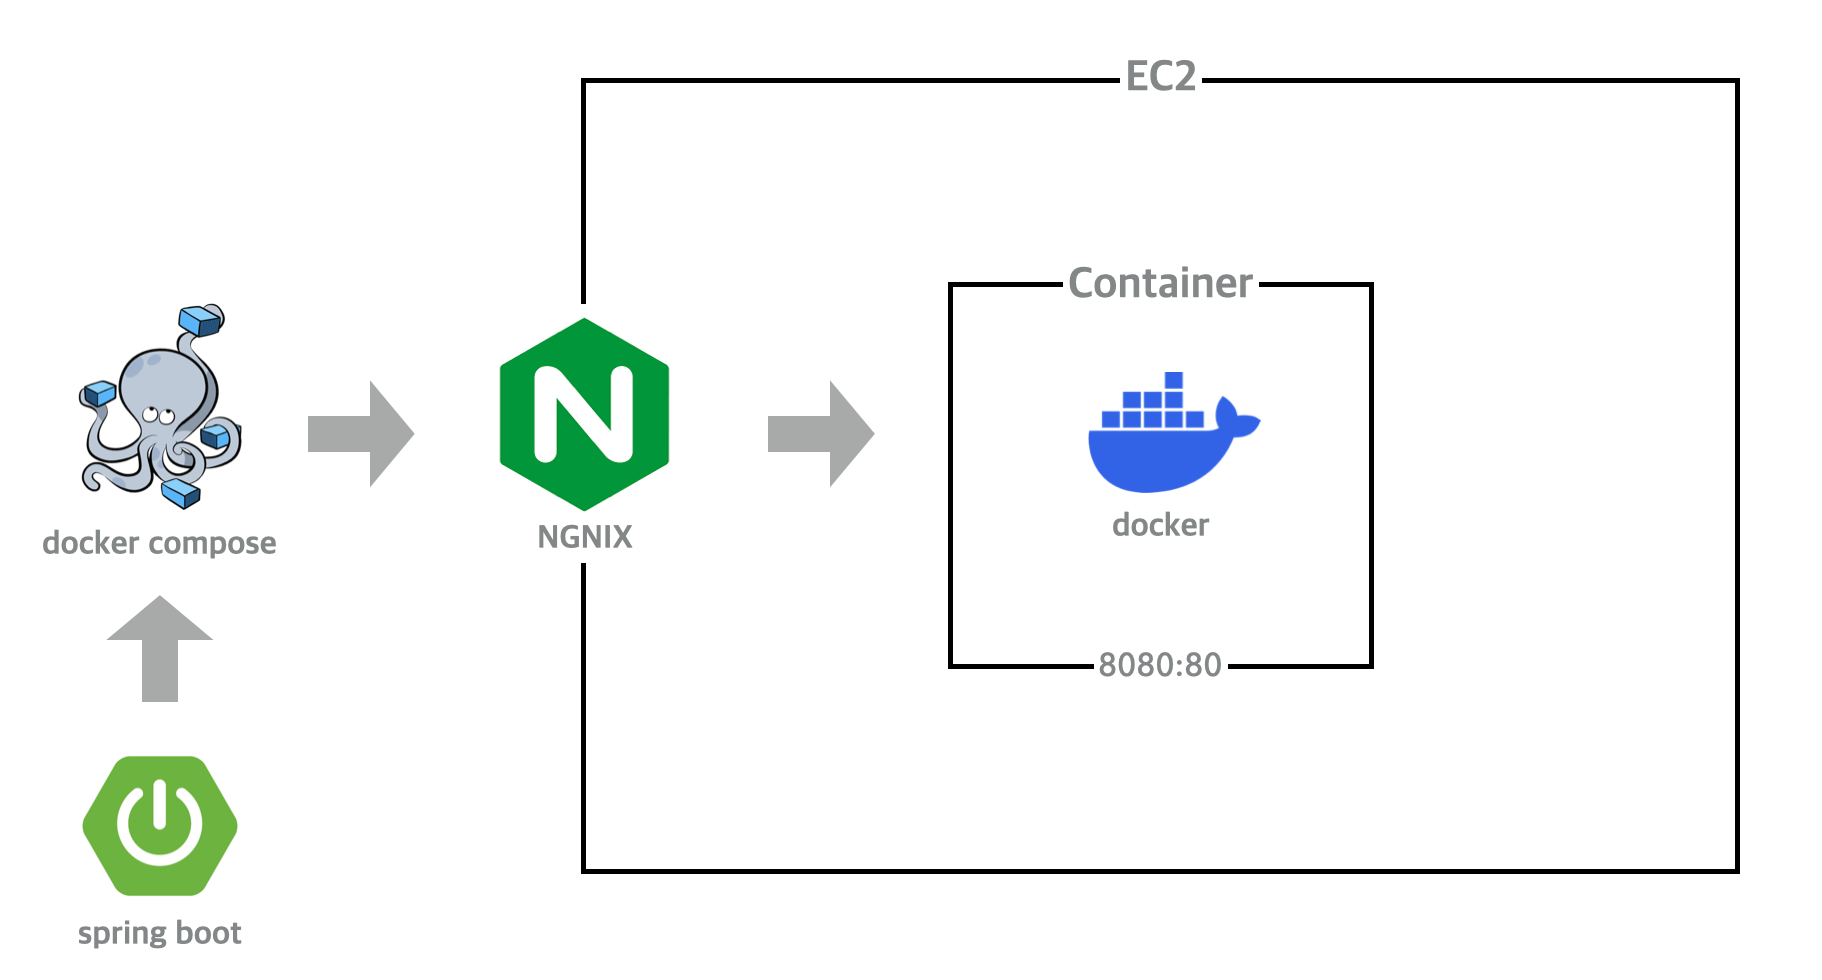
현재 내 프로젝트는 위의 이미지처럼 스프링 부트로 작성된 서비스에서(기본적으로 80으로 호출 보냄) gitAction에서 main 브랜치에 배포를 하면 자동으로 서버에 올라가도록 CI/CD 세팅을 해놓은 상태이다(사실 엄밀히 말하면 테스트는 진행하고 있지 않기때문에 CI는 안하고 있다...). 배포 과정은 docker-compose를 이용하여 dockerFile(이미지)를 만들고 AWS로 이용중인 EC2에서 내 dockerHub에 접속하여 이미지 pull 후 해당하는 컨테이너를 만드는 식으로 진행 중이다.
목표 프로젝트 환경 구조
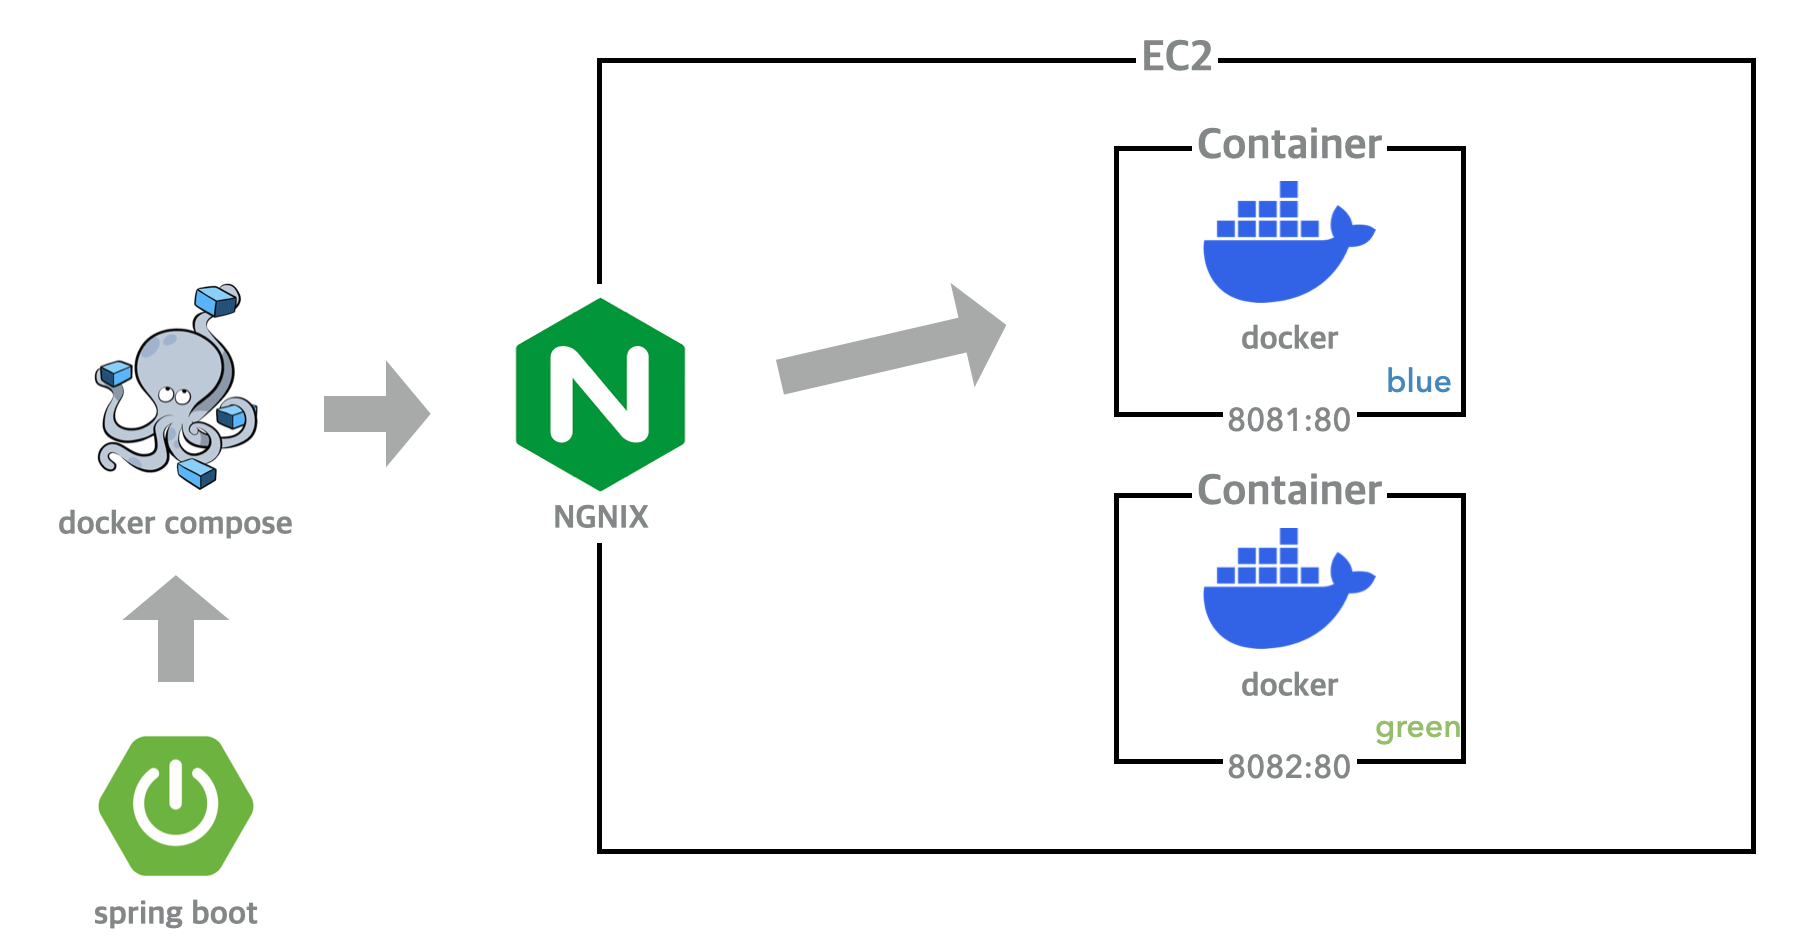
나는 최종적으로는 blue/green을 적용하여 위의 그림처럼 내 ec2에 2개의 컨테이너를 띄워서 (사실 서버를 2개를 띄우는 것이 더 좋지만 그러면 돈이 두배로 드니깐....ㅎㅎ) 한 인스턴스를 2개의 포트로 나눠 구번전과 신버전 서버를 띄우는 방식으로 하려고 한다.
Blue/green 구조
이전 글을 안보고 온 사람들도 있을 거기 때문에 내가 적용하려는 blue/green에 대해서 간단히 설명을 하려고 한다.
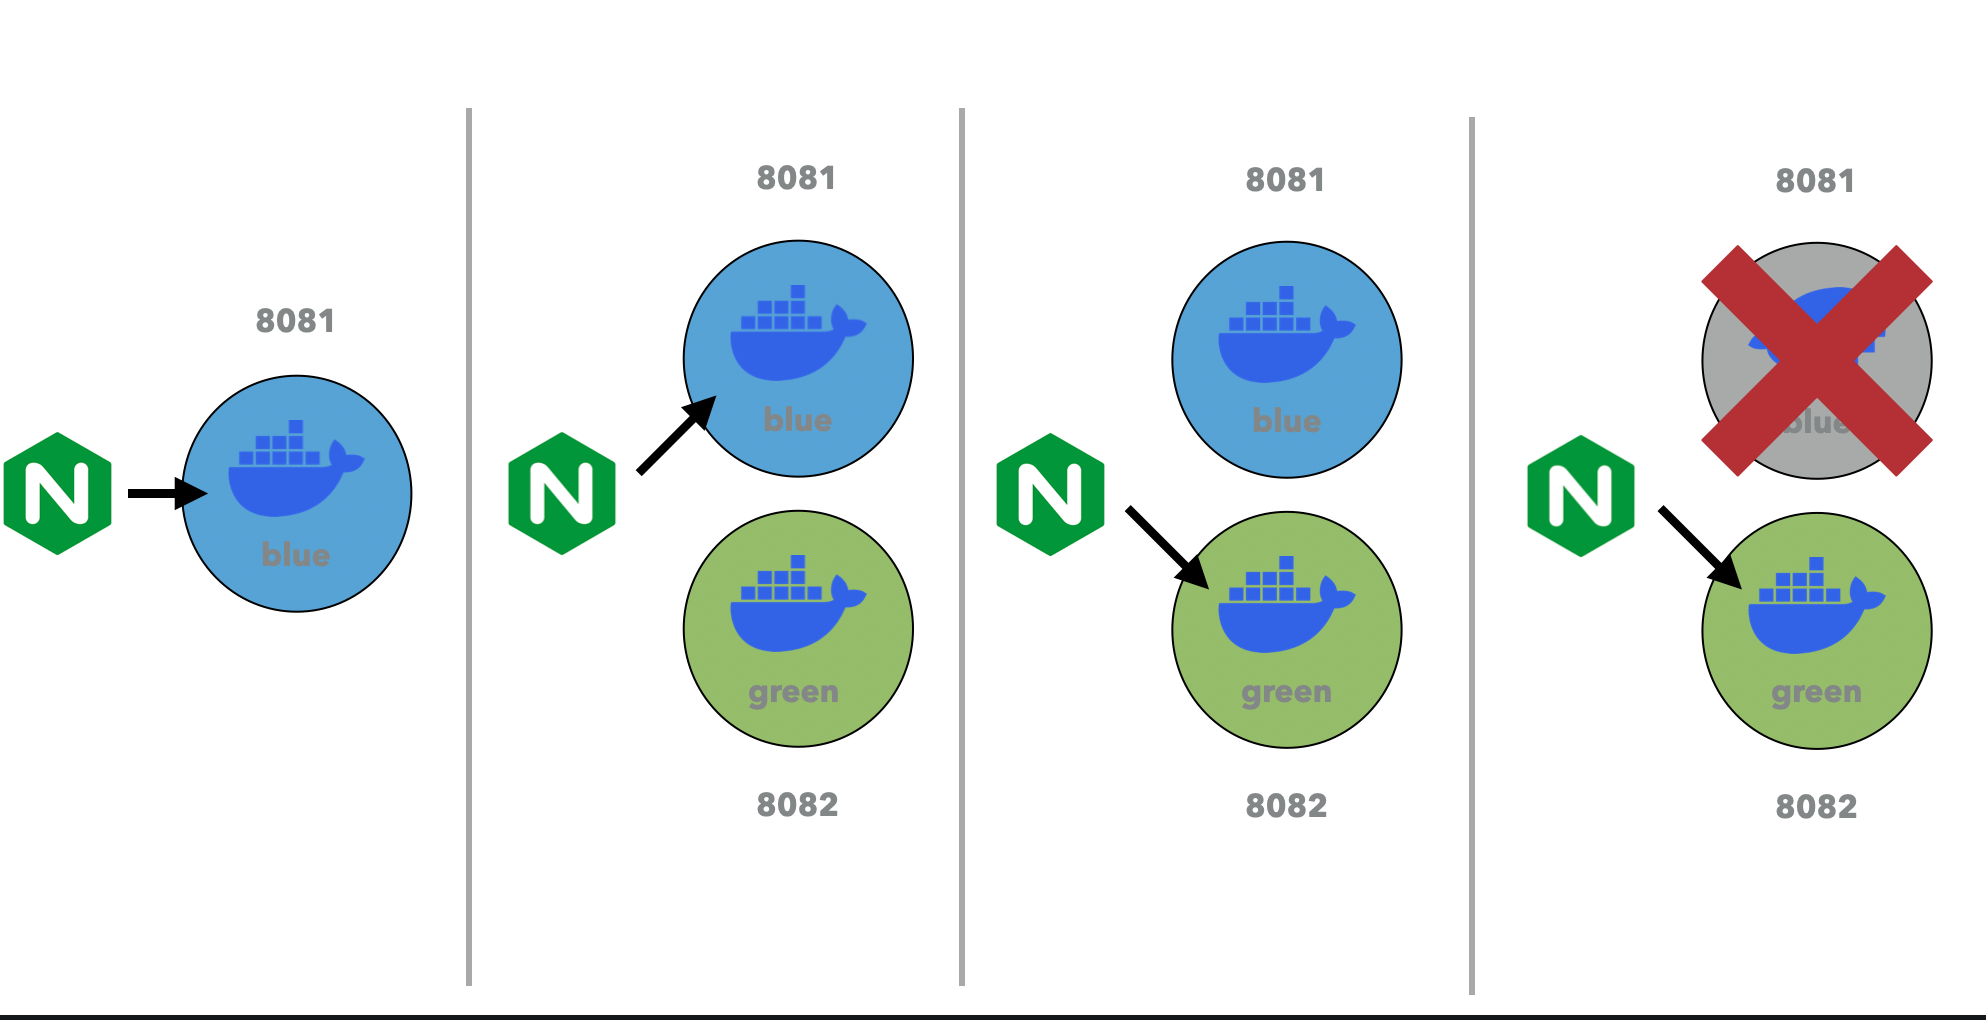
사실 개념은 매우 간단하다. 현재 서버에서 띄워져 있는 버전이 blue인지 green인지 확인을 한다. 만약 블루가 살아있다면 나는 그린 이미지를 가져와 서버에 띄운다. 그럼 이제 nginx가 그린으로 요청을 보내게 설정을 하고 이전 버전인 블루를 죽이면 우리의 서버는 다운타임이 없이 배포가 가능해진다.
프로젝트 설정
자 이제 실제로 적용을 해보자
순서도 매우 간단하다
1. docker-compose 설정
2. nginx config 설정
3. 배포 스크립트(deploy.sh) 작성
4. 깃 액션 스크립트 수정
실제 코드
- Docker
- blue container 8081:80
- green container 8082:80
- blue container 8081:80
- docker-compose.yml
version: '3'
services:
  blue:
    image: rlaxoqkf/majorfolio:latest
    container_name: blue
    restart: always
    ports:
      - 8081:8080
  green:
    image: rlaxoqkf/majorfolio:latest
    container_name: green
    restart: always
    ports:
      - 8082:8080
- deploy.sh
#!/bin/bash IS_GREEN_EXIST=$(docker ps | grep green) DEFAULT_CONF=" /etc/nginx/nginx.conf" # blue가 실행 중이면 green을 up합니다. if [ -z $IS_GREEN_EXIST ];then echo "### BLUE => GREEN ####" echo ">>> green image를 pull합니다." docker-compose pull green echo ">>> green container를 up합니다." docker-compose up -d green while [ 1 = 1 ]; do echo ">>> green health check 중..." sleep 3 REQUEST=$(curl http://127.0.0.1:8082) if [ -n "$REQUEST" ]; then echo ">>> 🍃 health check success !" break; fi done; sleep 3 echo ">>> nginx를 다시 실행 합니다." sudo ln -s -f /etc/nginx/sites-available/green /etc/nginx/sites-enabled/default sudo nginx -s reload echo ">>> blue container를 down합니다." docker-compose stop blue # green이 실행 중이면 blue를 up합니다. else echo "### GREEN => BLUE ###" echo ">>> blue image를 pull합니다." docker-compose pull blue echo ">>> blue container up합��다." docker-compose up -d blue while [ 1 = 1 ]; do echo ">>> blue health check 중..." sleep 3 REQUEST=$(curl http://127.0.0.1:8081) if [ -n "$REQUEST" ]; then echo ">>> 🍃 health check success !" break; fi done; sleep 3 echo ">>> nginx를 다시 실행 합니다." sudo ln -s -f /etc/nginx/sites-available/blue /etc/nginx/sites-enabled/default sudo nginx -s reload echo ">>> green container를 down합니다." docker-compose stop green fi - /etc/nginx/site-availibles/
- blue
server { listen 80 default_server; listen [::]:80 default_server; # SSL configuration # # listen 443 ssl default_server; # listen [::]:443 ssl default_server; # # Note: You should disable gzip for SSL traffic. # See: https://bugs.debian.org/773332 # # Read up on ssl_ciphers to ensure a secure configuration. # See: https://bugs.debian.org/765782 # # Self signed certs generated by the ssl-cert package # Don't use them in a production server! # # include snippets/snakeoil.conf; root /var/www/html; # Add index.php to the list if you are using PHP index index.html index.htm index.nginx-debian.html; server_name localhost; location / { proxy_pass http://localhost:8081; proxy_set_header X-Real-IP $remote_addr; proxy_set_header X-Forwarded-For $proxy_add_x_forwarded_for; proxy_set_header Host $http_host; } # pass PHP scripts to FastCGI server # location ~ \.php$ { include snippets/fastcgi-php.conf; # # # With php-fpm (or other unix sockets): fastcgi_pass unix:/var/run/php/php7.4-fpm.sock; # # With php-cgi (or other tcp sockets): # fastcgi_pass 127.0.0.1:9000; } # deny access to .htaccess files, if Apache's document root # concurs with nginx's one # #location ~ /\.ht { # deny all; #} } - green
server {

        listen 80 default_server;

        listen [::]:80 default_server;

        # SSL configuration

        #

        # listen 443 ssl default_server;

        # listen [::]:443 ssl default_server;

        #

        # Note: You should disable gzip for SSL traffic.

        # See: https://bugs.debian.org/773332

        #

        # Read up on ssl_ciphers to ensure a secure configuration.

        # See: https://bugs.debian.org/765782

        #

        # Self signed certs generated by the ssl-cert package

        # Don't use them in a production server!

        #

        # include snippets/snakeoil.conf;

        root /var/www/html;

        # Add index.php to the list if you are using PHP

        index index.html index.htm index.nginx-debian.html;

        server_name localhost;

        location / {

                proxy_pass http://localhost:8082;

                proxy_set_header X-Real-IP $remote_addr;

                proxy_set_header X-Forwarded-For $proxy_add_x_forwarded_for;

                proxy_set_header Host $http_host;

        }

        # pass PHP scripts to FastCGI server

        #

        location ~ \.php$ {

                include snippets/fastcgi-php.conf;

        #

        #       # With php-fpm (or other unix sockets):

                fastcgi_pass unix:/var/run/php/php7.4-fpm.sock;

        #       # With php-cgi (or other tcp sockets):

        #       fastcgi_pass 127.0.0.1:9000;

        }

        # deny access to .htaccess files, if Apache's document root

        # concurs with nginx's one

        #

        #location ~ /\.ht {

        #       deny all;

        #}

}
- blue
- Git Action scripts
## deploy to production
      - name: Deploy
        uses: appleboy/ssh-action@master
        id: deploy-prod
        with:
          host: ${{ secrets.SSH_HOST }}
          username: ${{ secrets.EC2_USERNAME }}
          key: ${{ secrets.SSH_PRIVATE_KEY }}
          envs: GITHUB_SHA
          script: |
            chmod 777 ./scripts/deploy.sh
            cp ./scripts/deploy.sh ./deploy.sh
            ./deploy.sh
            docker image prune -f
적용 결과
위의 코드들을 통해 이제 내 프로젝트는 blue/green을 통해 무중단 배포가 가능하게 되었다.
그러나 사실 blue/green도 결국은 nginx를 재실행해야 하기 때문에 0.01초라는 다운타임이 발생하여 완벽한 무중단 배포라고는 할 수 없다고 한다...
이를 해결하기 위해서는 결국 kubernets를 사용해야 하는데 이건 너무 어렵..ㅎㅎ 나중에는 꼭 해보고 싶다!