React + TypeScript 환경에서
tanstack/react-table(v8)을 사용하여 Table 만드는 방법
설치
//패키지 설치
npm install @tanstack/react-table

//타입 설치
npm install --save @types/react-table
데이터 정의
데이터는 배열로 정의한다.
그리고 배열 안에 테이블의 행으로 변환될 객체들을 넣는다.
모든 데이터는 처음에 한번만 렌더되어야 하므로 useMemo 와 함께 사용하는 것이 좋다.
type Person = {
  name: string;
  age: number;
};

const defaultData: Person[] = [
  { name: 'yon', age: 10 },
  { name: 'koya', age: 20 },
];

const data = useMemo(() => defaultData, []);
컬럼 정의
데이터와 마찬가지로 열도 배열로 정의한다.
배열 안에는 각 열을 구성할 항목들을 객체로 넣어준다.
header 옵션이 없으면 accessorKey값으로 header가 지정된다.
const columnData = [
  {
    accessorKey: 'name',
    header: 'Name',
  },
  {
    accessorKey: 'age',
    header: 'Age',
  }
];

const columns = useMemo(() => columnData, []);
createColumnHelper 사용
컬럼을 정의할 때 createColumnHelper 함수를 사용하면
컬럼 정의를 더 간편하고 읽기 쉽게 만들며, 타입 안전성을 보장할 수 있다.
const columnHelper = createColumnHelper<Person>()const columnData = [
columnHelper.accessor('name', {
header: 'Name',
cell: (info) => info.getValue(),
}),
columnHelper.accessor('age', {
header: 'Age',
cell: (info) => info.getValue(),
})
];
셀 정의
cell: info => info.getValue()
해당 셀의 데이터를 가져오는 메서드이다.
사용하지 않아도 기본적으로 셀의 값을 불러오지만,
해당 속성을 명시적으로 정의하면 코드에 일관성을 유지할 수 있고 커스터마이징에 용이하다.
const columnData = [
  columnHelper.accessor('name', {
    header: 'Name',
    cell: (info) => <span style={{ color: 'red' }}>{info.getValue()}</span>,
  }),
	...
];
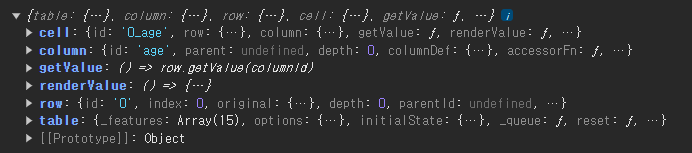
콘솔에 info를 찍어보면 활용 가능한 반환값을 확인할 수 있다.
테이블 생성
useReactTable 훅을 사용하여 테이블을 생성한다.
이때 data와 columns, 그리고 getCoreRowModel 함수를 필수 인자로 전달해야 한다.
getCoreRowModel 함수는 테이블이 데이터를 렌더링할 때 각 행을 어떻게 구성할지를 결정한다.
주로 데이터 필터링, 정렬, 그룹핑 등을 처리하기 위해 사용된다.
const table = useReactTable({ data, columns, getCoreRowModel: getCoreRowModel() });이렇게 생성된 table 인스턴스를 이용해 테이블을 만들 것이다.
getHeaderGroups 사용
콘솔에 table.getHeaderGroups()를 찍어보면 배열을 반환하는 것을 확인할 수 있다.
depth, id, headers 속성이 있다.

headers 속성을 활용하면 테이블의 header를 구성할 수 있다.
<thead>
  {table.getHeaderGroups().map((headerGroup) => (
    <tr key={headerGroup.id}>
      {headerGroup.headers.map((header) => (
        <th key={header.id}>
          {header.isPlaceholder ? null : flexRender(header.column.columnDef.header, header.getContext())}
        </th>
      ))}
    </tr>
  ))}
</thead>
getRowModel 사용
같은 방법으로 table.getRowModel().rows를 콘솔에 찍어보면 행 배열을 반환하는 것을 확인할 수 있다.

이를 활용해서 테이블의 행을 구성할 수 있다.
<tbody>
  {table.getRowModel().rows.map((row) => (
    <tr key={row.id}>
      {row.getVisibleCells().map((cell) => (
        <td key={cell.id}>{flexRender(cell.column.columnDef.cell, cell.getContext())}</td>
      ))}
    </tr>
  ))}
</tbody>
전체 코드
import React, { useState, useMemo } from 'react';
import './App.css';
import { createColumnHelper, flexRender, getCoreRowModel, useReactTable } from '@tanstack/react-table';

type Person = {
  name: string;
  age: number;
};

const defaultData: Person[] = [
  { name: 'yon', age: 10 },
  { name: 'koya', age: 20 },
];

const columnHelper = createColumnHelper<Person>();

const columnData = [
  columnHelper.accessor('name', {
    header: 'Name',
    cell: (info) => info.getValue(),
  }),
  columnHelper.accessor('age', {
    header: 'Age',
    cell: (info) => info.getValue(),
  }),
];

const App = () => {
  const data = useMemo(() => defaultData, []);
  const columns = useMemo(() => columnData, []);

  const table = useReactTable({ data, columns, getCoreRowModel: getCoreRowModel() });

  return (
      <table>
        <thead>
          {table.getHeaderGroups().map((headerGroup) => (
            <tr key={headerGroup.id}>
              {headerGroup.headers.map((header) => (
                <th key={header.id}>
                  {header.isPlaceholder ? null : flexRender(header.column.columnDef.header, header.getContext())}
                </th>
              ))}
            </tr>
          ))}
        </thead>
        <tbody>
          {table.getRowModel().rows.map((row) => (
            <tr key={row.id}>
              {row.getVisibleCells().map((cell) => (
                <td key={cell.id}>{flexRender(cell.column.columnDef.cell, cell.getContext())}</td>
              ))}
            </tr>
          ))}
        </tbody>
      </table>
  );
};

export default App;
Editable Table
react-table에서 테이블 데이터를 동적으로 업데이트하려면,
각 셀을 input 요소로 바꾸고, 그 값을 변경할 때마다 상태를 업데이트 하는 방법이 필요하다.
1. 상태 관리
먼저 데이터를 정의하고, useState를 사용하여 테이블 데이터를 상태로 관리한다.
초기 값에 정의한 데이터를 넣어준다.
const App = () => {
const [data, setData] = useState(defaultData);
...
return (
<>
<table>
// 테이블 내용 동일
</table>
{data.map((row) => (
<p key={row.name}>{row.name}'s age : {row.age}</p>
))}
</>
);
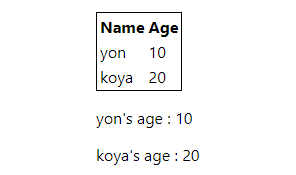
};초기 데이터 값이 고정된 테이블을 확인할 수 있다.
2. input요소 추가
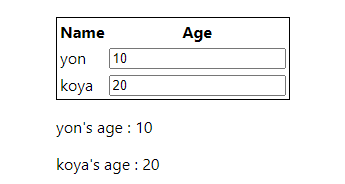
age 컬럼의 cell 속성에서 input 요소를 렌더링한다.
input의 value에 info.getValue()를 넣어 기존 값을 받아온다.
columnHelper.accessor('age', {
  header: 'Age',
  cell: (info) => <input type="number" value={info.getValue()} />,
})
3. 상태 업데이트
onChange 이벤트로 사용자가 입력한 값을 기반으로 상태를 업데이트한다.
이때 map 함수를 사용하여 index 값을 확인하고 해당 행의 데이터를 수정하도록 로직을 짜준다.
columnHelper.accessor('age', {
  header: 'Age',
  cell: (info) => (
    <input
      type="number"
      value={info.getValue()}
      onChange={(e) => {
        const newAge = Number(e.target.value);
        setData((prevData) =>
          prevData.map((row, index) => (index === info.row.index ? { ...row, age: newAge } : row)),
        );
      }}
    />
  ),
})
input 값이 바뀔 때마다 age값이 업데이트 되는 것을 확인할 수 있다.

