- ROS2로 시작하는 로봇 프로그래밍 - CH.6
- 10.15 doosan rookey boot camp
Goal: 신규 RQt 플러그인 제작 실습
6.1 RQt
- 플러그인 형태로 다양한 도구 및 인터페이스를 구현할 수 있는 ROS의 GUI
- ROS+Qt
- 토픽, 서비스, 액션 프로그래밍 가능
- 크로스 플랫폼 & 다양한 프로그래밍 언어 지원(c++, PyQt, PySide)-->(Qt의 특징)
6.2 RQt plugin
-
RQt 플러그인 스타일의 장점
- 표준화된 GUI 절차 제공
- GUI 시작 및 종료 처리 용이
- 다양한 옵션 저장 및 복원 가능 - API 제공
- 표준화된 GUI 절차 제공
-
RQt 패키지
| pkg name | explanation |
|---|---|
| rqt 패키지 | RQt의 메타 패키지 rqt_gui, rqt_gui_py, rqt_py_common 패키지 포함 |
| rqt_gui 패키지 | 여러 rqt 위젯을 단일 창에 도킹하는 위젯 패키지 |
| rqt_gui_cpp 패키지 | c++ 클라이언트 라이브러리를 사용하여 제작 가능한 api 제공 |
| rqt_gui_py 패키지 | python 클라이언트 라이브러리를 사용하여 제작 가능한 api 제공 |
| rqt_py_common 패키지 | python으로 작성된 RQt 플러그인에서 공용사용되는 기능을 모듈로 제공하는 패키지 |
| rqt_common_plugins 패키지 | rqt_action, rqt_bag 등 20여개의 RQt 플러그인을 포함하는 메타패키지 |
| qt_gui_core 패키지 | qt_gui, qt_gui_cpp, qt_gui_py_common, qt_gui_app, qt_dotgraph 등을 담은 메타패키지 |
| python_qt_binding 패키지 | Qtcore,QtGui, QtWidgets 등을 사용할 때 python 언어 기반의 Qt API를 제공하는 바인딩 패키지 |
6.2.1
-
python_qt_binding
- Qt Python API 사용
- python으로 Qt API 사용시 Qt C++ API 대신, Python으로 바인딩된 API 사용
- python으로 Qt API 사용시 Qt C++ API 대신, Python으로 바인딩된 API 사용
- 장점
- PyQt, PySide 구분없이 사용 가능
- 필요 시 두 바인딩 API 간 전환 가능
- 사용 순서
- rqt_gui_py.plugin 모듈의 Plugin 클래스 상속
- qt_gui.plugin 모듈의 Plugin 클래스 상속
- python_qt_binding.QtCore 모듈의 Qobject 클래스 상속
- 상속 관계
1) python_qt_binding.QtCore 모듈의 Qobject 클래스
2) qt_qui.plugin 모듈의 Plugin 클래스는 1)을 상속
3) rqt_gui_py.plugin 모듈의 Plugin 클래스가 2)를 상속
- Qt Python API 사용
-
RQt 플러그인 개발 환경
- `ros-humble- desktop'설치 시 추가 설치 필요 x
sudo apt install qtcreator로 설치 가능
6.3 RQt plugin 구성
(1)
패키지 생성
- RQt 플러그인의 기본 기능 관련 및 gui 관련 패키지는 의존성 패키지로 포함
- python 언어로 작성하지만 RQt 플러그인의 일부로 작성하기에 ament_cmake로 설정# 플러그인 패키지 생성 $ cd ~/workspace/src $ ros2 pkg create rqt_example --build-type ament_cmake --dependencies rclpy rqt_gui_py python_qt_binding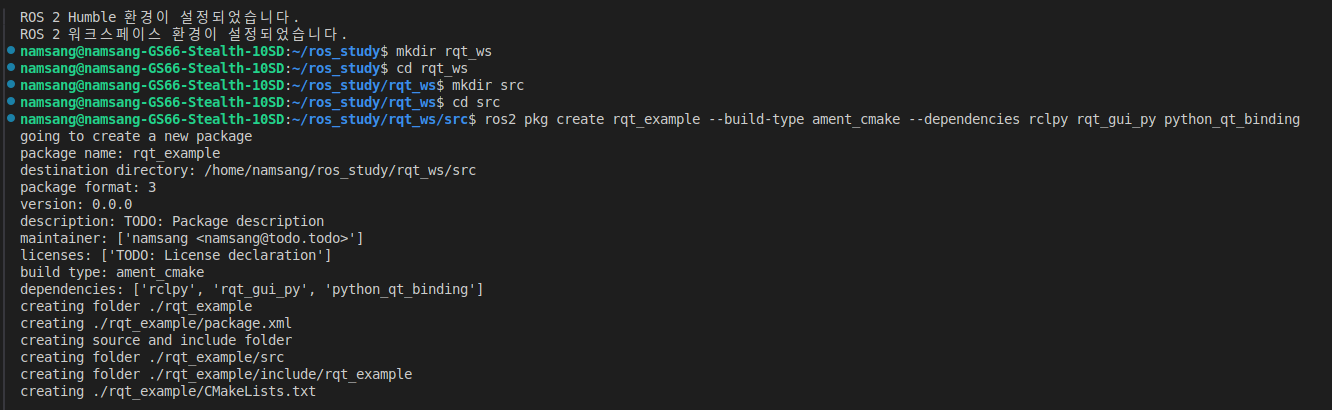
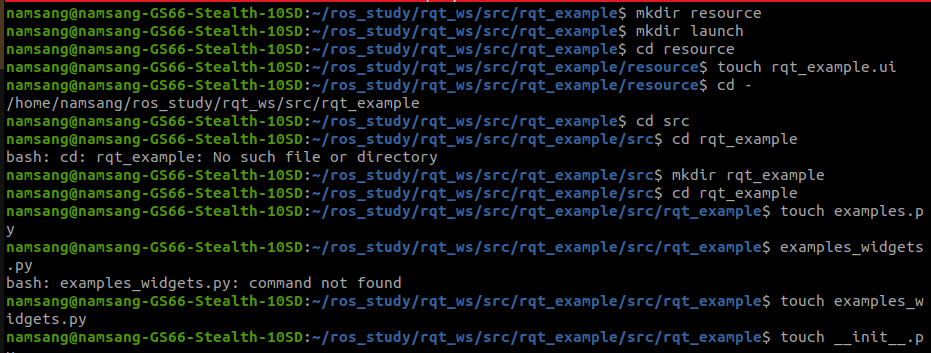
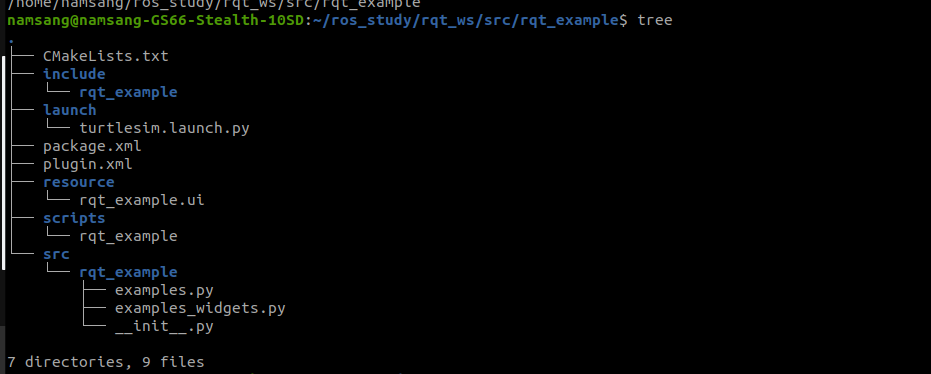
(1-1) 폴더 및 파일 생성

(2) packagae.xml 수정 (패키지, 빌드 설정 파일)
<?xml version="1.0"?>
<?xml-model href="http://download.ros.org/schema/package_format3.xsd" schematypens="http://www.w3.org/2001/XMLSchema"?>
<package format="3">
 <name>rqt_example</name>
 <version>0.6.0</version>
 <description>ROS 2 example for RQt plugin</description>
 <maintainer email="user@email.com">Juwan</maintainer>
 <license>Apache 2.0</license>
 <author email="user@email.com">Juwan</author>

 <buildtool_depend>ament_cmake</buildtool_depend>

 <exec_depend>geometry_msgs</exec_depend>
 <exec_depend>python_qt_binding</exec_depend>
 <exec_depend>python3-catkin-pkg-modules</exec_depend>
 <exec_depend>qt_gui_py_common</exec_depend>
 <exec_depend>rclpy</exec_depend>
 <exec_depend>rqt_gui</exec_depend>
 <exec_depend>rqt_gui_py</exec_depend>
 <exec_depend>rqt_py_common</exec_depend>
 <exec_depend>std_srvs</exec_depend>

 <test_depend>ament_lint_auto</test_depend>
 <test_depend>ament_lint_common</test_depend>
 <export>
   <build_type>ament_cmake</build_type>
   <rqt_gui plugin="${prefix}/plugin.xml"/>
 </export>
</package>-
pakcage.xml 파일은 패키지의 메타데이터와 의존성을 정의한다. 위 코드에서 주요 의존성에 대하여 설명하겠다
-
<buildtool_depend>ament_cmake</buildtool_depend>- ROS2 패키지 빌드 도구, cmake 기반의 build tool
- 패키지 빌드시에만 cmake 의존
-
<exec_depend> ... </exec_depend>geometry_msgs
: ROS에서 사용하는 기본적인 메시지 타입 패키지(point, qauternion, pose) 정의python_qt_binding
:python과 Qt GUI 연결 라이브러리, RQt 플러그인 작성 시 필수python3-catkin-pkg-modules
: ROS1의 catkin을 Python3에서 사용하기 위한 라이브러리(패키지 관리)qt_gui_py_common
: Qt 기반 GUI 요소를 위한 Python 모듈rclpy
: ROS2에서 python을 사용하기 위한 기본 라이브러리rqt_gui
: RQt 툴을 지원하는 패키지,rqt_gui_py
: Python으로 작성된 RQt 플러그인을 지원하는 패키지, RQt 플러그인을 Python으로 작성할 때 필요한 라이브러리 및 기능을 제공rqt_py_common
:Python으로 작성된 RQt 플러그인에서 공통적으로 사용하는 기능을 제공하는 라이브러리, 플러그인의 로딩, 관리 등의 기능을 포함std_srvs
: ROS에서 정의된 표준 서비스 타입들을 포함하는 패키지
-
<rqt_gui plugin="${prefix}/plugin.xml"/>- plugin: 플러그인에 대한 경로 지정
- ${prefix} : 패키지가 설치될 디렉토리를 나타내는 변수 --> 실제로는 install/<package_name>
: 해당 경로에 위치한 XML 파일을 통해 플러그인의 메타데이터를 로드하고 사용하도록 지시
(3) plugin.xml 생성 (플러그인 파일 생성)
<library path="src">
 <class name="Examples" type="rqt_example.examples.Examples" base_class_type="rqt_gui_py::Plugin">
   <description>
     A plugin visualizing messages and services values
   </description>
   <qtgui>
     <group>
       <label>Visualization</label>
       <icon type="theme">folder</icon>
       <statustip>Plugins related to visualization</statustip>
     </group>
     <label>Viewer</label>
     <icon type="theme">utilities-system-monitor</icon>
     <statustip>A plugin visualizing messages and services values</statustip>
   </qtgui>
 </class>
</library>-
plugin.xml 파일은 RQt 플러그인의 클래스 경로, 설명, GUI상에서의 그룹과 아이콘을 정의합니다.
-
library: 플러그인의 파일경로
-path="src": 플러그인 코드가 위치한 경로 정의
-
class: 플러그인으로 사용될 클래스와 타입 정의 --> examples.py 정의
-name: 플러그인의 이름 지정
-type: 클래스의 모듈 경로와 클래스 이름 지정
-
qtgui: 플러그인이 RQt GUI의 표시 설정, 사용자 인터페이스에서의 레이블,아이콘, 그룹 정보를 담고 있음group: 메뉴의 세부 항목이 됨
| 항목 | 설명 |
|---|---|
| label | 그룹 이름 |
| icon | 플러그인의 레이블(이름) 정의 |
| statustip | 그룹에 대한 간단한 설명 |
(4) script/rqt_example 생성 (스크립트 폴더 및 파일 생성)
- scripts : 실행 가능한 스크립트를 포함하는 폴더
rqt_example: 플러그인의 실행 스크립트
-> 이 파일의 확장자명을 기입하지 않은 이유:- 실행 가능한 스크립트로 명령어로 실행가능하도록 하기 위함
- RQt, ROS2 환경에서 플러그인과 관련된 실행 파일이 경로 기반으로 관리되어 확장자는 중요성이 떨어짐
# !/usr/bin/env python3
# 실행환경을 지정하는 shebang, python3 인터프리터 지정

import sys

from rqt_gui.main import Main # Main 클래스는 RQt API의 실행기능 제공

from rqt_example.examples import Examples # plugin.xml에 정의된 플러그인 클래스, 구현 클래스

plugin = 'rqt_example.examples.Examples' # 경로 문자열
main = Main(filename=plugin) # Main 객체 생성, 플러그인 경로 지정
sys.exit(main.main(standalone=plugin)) # 프로그램 종료시 반환값 전달
(5) resource/req_example.ui (리소스 폴더 및 UI 파일 생성)
- Qt의 ui파일은 XML 태그를 이용
ui
(6) 런치 폴더 및 런치 파일 생성,
(6.1) turtlesim.launch.py
- turtlesim 패키지의 turtlesim_node와 함께 연동하여 테스트 가능
- namespace = turtle1 --> turtlesim_node의 토픽과 맞추기 위함
from launch import LaunchDescription # 여러 노드와 액션을 조합하여 실행하도록 설명하는 객체
from launch.actions import LogInfo # 로그 메시지 출력을 위한 msg_type
from launch_ros.actions import Node # 노드 정의를 위한 호출
def generate_launch_description():
# LaunchDescription 객체를 생성하여 여러 노드를 포함할 수 있도록 합니다.
return LaunchDescription([
    # 런치가 시작될 때 출력될 로그 메시지 정의
    LogInfo(msg=['Execute the rqt_example with turtlesim node.']),

    # rqt_example 노드를 정의
    Node(
        namespace='turtle1',  # 노드가 속할 네임스페이스
        package='rqt_example',  # 실행할 노드가 포함된 패키지
        executable='rqt_example',  # 실행할 노드의 실행 파일 이름
        name='rqt_example',  # 이 노드에 부여할 이름
        output='screen'  # 이 노드의 출력을 터미널에 표시
    ),

    # turtlesim 노드를 정의
    Node(
        package='turtlesim',  # 실행할 노드가 포함된 패키지
        executable='turtlesim_node',  # 실행할 노드의 실행 파일 이름
        name='turtlesim',  # 이 노드에 부여할 이름
        output='screen'  # 이 노드의 출력을 터미널에 표시
    )
])
 (7)  메인 소스 코드
 (7-1) examples.py
 ```python
 from rqt_example.examples_widget import ExamplesWidget  # 사용자 정의 위젯 임포트
from rqt_gui_py.plugin import Plugin  # RQt 플러그인 기반 클래스 임포트

class Examples(Plugin):
    # RQt 플러그인의 초기화 메서드
    def __init__(self, context):
        # 부모 클래스 초기화
        super(Examples, self).__init__(context)

        # 플러그인 이름 설정
        self.setObjectName('RQt example')

        # ExamplesWidget 객체 생성, 현재 노드를 전달
        self.widget = ExamplesWidget(context.node)

        # 플러그인 인스턴스의 고유 번호 가져오기
        serial_number = context.serial_number()

        # 고유 번호가 1보다 클 경우, 창 제목에 고유 번호 추가
        if serial_number > 1:
            self.widget.setWindowTitle(self.widget.windowTitle() + ' ({0})'.format(serial_number))

        # 위젯을 RQt 컨텍스트에 추가
        context.add_widget(self.widget)

    # 플러그인 종료 시 호출되는 메서드
    def shutdown_plugin(self):
        print('Shutdown the RQt example.')  # 종료 메시지 출력
self.widget.shutdown_widget() # 위젯 종료 메서드 호출-
Examples클래스 : 'rqut_gui_py.plugin'의 Plugin 클래스 상속- RQt 플러그인 기본 기능 제공
- 플러그인 관리, 초기화 및 종료와 같은 기능 처리
-
self.setObjectName()함수는 QObject 계열일 경우 지정하는 이름 -
ExamlplsWidget: 작성하고자 하는 UI를 포함한 실제 코드가 담긴 클래스, 사용자 정의 위젯 -
Plugin: RQt의 기본 플러그인 클래스 해당 클래스를 상속받아 RQt 플러그인을 구현- 인자로 context.node 사용
- context 매개변수는 플러그인의 실행 환경에 대한 정보를 포함하며, 이를 통해 노드, 고유번호 등의 정보를 얻을 수 있음
- 해당 노드가 클래스 내에서 rclpy의 노드역할을 수행
-
생성된 widget은 마지막 contex의 add_widget() 함수를 통해 RQt 위젯으로 추가
- serial_number는 context 생성 시 현재 사용하지 않는 첫번째 양의 정수
--> 복수의 RQt 플러그인을 구별하기 위해 사용하는 ID 개념, 동일한 플러그인 인스턴스의 개수를 확인하기 위해 고유 번호를 가져옴, 이는 여러 인스턴스가 동시에 실행될 수 있는 경우에 유용 -
shutdown_plugin: rqt_example 노드를 실행한 터미널 창에서 ctrl+c 명령어 등으로 SIGINT 신호를 받을 때, 또는 UI 화면에서 X 버튼을 눌러 종료시 호출되는 함수
(7-2) examples_widget.py
import os
from ament_index_python.resources import get_resource
from geometry_msgs.msg import Twist
from python_qt_binding import loadUi
from python_qt_binding.QtCore import Qt
from python_qt_binding.QtCore import QTimer
from python_qt_binding.QtGui import QKeySequence
from python_qt_binding.QtWidgets import QShortcut
from python_qt_binding.QtWidgets import QWidget

import rclpy
from rclpy.qos import QoSProfile
from std_srvs.srv import SetBool

class ExamplesWidget(QWidget):
    # ExamplesWidget 클래스 정의: QWidget을 상속받아 RQt 위젯을 생성함
    def __init__(self, node):
        super(ExamplesWidget, self).__init__()
        self.setObjectName('ExamplesWidget')  # 위젯 이름 설정

        self.node = node  # RCLPY 노드 저장

        # 타이머 간격 및 속도 조정 상수
        self.REDRAW_INTERVAL = 30  # UI 업데이트 간격 (ms)
        self.PUBLISH_INTERVAL = 100  # 토픽 발행 간격 (ms)
        self.CMD_VEL_X_FACTOR = 1000.0  # x축 속도 조정 비율
        self.CMD_VEL_YAW_FACTOR = -10.0  # yaw 각도 조정 비율

        pkg_name = 'rqt_example'  # 패키지 이름
        ui_filename = 'rqt_example.ui'  # UI 파일 이름
        topic_name = 'cmd_vel'  # 토픽 이름
        service_name = 'led_control'  # 서비스 이름

        # UI 파일 경로 가져오기
        _, package_path = get_resource('packages', pkg_name)
        ui_file = os.path.join(package_path, 'share', pkg_name, 'resource', ui_filename)
        loadUi(ui_file, self)  # UI 파일 로드

        # 속도 초기화
        self.pub_velocity = Twist()  # 발행할 속도 메시지
        self.pub_velocity.linear.x = 0.0  # 초기 x축 속도
        self.pub_velocity.angular.z = 0.0  # 초기 각속도
        self.sub_velocity = Twist()  # 수신할 속도 메시지
        self.sub_velocity.linear.x = 0.0
        self.sub_velocity.angular.z = 0.0

        # UI 요소 초기화
        self.slider_x.setValue(0)  # 슬라이더 초기값 설정
        self.lcd_number_x.display(0.0)  # x축 LCD 디스플레이 초기값
        self.lcd_number_yaw.display(0.0)  # yaw LCD 디스플레이 초기값

        # QoS 설정
        qos = QoSProfile(depth=10)
        self.publisher = self.node.create_publisher(Twist, topic_name, qos)  # 속도 발행자 생성
        self.subscriber = self.node.create_subscription(Twist, topic_name, self.get_velocity, qos)  # 속도 구독자 생성
        self.service_server = self.node.create_service(SetBool, service_name, self.set_led_status)  # 서비스 서버 생성
        self.service_client = self.node.create_client(SetBool, service_name)  # 서비스 클라이언트 생성

        # 타이머 설정
        self.publish_timer = QTimer(self)  # 발행 타이머
        self.publish_timer.timeout.connect(self.send_velocity)  # 타이머가 만료되면 send_velocity 호출
        self.publish_timer.start(self.PUBLISH_INTERVAL)  # 타이머 시작

        self.update_timer = QTimer(self)  # UI 업데이트 타이머
        self.update_timer.timeout.connect(self.update_indicators)  # 타이머가 만료되면 update_indicators 호출
        self.update_timer.start(self.REDRAW_INTERVAL)  # 타이머 시작

        # 버튼 및 단축키 연결
        self.push_button_w.pressed.connect(self.increase_linear_x)  # 'W' 버튼: x축 속도 증가
        self.push_button_x.pressed.connect(self.decrease_linear_x)  # 'X' 버튼: x축 속도 감소
        self.push_button_a.pressed.connect(self.increase_angular_z)  # 'A' 버튼: yaw 각속도 증가
        self.push_button_d.pressed.connect(self.decrease_angular_z)  # 'D' 버튼: yaw 각속도 감소
        self.push_button_s.pressed.connect(self.set_stop)  # 'S' 버튼: 정지

        # 버튼에 단축키 설정
        self.push_button_w.setShortcut('w')
        self.push_button_x.setShortcut('x')
        self.push_button_a.setShortcut('a')
        self.push_button_d.setShortcut('d')
        self.push_button_s.setShortcut('s')

        # 스페이스바 단축키 설정
        self.shortcut_space = QShortcut(QKeySequence(Qt.Key_Space), self)
        self.shortcut_space.setContext(Qt.ApplicationShortcut)
        self.shortcut_space.activated.connect(self.push_button_s.pressed)  # 스페이스바로 정지

        # LED 서비스 버튼 연결
        self.radio_button_led_on.clicked.connect(self.call_led_service)  # LED 켜기
        self.radio_button_led_off.clicked.connect(self.call_led_service)  # LED 끄기

        # LED 버튼에 단축키 설정
        self.radio_button_led_on.setShortcut('o')
        self.radio_button_led_off.setShortcut('f')

    def get_velocity(self, msg):
        self.sub_velocity = msg  # 수신된 속도 메시지 저장

    def set_led_status(self, request, response):
        # LED 상태 설정 서비스 콜백
        if request.data:
            self.push_button_led_status.setText('ON')  # LED가 켜짐
            self.push_button_led_status.setStyleSheet('color: rgb(255, 170, 0);')  # 색상 변경
            response.success = True
            response.message = 'LED ON'
        elif not request.data:
            self.push_button_led_status.setText('OFF')  # LED가 꺼짐
            self.push_button_led_status.setStyleSheet('')  # 기본 색상으로 되돌림
            response.success = True
            response.message = 'LED OFF'
        else:
            response.success = False
        return response  # 서비스 응답 반환

    def increase_linear_x(self):
        self.pub_velocity.linear.x += 0.1  # x축 속도 증가

    def decrease_linear_x(self):
        self.pub_velocity.linear.x -= 0.1  # x축 속도 감소

    def increase_angular_z(self):
        self.pub_velocity.angular.z += 0.1  # yaw 각속도 증가

    def decrease_angular_z(self):
        self.pub_velocity.angular.z -= 0.1  # yaw 각속도 감소

    def set_stop(self):
        self.pub_velocity.linear.x = 0.0  # 속도 정지
        self.pub_velocity.angular.z = 0.0

    def call_led_service(self):
        request = SetBool.Request()  # 서비스 요청 생성

        # 선택된 LED 상태에 따라 요청 데이터 설정
        if self.radio_button_led_on.isChecked():
            request.data = True
        elif self.radio_button_led_off.isChecked():
            request.data = False

        wait_count = 1
        while not self.service_client.wait_for_service(timeout_sec=0.5):  # 서비스가 준비될 때까지 대기
            if wait_count > 5:  # 5회 이상 대기 시 중단
                return
            self.node.get_logger().error('Service not available #{0}'.format(wait_count))  # 서비스 미준비 에러 로그
            wait_count += 1

        future = self.service_client.call_async(request)  # 비동기적으로 서비스 호출

        while rclpy.ok():  # ROS가 정상적으로 작동 중인 동안
            if future.done():  # 서비스 호출 완료 시
                if future.result() is not None:  # 결과가 정상적으로 반환되었을 경우
                    response = future.result()
                    self.node.get_logger().info(
                        'Result of service call: {0}'.format(response.message))  # 서비스 호출 결과 로그
                else:
                    self.node.get_logger().error('Error calling service')  # 서비스 호출 에러 로그
                break

    def send_velocity(self):
        # 현재 속도를 Twist 메시지로 발행
        twist = Twist()
        twist.linear.x = self.pub_velocity.linear.x
        twist.linear.y = 0.0
        twist.linear.z = 0.0
        twist.angular.x = 0.0
        twist.angular.y = 0.0
        twist.angular.z = self.pub_velocity.angular.z
        self.publisher.publish(twist)  # Twist 메시지 발행

    def update_indicators(self):
        # UI 요소 업데이트
        self.slider_x.setValue(int(self.sub_velocity.linear.x * self.CMD_VEL_X_FACTOR))  # 슬라이더 값 업데이트
        self.dial_yaw.setValue(int(self.sub_velocity.angular.z * self.CMD_VEL_YAW_FACTOR))  # 다이얼 값 업데이트
        self.lcd_number_x.display(self.sub_velocity.linear.x)  # LCD 디스플레이 업데이트
        self.lcd_number_yaw.display(self.sub_velocity.angular.z)  # LCD 디스플레이 업데이트

    def shutdown_widget(self):
        # 위젯 종료 시 자원 해제
        self.update_timer.stop()  # 업데이트 타이머 중지
        self.publish_timer.stop()  # 발행 타이머 중지
        self.node.destroy_client(self.service_client)  # 서비스 클라이언트 파괴
        self.node.destroy_service(self.service_server)  # 서비스 서버 파괴
        self.node.destroy_subscription(self.subscriber)  # 구독자 파괴
self.node.destroy_publisher(self.publisher) # 발행자 파괴ExamplesWidget클래스는 앞서 설명한 GUI 화면 구성을 담당하는 rqt_example.ui 파일을 호출 및 화면에 출력- topic publisher/subscriber, service server/client, timer, push button, radio button 등 포함