

기존 기능을 Elastic Search로 변경하려는 이유
그룹 프로젝트를 진행하며, 10만 단위가 넘는 서울시 음식점 데이터를 DB에 저장한 후에, 앱에서 음식점 이름 검색 등을 통한 접근 경우에 응답 속도를 줄이고 싶었다.
기존 와일드 카드 연산자 '%' 을 포함한 Like 쿼리문을 DB 데이터 조회에 이용하였으나 이는 인덱스가 적용되지 않은 접근이었다.
정확히 말하자면 기존 우리 프로젝트 서버에서 제공하는 '음식점 검색 자동완성 기능'은 검색하는 키워드가 있을 때, 해당 키워드를 포함하는 음식점 이름을 가진 리스트를 서버에서 제공하는 것이었다.
이때 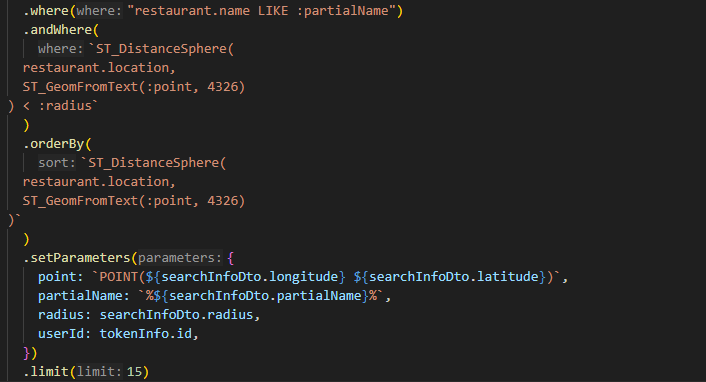
처럼 where 조건절에서 restautant.name Like %{searchInfoDto.partialName}% 으로 처리를 했는데, 이 경우에 와일드카드 연산자 '%'가 검색어 앞에 붙으면서 restaurant.name에 세컨더리 인덱스를 적용한다 하더라도 인덱싱이 적용되지 않았다.
DB에서 데이터를 조회할 때 인덱스가 적용되는 기준은 시작 단어이기 때문에 와일드 카드 연산자 % 가 앞에 붙는 경우에는 제외되었기 때문이었다.
그렇기에 우리는 다른 효율적인 방법을 찾아보았고, 찾은 것은 Elastic Search Engine내 Full-Text-Search였다.
Elastic Search란?, 왜??

Nest.js문서 참고 : https://www.npmjs.com/package/@nestjs/elasticsearch
Elastic Search는 대규모 데이터 셋이나 실시간으로 분산된 데이터를 검색하고 분석하는데 사용되는 오픈소스 검색 엔진이라고 할 수 있다.
내가 사용하려는 이유는 Elastic Engine에서 'Full text Search'기능을 지원하기 때문인데, 복잡하고 다양한 텍스트 데이터 (ex : 내 경우엔 수십만개의 "음식점 이름 데이터")에서 빠르고 정확한 검색 결과를 제공하기 때문이다.
또한, DB에서 지원하는 full text search 기능과 다르게 영어만이 아닌 한글 키워드에도 해당 기능을 적용할 수 있고, 다양한 쿼리를 지원하기에 간단한 텍스트 검색부터 복잡한 질의까지 추후 확장성을 고려함에 있어서도 효율적이라고 생각했다.
설치하기
내가 사용하는 서버 프레임워크는 Nest.js였다.
따라서 npm 을 이용한 패키지 설치를 먼저 진행했다.
npm install @nestjs/elasticsearch @elastic/elasticsearch이제 restaurant 모듈 내에서 elastic service를 이용하기 전에
Elastic Server를 Was와 별도로 실행해야 했다.
Elastic Search 는 단순한 코드 라이브러리가 아닌, 자체적인 데이터 저장이나 검색 기능을 갖춘 전문적인 검색 엔진 그 자체였기에 elastic 서버를 실행해야 했다.
내 경우에는 Nginx reverse proxy 서버만이 통신할 수 있는 private내 실행하는 was와 같은 서버이지만 docker를 이용해 다른 컨테이너 에서 독립적으로 elastic server를 실행하기도 했다.
WAS와 독립적으로 실행되어 서로간에 의존성을 주지 않는 것이 중요하다고 생각했고, 유연한 관리를 위해 이를 적용하기로 했다.
docker run -d --name elasticsearch -p 9200:9200 -p 9300:9300 -e "discovery.type=single-node" docker.elastic.co/elasticsearch/elasticsearch:7.9.3명령을 통해 docker 내 다른 컨테이너에서 실행하도록 하였다.
다음으로는 restaurant 모듈 내 검색기능 service에서 호출할 elastic search service파일을 만들어야 했다.
위에서 Docker 컨테이너로 Elastic Server를 만들었으니 해당 서버와의 연결 객체를 생성했다.
constructor(private restaurantRepository: RestaurantRepository) {
    this.client = new Client({ node: "서버 IP" });
  }
적용하기
이제 해당 객체를 통해서 Service Load시에 Elastic Server에 음식점 이름에 대해서 Index를 생성해야 했다.
Elastic에 음식점 이름에 관한 Index 생성
async createRestaurantIndex() {
    return this.client.indices.create({
      index: "restaurants",
      body: {
        settings: {
          analysis: {
            analyzer: {
              ngram_analyzer: {
                type: "custom",
                tokenizer: "ngram",
                filter: ["lowercase", "edge_ngram"]
              }
            },
            filter: {
              edge_ngram: {
                type: "edge_ngram",
                min_gram: 1,
                max_gram: 20
              }
            }
          }
        },
        mappings: {
          properties: {
            restaurant_name: {
              type: "text",
              analyzer: "ngram_analyzer",
              search_analyzer: "standard"
            },
            location: {type: "geo_point"},
          },
        },
      },
    });
  }
DB의 음식점 데이터 중에,
음식점 이름을 포함해서 응답에 넣어야 하는 요소들을 Elastic Server로 보냈다.

추가로, DB에 저장된 음식점 데이터는 10만 단위가 넘어가기에,
DB로부터 꺼내온 데이터 하나하나씩 Elastic Server로 넘겨주기에는
작업 시간이 상~~~~~당히 길었다.

다행히 Elastic Search에서 제공하는 bulk기능을 통해 대량의 데이터를
전달할 수 있었다.

나의 경우에는 batchSize를 2000으로 하여 2000개마다 모아서 데이터 전송을 하였다.


async indexRestaurantData() {
    const restaurants = await this.restaurantRepository.find();
    const batchSize = 2000;
    const totalBatches = Math.ceil(restaurants.length / batchSize);
    for (let i = 0; i < totalBatches; i++) {
      console.log(i * batchSize);
      const currentBatch = restaurants.slice(
        i * batchSize,
        (i + 1) * batchSize
      );
      const bulkBody = currentBatch.flatMap((restaurant) => [
        { index: { _index: "restaurants", _id: restaurant.id } },
        {
         // 자동완성 검색 응답에 포함될 데이터 요소들
         // 해당 데이터들은 name을 제외하고
         //'자동완성 텍스트'에 포함되지 않기에 createIndex에는 미포함하였음
          restaurant_id: restaurant.id,
          restaurant_name: restaurant.name,
          location: {
            lat: restaurant.location.coordinates[1],
            lon: restaurant.location.coordinates[0]
          },
          restaurant_phoneNumber: restaurant.phoneNumber,
          restaurant_address: restaurant.address,
          restaurant_category: restaurant.category,
        },
      ]);
      await this.client.bulk({ body: bulkBody }); // 데이터 전송부분
    }
  }
이제 위에서 만든 함수들을 Service Load시에 Elastic Server 객체를 통해 Elastic Server에 음식점 이름에 대해서 Index를 생성해야 했다.
async onModuleInit() {
    const indexExists = await this.client.indices.exists({
      index: "restaurants",
    });
    await this.client.indices.delete({ index: 'restaurants' });
    await this.createRestaurantIndex();
    await this.indexRestaurantData();
  }
그런데, 문제가 있었다. 아래와 같은 오류가 있었던 것인데,
ConnectionError: other side closed - Local: ::1:62248, Remote: ::1:9200해당 오류는 우습게도, docker 컨테이너를 실행할때의 명령어에서 Elastic search 버전이 7.9.3이었기 때문이었다. 내가 npm으로 다운받은 버전은 8.11.0 당연히 호환될리가 없었다.
docker run 명령어에서 버전을 바꿔주며 해결할 수 있었다.
이제 마지막으로 할 일은, 자동완성 검색 데이터 반환 기능이었다.
앞에서 생성한 CreateIndex, indexRestaurantData 함수를 통해서 선행 작업을 다 해놓았으니 최종적으로 자동완성 검색 데이터를 반환하는 기능이 있어야 했다
앞에서 생성한 restaurans index를 통해서 입력값인 searchInfoDto.partialName
과 연관있는 데이터들을 match하여 받아와야 했다.

동시에, 개수를 15개로 제한하는데 이때, searchInfoDto.location 즉
사용자의 현위치 기준 가까운 순서대로 15개로 제한하였다.

const response = await this.client.search({
            index: 'restaurants',
            body: {
                query: {
                    match: {
                        restaurant_name: {
                            query: searchInfoDto.partialName
                        }
                    }
                },
                _source: ["restaurant_name", "restaurant_address", "restaurant_phoneNumber", "restaurant_category"],
                size: 15,
                sort: [
                    {
                        _geo_distance: {
                            location: { lat: searchInfoDto.latitude, lon: searchInfoDto.longitude }, // 사용자 위치
                            order: 'asc', // 가까운 순으로 정렬
                            unit: 'km' // 거리 단위
                        }
                    }
                ],
                script_fields: {
                    distance: {
                        script: {
                            source: "doc['location'].arcDistance(params.lat,params.lon)", // 거리 계산 스크립트
                            params: {
                                lat: searchInfoDto.latitude,
                                lon: searchInfoDto.longitude
                            }
                        }
                    }
                },
            }
        });
결과
결과는 성공이었다.
이제 바꾼 기능에 대한 개선 정도를 확인해야 했다.
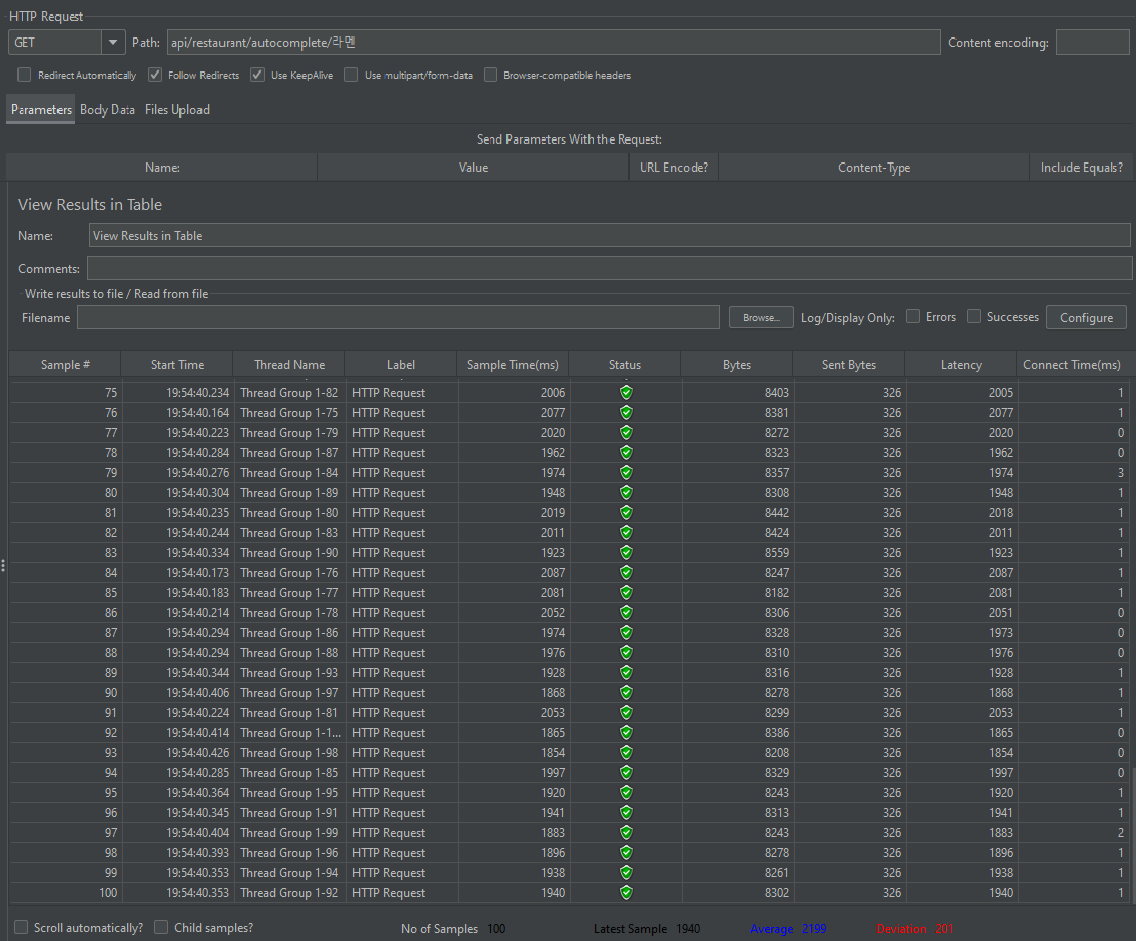
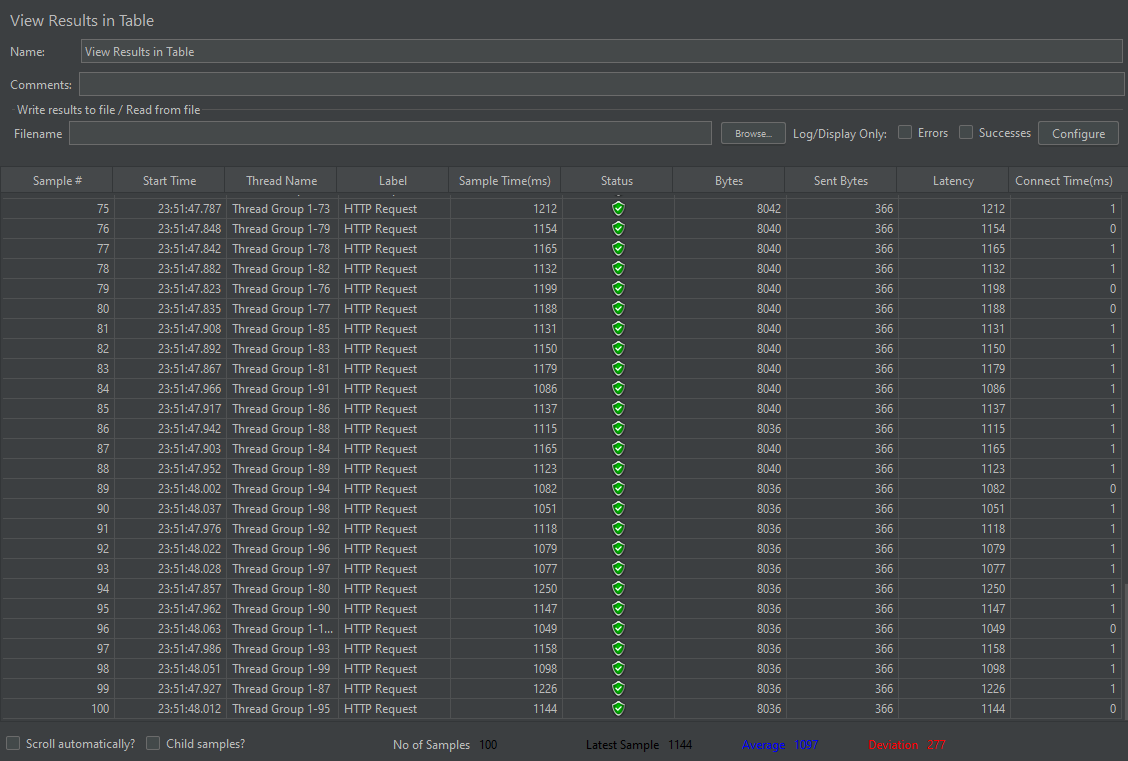
테스트는 Apache Jmeter 도구를 이용해 스레드 10개, 100개를 동시 요청하여 응답 평균 시간을 비교했다.
개선 전
10개 스레드 동시 실행

100개 스레드 동시 실행
개선 후
10개 스레드 동시 실행

유저 10명 동시 요청 개선 전 평균 156ms -> 59ms로 약 응답속도 3배 개선
유저 100명 동시 요청 개선 전 평균 2199ms -> 1097ms로 응답속도 약 2배 개선