
- 여태까지는 흐름이 하나인 single thread 프로그램을 고려함
- 하나의 process는 여러 개의 thread를 가질 수 있음
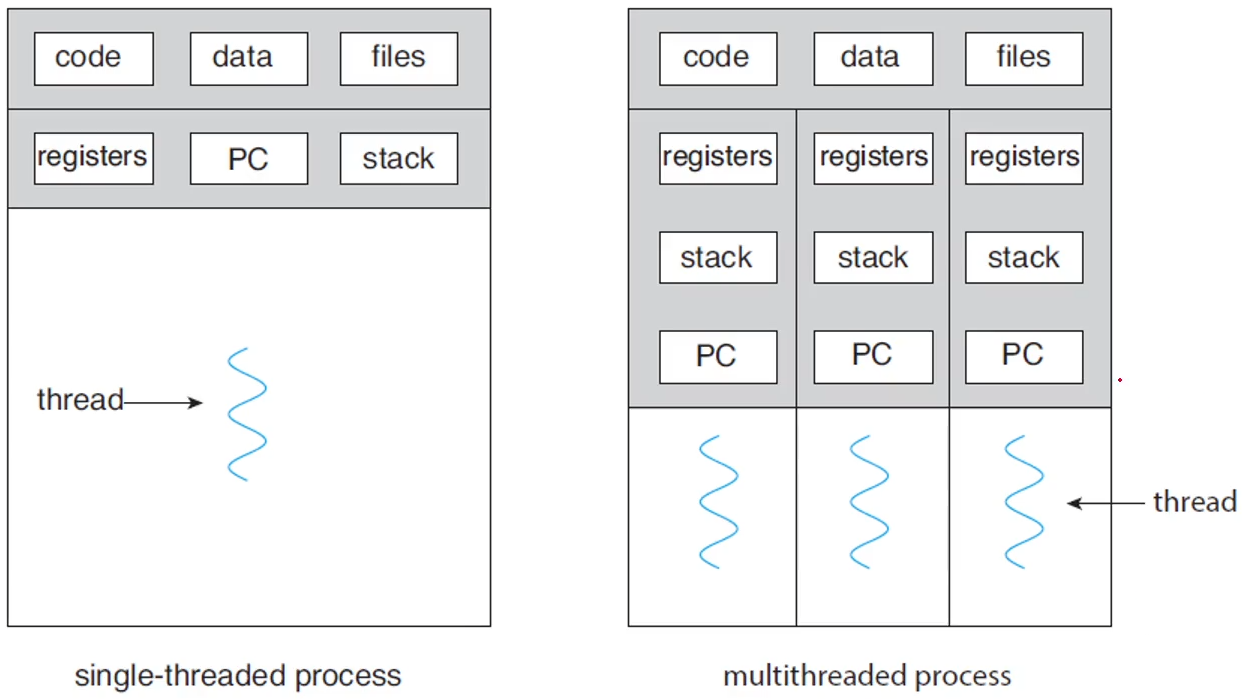
Thread
- lightweight process
- CPU 입장에서는 process 단위가 아닌 thread 단위로 처리
- process가 CPU를 점유하는 것이 아닌 thread가 CPU를 점유
- PC, register 정보, stack 정보를 process 단위가 아닌 thread 단위로 가짐
- code, data, files은 process 단위로 가짐
Multi-threading
하나의 thread만 사용하면 하나의 처리를 끝낸 후 다른 처리를 시작할 수 있다. multi-thread를 사용하면 서버가 request를 받으면 데이터 처리를 thread에 맡기고 서버는 다시 listening 상태를 유지하며 request를 받을 수 있다. 하나의 thread를 사용한다면 서버는 request 받은 내용을 모두 처리한 후, 다시 listening 상태가 될 수 있기 때문에 여러 개의 request를 동시에 처리할 수 없게 된다.
장점
- Responsiveness: 블록킹 없이 실행
- Resource Sharing: code와 data를 공유하기 때문에 resource sharing이 쉬움
- Economy: process 생성보다 경제적, thread switching이 context switching보다 간단함
- Scalability: 코어에서 여러 개의 thread를 병렬적으로 처리 가능
Java
- thread 기반으로 만들어져 있어 사용이 쉬움
- thread의 생성과 관리가 쉬움
- 사용 방법
- Thread class를 상속
- public void run() method를 사용
- Runnable interface를 사용
- public void run() method를 override
- Lambda expression을 사용
- 새로운 클래스를 선언하지 말고 runnable interface를 정의
- Thread class를 상속
방법1. Thread class 상속
class MyThread1 extends Thread {
	public void run() {
    	try {
        	while (true) {
            	System.out.println("Hello, Thread!");
                Thread.sleep(500);
        }
    }
    catch (InterruptedException ie) {
    	System.out.println("I'm interrupted");
        }
    }
}

public class ThreadExample1 {
	public static final void main(String[] args) {
    	MyThread1 thread = new MyThread1();
        thread.start(); // run method를 호출
        System.out.println("Hello, My Child!"); // 부모 thread가 출력
    }
}- fork와 동일한 과정
- main thread가 동작한 후에, thread switching이 일어나 child thread가 실행
방법2. Runnable Interface 구현
class MyThread2 implements Runnable {
	public void run() {
    	try {
        	while (true) {
            	System.out.println("Hello, Runnable!");
                Thread.sleep(500);
            }
        }
        catch (InterruptedException ie) {
        	System.out.println("I'm interrupted");
        }
    }
}

public class ThreadExample2 {
	public static final void main(String[] args) {
    	Thread thread = new Thread(new MyThread2());
        thread.start();
        System.out.println("Hello, My Runnable Child!");
    }
}- MyThread2 클래스 인스턴스를 만든 후에, Thread 생성자에 파라미터를 전달함
- thread가 start하면 MyThread2의 run() method가 호출됨
방법3. Runnable 람다 표현식 사용
public class ThreadExample3 {
	public static final void main(String[] args) {
		Runnable task = () -> {
        	try {
            	while (true) {
                	System.out.println("Hello, Lambda Runnable!");
                    Thread.sleep(500);
                }
            }
            catch (InterruptedException ie) {
            	System.out.println("I'm interrupted");
            }
        };
        Thread thread = new Thread(task);
        thread.start();
        System.out.println("Hello, My Labmda child!");
	}
}
별도 클래스를 선언하여 생성자에 인스턴스를 넘기는 것이 아닌 람다 인스턴스를 넘기는 방법
부모 thread의 대기: wait? join!
public class ThreadExample4 {
	public static final void main(String[] args) {
		Runnable task = () -> {
        	for (int i=0;i<5;i++)
            	System.out.println("Hello, Lambda Runnable!");
        }
	};
    Thread thread = new Thread(task);
    thread.start();
    try {
    	thread.join();
    }
    catch (InterruptedException ie) {
    	System.out.println("Parent thread is interrupted!");
    }
    System.out.println("Hello, My Joined Child!");
}- thread에서는 process와 다르게 wait이 아닌 join을 사용
- join을 사용하면 부모 thread가 자식 thread가 끝날 때까지 기다린 후 부모 thread가 실행됨
thread 종료: stop? interrupt!
public class ThreadExample5 {
	public static final void main(String[] args) throws InterruptedException {
    	Runnable task = () -> {
        	try {
            	while (true) {
                	System.out.println("Hello, Lambda Runnable!");
                    Thread.sleep(100);
                }
            }
            catch (InterruptedException ie) {
            	System.out.println("I'm interrupted");
            }
        };
        Thread thread = new Thread(task);
        thread.start();
        Thread.sleep(500);
        thread.interrupt();
        System.out.println("Hello, My Interrupted Child!");
    }
}
Multicore Programming
기능은 좋지만 문제가 너무 어려워짐 -> context switching 횟수가 줄어듬
- single core: 시간에 따라 interleaving됨
- multi core: time sharing하며 병렬 처리가 가능해짐
고려해야할 점
- Identifying tasks: task를 어떻게 쪼개서 처리할지
- Balance: thread에 어떻게 동일한 처리량을 할당할지
- Data splitting: core에 data를 어떻게 할당할지
- Data dependency: task별로 어떻게 동기화를 할지
- Test & debugging: thread별로 test와 debugging을 어떻게 수행할지
병렬처리의 종류
- data를 각각의 core에 병렬화하는 방법
- data를 그대로 두고 task를 쪼개는 방법
암달의 법칙
- 컴퓨터 시스템의 일부를 개선할 때 전체적으로 얼마만큼의 최대 성능 향상이 있는지 계산할 때 사용
- 컴퓨터 코어 개수에 따른 성능 향상에는 한계가 있음을 보임
어떤 시스템을 개선하여 전체 작업 중 P%의 부분에서 S배의 성능이 향상되었을 때, 전체 시스템 성능향상을 정의함
ex)
어떤 작업의 40%에 해당하는 부분의 속도를 2배로 늘릴 수 있다면, , 이며, 최대성능 향상은 가 된다.

스터디를 해보자